Advertisement
_-_S
Owner's Manual
I:RRFTSMRN°
10 inch Blade
2.5 Horsepower (Maximum Developed)
5000 R.P.M.
TABLE SAW
Model No.
137.221940
Serial No.
i
o
E82443
NOTE:
Model and serial numbers
may be found on the name plate
located on the front of the tool.
You should record both numbers
and retain them in a safe place.
CAUTION:
Before
using this table saw, read this manual and follow
all its Safety
Rules and Operating
Instructions.
Sears,
Roebuck
and Co., Hoffman
Estates,
IL 60179
USA
Advertisement
Table of Contents

Related Manuals for Craftsman 137.221940


Summary of Contents for Craftsman 137.221940
- Page 1 _-_S Owner's Manual I:RRFTSMRN° 10 inch Blade 2.5 Horsepower (Maximum Developed) 5000 R.P.M. TABLE SAW Model No. 137.221940 Serial No. NOTE: Model and serial numbers may be found on the name plate located on the front of the tool. You should record both numbers and retain them in a safe place.
-
Page 2: Warranty
Maintenance ......... Troubleshooting Guide ........ Parts Pages ......... FULL ONE-YEAR WARRANTY ON CRAFTSMAN TABLE If this Table Saw fails due to a defect within one year from the date of purchase, CONTACT THE NEAREST SEARS SERVICE CENTER IN THE UNITED... -
Page 3: General Safety Instructions
GENERAL SAFETY INSTRUCTIONS WEARYOUR 13. ALWAYS WEAR EYE PROTECTION. BEFORE USING THE TABLE Any table saw can throw foreign obieots into the eyes which To avoid mistakes that could cause serious personal could cause injury, do not plug the table saw in until you read and do permanent eye damage. - Page 4 20. MAKE WORKSHOP CHILD'i .,OOF. By use of SPECIFIC SAF,--rY INSTRUCTIONS padlocks, master switches, or by removing starter keys. FOR THE TABLE 21. DRUGS, ALCOHOL OR MEDICATIONS. DO NOT ALWAYS USE SAW BLADE GUARD spreader and operate tool if you are under the influence of drugs, anti-kickback pawls for every operation for which...
- Page 5 REPAIR OR REPLACE DAMAGED OR WORN CORD 14. AVOID AWKWARD OPERATIONS and hand IMMEDIATELY...it repair or replacement of the electric positions where a sudden slip could cause your hand cord or plug is ever necessary, DO NOT connect the to move into the cutting tool. equipment-grounding conductor to a live terminal.
- Page 6 AVAILABLE ACCESSORIES UNPACKING AND CHECKING CONTENTS TOOLS NEEDED Visit your Sears Hardware Department or see the Sears Power and Handtool Catalog for the following accessories: Mediurn screwdriver ITEM ITEM NUMBER Adjustable wrench • Saw blades .... See catalog or store #2 Phillips screwdriver °...
- Page 7 UNPACKING YOUR TABLE Table saw assembly Hand wheels Mitre gauge Blade guard and splitter Blade wrenches Hex keys "'- _-_.._ Table insert Owner's manual Dado lable insert Bag of miscellaneous >arts Rip fence and handle o ° h ..Tool hangers •...
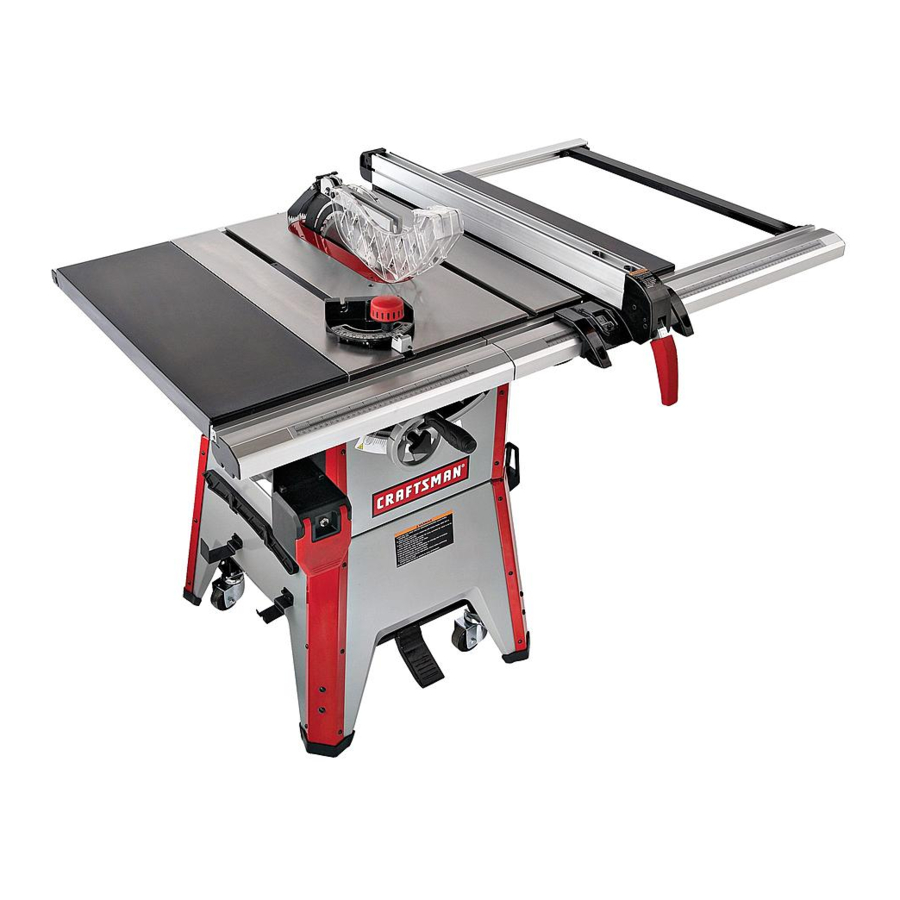
- Page 8 Mitre Gauge Blade Guard Table Insert Rip Fence Table Blade Bevel Lock Knob Blade Bevel Scale Overload Blade Tilting Handwheel On-Off Switch Elevation Handwheel Mounting Holes Tool Hanger Tool Hanger Steel Legs Wrenches Dado Insert Splitter Blade Kickback Pawls Splitter Bracket Page 8...
- Page 9 SAW TO LEG SET (FIG. Before mounting the rip and miler gauge to the saw top, invert the saw table so that it is facing the floor. NOTE: Save time - Legs can be mounted to saw For your own safety, never connect plug to power source before removing the saw from the carton, saw is outlet until all assembly steps are complete, and you have...
- Page 10 SAW MOUNTED TO OTHER SURFACES (FIG. if the leg set will not be used, the saw must be properly secured to a sturdy workbench using the four mounting holes at the base of the saw. A hole must be provided in the surface of the table where the saw is mounted to facilitate sawdust fall-through and removal.
- Page 11 RIP FENCE (FIG. G) 1. Thread the fence handle (1) into the cam hole (2) Raise the blade arbor (3) (FIG. I) to the maximum until tight. height by turning the blade raising hand wheel counterclockwise. Lift upward on the rip fence handle (1) so that the holdingclamp (3) is fully extended.
- Page 12 Check that the nuts (7) that hold the blade guard BLADE GUARD ASSEMBLY (FIG. K, L, M, N) assembly (8) to the splitter bracket (4) are tight. Tighten if necessary. To avoid injury from an accidental start, make sure the switch is in the "OFF"...
-
Page 13: Miter Gauge Adjustment
MITER GAUGE ADJUSTMENT (FIG, O) Lock the fence handle (2). The fence should be parallel with the miter gauge groove. 1. Make sure that the miter gauge will slide freely through both table grooves. If adjustment is needed to make the fence parallel Loosen the lock knob (1). - Page 14 To avoid injury from an accidental start, make sure the switch is in the "OFF" position and the plug is not connected to the power source outlet, ADJUSTING THE 90 ° AND 45 ° POSITIVE STOPS (FIG. Q, R) Yoursaw has positivestops that will quickly position the saw blade at 90 °...
-
Page 15: Blade Parallel To Miter Gauge Groove
BLADE PARALLEL TO THE MITER ADJUSTING BLADE TO BE PARALLELTO GAUGE GROOVE (FIG. S) MITER GAUGE GROOVE (FIG.T) If the front and rear measurements are not the same, remove the combination square and loosen the To prevent personal injury,always disconnect plug from four adjusting screws (1) on the top of the table about the power source when making any adjustments. -
Page 16: Basic Saw Operations
BASIC SAW OPERATIONS RAISING THE BLADE (FIG. U) To raise or lower the blade, turn the blade elevation handwheel (1) to the desired blade height, and then tighten lock knob (2) to maintain the desired blade angle. Fig. U Fig. V OVERLOAD PROTECTION (FIG. -
Page 17: Cutting Operations
r! =j CUTTING OPERATIONS AVOID KICKBACK by pushing forward that section of the There are two basic types of cuts: ripping end cross workpiece that will pass between the blade and the fence. cutting. Ripping is cutting along the length and the grain of the workpiece. - Page 18 BEVEL RIPPING This cut is the same as ripping except the blade bevel angle is set to an angle other than 0 °. Cut only with the workpiece and the fence on the right side of the blade. RIPPING SMALL PIECES Avoid injury from blade contact.
- Page 19 Fig. CC DADO CUTS (FIG. 1. The dado table insert is included with tills saw. Fig. AA Remove saw blade, blade guard, installed dado, and dado table insert. MITERING (FIG. 2. Instructions for operating the dado are packed with the This sawing operation is the same as crosscutting except...
- Page 20 MAINTAINING YOUR TABLE MAINTENANCE - GENERAL For your own safety, turn the switch OFF and remove the switch key. Remove the plug from the power source outlet before maintaining or lubricating your saw. 1. Clean out all sawdust that has accumulated inside the saw cabinet and the motor.
-
Page 21: Troubleshooting
TROUBLESHOOTING GUIDE To avoid injury from accidental start, turn the switch OFF, remove the switch key and remove the plug from the power source before making any adjustment. PROBLEM PROBABLE CAUSE REMEDY Saw will not start 1. Saw not plugged in 1. - Page 22 TABLE SAW PARTS LIST MODEL NO. 137.221940 Key# Part ;_ Description Size Description Size Key# Part # 940079 Label 940001 Hex hal.screw M5-1.8-40 940080 Tapping screw M4x 16 940002 Flat washer 6x13-1 940081 Breaker switch 120V, 940003 Supporting arm 940082 Switch 940004 Hex nut...
- Page 23 TABLE SAW PARTS DIAGRAM • t 52 143142_4 .140 • 122 120119 135/ 109 - -117 116'_ Page 23...
- Page 24 LEG SET PARTS LIST Size Size Key# Part # Description Key# Part # Description 940424 Hex. nut M8x1.25 940410 Bottom bracket - legs M8x1.25-16 940425 Bracket _ top (short) 940412 Cap hd. sq. neck bolt 940426 Hex. nut M6xl.0 Hex. nut M8x1.25 940413 940428...
-
Page 25: Push Stick
PUSH STICK Make from 1/2" or 3/4" wood or thickness less than width of material to be cut CAUTION! "_ Use only good "_ strong wood Cut off here to or plywood :_ush 1/4" wood "'_--. Cut off here to push 1/2"... - Page 26 Forthe repair or replacementparts you need delivereddirectlyto your home Call7 am - 7 pro, 7 days a week 1-800-366-PART (1-800-366-7278) For in-home major brandrepair service Call24 hoursa day, 7 daysa week 1-800-4-FIIEPAIR (1-800-473-7247) Forthe locationof a SearsParts and RepairCenterin your area Call 24 hoursa day, 7 days a week 1-800-488'1222 For informationon purchasinga Sears...
Need help?
Do you have a question about the 137.221940 and is the answer not in the manual?
Questions and answers