Table of Contents
Advertisement
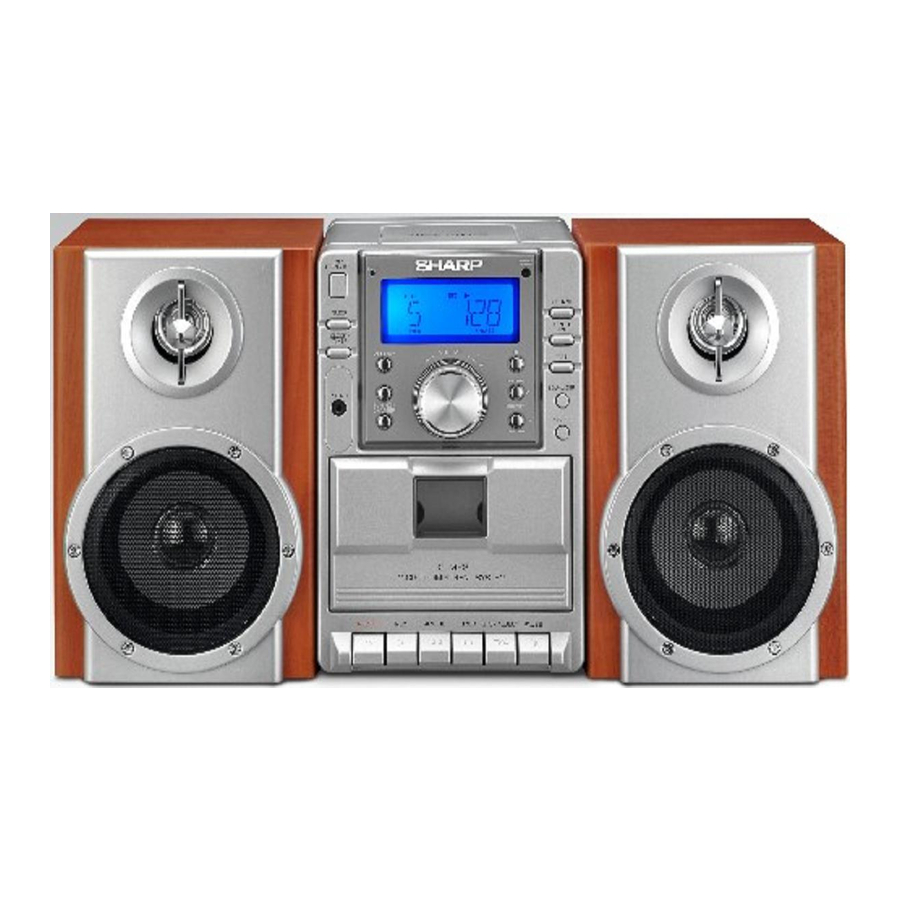
MICRO COMPONENT SYSTEM
MODEL
XL-MP2H
OPERATION MANUAL
Thank you for purchasing this SHARP product.
To obtain the best performance from this product, please read this
manual carefully. It will guide you in operating your SHARP product.
XL-MP2H Micro Component System consisting of XL-MP2H (main unit)
and CP-MP2H (speaker system).
04/12/15
XL-MP2H_FRONT.fm
Advertisement
Table of Contents

Related Manuals for Sharp XL-MP2H


Summary of Contents for Sharp XL-MP2H
- Page 1 Thank you for purchasing this SHARP product. To obtain the best performance from this product, please read this manual carefully. It will guide you in operating your SHARP product. XL-MP2H Micro Component System consisting of XL-MP2H (main unit) MICRO COMPONENT SYSTEM and CP-MP2H (speaker system).
- Page 2 Copyright may exist in material you wish to record. Copying or broad- casting such material without permission of the relevant licensees or owners of the copyright is prohibited by law. SHARP is not in a posi- tion to authorise the copying or broadcasting of copyright materials and nothing in this OPERATION MANUAL should be implied as giv- ing that authority.
-
Page 3: Table Of Contents
Special Note Contents XL-MP2H Supply of this product does not convey a license nor imply any right Page General Information to distribute content created with this product in revenue-generating broadcast systems (terrestrial, satellite, cable and/or other Precautions ......... 4 distribution channels), revenue-generating streaming applications Controls and indicators . -
Page 4: Precautions
There must also be a minimum of 10 cm (4") of cident causing damage. SHARP will not be held responsible for free space on the top of the unit. -
Page 5: Controls And Indicators
Controls and indicators XL-MP2H Front panel Reference page 1. CD Door ........14 2. - Page 6 Controls and indicators (continued) XL-MP2H Display Reference page 1. Memory Indicator ....... . . 17 2.
- Page 7 XL-MP2H Remote control Reference page 1. Remote Control Transmitter ......10 2. On/Stand-by Button ....... 11 3.
-
Page 8: System Connections
System connections XL-MP2H Make sure to unplug the AC power lead before any connections. Aerial connection (see page 9) AM loop aerial FM aerial Right speaker Left speaker ANTENNA 75 OHMS Wall socket Speaker connection (AC 220 - 240V, 50/60 Hz) (see page 9) AC power connection (see page 9) -
Page 9: Am Loop Aerial Sockets
XL-MP2H Aerial connection Speaker connection Attached FM aerial: Connect the black wire to the minus (-) terminal, and the red wire to the plus (+) terminal. Position the FM aerial wire in the direction where the strongest signal can be received. Supplied AM loop aerial: Connect the AM loop aerial to the AM loop aerial socket. -
Page 10: Remote Control
Remote control XL-MP2H Battery installation Notes concerning use: Replace the batteries if the operating distance is reduced or if the 1 Open the battery cover. operation becomes erratic. Purchase 2 "AAA" size batteries (UM- 2 Insert the batteries according to the direction indicated in 4, R03, HP-16 or similar). -
Page 11: General Control
General control XL-MP2H Volume control Main unit operation: VOLUME When the VOLUME control is turned clockwise, the volume will increase. When it is turned anti-clockwise, the volume will decrease. Remote control operation: Press the VOLUME (+ or -) button to increase or decrease the volume. 01 ... -
Page 12: Setting The Clock
Setting the clock XL-MP2H To confirm the time display: Press the CLOCK/TIMER button.The time display will appear for about 5 seconds. Notes: To reset the clock if the power fails or is unplugged, the unit must be in the STAND-BY mode. "0:00"... -
Page 13: Listening To A Cd Or Mp3/Wma Disc
Listening to a CD or MP3/WMA disc XL-MP2H This system can play back a standard CD, CD-R/RW in the CD format and CD-R/RW with MP3 or WMA files, but cannot record on them. Some audio CD-R and CD-RW discs may not be playable due to the state of the disc or the equipment used for recording. -
Page 14: Mp3/Wma Track Indicator
Listening to a CD or MP3/WMA disc (continued) XL-MP2H To interrupt playback: Press the ON/STAND-BY button to turn the power on. Press the CD button during playback. Press the CD button again to resume playback. Open the CD compartment. Place the disc on the spindle, label side up. 8 cm (3") discs To listen to the track being played again: During playback, press the button. -
Page 15: Advanced Cd Or Mp3/Wma Disc Playback
Advanced CD or MP3/WMA disc playback XL-MP2H Direct track search Notes: A track number higher than the number of tracks on the disc By using the direct search buttons, the desired tracks on the current cannot be selected. disc can be played. During random play, direct search is not possible. -
Page 16: Disc Repeat Indicator
Advanced CD or MP3/WMA disc playback (continued) XL-MP2H Repeat play (REMOTE CONTROL ONLY) To cancel random playback, press the button again, so that the ran- dom indicator will disappear. Repeat play can play single track and all track sequence continu- ously. -
Page 17: Memory Indicator
XL-MP2H Programmed play To cancel the programmed play mode: During programmed stop mode, press the MEMORY/DISP button Whilst in the stop mode, press the MEMORY/DISP button and press the button or STOP button on the remote control. The display will show "CLEAR" and all the programmed contents will be to enter the programming save mode. -
Page 18: Advanced Cd Or Mp3/Wma Disc Playback
Advanced CD or MP3/WMA disc playback (continued) XL-MP2H Programmed play (Folder mode) Repeat steps 2 – 3 for other folder/tracks. Up to 32 tracks can be programmed. Whilst in the stop mode, press the MEMORY/DISP button to enter the programming save mode. Press the CD button to start playback. -
Page 19: Mp3/Wma Folder Mode (Only For Mp3/Wma Files)
MP3/WMA folder mode (only for MP3/WMA files) XL-MP2H To playback MP3/WMA (Windows Media Audio) file All the files inside the selected folder will be played back. There are many music sites on the internet that you can download In case Folder D is selected, file 4, 5 and 6 will be played back. File MP3/WMA (Windows Media Audio) music files. -
Page 20: Mp3/Wma Folder Indicator
MP3/WMA folder mode (only for MP3/WMA files) (continued) XL-MP2H Procedure to playback MP3/WMA disc Select desired track to be played back by pressing the To playback CD-R/RW. button. Proceed to step 4. Press the CD button, and load a MP3/WMA disc. After disc is loaded, the disc info will be displayed. -
Page 21: Listening To The Radio
Listening to the radio XL-MP2H Tuning Press the ON/STAND-BY button to turn the power on. Press the TUNER (BAND) button to select the desired fre- quency band (FM or AM). Press the TUNING/FOLDER ( ) button to tune into the desired station. Manual tuning: Press the TUNING/FOLDER ( ) button as many times as... -
Page 22: Listening To The Memorised Station
Listening to the memorised station Listening to a cassette tape XL-MP2H Memorising a station Before playback: Up to 20 stations for FM band, 10 station for AM band can be preset. For playback, use normal or low-noise tapes for the best sound. -
Page 23: Tape Playback
XL-MP2H Tape playback Pause Press the PAUSE button to temporarily stop playback or record- ing. Press it again to resume operation. Press the ON/STAND-BY button to turn the power on. Fast forward and rewind Press the TAPE button to select "TAPE" function. "TAPE" Press the F.FWD or REWIND button. -
Page 24: Recording On A Cassette Tape
When recording important selections, make a preliminary test to Press the ON/STAND-BY button to turn the power on. ensure that the desired material is properly recorded. SHARP is not liable for damage or loss of your recording arising Load a blank cassette. from malfunction of this unit. -
Page 25: Beat Cancel Switch
XL-MP2H Recording from the radio Erasing recorded tapes Tune in to the desired station. (See page 21) Load the tape to be erased into the cassette compartment with the side to be erased facing towards you. Load a blank cassette. Press the TAPE button until "TAPE"... -
Page 26: Timer And Sleep Operation
Timer and sleep operation XL-MP2H Press the PRESET ( ) button to set minute and then press the CLOCK/TIMER button. Switch input with the PRESET ( ) button to select "TMR-OFF" and then press the CLOCK/TIMER button. Press the PRESET ( ) button to set hour and then Timer playback press the CLOCK/TIMER button. -
Page 27: Timer Play Indicator
XL-MP2H To select a preset channel number, press the PRESET ( To select CD, press the CD button and then press the ) button and then press the CLOCK/TIMER button. CLOCK/TIMER button. Press the SLEEP button for more than 2 seconds to To select TUNER (BAND), press the TUNER (BAND) activate timer function. -
Page 28: Sleep Indicator
Timer and sleep operation (continued) XL-MP2H Sleep operation To confirm the remaining sleep time: The radio, compact disc and cassette tape can all be turned off au- 1 Whilst "SLEEP" is indicated, press the SLEEP button. The remaining sleep time is displayed for about 10 seconds. tomatically. -
Page 29: Enhancing Your System
If something is wrong with this product, check the following before ume. calling your authorised SHARP dealer or service centre. Be sure your headphones have a 3.5 mm (1/8") diameter plug and impedance between 16 and 50 ohms. The recommended imped- General ance is 32 ohms. -
Page 30: 5. Reset Button
Troubleshooting chart (continued) XL-MP2H Tuner If trouble occurs When this product is subjected to strong external interference (me- Symptom Possible cause chanical shock, excessive static electricity, abnormal supply voltage The radio makes unusual Is the unit placed near the TV or due to lightning, etc.) or if it is operated incorrectly, it may malfunc- noises continuously. -
Page 31: Maintenance
Maintenance XL-MP2H Cleaning the CD pickup lens Cleaning the tape-handling parts Dirty head, capstan or pinch roller can cause poor sound and tape Do not touch the laser pickup lens. If jams. Clean these parts with a cotton swab moistened with com- finger prints or dust accumulate on mercial head/pinch roller cleaner or isopropyl alcohol. -
Page 32: Specifications
Specifications XL-MP2H As part of our policy of continuous improvement, SHARP reserves CD player the right to make design and specification changes for product Type Compact disc player improvement without prior notice. The performance specification figures indicated are nominal values of production units. There may... - Page 33 MEMO MEMO 11/16/05, 4:41 PM...
- Page 34 MEMO MEMO 11/16/05, 4:41 PM...
- Page 35 OR CALL 1300 135 022 SHARP CUSTOMER SERVICES TELEPHONE: 09 573 0111 (LOCAL CALL COST APPLY WITHIN AUSTRALIA) FACSIMILE: 09 573 0113 SHARP CORPORATION OF AUSTRALIA PTY LTD SHARP CORPORATION OF NEW ZEALAND LIMITED SPform019(JUNE 2004) XL_MP2H Back 8/11/06, 5:23 PM...
- Page 36 Consumer Electronic Products Congratulations on Your Purchase! This Sharp product is warranted against faults in materials and manufacture for a period of twelve(12) months from the date of original purchase. If service is required during the warranty period, please contact your nearest Sharp Approved Service Centre.
Need help?
Do you have a question about the XL-MP2H and is the answer not in the manual?
Questions and answers