Table of Contents
Advertisement
Quick Links
MICRO COMPONENT SYSTEM
MODEL
XL-35W
OPERATION MANUAL
Thank you for purchasing this SHARP product.
To obtain the best performance from this product,
please read this manual carefully. It will guide you in
operating your SHARP product.
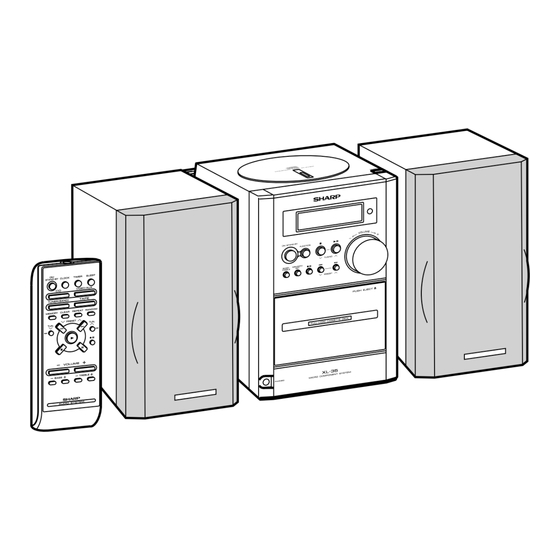
XL-35W Micro Component System consisting of XL-35W
(main unit) and CP-XL45H (speaker system).
Advertisement
Table of Contents

Subscribe to Our Youtube Channel
Related Manuals for Sharp XL-35W


Summary of Contents for Sharp XL-35W
-
Page 1: Operation Manual
Thank you for purchasing this SHARP product. To obtain the best performance from this product, MICRO COMPONENT SYSTEM please read this manual carefully. It will guide you in operating your SHARP product. XL-35W Micro Component System consisting of XL-35W (main unit) and CP-XL45H (speaker system). - Page 2 Copyright may exist in material you wish to record. Copying or broadcasting such material without permission of the relevant lic- ensees or owners of the copyright is prohibited by law. SHARP is not in a position to authorise the copying or broadcasting of copy- right materials and nothing in this OPERATION MANUAL should be implied as giving that authority.
-
Page 3: Table Of Contents
Accessories Contents XL-35W Please confirm that the following accessories are included. Page " General Information Precautions ......... 3 Controls and indicators . -
Page 4: Precautions
! Keep the unit away from direct sunlight, strong magnetic fields, accident causing damage. SHARP will not be held responsible excessive dust, humidity and electronic/electrical equipment for any damage resulting from use of this unit with a voltage other (home computers, facsimiles, etc.) which generate electrical... -
Page 5: Controls And Indicators
Controls and indicators XL-35W Reference page 1. CD Compartment ....... . . 13 2. -
Page 6: Controls And Indicators
Controls and indicators (continued) XL-35W 1. Full-Range Speaker 2. Speaker Wire Reference page 3. Remote Control Transmitter ......6 4. -
Page 7: Remote Control
Remote control XL-35W " Battery installation " Test of the remote control Check the remote control after checking all connections have been Remove the battery cover. made correctly. (See pages 7 - 9.) Insert the supplied batteries according to the direction indi- cated in the battery compartment. -
Page 8: System Connections
System connections XL-35W FM aerial AM loop aerial (See page 25.) VCR, DVD, etc. Right speaker Left speaker RCA lead (not supplied) Right speaker Left speaker White line Black To a wall socket (See page 9.) 02/11/22 XL_35W_SCA_1.fm... -
Page 9: Speaker Connection
XL-35W " Aerial connection " Speaker connection Connect the wire with the white line to the minus (-) terminal and the Supplied FM aerial: black wire to the plus (+) terminal. Connect the FM aerial wire to the FM 75 OHMS socket and position the FM aerial wire Caution: in the direction where the strongest signal... - Page 10 XL-35W System connections (continued) Wall socket (230 - 240 V, 50/60 Hz) " Setting the AC voltage selector Check the setting of the AC voltage selector located on the rear panel before plugging the unit into a wall socket. If necessary, adjust the selector to correspond to the AC power voltage used in your area.
- Page 11 XL-35W " Setting the AM/FM interval To check the tuning span currently selected: 1 Press the ON/STAND-BY button to turn the power on. The International Telecommunication Union (ITU) has established 2 Press the FUNCTION button until "AM" appears on the display. that member countries should maintain either a 10 kHz or 9 kHz ! If "AM 531 kHz"...
-
Page 12: Sound Control
Sound control XL-35W " Adjusting the volume Main unit operation: When the VOLUME control is turned clockwise, the volume will increase. When it is turned anti-clockwise, the volume will decrease. Remote control operation: Press the VOLUME + button to increase the volume and the VOL- UME - button to decrease the volume. -
Page 13: Setting The Clock
Setting the clock XL-35W Within 1 minute, press the PRESET ( ) button to ad- just the hour and then press the MEMORY button. When the 12-hour display is selected, "AM" will change auto- matically to "PM". Within 1 minute, press the PRESET ( ) button to ad- This may be operated only with the remote control. -
Page 14: Listening To A Cd
Listening to a CD XL-35W This system can play audio CD-R and CD-RW discs just like CD Press the ON/STAND-BY button to turn the power on. discs, but cannot perform recording. Playback of audio CD-R or CD-RW may not be performed depend- Press the FUNCTION button until "CD STOP"... - Page 15 XL-35W " Care of compact discs To interrupt playback: Main unit operation: Compact discs are fairly resistant to damage, however mistracking Press the button. can occur due to an accumulation of dirt on the disc surface. Follow To resume playback from the same point, press the button again.
-
Page 16: Listening To A Cd
XL-35W Listening to a CD (continued) " To locate the desired portion " Repeat play All tracks or a programmed sequence can be continuously repeated. For audible fast forward: To repeat all tracks: Press and hold down the button on the main unit or the but- ton on the remote control during playback. -
Page 17: Programmed Play
Programmed play XL-35W You can choose up to 20 selections for playback in the order you Press the MEMORY (MEMORY/SET) button to save the like. track number. Playback order Total playback time Repeat steps 2 - 3 for other tracks. Up to 20 tracks can be programmed. -
Page 18: Listening To The Radio
Listening to the radio XL-35W Press the ON/STAND-BY button to turn the power on. Press the FUNCTION button until "FM" or "AM" appears on the display. When operating with the remote control, press the TUNER (BAND) button to select "FM" or "AM". Press the TUNING ( ) button to tune in to the desired station. -
Page 19: Listening To Memorised Stations
Listening to memorised stations XL-35W " Memorising a station " To recall a memorised station You can store 30 AM and FM stations in memory and recall them at Press the PRESET ( ) button for less than 0.5 seconds to the push of a button. -
Page 20: Listening To A Cassette Tape
Listening to a cassette tape XL-35W Before playback: Press the ON/STAND-BY button to turn the power on. ! For playback, use normal or low-noise tapes for the best sound. (Metal or CrO tapes are not rec- Press the FUNCTION button until "TAPE" appears on the ommended.) display. - Page 21 XL-35W To stop playback: Press the button. Fast forward/rewind: To advance the tape, press the button on the main unit or the button on the remote control. To rewind it, press the button on the main unit or the button on the remote control. Caution: ! To remove the cassette, press the button, and then open the...
-
Page 22: Recording To A Cassette Tape
Press the ON/STAND-BY button to turn the power on. ! SHARP is not liable for damage or loss of your recording arising from malfunction of this unit. Press the FUNCTION button until "CD STOP" appears on ! The volume and sound controls can be adjusted with no effect on the display. -
Page 23: Recording From The Radio
XL-35W " Recording from the radio To perform programmed recording: Programme tracks (see page 16). Tune in to the desired station (see page 17). Press the button. Press the ( ) button. Load a cassette into the cassette compartment with the To interrupt recording: side to be recorded on facing you. -
Page 24: Timer And Sleep Operation
Timer and sleep operation XL-35W " Timer playback This may be operated only with the remote control. Before setting timer: Timer playback: Press the CLOCK button to check that the clock is set to the The unit turns on and plays the desired source (CD, tuner, tape) at correct time. - Page 25 XL-35W " Sleep operation Within 1 minute, press the PRESET ( ) button to specify the minutes to start, then press the MEMORY but- Play back the desired sound source. ton. Press the SLEEP button. ! The timer playback starting time, function, and volume will be displayed, and then the unit will enter the stand-by mode au- tomatically.
-
Page 26: Enhancing Your System
Enhancing your system XL-35W Timer and sleep operation (continued) " To use timer and sleep operation together The connection lead is not included. Purchase a commercially avail- able lead as shown below. Example: To fall asleep and wake to the same radio station You can play back the same source only (the function cannot be switched). -
Page 27: Troubleshooting Chart
! Is the unit placed near the TV or comput- The radio makes un- If something is wrong with this product, check the following before usual noises contin- calling your authorised SHARP dealer or service centre. uously. ! Is the FM or AM aerial placed properly? " General Move the aerial away from the AC power lead if it's located nearby. -
Page 28: Maintenance
Maintenance XL-35W " Cleaning the CD pickup lens " If trouble occurs When this product is subjected to strong external interference Do not touch the laser pickup lens. If fingerprints (mechanical shock, excessive static electricity, abnormal supply or dust accumulate on the pickup, clean it gently voltage due to lightning, etc.) or if it is operated incorrectly, it may with a dry cotton swab. -
Page 29: Specifications
Specifications XL-35W " CD player As part of our policy of continuous improvement, SHARP reserves the right to make design and specification changes for product Type Compact disc player improvement without prior notice. The performance specification fig- ures indicated are nominal values of production units. There may be... - Page 30 MEMO...
- Page 31 MEMO...
- Page 32 SHARP CORPORATION 9906 TINSE0121SJZZ 02L N HK 1...
Need help?
Do you have a question about the XL-35W and is the answer not in the manual?
Questions and answers