Table of Contents
Advertisement
Owner's Manual
II:RRFTSMRN'I
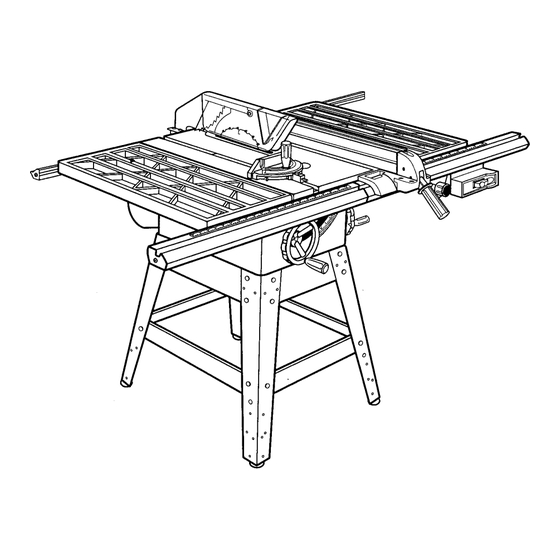
10 in. Stationary
TABLE SAW
Model No.
315.228490
Save this manual
for
future reference.
CAUTION:
Read and follow all
Safety Rules and Operating
Instructions
before first use of
this product.
O
O
Customer
Help Line: 1-800-932-3188
Sears,
Roebuck
and Co.,
Hoffman
Estates,
IL 60179
USA
Visit the Craftsman
web page: www.sears.com/craftsman
972000-781
9-00
• Safety
• Features
• Assembly
• Operation
• Maintenance
• Parts List
Advertisement
Table of Contents

Related Manuals for Craftsman 315.228490


Summary of Contents for Craftsman 315.228490
- Page 1 Safety Rules and Operating • Assembly Instructions before first use of • Operation this product. • Maintenance Customer Help Line: 1-800-932-3188 • Parts List Sears, Roebuck and Co., Hoffman Estates, IL 60179 Visit the Craftsman web page: www.sears.com/craftsman 972000-781 9-00...
-
Page 2: Table Of Contents
FULL ONE YEAR WARRANTY ON CRAFTSMAN TABLE SAW If this £1tRFIrSNRN Table Saw fails due to a defect in matedal or workmanship within one year from the date of purchase, Sears will repair it, free of charge. Contact a Sears Service Center for repair. -
Page 3: Table Of Contents
• Assembly ..............................18-29 Installing Handwheels on Table Saw Base ....................Assembling Steel Leg Stand ........................18-19 Mounting the Leg Stand on the Table Saw Base ..................Assembling Table Extensions ........................Aligning Table Extensions ..........................Installing the Rear Rail ..........................Installing the Front Rail .......................... - Page 4 It's safer than using your • MAINTAIN TOOLS WITH CARE. Keep tools sharp hand and frees both hands to operate tool. and clean for better and safer performance. Follow instructions for lubricating and changing accesso- ries. CRAFTSMAN" TABLE SAW315.228490...
-
Page 5: Rules For Safe Operation
_1= WARNING: When servicing, use only identical product will draw. An undersized cord will cause a Craftsman replacement parts. Use of any other drop in line voltage resulting in loss of power and parts may create a hazard or cause product overheating. - Page 6 RULES FOR SAFE OPERATION (Continued) • KEEP TOOL DRY, CLEAN, AND FREE FROM • CUT ONLY WOOD, PLASTIC OR WOOD-LIKE MATERIALS. Do not cut metal. OIL AND GREASE. Always use a clean cloth when cleaning. Never use brake fluids, gasoline, •...
- Page 7 Figure 1. It also has a grounding pin like the one shown. ELECTRICAL CONNECTION Your Sears Craftsman Table Saw is powered by a WARNING: Instructions are given in the precision built electric motor. It should be connected...
- Page 8 Anti-Kickback Pawls Molding Toothed safety devices behind the blade designed to A non-through cut that gives a varied shape to the workpiece and requires a special blade. stop a workpiece from being kicked back at the operator during a ripping operation. Push Stick Arbor A device used to feed the workpiece through the saw...
-
Page 9: Loose Parts List
Your new table saw has been designed to give you • Remove the wax paper covering on the table. Use many years of high quality performance. To insure any ordinary household type grease and spot this goal, proper care and treatment is important. remover. - Page 10 The following items are included with your Table Saw. Table Saw Base ............ O. Rip Fence ............. Belt ............... Rail, Front (Hardware Shown Separately) .... 1 C. Belt Guard ............Q. Rail, Rear (Hardware Shown Separately) .... 1 D. Blade Guard Assembly R.
- Page 11 Check all loose parts from the box with the list on the previous page, the figures below and on the following page. Small items such as fasteners and end caps are shown in figures 2 b and 2 c. Follow the instructions in the Assembly section to assemble your new saw.
- Page 12 Check all loose parts from the box with the list and figures below and on the previous pages. Small items such as fasteners and end caps are shown in figures 2 b and 2 c. Follow the instructions in the Assembly section to assemble your new saw.
- Page 13 The following tools are needed for assembly and alignment. Note: The five hex keys listed below have been provided with your saw. The remaining tools are typical shop tools and are not included with your saw. SMALL/ MEDIUM NUTDRIVER PHILLIPSSCREWDRIVER 8 ram,10 mm,and 12 mm REX KEYS(PROVIDED) and 6 mm...
- Page 14 3600 R.P.M, 120/240 VOLTS 60 Hz AC ONLY 13 A / 6.5 A • Toreduce The RiskofInjury, I A' WARNINGI W.EN SE.V,C.NG, USE ON.y Guard Must bein Place IDENTICAL CRAFTSMAN REPLACEMENT PARTS. LRS34=O During Use. •Alignand MODEL 315.228490 SER. NO.
- Page 15 You could be hit or cut. Clean debris off fence rail before A WARNING )ositioning fence. • Attach Blade Guard As._embly Before Operating this Saw ON I IPUSHOFF_ A WARNING CRAFTSMAN" Fig. 4 b CRRFTSMRN* TABLE SAW315,228490...
- Page 16 KNOW YOUR TABLE ANTI-KICKBACK PAWLS BLADE REARRAIL RIP FENCE BLADEGUARD RIVINGKNIFE ORSPREADER ALIGN-A-CUT TABLE INSERT EXTENSION MITER _ SCALE GAGEGROOVE TABLE EXTENSION FRONT RAIL MITER SWITCH GAGE WITH KEY BEVEL HANDWHEEL ADJUSTMENT KNOB RIP FENCE SCALE HANDLE HANDWHEEL LEGSTAND BELTCOVER LEVELING FOOT BEVEL LOCKHANDLE...
- Page 17 RIP FENCE - A sturdy metal fence guides the BLADE - This saw is provided with a Craftsman 24 workpiece and is secured with the rip fence handle. tooth, 10 in. carbide tipped blade. The blade is...
- Page 18 Assembly is best done in the area where the saw will be used. When you remove the table saw base, loose parts, and hardware from the packing materials, check all items with the loose parts list and drawing. If you are unsure about the description of any part, refer to the drawing.
-
Page 19: Labels
Add hardware and finger tighten. Repeat for the holes in the table with the holes in the end the other long upper brace. braces. Make sure the Craftsman label faces the • Use the same steps to install the lower braces. -
Page 20: Assembly
ALIGNING TABLE EXTENSIONS ASSEMBLING TABLE EXTENSIONS See Figure 11. See Figure 10. • Locate the table extensions and the small hard- A good alignment allows the rails to slide on easily. ware bag with the folrowing: • Stand at the front of the saw and line up the front edges of the table and extensions. -
Page 21: Installing The Front Rail
Note: Remaining hardware from this hardware bag is Note: The right side of saw is on your right when used for installing the front rail and end caps. facing the saw, as if you were in normal • At the back of the table, put the square head bolts operating position. - Page 22 INSTALLINGTHE FRONTRAIL RAILSLOT HEXNUT See Figures 15, 16, and 17. • Locate the front rail pieces, the switch assembly, and the following hardware: 6 square head bolts (5/16-18 x 3/4 in.) 6 flat washers (5/16 in.) 6 hex nuts (5/16-18) Front rail connector FRONTRAIL SWITCH...
- Page 23 RIP FENCE HOOKOVER MOUNTING THE MOTOR AND SWITCH REARRAIL HERE See Figures 21 and 22. • Locate the motor and switch assembly, the motor mounting plate and the following hardware: 4 hex bolts (5/16-18 x 1 in.) REARRAiL 8 flat washers (5/16 in.) 4 lock washers (5/16 in.) 4 hex nuts (5/16-18) 2 hex bolts (5/16-18 x 3/4 in.)
-
Page 24: Installing The Belt And Belt Guard
• Locate the switch assembly, two screws (1/4-20 x • Pull the motor out until the belt is taut. Securely tighten the hex bolts above the rods with a 12 mm 3/8 in.) and two square nuts (1/4-20). Insert the wrench. - Page 25 INSTALLING THE BLADE GUARD SOCKETHEAD CAPSCREWS(3) BLADEGUARD See Figures 25, 26, and 27. FLAT WASHER WARNING: If the blade is not fully lowered, turn the height handwheel on the front of the cabinet to lower the blade to prevent the risk of injury, RIVING KNIFE •...
-
Page 26: Aligning Riving Knife With The Blade
CHECKING THE THROAT PLATE See Figure 28. BLADEGUARD RIVINGKNIFE CAUTION: The throat plate must be even with the table surface. If it is too high or too low, the workpiece can catch on uneven edges and cause kickback. • Make sure the throat plate is flush with the table top. To change the height of the throat plate, loosen the flat head screw that secures the throat plate and adjust the four setscrews on the throat plate with a 2 mm hex... - Page 27 BLADEGUARDIS NOT SHOWNFOR CLARITY CHECK HEELING (PARALLELING) OF THE SAWBLADE TO THE MITER GAGE GROOVE MARKEDTOOTH See Figures 32-33. AT FRONT Do Not loosen any screws until you have checked with a square and made sure adjustments are necessary. Once the screws are loosened, these items must be reset.
-
Page 28: Checking Rip Fence And Blade Alignment
CHECKINGRIP FENCEAND FRAMINGSQUARE MITERGAGE BLADEALIGNMENT GROOVE See Figures 34, 35, and 36. The rip fence is self-aligning but should be checked before first use. WARNING: Failure to align the rip fence to the blade can cause jams and kickback, resulting in serious personal injury. - Page 29 Make sure the receptacle is connected to a 240V AC power supply through a 240V branch circuit having at least a 15 amp capacity and protected by a time delay fuse or circuit breaker of the correct size. Fig. 38 CRAFTSMAN' TABLE SAW 315.228490...
- Page 30 TO TIGHTEN BLADENI the throat plate is not flush with the table, adjust the setscrews with a 2 mm hex key. Do not allow the throat plate to bow up above the table surface. Fig. 41 CRAFTSMAN" TABLE SAW 315.228490...
- Page 31 FRAMINGSQUARE HEELING (PARALLELING) THE SAWBLADE MARKEDTOOTH TO THE MITER GAGE GROOVE See Figures 42, 43, and 44. Do Not loosen any screws for this adjustment until you have checked with a square and made test cuts to be sure adjustments are necessary.
- Page 32 SAW TABLEVIEWEDFROMBELOW • If scale indicator does not point to 0, loosen scale REARTABLE BRACKET REARBRACKET indicator screw with a screwdriver. Adjust scale SCREWS indicator within slot and retighten screw. • If blade angle is wrong, adjust the 90" stop screw (left of the blade, looking from the front).
- Page 33 ADJUSTINGTHE MITERGAGE MITERGAGEKNOB See Figure 47. MITERGAGEROD You can set the miter gage at 0 and plus or minus 45" with the miter gage stop pin and adjustable stop screws. Note: The miter gage provides close accuracy in MITERGAGEBASE angled cuts. For very close tolerances, test cuts are recommended.
- Page 34 BASIC OPERATION OF THE TABLE • When making a cut, use steady, even pressure. Never force cuts. A table saw can be used for straight-line cutting • Do not cut wet or warped lumber. operations such as cross cutting, ripping, mitering, beveling, compound cutting, and resawing.
-
Page 35: Changing The Motor Voltage
RESETTING THE THERMAL OVERLOAD CAUSES OF OVERLOAD PROTECTOR Overload and overheating result from a number of See Figure 50. sources. Always check the connections, the load and Your table sew is equipped with an ovedoad protector the supply circuit if motor performance is not satisfac- tory. - Page 36 TYPES OF CUTS See Figure 51. There are six basic cuts: 1) the cross cut, 2) the rip cut, 3) the miter cut, 4) the bevel cross cut, 5) the CROSSCUT bevel rip cut, and 6) the compound (bevel) miter cut. All other cuts are combinations of these basic opera- tions.
- Page 37 MAKING A CROSS See Figures 52, 53, 54, and 55. WARNING: Make sure the blade guard is lowered over the blade and is working properly to prevent possible injury. It is recommended that you make test cuts on scrap INSERT_ wood.
- Page 38 • Check that the wood is not touching the blade. WARNING: Make sure the blade guard is Insert switch key and lift switch to ON position. See lowered over the blade and is working properly to Figures 53 and 54. prevent possible injury.
- Page 39 MAKING A MITER CUT • Hold work firmly against the miter gage and push to feed work into the blade. See Figure 57. • When work is completed, press switch off and remove switch key. WARNING: Make sure the blade guard is lowered over the blade and is working properly to MAKING A BEVEL...
- Page 40 • Set miter gage to 0 if needed. Loosen miter gage • Set blade angle by loosening blade lock handle knob and use indicator on the miter gage. and turning bevel handwheel. Retighten blade lock handle. Retighten miter gage knob. •...
- Page 41 • Set blade angle and height by loosening the bevel MAKING A COMPOUND (BEVEL) MITER CUT lock handle and turning the height and bevel See Figure 61. handwheels. Retighten bevel lock handle. Practice on scrap wood. From the front of the saw, •...
- Page 42 MAKING A LARGE PANEL II Depending on the shape of panel, use rip fence or miter gage. If panel is too large to use either rip See Figure 62. fence or miter gage, it is too large for this saw. Make sure the saw is properly secured to a work surface to avoid tipping from the weight of a large WARNING:...
-
Page 43: Replacing The Blade
MAKING A DADO MAKING A NON-THROUGH See Figure 64. See Figure 63. An optional dado throat plate is required for this This is the only type of cut made without the blade procedure. See the Accessories section of this guard. manual and check with your nearest Sears Retail Store. -
Page 44: Maintenance
To avoid fire or electrocution, reassemble electric parts with only identical • Remove sawdust from the rails, top surface, and Craftsman replacement parts. Reassemble inside of saw frequently. exactly as originally assembled. • Clean plastic parts with a soft damp cloth. Do not use any strong solvents. - Page 45 PROBLEM CAUSE SOLUTION Saw does not start. 1. Motor cord or wall cord is not 1. Plug in motor cord or wall cord. plugged in. 2. Circuit fuse is blown, 2. Replace circuit fuse. 3. Reset circuit breaker. 3. Circuit breaker is tripped. 4.
- Page 46 1. Indicators are not properly ad- 1. See Setting the Bevel Stops and 45" positions. justed. Indicatorin the Adjustments sec- tion. 2. Positive stops inside base are 2, See Setting the Bevel Stops and not accurate. Indicatorin the Adjustments sec- tion. CRAFTSMAN" TABLE SAW315.228490...
- Page 47 2. Clean and wax the rails. Wood edges away from rip fence 1. Rip fence is misaligned. See the Assembly section for when ripping. Checking Rip Fence and Blade Alignment and Aligning Rip Fence and Front Rail procedures. CRAFTSMAN" TABLE SAW315.228490...
- Page 48 CRAFTSMAN TABLE SAW - MODEL NO. 315.228490 number in all correspondence regarding your TABLE SAW or when ordering repair pads, The model number will be found on a plate attached to the cabinet, Always mention the model FIGURE CRRFTSMRN" T ABLE SAW 315.228490...
- Page 49 CRAFTSMAN TABLE SAW - MODEL NO. 315.228490 The model number will be found on a plate attached to the cabinet. Always mention the model number in all correspondence regarding your TABLE SAW or when ordering repair parts. PARTS LIST FOR FIGURE A...
- Page 50 CRAFTSMAN TABLE SAW - MODEL NO. 315.228490 I The model number will be found on a plate attached to the cabinet. Always mention the model number in all correspondence SAW or when ordering repair parts. regarding your TABLE FIGUREB...
- Page 51 CRAFTSMAN TABLE SAW - MODEL NO. 315.228490 SAW or when ordering repair parts. I The model number will be found on a plate attached to the cabinet. Always mention the model number in all correspondence regarding your TABLE PARTS LIST FOR FIGURE B...
- Page 52 CRAFTSMAN TABLE SAW - MODEL NO. 315.228490 I The model number will be found on a plate attached to the cabinet. Always mention the model number in all correspondence SAW or whert ordering repair parts. regarding your TABLE FIGUREC...
- Page 53 CRAFTSMAN TABLE SAW- MODEL NO. 315.228490 The model number will be found on a plate attached to the cabinet. Always mention the model number in all correspondence regarding your TABLE SAW or when ordering repair parts. PARTS LIST FOR FIGURE C...
- Page 54 CRAFTSMAN TABLE SAW - MODEL NO. 315.228490 I The model number will be found on a plate attached to the cabinet. Always mention the model number in all correspondence SAW or when' ordering repair parts. regarding your TABLE RGURED...
- Page 55 CRAFTSMAN TABLE SAW - MODEL NO. 315.228490 I The model number will be found on a plate attached to the cabinet. Always mention the model number in all correspondence SAW or when ordering repair parts. regarding your TABLE PARTS LIST FOR FIGURE D...
- Page 56 CRAFTSMAN TABLE SAW- MODEL NO. 315.228490 The model number will be found on a plate attached to the cabinet. Always mention the model number in all correspondence regarding your TABLE SAW or when,ordering repair parts. RGUREE...
- Page 57 CRAFTSMAN TABLE SAW - MODEL NO. 315.228490 The model number will be found on a plate attached to the cabinet. Always mention the model number in all correspondence regarding your TABLE SAW or when ordering repair parts. PARTS LIST FOR FIGURE E...
- Page 58 CRAFTSMAN TABLE SAW- MODEL NO. 315.228490 limB :l> FIGUREF...
- Page 59 CRAFTSMAN TABLE SAW- MODEL NO. 315.228490 The model number will be found on a plate attached to the cabinet. Always mention the model number in all correspondence SAW or when ordering repair parts. regarding your TABLE PARTS LIST FOR FIGURE F...
- Page 60 CRAFTSMAN TABLE SAW- MODEL NO. 315.228490 SAW or when ordering repair parts. I The model number will be found on a plate attached to the cabinet. Always mention the model number in all correspondence regarding your TABLE FIGUREG...
- Page 61 CRAFTSMAN TABLE SAW- MODEL NO. 315.228490 I The model number will be found on a plate attached to the cabinet. Always mention the model number in all correspondence regarding your TABLE SAW or when ordering repair parts. PARTS LIST FOR FIGURE G...
- Page 62 CRAFTSMAN TABLE SAW - MODEL NO. 315.228490 SAW or when ordering repair parts. I The model number will be found on a plate attached to the cabinet. Always mention the model number in all correspondence regarding your TABLE FIGUREH...
- Page 63 CRAFTSMAN TABLE SAW- MODEL NO. 315.228490 SAW or when ordering repair parts. I The model number will be found on a plate attached to the cabinet. Always mention the model number in all correspondence regarding your TABLE PARTS LIST FOR FIGURE H...
- Page 64 CRAFTSMAN TABLE SAW - MODEL NO. 315.228490 The model number will be found on a plate attached to the cabinet. Always mention the model number in all correspondence regarding your TABLE SAW or when ordering repair parts. 41 _ 23--...
- Page 65 CRAFTSMAN TABLE SAW - MODEL NO. 315.228490 I The model number will be found on a plate attached to the cabinet. Always mention the model number in all correspondence SAW or when ordering repair parts. regarding your TABLE PARTS LIST FOR FIGURE I...
- Page 66 For repair of major brand appliances in your own home... no matter who made it, no matter who sold it! 1-800-4-MY-HOM EsM Anytime, day or night (1-800-469-4663) www.sears.com To bring in products such as vacuums, lawn equipment and electronics _'_: for repair, call for the location of your nearest Sears Parts...
Need help?
Do you have a question about the 315.228490 and is the answer not in the manual?
Questions and answers