Table of Contents
Advertisement
Quick Links
CERTIFIED UNDER CANADIAN AND AMERICAN NATIONAL STANDARDS: CR97-003 ● CAN-2.21-M85 ● IAS US. 4-96
OUTDOOR
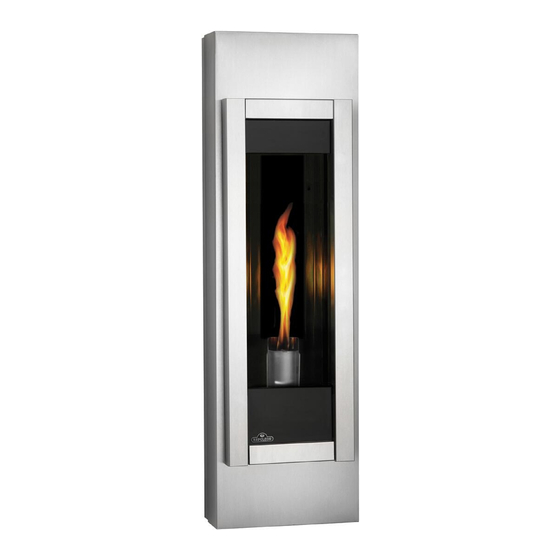
GSST8N
NATURAL GAS
GSST8P
PROPANE
Certified for Canada and United States using ANSI/CSA Methods.
SAFETY INFORMATION
WARNING
!
If the information in these instructions are not
followed exactly, a fire or explosion may result
causing property damage, personal injury or loss
of life.
- Do not store or use gasoline or other flammable
vapors and liquids in the vicinity of this or any other
appliance.
- WHAT TO DO IF YOU SMELL GAS:
● Do not try to light any appliance.
● Do not touch any electrical switch; do not use
any phone in your building.
● Immediately call your gas supplier from a
neighbour's phone. Follow the gas supplier's
instructions.
● If you cannot reach your gas supplier, call the
fire department.
- Installation and service must be performed by a
qualified installer, service agency or the supplier.
Wolf Steel Ltd., 24 Napoleon Rd., Barrie, ON L4M 4Y8 Canada • (705)721-1212 • fax(705)722-6031
$10.00
INSTALLER: LEAVE THIS MANUAL WITH THE APPLIANCE.
CONSUMER: RETAIN THIS MANUAL FOR FUTURE REFERENCE.
OPERATION INSTRUCTIONS
www.napoleonfireplaces.com • ask@napoleon.on.ca
INSTALLATION
WARNING: FOR OUTDOOR USE ONLY
1
AND
W415-0689 / 06.25.08
Advertisement
Table of Contents

Related Manuals for Napoleon Torch GSST8N


Summary of Contents for Napoleon Torch GSST8N
- Page 1 INSTALLER: LEAVE THIS MANUAL WITH THE APPLIANCE. CONSUMER: RETAIN THIS MANUAL FOR FUTURE REFERENCE. INSTALLATION OPERATION INSTRUCTIONS CERTIFIED UNDER CANADIAN AND AMERICAN NATIONAL STANDARDS: CR97-003 ● CAN-2.21-M85 ● IAS US. 4-96 OUTDOOR GSST8N NATURAL GAS GSST8P PROPANE Certified for Canada and United States using ANSI/CSA Methods. SAFETY INFORMATION WARNING If the information in these instructions are not...
-
Page 2: Table Of Contents
TABLE of CONTENTS PG 2-5 INTRODUCTION OPERATING INSTRUCTIONS Warranty MAINTENANCE General Instructions General Information / Rates and Effi ciencies Cleaning Care of Glass and Plated Parts ADJUSTMENTS Dimensions Gas Pressure Adjustment INSTALLATION Venturi Adjustment Gas Installation Flame Characteristics Electrical Connection REPLACEMENTS Clearance to Combustibles Replacement Parts... - Page 3 NAPOLEON® products are manufactured under the strict Standard of the world recognized ISO 9001 : 2000 Quality Assurance Certifi cate. NAPOLEON® products are designed with superior components and materials, assembled by trained craftsmen who take great pride in their work. Th e burner and valve assembly are leak and test-fi red at a quality test station.
-
Page 4: General Instructions
GENERAL INSTRUCTIONS THIS GAS APPLIANCE SHOULD BE INSTALLED AND SERVICED BY A QUALIFIED INSTALLER to conform with local codes. Installation practices vary from region to region and it is important to know the specifi cs that apply to your area, for example: in Massachusetts State: •... -
Page 5: Installation
DIMENSIONS FIGURES 1a-c ELECTRICAL GAS LINE ACCESS ACCESS INSTALLATION GAS INSTALLATION Note: All gas connections must be contained within the appliance when complete. 1. The appliance is designed to accept a 1/2” gas supply line. The appliance is equipped with a 1/2” manual shut-off valve. 2. -
Page 6: Electrical Connection
ELECTRICAL CONNECTION WARNING FIGURE 3 VALVE RISK OF ELECTRIC SHOCK! IGNITOR Control and valve operate with 110v. Do NOT use the appliance if any part has been IGNITOR under water. Call a qualifi ed service technician WIRE IMMEDIATELY to have the appliance inspected for damage to the electrical circuit. - Page 7 FIGURE 5 INSTALLATIONS CANADA U.S.A. 8 INCHES 8 INCHES Clearance above grade, veranda porch, deck or balcony. 12 INCHES 9 INCHES Clearance to windows or doors that open. 12 INCHES* 12 INCHES* Clearance to permanently closed windows. 18 INCHES** 18 INCHES** Vertical clearance to ventilated soffi...
-
Page 8: Finishing
FINISHING TMCSS MOUNTING CABINET INSTALLATION WARNING Before starting the installation remove the INSTALLATION protective layer from all three components that TEMPLATE make up the GSST8 (cabinet, frame, and Torch) NOTE: It is recommended that all fasteners be stainless steel. 1. Using the installation template (W122-0401) supplied, determine the best mounting location for your new Torch. -
Page 9: Rain Tabs
RAIN TABS When shipped, the rain tabs should be at a 90º angle. Push the rain tabs down until they are at an approximate 60º angle to assist rain in running off and out of the unit. RAIN FIGURE 8 DOOR REMOVAL The door is held in place at the bottom by a retainer tab FIGURE 9... -
Page 10: Tfsso Frame Installation
TFSSO FRAME INSTALLATION 1. Hang the frame onto the fi rebox by engaging the FIGURE 13 top trim bracket into the slot in the top of the frame and the bottom hooks of the frame into the slot in the mounting cabinet. FIGURE 12 TRIM SLOT... - Page 11 ACCENT GLASS INSTALLATION Carefully sprinkle the accent glass onto the glass support ACCENT evenly. Ensure no glass falls into the burner area. If this GLASS happens, insert a clean bag into your vacuum cleaner and BURNER vacuum out the accent glass. Replacement accent glass can be purchased from your authorized dealer.
-
Page 12: Operating Instructions
OPERATING INSTRUCTIONS If the appliance keeps shutting off, have it serviced. Keep After extended periods of non-operation such as following burner and control compartment clean. a vacation or a warm weather season, the fi replace may emit a slight odour for a few hours. This is caused by When lit for the fi... -
Page 13: Cleaning
MAINTENANCE TURN OFF THE GAS AND ELECTRICAL POWER BEFORE CLEANING SERVICING THE APPLIANCE. • Visually inspect the appliance for carbon buildup. CAUTION: Label all wires prior to disconnection when • Using a small whisk or brush, brush off the excess carbon servicing controls. -
Page 14: Replacements
REPLACEMENTS Contact your dealer for questions concerning prices and WARNING availability of replacement parts. Normally all parts can be ordered through your authorized dealer or distributor. Failure to position the parts in accordance with these diagrams or When ordering replacement parts always give the following failure to use only parts specified approved with this appliance may information: result in property damage or personal injury. -
Page 15: Trouble Shooting Guide
TROUBLE SHOOTING GUIDE BEFORE ATTEMPTING TO TROUBLESHOOT, PURGE YOUR UNIT AND INITIALLY LIGHT THE IGNITOR AND THE MAIN BURNER WITH THE GLASS DOOR REMOVED. SYMPTOM PROBLEM TEST SOLUTION Electrode sparks, Hot and neutral wires are - Connect the hot wire to the black wire. Connect the neutral burner ignites, reversed at control module. - Page 16 W415-0689 / 06.25.08...
Need help?
Do you have a question about the Torch GSST8N and is the answer not in the manual?
Questions and answers