Table of Contents
Advertisement
Quick Links
Advertisement
Table of Contents

Related Manuals for Uniden UDR444


Summary of Contents for Uniden UDR444
- Page 1 UDR444 WIRELESS VIDEO SURVEILLANCE Owner’s Manual www.uniden.com...
- Page 2 Visiting our customer support website at www.uniden.com. Calling our customer care specialists at 1-817-858-2900 or 1-800-658-8068. Uniden surveillance products are not manufactured and/or sold with the intent to be used for illegal purposes. Uniden expects customers’ use of these products to be in compliance with all local, state, and federal law.
-
Page 3: Table Of Contents
BASIC OPERATIOn .................. 10 WIRELESS Monitor ........................10 WIRELESS CAMERA ........................12 Front & Back Controls ..........................12 LCD DISPLAY ..........................13 USING THE UDR444 ........................14 Viewing Modes ............................14 Common Operations ..........................14 UDR444 SYSTEM MEnUS ............... 17 ALERT .............................. 17 POWER SAVE .......................... - Page 4 USING THE INTERCOM ......................28 VIEWING LIVE VIDEO ......................... 28 Viewing On Your TV ..........................28 Viewing On Your Computer .........................28 Viewing on Your Wireless Device or Remote Computer ............29 PAIRING ACCESSORY CAMERAS ................... 30 MAInTAInInG YOUR SYSTEM ..............31 MONITOR ............................31 CAMERAS ............................
-
Page 5: Overview
Uniden UDR444 Screen Descriptions. Here you will find detailed descriptions of each • screen and how it is used. Special Features. This section tells you about the UDR444 special features, such as • how to connect your surveillance system to Skype™ and access it from your remote computer or other wired/wireless devices. -
Page 6: Getting Started
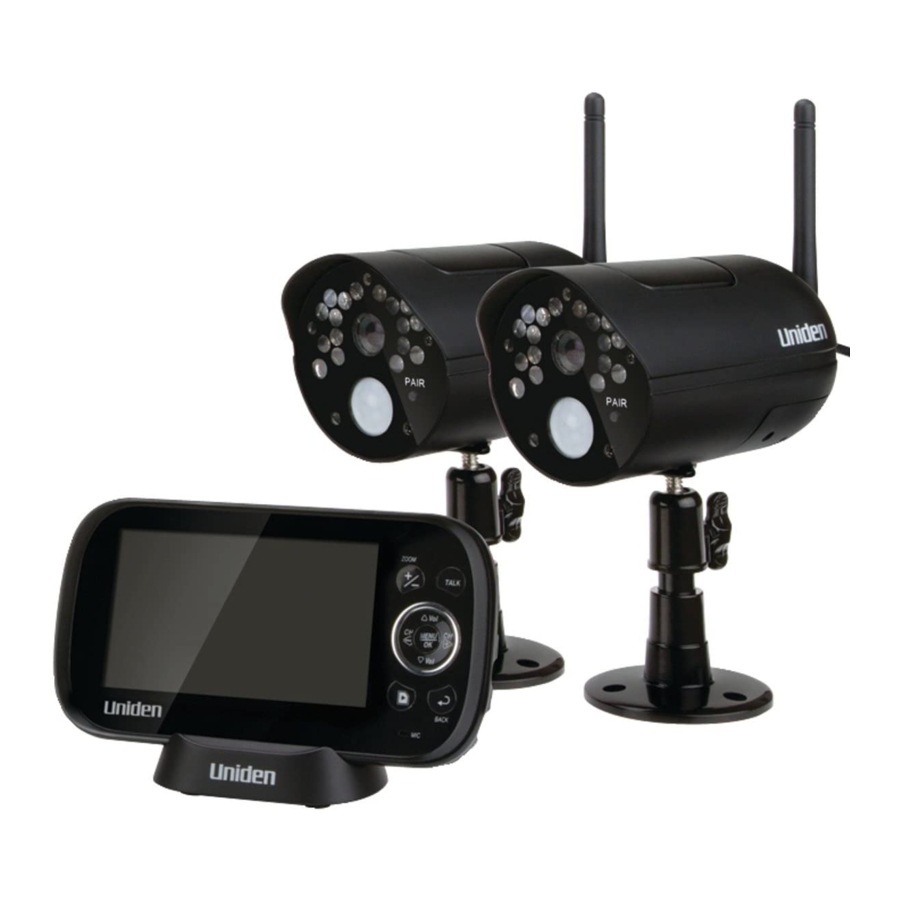
GETTInG STARTED WHAT'S InCLUDED Digital Wireless Digital Wireless Camera Power Monitor Power Cameras (2) Monitor (1) Adapters (2) Adapter (1) USB Cable AV Cable User Manual Monitor Cradle Screws and 4GB microSD Card anchors (Adapter not (6 each) shown) If any items are missing or damaged, contact our Customer Care Line immediately. Never use damaged products! InSTALLATIOn General Placement Considerations... -
Page 7: Installing Your Monitor
Clear line of sight video transmission distance is up to 500 ft. • Walls, especially brick and concrete, shorten the transmission distance. — Placement next to windows allows better transmission. — Avoid having a direct light source in view of the camera. This includes street lights, •... - Page 8 Hold the base of the camera stand where you want to mount it and mark the location of the screw holes. Drill holes using the 5mm drill bit. Insert anchors. Use the included screws to attach the base to the wall or ceiling. You can also screw the base into a flat surface such as a tabletop if needed.
- Page 9 The monitor displays the Uniden title screen and then displays the live view. Power Up the Camera Connect one end of an AC adapter to the camera’s power pigtail and plug the other end into a 120 volt AC (standard indoor) power outlet.
-
Page 10: Basic Operation
BASIC OPERATIOn WIRELESS MOnITOR What it does Antenna: Receives signals (video and audio) from cameras. LCD Screen: Displays video from the cameras. Zoom (+/−): Set the image to double size. In Zoom mode, use the navigation buttons to see the parts of the image not displayed on the LCD screen. Return it to original size by selecting Zoom again. - Page 11 • Press this button to change viewing camera channel in Live view. • Fast forward in Playback mode. Menu/OK • Press to access the UDR444 menu. • Confirm selections in Menu mode. Back: Press this button to return to previous screen.
-
Page 12: Wireless Camera
WIRELESS CAMERA FRONT BACK Front & Back Controls What it does Camera Antenna: Sends signals to the monitor. Light sensor: Measures light intensity to activate IR LEDs for night vision. Microphone: Receives sounds from the area near the camera. PIR sensor: Detects motion within camera's line of sight. Camera Lens: Mechanism through which the cameras view surroundings and record images. -
Page 13: Lcd Display
LCD DISPLAY 2 3 4 5 6 7 Rec 055920-1.AVI 11.25.2012 06:34:24 What it does Signal Indicator: Shows the camera’s signal strength. Signal Strength Indicator Warning Perfect None Good None Fair None None No Signal Out of Range Channel indicator: Displays the current channel number. Press to switch between available cameras. -
Page 14: Using The Udr444
Trigger Recording Time screen. You can also select OFF to disable the function. USInG THE UDR444 Viewing Modes In Live view, video displays live images from the camera in the following modes: Quad mode: Monitor displays video from all cameras on a single screen in 4 quadrants. - Page 15 Cancel watching a recorded Press video Watching recorded video on To view on PC: Place the UDR444's microSD card PC or television in the PC's memory slot (microSD card adapter included). You can play the files from the card itself or copy the files to your computer and play them from that destination.
- Page 16 To... Do This... How do you use the Intercom? Press and hold TALK Release to hear reply. How do you delete individual Select the red X next to the file name on the PLAY recorded files? FILE screen. See page 28 for details.
-
Page 17: Udr444 System Menus
UDR444 SYSTEM MEnUS Press to access the UDR444 system menu options. Use the navigating buttons to navigate up/down/left/right in the menu, and press to confirm a setting. MEnU/OK The Main menu options are: Alert • Power Save • System •... -
Page 18: Power Save
POWER SAVE This option allows you to enable/disable the Power Save function. Enable this function to turn off the LCD backlight after 2 minutes of inactivity. The monitor "wakes up" if it detects motion or if you press any key. (Default = Off) SYSTEM These system setup options allow you to configure your system according to your personal preferences. -
Page 19: Date & Time
Date & Time The Month option is automatically selected when you select Date & Time. Press ▲ or ▼ to scroll through the options for that selection. to switch to another section of the date or time. Press ▲ or ▼ Press to scroll through the options as before. -
Page 20: A/V Out
A/V Out This option allows you to select the TV output format. (Default = NTSC) NTSC is the TV standard in North America. Press ▲ or ▼ to select either NTSC or PAL for this option. Press ; the System screen displays. MEnU/OK Language This option allows you to select the display language for the system. -
Page 21: Default
If you try to format the microSD card but no microSD card is inserted, NO SD CARD displays. Default This option allows you to restore the UDR444 to factory settings. (Default = No) Camera pairings and date/time settings are not affected by a reset. Press ▲... -
Page 22: Pair
Pair Select this option if you are pairing accessory cameras or changing a camera's channel assignment. Press ▲ or ▼ to select the camera you want to pair to the monitor. Press MEnU/OK. An information message displays, indicating that you have 30 seconds to press the pairing button on the front of the camera. -
Page 23: Record
Press to change the setting (On or Off). Press MEnU/OK to confirm the setting. The main Camera screen displays. RECORD The Record screen contains 5 sub-screens that help you establish the quality level of your recordings and a repeatable one week recording schedule. Video Quality •... -
Page 24: Motion Sensitivity
room. This option lets you set how long the system will record once it has been triggered. (Default = 30 s) Press ▲ or ▼ to select the recording time. Press MEnU/OK. If you select Off, the system won’t start to record, even if a trigger occurs and motion detection is enabled. -
Page 25: Schedule Recording
The camera's sensitivity levels display on the next screen. Select the sensitivity level and press MEnU/OK The Motion Sensitivity screen displays again. Schedule Recording This option allows you to create a weekly recording schedule. This weeky schedule repeats until you change it. You can set each day separately, and you can also set that day's schedule to turn on or off. -
Page 26: Overwrite
Overwrite When the microSD card is full, the new video recording overwrites the oldest video recording. Select Yes to enable this function. (Default = No) -
Page 27: Special Features
Video records on the 4GB microSD card included in your package (the UDR444 will support up to a 32GB microSD card). You can set up a recording schedule so the UDR444 records automatically (see page 25), or you can manually start recording. -
Page 28: Deleting Recorded Files
VIEWInG LIVE VIDEO The Uniden UDR444 let you view live video from your system on your television. You can also use Skype™ to view your system on a remote PC or wireless devices such as an iPhone®, iPad®, or Android... -
Page 29: Viewing Recorded Video On Your Computer
Skype™ account to call itself. VIEWInG RECORDED VIDEO On YOUR COMPUTER The files that record on the UDR444 record onto the microSD card in AVI format. You can take that card and play it on your computer. You will need: UDR444 microSD card •... -
Page 30: Pairing Accessory Cameras
The files begin playing, in order, through your default media player. PAIRInG ACCESSORY CAMERAS The two cameras that come with your UDR444 are paired to your monitor at the factory. If you add cameras, install them and then pair the camera to the monitor. -
Page 31: Maintaining Your System
MAInTAInInG YOUR SYSTEM MOnITOR As you use your monitor, keep the screen clean by wiping it with a microfiber cloth to remove fingerprints, dust, etc. CAMERAS When dust and grime builds up on the camera lens and glass, it affects night vision capability. -
Page 32: Troubleshooting
• Check that the microSD card memory is not full. • Verify that the microSD card is compatible with the UDR444. It can support up to 32GB microSD card. The monitor picture has Use a blunt object like an unbent paper clip to press frozen and reset the monitor. -
Page 33: Specifications
SPECIFICATIOnS MOnITOR General Operating frequency range 2.400 ~ 2.4835GHz RX sensitivity – 81dBm Spread spectrum FHSS Modulation type GFSK Data Rate 2 Mbps Communication range 500 ft Line of Sight Monitor Display size/type 4.3” TFT LCD Resolution H: 480; V: 272 Power requirement 5.0V DC ±... -
Page 34: Camera
Consult your local waste management authority or a recycling organization like • Earth911.com to find an electronics recycling facility in your area. If you are unable to locate proper recycling facilities in your area, please return this • product to Uniden for recycling. -
Page 35: Fcc Compliance Information
FCC Compliance Information Part 15 Compliance Statement This device complies with Part 15 of the FCC Rules. Operation is subjected to the following two conditions: (1) this device may not cause harmful interference, and (2) this device must accept any interference received, including interference that may cause undesired operation. -
Page 36: One-Year Limited Warranty
(E) used in any conjunction with equipment or parts or as part of any system not manufactured by Uniden, or (F) installed or programmed by anyone other than as detailed by the owner’s manual for this product. - Page 37 Product. Include evidence of original purchase & a note describing the defect that has caused you to return it. The Product should be shipped freight prepaid, by traceable means, to warrantor at: Uniden America Service 4700 Amon Carter Blvd. Fort Worth, TX 76155...
Need help?
Do you have a question about the UDR444 and is the answer not in the manual?
Questions and answers