Table of Contents
Advertisement
Advertisement
Table of Contents

Related Manuals for Epson T88IIIP - TM B/W Thermal Line Printer


Summary of Contents for Epson T88IIIP - TM B/W Thermal Line Printer
- Page 1 TM-T88II/T88III Technical reference guide English 405227700 EPSON...
-
Page 3: Revision History
Its high scalability enables users to build versatile POS systems. The system is compatible with all types of EPSON POS printers and displays. Moreover, its flexibility make it easy to upgrade in the future. The functionality and the user-friendliness is valued from around the world. -
Page 4: For Safety
For Safety Key to Symbols The symbols in this manual are identified by their level of importance, as defined below. Read the following carefully before handling the product. WARNING: You must follow warnings carefully to avoid serious bodily injury. CAUTION: Provides information that must be observed to prevent damage to the equipment or loss of data. -
Page 5: Warnings
TM-T88II/T88III Technical Reference Guide Warnings WARNING: ❏ Shut down your equipment immediately if it produces smoke, a strange odor, or unusual noise. Continued use may lead to fire or electric shock. Immediately unplug the equipment. ❏ Only disassemble this product as described in this manual. Do not make modifications to the unit. -
Page 6: Modular Connectors
❏ Do not place heavy objects on top of this equipment. Never stand or lean on this equipment. Equipment may fall or collapse, causing breakage and possible injury. ❏ To ensure safety, unplug this equipment prior to leaving it unused for an extended period. -
Page 7: About This Manual
TM-T88II/T88III Technical Reference Guide About this Manual This manual describes the TM-T88III, a current EPSON thermal printer product. This manual also describes the TM-T88II, an obsolete product, for the purpose of supporting legacy systems. The TM-T88II has been replaced by the newer TM-T88III. However, even though the TM-T88II is no longer being sold, it is still in use by customers. - Page 8 EPSON Advanced Printer Driver Manual Provides information for anyone who is programming using the APD (EPSON Advanced Printer Driver). This is included in the EPSON Advanced Printer Driver.* * You can obtain these items from one of the following URLs: For customers from North America: http://pos.epson.com/...
-
Page 9: Table Of Contents
Windows Driver (EPSON Advanced Printer Driver) ........ - Page 10 ESC/POS Commands ..............3-5 Various Utilities .
- Page 11 TM-T88II/T88III Technical Reference Guide Appendix C Character Code Tables Page 0 (PC437: USA, Standard Europe) ............C-1 Page 1 (Katakana) .
- Page 12 x Contents Rev. A...
-
Page 13: Chapter 1 Product Overview
Chapter 1 Product Overview The TM-T88III thermal printer product is currently available from EPSON. The TM-T88II is an obsolete product, which is described here for the purpose of supporting legacy systems. In addition, the PS-170, the power supply for the TM-T88II printer, also is obsolete and no longer available. -
Page 14: Consumable Products
5. Supported character sets 11 pages including WPC 1252, 8 pages (extended graphics) PC866 [Cyrillic #2], PC852 [Latin2]) 6. Driver (EPSON OPOS ADK, Also can be operated by the driver for — Advanced Printer Driver) the TM-T88II. Functions, however, are restricted as follows: •... -
Page 15: Part Names And Basic Operation
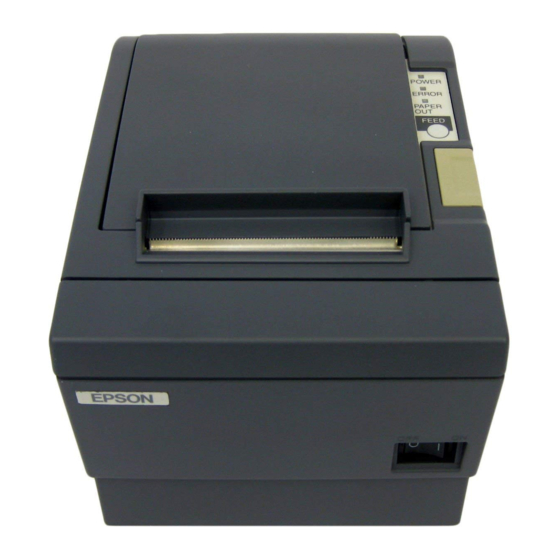
TM-T88II/T88III Technical Reference Guide 1.2 Part Names and Basic Operation 1.2.1 Part Names Printer cover Control panel Cutter cover Cover open button Power switch Figure 1-1 Printer part names * For details on DIP switch settings, refer to “DIP Switch Positions and Steps for Changing DIP Switch Settings”... -
Page 16: Power Switch
1.2.2.1 LED POWER LED (green) ❏ Lights when the power supply is on. ❏ Goes out when the power supply is turned off. ERROR LED Lights or flashes when the printer is offline. ❏ Lights after the power is turned on or after a reset (offline). Automatically goes out after a while to indicate that the printer is ready. -
Page 17: Connectors
TM-T88II/T88III Technical Reference Guide 1.2.4 Connectors All cables are connected to the connector panel on the lower rear of the printer. Power supply connector Drawer kick-out connector Interface connector Figure 1-3 Connector panel ❏ Drawer kick-out connector for connecting the cash drawer ❏... -
Page 18: Installing And Replacing Roll Paper
1.3.2 Installing and Replacing Roll Paper Note: Be sure to use roll paper that meets printer specifications. See Appendix B for details on the paper specifications. Do not use roll paper whose trailing end is glued to the roll paper core. 1.3.2.1 Installing Roll Paper 1. -
Page 19: Power Switch Cover
TM-T88II/T88III Technical Reference Guide 3. Pull out the roll paper toward you. 4. Close the printer cover. Figure 1-8 Closing the printer cover 5. Tear off the leading edge of the roll paper using the manual cutter. Figure 1-9 Tear off paper 1.3.2.2 Replacing Paper Follow the procedure below to replace roll paper. -
Page 20: Shipping Procedures
1.3.4 Shipping Procedures Do the following before shipping the printer. 1. Press the power switch to turn the power off. 2. Make sure the POWER LED is out. 3. Remove the power supply connector. 4. Pack the printer, keeping the top and bottom correctly oriented. 1-8 Product Overview Rev. -
Page 21: Chapter 2 Setup
TM-T88II/T88III Technical Reference Guide Chapter 2 Setup Before using the printer, you need to make various settings to increase the printer's functionality. Configure the printer appropriately depending on the environment. 1. Install the printer (page 2-2) Detailed setup 2. Set the DIP switches (page 2-2) 3. -
Page 22: Installing The Printer
2.1 Installing the Printer In addition to regular horizontal installation, the printer can be hung on a wall using the optional WH-10 Wall Hanging Bracket Set. 2.1.1 Precautions for Horizontal Installation ❏ Install the printer in a flat, horizontal position. ❏... -
Page 23: Dip Switch Functions
TM-T88II/T88III Technical Reference Guide 2. Unscrew the screw to remove the DIP switch cover from the base of the printer. DSW1 DSW2 Figure 2-2 Removing the DIP switch cover 3. Set the DIP switches as desired, using the tip of a tool, such as a small screwdriver. 4. - Page 24 Table 2-2 Baud rate selection (DIP SW1-7, 1-8) TM-T88II TM-T88III Switch no. Switch no. Baud rate Baud rate (BPS) (BPS) 2400 38400 4800 4800 9600 * 9600 * 19200 19200 Table 2-3 Switch bank 2 settings Function Handshake (BUSY) conditions Receive buffer full Printer offline or receive buffer full *...
- Page 25 TM-T88II/T88III Technical Reference Guide Note: With the TM-T88III, the DIP SW2-5 setting is enabled only when DIP SW1-2 is set to OFF and the receive buffer is set to 4KB. With the older TM-T88II model, be sure to set DIP SW2-5 to OFF before use. Otherwise, the printer may no longer function correctly.
- Page 26 Table 2-8 Selection of print density Switch no. Level Print density Low-power mode Regular print density * Heavy print density Table 2-9 Conditions for canceling receive buffer BUSY state TM-T88II TM-T88III Switch no. Switch no. Conditions to cancel receive buffer BUSY Conditions to cancel receive buffer BUSY state state (enabled only when DIP SW1-2 OFF)
-
Page 27: Adjusting The Roll Paper Near-End Detector
TM-T88II/T88III Technical Reference Guide 2.3 Adjusting the Roll Paper Near-End Detector Below are two situations where a roll paper NE detector adjustment is required. ❏ To adjust the detection position to suit the diameter of the roll paper core used. ❏... -
Page 28: Connecting The Printer To The Host Computer
2.4 Connecting the Printer to the Host Computer 2.4.1 Serial Interface Connection 2.4.1.1 Cross cable wiring diagrams The wiring selections for available serial cross cables are as follows: Figure 2-4 Cross cable diagrams The cable needed depends on printer control and handshake method. You can operate the TM printer with a Windows driver, OPOS, or ESC/POS commands. - Page 29 TM-T88II/T88III Technical Reference Guide Stand alone Both the TM printer and DM-D are connected to the host computer directly via the serial port. Application XON/XOFF DTR/DSR RTS/CTS control (except OPOS) (DOS, OPOS, Visual C) (DOS, Windows driver, Visual C, TM side Visual Basic MSComm) control setting XON/XOFF...
- Page 30 2.4.1.3 Connecting the serial interface (RS-232) cable WARNING: Be sure to turn off the power supply for both the printer and host computer before connecting the cables. 1. Insert the interface cable connector firmly into the interface connector on the connector panel.
-
Page 31: Parallel Interface Connection
TM-T88II/T88III Technical Reference Guide 2.4.2 Parallel Interface Connection The parallel interface model TM printer is connected to the host computer via the parallel port. When a customer display (DM-D) is to be connected, connect the TM printer to the host computer via the serial port. - Page 32 2.4.3.1 USB Interface Connection Diagram Example: Figure 2-11 USB connection 2.4.3.2 Connecting the USB interface cable 1. Attach the locking wire saddle at the location shown in the figure below. 2. Put the USB cable through the locking wire saddle as shown in the figure below. Note: Putting the USB cable through the locking wire saddle, as shown in the figure below, prevents the cable from coming unplugged.
-
Page 33: Ethernet Interface Connection
TM-T88II/T88III Technical Reference Guide To use USB model TM printers, the TM printer driver (EPSON OPOS ADK or advanced printer driver) must be installed on the host computer. Get the latest driver information from one of the following URLs: For customers from North America, go to the following web site: http://pos.epson.com/ For customers from other countries, go to the following web site: http://www.epson-pos.com/... - Page 34 For customers from other countries, go to the following web site: http://www.epson-pos.com/ Select the product name from the “Select any product” pull-down menu. Other compatible Ethernet interface modules may be available for your printer. Contact your EPSON dealer for information on the options available. 2-14 Setup...
-
Page 35: Connecting Power Supply Unit And Cash Drawer
TM-T88II/T88III Technical Reference Guide 2.5 Connecting Power Supply Unit and Cash Drawer Always use one of the following power supplies: the EPSON PS-180 (the currently available power supply that can be used with either the TM-T88III or the TM-T88II); the PS-170 (the legacy power supply used with the TM-T88II printer when that model printer was available);... -
Page 36: Connecting The Drawer Kick-Out Cable
Note: Before removing the DC cable connector from the EPSON PS-180 (current model power supply) or the PS-170 (legacy model), make sure the power supply cable has been removed from the power supply unit, then grasp the arrow-marked section of the connector and pull straight out. -
Page 37: Chapter 3 Application Development Information
API. This uses the printer’s bidirectional communication capability in the Windows standard printer driver operating environment. Note: The status API is a printer control API originally supplied by EPSON. This can be used to get the printer status and send ESC/POS commands. Rev. A... - Page 38 User's manual (for developers) • Engineering data for each status • Main function control methods (for WordPad and VB) 3.1.1.3 EPSON Advanced Printer Driver support environment ❏ Supported interfaces • Serial, parallel, USB, Ethernet ❏ Supported operating systems (with confirmation of system operation) •...
-
Page 39: Epson Opos Adk
PC. ❏ The EPSON OPOS ADK reduces the man-hours for application development, since it handles the following functions that application developers up till now have had to consider. - Page 40 3.1.2.2 EPSON OPOS ADK contents The installer of the EPSON OPOS ADK, Ver. 2.10 or later, has a silent installation function, which can install the OPOS environment without a user interface and facilitate installation. With the installer, the following OPOS-compliant OPOS Control for EPSON devices, manuals, various utilities, and sample programs can be installed.
-
Page 41: Esc/Pos Commands
3.1.2.4 Driver information and download destination Get the latest driver information from one of the following URLs: For customers from North America, go to the following web site: http://pos.epson.com/ For customers from other countries, go to the following web site: http://www.epson-pos.com/... -
Page 42: Various Utilities
We provide the utilities described below for developers of TM printer applications. You can obtain the utilities from one of the following URLs: For customers from North America, go to the following web site: http://pos.epson.com/ For customers from other countries, go to the following web site: http://www.epson-pos.com/... -
Page 43: Panel Leds And Error Status
TM-T88II/T88III Technical Reference Guide 3.3 Panel LEDs and Error Status 3.3.1 Power LED Table 3-1 Power LED Item Specifications LED color Green LED states Power is not supplied. Power is supplied. 3.3.2 No Roll Paper (PAPER OUT) LED Table 3-2 No roll paper (PAPER OUT) LED Item Specifications LED color... - Page 44 3.3.3.1 Error Codes There are three possible error types: automatically recoverable errors, recoverable errors, and unrecoverable errors. ❏ For automatically recoverable errors, the user does not have to take any action. The error recovers automatically when the head temperature returns to normal or the cover is correctly closed.
- Page 45 TM-T88II/T88III Technical Reference Guide Note: The error recovery command is valid only if a recoverable error (excluding automatically recoverable errors) occurs. If a recoverable error occurs, the printer recovers from the error upon receipt of an error recovery command from the driver after the cause of the error is eliminated. Turning the printer’s power off and on is not required.
-
Page 46: Sensors
3.4 Sensors 3.4.1 Paper Sensors The printer has two paper sensors. 3.4.1.1 Roll paper near-end sensor The roll paper near-end sensor uses the diameter of the roll paper to detect whether the remaining paper is getting low. This sensor is located inside the roll paper supply unit, and you can fine-tune the amount of remaining paper detected by this sensor. -
Page 47: Offline
TM-T88II/T88III Technical Reference Guide 3.4.3 Offline This printer is not equipped with an online/offline switch. The printer automatically goes offline under the following conditions: • During power on (including resetting with the interface) until the printer is ready • When the printer is waiting to receive data •... -
Page 48: Nvram (Non-Volatile Memory)
Note: When DIP SW2-1 is ON, the printer will not become BUSY even if printer hardware stops operating. • When an error has occurred • When the cover is open • When printing has stopped for a paper out • When paper is fed by the paper FEED button 3.5 NVRAM (Non-volatile Memory) NVRAM is mounted on this printer, and bitmap images (for example, business logos) or other... -
Page 49: Operating Mode (Switch Panel Operation)
TM-T88II/T88III Technical Reference Guide 3.7 Operating Mode (Switch Panel Operation) The printer has a self-test mode to check printer settings in addition to the regular print mode. 3.7.1 Self-test Mode In the self-test mode, the following items are checked and printed out: •... -
Page 50: Faq List
3.8 FAQ List Listed here are the most-asked questions (Q) and answers (A). 1. Look for information relating to your inquiry or problem in the questions. 2. Then, follow the instructions described in the “A” sentence below it. 3.8.1 Q: Why has my print data dropped out? A: Check the handshake process. -
Page 51: Q: Why Does The Drawer Kick-Out Not Operate Properly
TM-T88II/T88III Technical Reference Guide 3.8.2 Q: Why does the drawer kick-out not operate properly? A: Drawer specifications differ depending on the manufacturer and the part number. Make sure the specifications of the drawer to be used meet the following conditions before connecting it to the drawer kick-out connector. - Page 52 3-16 Application Development Information Rev. A...
-
Page 53: Chapter 4 Esc/Pos Command-Related Information
TM-T88II/T88III Technical Reference Guide Chapter 4 ESC/POS Command-related Information This chapter introduces the printer operation settings, which can be made by using ESC/POS commands, and precautions for those operation settings. 4.1 NV Memory (Non-volatile Memory) The printer’s NV memory can be roughly divided into three parts: •... -
Page 54: Printer Status
Note: For details on NV graphics and NV bit images, see the “ESC/POS Application Programming Guide.” 4.2 Printer Status There are three ways to get the printer status, and each method has the following features. For details, see the “ESC/POS Application Programming Guide.” •... -
Page 55: Chapter 5 Product Specifications
TM-T88II/T88III Technical Reference Guide Chapter 5 Product Specifications 5.1 Product Specifications (TM-T88II/TM-T88III) Table 5-1 Specifications Print method Thermal line printing Print width Standard: paper width of 80 mm — print width of 72 mm {2.84"}, 512 dot positions Factory option (with spacer): paper width of 58 mm {2.28"} — print width of 50.8 mm {2"}, 360 dot positions Cut type Partial cut (left-most one point uncut) -
Page 56: Print Specifications (Tm-T88Ii/Tm-T88Iii)
5.2 Print Specifications (TM-T88II/TM-T88III) Table 5-2 Print characteristics Characteristics Specifications Print method Thermal line printing Paper feed method Unidirectional with friction feed ❐ Print width 72 mm {2.84"} ❐ 50.8 mm {2.28"} (factory option with paper spacer) Characters per line See table titled “Print width/characters per line,”... -
Page 57: Character Specifications (Tm-T88Ii/Tm-T88Iii)
TM-T88II/T88III Technical Reference Guide 5.3 Character Specifications (TM-T88II/TM-T88III) Table 5-5 Character specifications Item Specifications Character type Alphanumeric 95 character sets International TM-T88III: 37 types TM-T88II 32 types Extended graphics TM-T88III: 128 characters × 11 pages (including 1 blank page) TM-T88II: 128 characters ×... -
Page 58: Printable Area (Tm-T88Ii/Tm-T88Iii)
5.5 Printable Area (TM-T88II/TM-T88III) Print direction Printable area Roll paper width Figure 5-1 Printable area Table 5-7 Dimensions a (roll paper width) b (left margin) c (print width) d (right margin) 79.5 ± 0.5 72.2 ± 0.2 57.5 ± 0.5 (factory option) 50.8 ±... -
Page 59: Print Position Versus Cutter Position (Tm-88Ii/Tm88Iii)
TM-T88II/T88III Technical Reference Guide 5.6 Print Position versus Cutter Position (TM-88II/TM88III) The following illustration shows the relationship between print position and cutter position. Final line of previous receipt Manual cutter position Approx. 29 mm Autocutter blade position Approx. 15 mm Cut position Print direction Maximum printable area... -
Page 60: Overview Of External Dimensions (Tm-T88Ii/Tm-T88Iii)
5.7 Overview of External Dimensions (TM-T88II/TM-T88III) 5.7.1 External Dimensions The dimensions in the figure below are common to both the TM-88III and TM-88III. ❏ Height 148 mm {5.83"} ❏ Width 145 mm {5.71"} ❏ Depth 195 mm {7.68"} ❏ Weight Approx. -
Page 61: Operating Specifications (Tm-T88Ii/Tm-T88Iii)
TM-T88II/T88III Technical Reference Guide 5.8 Operating Specifications (TM-T88II/TM-T88III) Table 5-8 Temperature and humidity Item Specifications Temperature/ Operating: 5 to 45°C (41 to 113°F), 10 to 90% RH no condensation allowed. Humidity (Refer to ambient operating ranges in the figure below.) Storage: (shipped –10 to +50°C (14 to 122°F), 10 to 90% RH (excluding paper) packed state) - Page 62 5-8 Product Specifications Rev. A...
-
Page 63: Appendix A Interfaces And Connectors
TM-T88II/T88III Technical Reference Guide Appendix A Interfaces and Connectors A.1 RS-232 Serial Interface A.1.1 Interface Board Specifications (RS-232-compliant) Table A-1 Serial interface specifications Item Specifications Data transfer method Serial Synchronization Asynchronous Handshake Select one of the following with DIP SW1-3: ❏... -
Page 64: Functions Of Each Connector Pin
A.1.2 Functions of each Connector Pin Table A-2 Pin assignments Signal Signal name direction Function Frame ground Output Transmission data Input Reception data Output Equivalent to DTR signal (pin 20) Input This signal indicates whether the host computer can receive data. SPACE indicates that the host computer can receive data. -
Page 65: Code
TM-T88II/T88III Technical Reference Guide A.1.4 Code The hexadecimal numbers corresponding to the XON/XOFF codes are shown below. ❏ XON code: ❏ XOFF code: Note: When the printer goes from offline to online and the receive buffer is full, XON is not transmitted. When the printer goes from online to offline and the receive buffer is full, XOFF is not transmitted. - Page 66 Reverse mode The transfer of status data from the printer to the host proceeds in the nibble or byte mode. This mode allows data transfer from an asynchronous printer under the control of the host. Data transfers in the nibble mode are made via the existing control lines in units of four bits (a nibble).
-
Page 67: Interface Signals
TM-T88II/T88III Technical Reference Guide A.2.2 Interface Signals Table A-5 Connector pin assignments Source Compatibility Mode Nibble Mode Byte Mode Host Strobe HostClk HostClk Host/Ptr Data0(LSB) Data0 (LSB) Data0 (LSB) Host/Ptr Data1 Data1 Data1 Host/Ptr Data2 Data2 Data2 Host/Ptr Data3 Data3 Data3 Host/Ptr Data4... - Page 68 Note: A signal name with a rule above it indicates an “L” active signal. Bidirectional communications cannot take place, unless all signal names for both sides correspond to each other. Connect all signal lines using a twisted-pair cable. Connect the return side to the signal ground level. Make sure the signals satisfy electrical characteristics.
-
Page 69: Appendix B Options And Consumables
TM-T88II/T88III Technical Reference Guide Appendix B Options and Consumables B.1 Roll Paper The table below shows the roll paper specifications. Table B-1 Paper specifications Type of paper Specified thermal paper Shape Roll Select from the following: ❐ Paper width 79.5 mm ± 0.5 mm (default) ❐... - Page 70 Figure B-1 Case specifications B.2.1.3 Material No specific brominated flame retardants, such as PBBE and PBB, are used in this product. B.2.1.4 AC cable selection ❏ Select an AC cable that satisfies the following conditions: • Safety standard product • Plug with PE terminal ❏...
- Page 71 TM-T88II/T88III Technical Reference Guide ❏ Output conditions 24 VDC ± 5% Output voltage (rating): Output current (rating): 2.0 A Output electric power (rating): 48 VA Output peak current: 4.5 A B.2.2.2 Case specifications ❏ Dimensions: 68 mm (D) × 136 mm (L) × 32 mm (H) (excluding projections) {2.68"...
- Page 72 B-4 Options and Consumables Rev. A...
-
Page 73: Appendix C Character Code Tables
TM-T88II/T88III Technical Reference Guide Appendix C Character Code Tables C.1 Page 0 (PC437: USA, Standard Europe) (International character set: when “America” is selected) Note: The character code tables show only character configurations. They do not show the actual print pattern. Rev. -
Page 74: Katakana
C.2 Page 1 (Katakana) Rev. B C-2 Character Code Tables... -
Page 75: Pc850: Multilingual
TM-T88II/T88III Technical Reference Guide C.3 Page 2 (PC850: Multilingual) Rev. B Character Code Tables C-3... -
Page 76: Pc860: Portuguese
C.4 Page 3 (PC860: Portuguese) Rev. B C-4 Character Code Tables... -
Page 77: Pc863: Canadian-French
TM-T88II/T88III Technical Reference Guide C.5 Page 4 (PC863: Canadian-French) Rev. B Character Code Tables C-5... -
Page 78: Pc865: Nordic
C.6 Page 5 (PC865: Nordic) Rev. B C-6 Character Code Tables... -
Page 79: Wpc1252) (Tm-T88Iii Only
TM-T88II/T88III Technical Reference Guide C.7 Page 16 (WPC1252) (TM-T88III only) Rev. B Character Code Tables C-7... -
Page 80: Pc866: Cyrillic #2) (Tm-T88Iii Only
C.8 Page 17 (PC866: Cyrillic #2) (TM-T88III only) Rev. B C-8 Character Code Tables... -
Page 81: Pc852: Latin2) (Tm-T88Iii Only
TM-T88II/T88III Technical Reference Guide C.9 Page 18 (PC852: Latin2) (TM-T88III only) Rev. B Character Code Tables C-9... -
Page 82: Pc858: Euro
C.10 Page 19 (PC858: Euro) Rev. B C-10 Character Code Tables... -
Page 83: Blank Page
TM-T88II/T88III Technical Reference Guide C.11 Page 255 (Blank Page) UD: undefined Rev. B Character Code Tables C-11... -
Page 84: International Character Set
C.12 International Character Set ASCII codes (base 16) Country America France Germany Denmark I Sweden Italy Spain I Japan Norway Denmark II Spain II Latin America Korea Rev. B C-12 Character Code Tables... -
Page 85: Appendix D Tm-T88Ii/Tm-88Iii Comparison Table
5. Supported character sets 11 pages 8 pages (extended graphics) * including WPC 1252, PC866 [Cyrillic #2], PC852 [Latin2]) 6. Driver (EPSON OPOS ADK, Also can be operated by the TM-T88II — Advanced Printer Driver ) driver. Functions, however, are restricted as follows: •... - Page 86 Rev. A D-2 TM-T88II/TM-88III Comparison Table...
- Page 88 EPSON SEIKO EPSON CORPORATION Printed in Japan...
Need help?
Do you have a question about the T88IIIP - TM B/W Thermal Line Printer and is the answer not in the manual?
Questions and answers