
Related Manuals for Emerson RS1008


Summary of Contents for Emerson RS1008
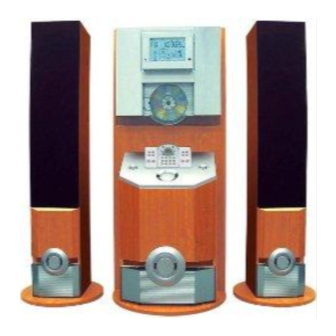
- Page 1 HOME AUDIO SYSTEM with CD PLAYER, DIGITAL TUNER, 3-WAY TOWER SPEAKERS and POWERED SUBWOOFER OWNER'S MANUAL RS1008 Visit our web site at www.emersonradio.com RS1008_ib042303.p65 23/4/2003, 14:51...
-
Page 2: Important Safety Instructions
TO PREVENT FIRE OR SHOCK HAZARD, DO NOT USE THIS PLUG WITH AN EXTENSION CORD, RECEPTACLE OR OTHER OUTLET UNLESS THE BLADES CAN BE FULLY INSERTED TO PREVENT BLADE EXPOSURE. TO PREVENT FIRE OR SHOCK HAZARD, DO NOT EXPOSE THIS APPLIANCE TO RAIN OR MOISTURE. The lightning flash with arrowhead symbol, within an equilateral triangle is intented to alert the user to... - Page 3 This system was in perfect working order when it left our factory. If you have any problem with the set up or operation of this system, do not return it to the retail store. Please call the Emerson Customer Service Hotline, toll free, at 800-898-9020.
-
Page 4: Important Notes
• Avoid installing this unit in places exposed to direct sunlight or close to heat radiating appliances such as electric heaters, on top of other stereo equipment that radiates too much heat, places lacking ventilation or dusty areas, places subject to constant vibration and/ or humid or moist areas. -
Page 5: Preparation For Use
PREPARATION FOR USE UNPACKING AND SET-UP • Carefully remove all of the components and confirm that you have the following: 1.) Center Stand with Subwoofer x 1. 2.) Tower Speakers x 2. 3.) Receiver/CD Player Unit x 1 (with FM Antenna Wire attached). 4.) Remote Control x 1. -
Page 6: Connecting The Speakers
CONNECTING THE SPEAKERS Note: The Receiver CD/Player unit must be mounted on the Center Stand before you connect the speakers to the back panel. TOWER SPEAKERS Locate the color-coded speakers cables. The speaker terminals on the back of the tower speakers are ‘... - Page 7 SUBWOOFER Locate the Subwoofer Connection Cable. This is a black cable with black colored plugs on each end. Connect one end of the Subwoofer cable to the AUDIO IN jack on the back of the subwoofer. Connect the other end of the Subwoofer Connection Cable to the SUBWOOFER jack on the back panel of the Receiver/CD Player unit.
-
Page 8: Installing The Remote Control Batteries
INSTALLING THE REMOTE CONTROL BATTERIES Locate the Remote Control unit. The battery compartment is on the back side of the remote. Press down on the battery door locking tab to open and remove the door. Insert two fresh “AA” alkaline batteries in the battery compartment, then replace the battery door. Be sure to insert the batteries according to the polarity (+ / –... -
Page 9: Power Source
POWER SOURCE This system requires two 120V 60 Hz AC outlets. The small plug from this AC adapter must be connected to the DC Input Jack on the back of the Receiver/CD Player as shown The power source for the stereo receiver/CD player unit is a separate AC adapter, included. -
Page 10: System Controls
SYSTEM CONTROLS There are two ways to operate this system. You may use the remote control or you may use the touch sensor control panel that is located above the CD door. All of the main system controls are found in both locations, however the remote handset has some additional controls that are not on the touch sensor control panel. -
Page 11: Location Of Controls And Indicators
LOCATION OF CONTROLS AND INDICATORS FRONT PANEL 1.) LCD Display/Touch Panel. 2.) CD Door Open/Close. 3) POWER On/Off. 4.) VOLUME 5.) SKIP/TUNER 6.) POWER ‘ On’ Indicator. 7.) PLAY/PAUSE 8.) STOP 9.) CD. 10.) EQ. 11.) TUNER/BAND. 12.) X-BASS. 13.) AUX. 14.) PROGRAM. - Page 12 SUBWOOFER AND SPEAKER 1.) Detachable Speaker Grille. 2.) POWER ON /OFF 3.) Subwoofer Power ‘ On’ Indicator. 4.) VOLUME Control (Subwoofer). 5.) Subwoofer. 6.) FM Wire Antenna. 7.) DC Power Plug of AC/DC Adapter for Connecting to Main Unit. 8.) Wire Groove for Dressing All Cables inside. 9.) AUDIO IN Jack.
-
Page 13: Remote Control
REMOTE CONTROL MODE TIMER X-BASS 1.) EQ Button. 2.) X-BASS Button. 3.) SNOOZE Button. 4.) TIMER Button. 5.) MODE Button. 6.) SLEEP Button. 7.) PLAY/PAUSE Button. 8.) TUNING – / Rev Skip-SEARCH 9.) CD Button. 10.) MUTE Button. 11.) VOL (Volume) Button. -
Page 14: Multifunction Lcd Display
MULTIFUNCTION LCD DISPLAY 1.) Touch Panel Function Controls. 2.) CLOCK Indicator. 3.) AM/PM Indicators. 4.) REPEAT/REPEAT ALL Indicators. 5.) TIMER ON/OFF Indicators. 6.) SNOOZE Indicator. 7.) SLEEP Indicator. 8.) MUTE Indicator. 9.) ST (FM Stereo) Indicator. 10.) Multi-Data Indicators. 11.) Preset EQ Indicators. RS1008_ib042303.p65 23/4/2003, 14:51... -
Page 15: General Controls
OPERATING INSTRUCTIONS • Make sure that the AC power cords from both the Receiver/CD Player unit and the Subwoofer are connected to 120V 60Hz AC outlets. • Make sure that you have installed batteries in the Remote Control unit. • Make sure that both the tower speakers and the subwoofer are correctly connected to the appropriate terminals and jacks on the back of the Receiver/CD Player unit. - Page 16 Subwoofer VOLUME Level Control (on Subwoofer only) After switching the Subwoofer POWER Button ‘ On’ , rotate the Subwoofer VOLUME level control to adjust the volume of the subwoofer speaker. Note: The volume of the subwoofer speaker cannot be controlled by the VOLUME Buttons on the touch panel or the remote control.
-
Page 17: Setting The Clock
SETTING THE CLOCK When the AC cord from the Receiver/CD Player unit is connected to the AC outlet for the first time, the time display will begin flashing. This flashing is your indication that power has been interrupted, the display is incorrect and the time must be reset. The flashing will stop when you set the time. -
Page 18: Listening To Radio
LISTENING TO RADIO Reminder: Unless otherwise specified you may use the controls on the touch panel display or on the remote control to perform all of the following operations. 1.) Press the POWER button to turn the Receiver/CD Player unit ‘... - Page 19 Presetting Stations In The Tuner Memory The tuner in this system has a 32 station preset memory. You can store up to 16 FM stations and 16 AM stations in the tuner memory for immediate recall. 1.) Tune to the first station you wish to memorize. Example: FM 103.5 MHz.
- Page 20 Changing Preset Stations (Remote Control Only) 1.) Tune to the new station you wish to memorize. When the desired station appears on the display press the PROGRAM button. 2.) Within 5 seconds press the PRESET button on the remote control repeatedly to select the preset number that you wish to change, or select the preset number directly with the corresponding number keys.
-
Page 21: Playing Compact Discs
PLAYING COMPACT DISCS IMPORTANT: This CD player can play normal CDs plus CD Recordable (CD-R) and CD Rewriteable (CD-RW) discs. However the playability of CD-R and CD-RW discs may be affected by the type of software that was used in ‘ ripping’ the tracks from the original discs and ‘ burning’ the tracks onto the blank media. Playability may also be affected by the quality and condition of the blank media you use for recording. - Page 22 Pause Control ( To pause momentarily during playback press the PLAY/PAUSE button again. The sound stops and the Pause indicator ( ) flashes but the disc continues to spin. To cancel pause and resume normal playback, press the PLAY/PAUSE indicator ( ) disappears. SKIP/SEARCH Controls ( •...
-
Page 23: Programmed Playback
Programmed Playback This CD player has a 40-track programmable memory system. You can program up to 40 tracks on any disc to play back in any desired order. The same track can be programmed to play multiple times if desired. NOTE: You cannot program a disc during playback. - Page 24 Note: The program icon remains ‘ On’ and the programmed sequence remains in the memory. To repeat the programmed sequence press the PLAY/PAUSE button again. To erase the programmed sequence from the memory press the STOP button while the player is stopped. The program icon disappears.
-
Page 25: Other Functions
OTHER FUNCTIONS TIMER Operation (Remote Control Only) This system includes a programmable timer that can switch the system ‘ On’ and ‘ Off’ at any time you specify. NOTE: IN ORDER FOR THE TIMER TO OPERATE THE SYSTEM, THE TIME OF DAY MUST BE SET CORRECTLY. -
Page 26: Sleep Timer (Remote Control Only)
SNOOZE Function (Remote Control Only) When the system turns ‘ On’ automatically you may press the SNOOZE button on the remote control to stop the radio or CD temporarily. After 9 minutes the system will turn ‘ On’ again. The Snooze operation can be repeated multiple times. -
Page 27: Audio Out
CONNECTING AN AUXILIARY SOUND SOURCE We have provided a pair of Auxiliary Input jacks on the back panel of the Receiver/CD Player unit. To listen to an auxiliary audio source through the speakers of this system connect the L/R audio outputs of the external source to the L/R Auxiliary Input jacks on the back of this unit. -
Page 28: Reset Button
RESET BUTTON This unit includes a special protective device to prevent permanent damage to the internal computer in the event of a sudden power surge. If the system does not respond to any commands from the remote control, or the controls on the main unit, you may have experienced a power surge that triggered the internal computer to shut down automatically. -
Page 29: Care And Maintenance
CARE AND MAINTENANCE COMPACT DISC CARE • To remove a disc from its storage case, press down on the center of the case and lift the disc out, holding it carefully by the edges. • Fingerprints and dust should be carefully wiped off the disc’ s recorded surface with a soft cloth.Unlike conventional records, compact discs have no grooves to collect dust and microscopic debris, so gently wiping with a soft cloth should remove most particles. -
Page 30: Limited Warranty
Please call the Emerson Customer Service Hotline toll free at 1-800-898-9020. We will diagnose the problem and instruct you how to have your system repaired or replaced, at our discretion. - Page 31 EMERSON RADIO CORP. EMERSON Part No.: 16-2904 304-01 Printed in China RS1008_ib042303.p65 23/4/2003, 14:51...
Need help?
Do you have a question about the RS1008 and is the answer not in the manual?
Questions and answers
Can the cd belt be adjusted if something was jammed into it