Table of Contents
Advertisement
Quick Links
8X8 HDMI 1.3 over CAT5
Matrix Switch with IR Pass-Through and
3D Support
Model #: SW-HDM3D-C5-8X8
© 2012 Avenview Inc. All rights reserved.
The contents of this document are provided in connection with Avenview Inc. ("Avenview") products. Avenview makes no representations or warranties with
respect to the accuracy or completeness of the contents of this publication and reserves the right to make changes to specifications and product descriptions at any
time without notice. No license, whether express, implied, or otherwise, to any intellectual property rights is granted by this publication. Except as set forth in
Avenview Standard Terms and Conditions of Sale, Avenview assumes no liability whatsoever, and disclaims any express or implied warranty, relating to its products
including, but not limited to, the implied warranty of merchantability, fitness for a particular purpose, or infringement of any intellectual property right.
Reproduction of this manual, or parts thereof, in any form, without the express written permission of Avenview Inc. is strictly prohibited.
Model #: HDM3D-C5SW-R
www.avenview.com
1
Advertisement
Table of Contents

Subscribe to Our Youtube Channel
Related Manuals for Avenview SW-HDM3D-C5-8X8


Summary of Contents for Avenview SW-HDM3D-C5-8X8
- Page 1 No license, whether express, implied, or otherwise, to any intellectual property rights is granted by this publication. Except as set forth in Avenview Standard Terms and Conditions of Sale, Avenview assumes no liability whatsoever, and disclaims any express or implied warranty, relating to its products including, but not limited to, the implied warranty of merchantability, fitness for a particular purpose, or infringement of any intellectual property right.
-
Page 2: Table Of Contents
Section 2: Specifications ........................20 EDID Learning ........................21 2.1 Method 1: Manually Connect HDMI Displays to HDMI Input Ports ......... 21 2.2 Method 2: Use the Front Panel of The Master Unit ................. 22 IR Discrete Code ........................23 www.avenview.com... -
Page 3: Section 1: Getting Started
Removal, installation, and set-up service charges. Safety Instructions The Avenview SW-HDM3D-C5-8X8 HDMI 1.3 Matrix Switch over CAT5 with Full 3D Support has been tested for conformance to safety regulations and requirements, and has been certified for international use. However, like all electronic equipment’s, the SW-HDM3D-C5-8X8 should be used with care. Read the following safety instructions to protect yourself from possible injury and to minimize the risk of damage to the unit. -
Page 4: Regulatory Notices Federal Communications Commission (Fcc)
Introduction The Avenview SW-HDM3D-C5-8X8, HDMI over CAT5 Matrix with IR Pass-through and Full 3D Support provides the most flexible and cost effective solution in the market to route high definition video sources plus multi-channel (up to 7.1 channel) digital audio from any of the eight HDMI sources to the remote displays at the same time. - Page 5 www.avenview.com...
-
Page 6: Package Contents
Use the DC power adapter with correct specifications. If inappropriate power supply is used then it may cause a fire. Do not twist or pull by force ends of the optical cable. It can cause malfunction. www.avenview.com... -
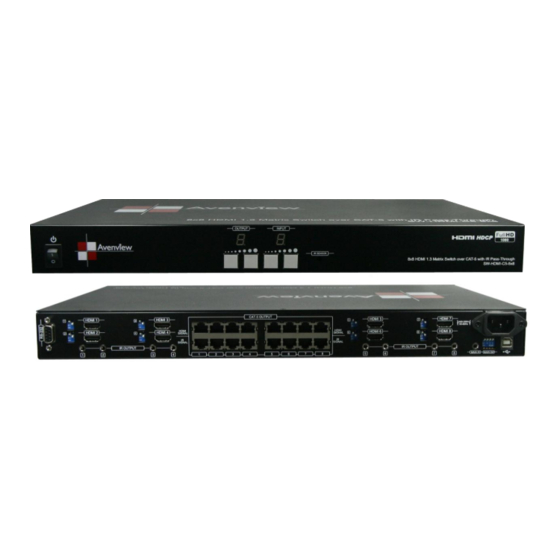
Page 7: Panel Description
5. Output Ports: 8 RJ-45 TMDS/DDC outputs 6. IR Main: 3.5mm IR Blaster socket for for each output channel HDMI Source Control on all 8 Inputs 7. SW Main: DIP Switches 8. AC Power 9. USB: USB Control Port www.avenview.com... -
Page 8: Hdm3D-C5Sw-R
(strongest) to 7 (weakest) for respective transmission length from longest possible range to short distance. Please adjust the signal level from 7 to 0 and stop turning the rotary switch whenever the audio/video is playing normally. Inappropriate signal level setting may cause overpowering issue that would shorten the product life significantly! www.avenview.com... -
Page 9: Dip Switch For Edid & Audio Settings (Sw1 - Sw4)
By setting at this mode, the users may encounter compatibility issue among different kinds of HDMI sources and displays. If you cannot get the audio and/or video output normally at the system installation, please change the DIP switch setting to default mode or even safe mode to verify the functionality of the device. www.avenview.com... -
Page 10: Sw Main Dip Switch For Firmware Update
[6]. Repeat step 3 ~ step6 if you want to update the firmware of the remaining Blocks. [7]. Set the [SW Main] switch position to Normal Operation Mode. [8]. Power on the Matrix unit. [6]. Power on the SW-HDM3D-C5-8X8. www.avenview.com... -
Page 11: Ir Control Patch
IR Receiver Cable Incorrect placement of IR Blaster and Receiver may result in the failure of the IR extenders. Please check carefully before plugging in the IR extender to the respective IR sockets. Warranty will not cover the damage. www.avenview.com... -
Page 12: Supported Ir Data Formats
SONY 20 BIT CODE RCA CODE RCM CODE MATSHUSHITA CODE MITSUBISHI CODE ZENITH CODE JVC CODE M50560-001P MN6125H MN6125L MN6014-C5D7 MN6014-C6D6 MC14457P LC7464(AHEA) GEMINI-CM www.avenview.com... -
Page 13: Installation (Sw-Hdm3D-C5-8X8)
Installation (SW-HDM3D-C5-8X8) To setup Avenview SW-HDM3D-C5-8X8 follow these steps for connecting to a device: Matrix Switch Connect all sources to HDMI Inputs on the 8X8 HDMI over CAT5 Matrix Switch (SW-HDM3D-C5-8X8) Connect each HDMI CAT 5/6 output on the SW-HDM3D-C5-8X8 to respective CAT 5/6 input on the... -
Page 14: Operation And Ir Control
HDMI output port #2 OUTPUT 3 HDMI output port #3 OUTPUT 4 HDMI output port #4 OUTPUT 5 HDMI output port #5 OUTPUT 6 HDMI output port #6 OUTPUT 7 HDMI output port #7 OUTPUT 8 HDMI output port #8 www.avenview.com... -
Page 15: Display Side
) button to switch input source in ascending order (1, 2, 3, 4, 5, 6, 7, 8, 1, 2, ..) Left ( ) button to switch input source in descending order (1, 8, 7, 6, 5, 4, 3, 2, 1, 2, ..) www.avenview.com... -
Page 16: Rs232 Serial Port Control
Select the RS232 serial port connected to the machine. And set device ID 255 is for all device. Only the same device id or 255 can get the command you sent. Press OK. Get the new status from the machine you select. www.avenview.com... - Page 17 Release output selection. Select Input1~8-Output: Select Input Source. Then select the output port icon. For example: Select input source 1. Then select output port one and two. The video and audio will be sending to port one and two. www.avenview.com...
- Page 18 The linking line will change to yellow. Group setting First select output ports one by one. Then select the input source. The selected output ports change the setting at the same time. By using Terminal: Baud rate: 9600 Data length: 8bit Parity check: Stop bit: www.avenview.com...
-
Page 19: 1Rs232 Commands
Output H select Input5 Output C select Input2 Output E select Input8 Output H select Input6 Output C select Input3 Output F select Input1 Output H select Input7 Output C select Input4 Output F select Input2 Output H select Input8 www.avenview.com... -
Page 20: Section 2: Specifications
17” x 11” x 1.7” 3.3” x 2.4” x 1” Power Supply 5V 6A DC Most not required 1.5 Watt (max) / provided by Power Consumption 60 Watt (max) SW-HDM3D-C5-8X8 Environmental Operating Temperature 32˚ ~ 104˚F (0˚ to 40˚C) www.avenview.com... -
Page 21: Edid Learning
EDID by pulling both DIP switch pin-1 & pin-2 of SW1 – SW8 up-and-down one more time. 3. Repeat step1 & step2 if you want to learn the EDID of this HDMI display on any other HDMI input ports that have same trouble playing the audio/video properly. www.avenview.com... -
Page 22: Method 2: Use The Front Panel Of The Master Unit
2. Release these two buttons. . The EDID will be read from the receiver unit connected to the display and sent the Output Port then written to all eight Input Channels. 3. If the operation is successful, the Input Channels will show “O” (OK). If the operation is not successful, it will show “F” (failure). www.avenview.com... -
Page 23: Ir Discrete Code
0x5B 0x19 0x07 INPUT 5 INPUT 6 INPUT 7 INPUT 8 0x1B 0x5A 0x1A 0x04 OUTPUT 1 OUTPUT 2 OUTPUT 3 OUTPUT 4 0x0E 0x0D 0x12 0x05 OUTPUT 5 OUTPUT 6 OUTPUT 7 OUTPUT 8 0x1C 0x1D 0x1F 0x1E www.avenview.com... - Page 24 Source 8 0xA7 0xB7 0xC7 0xD7 0xE7 0xF7 0x17 0x27 Using terminal to set Custom Code Example: Set custom code from 0x01 0xEE to 0x13 0x31 >> IR4 -------------- command (using RS-232 terminal command mode) >> IR4 -------------- echo www.avenview.com...
- Page 25 Command Custom Code 0x00 0xFF 0x12 0x21 0x13 0x31 www.avenview.com...
- Page 26 Disclaimer While every precaution has been taken in the preparation of this document, Avenview Inc. assumes no liability with respect to the operation or use of Avenview hardware, software or other products and documentation described herein, for any act or omission of...
Need help?
Do you have a question about the SW-HDM3D-C5-8X8 and is the answer not in the manual?
Questions and answers