Table of Contents
Advertisement
Quick Links
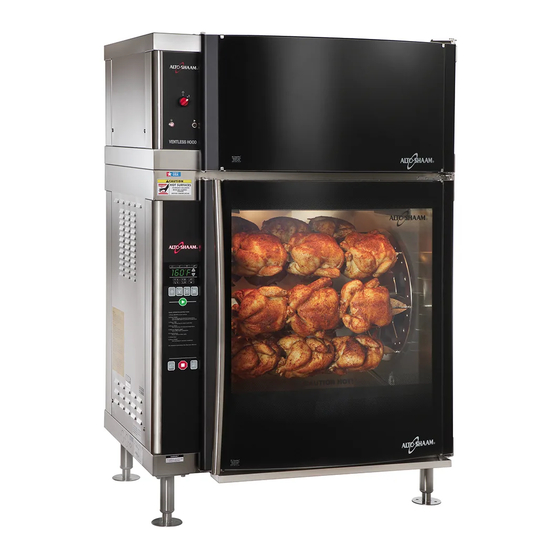
R o t i s s e r i e
E l e c t r i c
Models:
AR-7EVH
ElEctric rOtiSSEriE WitH VENtlESS HOOD
• InstallatIon
• operatIon
• MaIntenance
W164 N9221 Water Street • P.O. Box 450 • Menomonee Falls, Wisconsin 53052-0450 USA
PHONE: 262.251.3800 • 800.558.8744
/
FAX: 262.251.7067 • 800.329.8744
.
.
.
USA
CANADA
U
S
A
ONLY
www.alto-shaam.com
.
.
.
p r i n t e d i n u
s
a
M N - 2 8 9 0 7 • 0 9 / 1 0
Advertisement
Table of Contents

Subscribe to Our Youtube Channel
Related Manuals for Alto-Shaam AR-7EVH


Summary of Contents for Alto-Shaam AR-7EVH
- Page 1 W164 N9221 Water Street • P.O. Box 450 • Menomonee Falls, Wisconsin 53052-0450 USA PHONE: 262.251.3800 • 800.558.8744 FAX: 262.251.7067 • 800.329.8744 CANADA ONLY www.alto-shaam.com p r i n t e d i n u M N - 2 8 9 0 7 • 0 9 / 1 0...
-
Page 2: Table Of Contents
Delivery ..............1 Service Unpacking ..............1 Troubleshooting Guide ........24 Safety Procedures and Precautions ......2 Ventless Hood, Final Floor ......... 25 Ventless Hood, Electrical Assembly ....26 Installation Ventless Hood, Parts List ........27 Installation Requirements ........3 Rotisserie, Bulb Replacement Instructions .. -
Page 3: Delivery
Additional model. Contact the Alto-Shaam Tech Team Service manuals are available from the Alto-Shaam Department if you have any questions concerning Tech Team Service Department. -
Page 4: Safety Procedures And Precautions
safEty procEdurEs and prEcautIons Knowledge of proper procedures is essential to the 1. This appliance is intended to cook, hold safe operation of electrically and/or gas energized or process foods for the purpose of human equipment. In accordance with generally accepted consumption. -
Page 5: Installation
I n s t a l l a t I o n d a n G E r c a u t I o n IMPROPER INSTALLATION, METAL PARTS OF THIS EQUIPMENT ALTERATION, ADJUSTMENT, BECOME EXTREMELY HOT WHEN SERVICE, OR MAINTENANCE COULD IN OPERATION. -
Page 6: Dimension Drawings
I n s t a l l a t I o n s I t E I n s t a l l a t I o n flat glass door double pane curved glass door single pane 39-1/16" (992mm) PASS-THROUGH OPTION PASS-THROUGH OPTION 6"... -
Page 7: Electrical Connection
I n s t a l l a t I o n E l E c t r I c a l c o n n E c t I o n The appliance must be installed by a qualified E lE c t rI c al service technician. -
Page 8: Stacking Combinations & Instructions
I n s t a l l a t I o n Attach tray using two carriage bolts in base panel. Lift tray up and away to remove. d r I p t r a y I n s t a l l a t I o n s t a c k I n G c o M b I n a t I o n s &... - Page 9 I n s t a l l a t I o n s t a c k I n G I n s t r u c t I o n s A rotisserie with ventless hood can be stacked on top of a matching holding cabinet.
-
Page 10: Options & Accessories
I n s t a l l a t I o n o p t I o n s & a c c E s s o r I E s dE sc rI ptI o n p ar t n o . DOOr hanDle HD-26900 DrIp pan,... -
Page 11: Operating Instructions
o p E r a t I n G I n s t r u c t I o n s start-up VENtlESS HOOD 1. Before operating the unit, become familiar with cONtrOl iDENtificatiON the operation of the controls. Read this manual carefully and retain it for future reference. -
Page 12: Rotisserie Control Identification
o p E r a t I n G I n s t r u c t I o n s rotIssErIE control IdEntIfIcatIon Holding Indicator Bar Cook Cycle Indicator Bar Preheat Indicator Bar Product Ready Indicator Bar UP Arrow Key LED Display DOWN Arrow Key Cook Time Indicator Bar 1... -
Page 13: Cooking Procedures - Quick Reference
A R -7 EVH Elec tric Rotiss erie w i th V entl ess Hood Op eration & Care Manual • 11 A R -7 EVH Elec tric Rotiss erie w i th V entl ess Hood Op eration & Care Manual • 11... -
Page 14: Cooking Instructions
o p E r a t I n G I n s t r u c t I o n s c o o k I n G I n t r u c t I o n s Press the ON/OFF key. The on/off indicator light will illuminate. -
Page 15: Hold Only Instructions
o p E r a t I n G I n s t r u c t I o n s h o l d o n l y I n s t r u c t I o n s Hold with rotisserie can be set in the power on hold mode or if the operator wants to stop a cooking procedure but continue holding with rotisserie. -
Page 16: Additional Browning Feature
o p E r a t I n G I n s t r u c t I o n s a d d I t I o n a l b r o w n I n G f E a t u r E The control allows the operator to set a specific period of time for additional browning between the end of the COOK TIME and the illumination of the PRODUCT READY BAR at the end of the cooking cycle. -
Page 17: Preset Menu Key Option
E s E t M E n u k E y o p t I o n The Alto-Shaam rotisserie provides the operator with the ability to set as many as seven cooking programs. Each cooking program can be preset to include all cooking and holding functions. Cooking programs are stored and recalled using the P Keys labeled 1 th r ough 7. -
Page 18: Cool Down
o p E r a t I n G I n s t r u c t I o n s ATTEN TI ON C H I C K E N W H O L E CH IC KE N QUAR TERS After programming a specific product into memory T U R K E Y B R E A S T... -
Page 19: Product Loading
o p E r a t I n G I n s t r u c t I o n s p r o d u c t l o a d I n G STANdARd SpITS Each of the seven rotisserie spits includes two welded prongs on the square end and one welded, ridged prong on the tapered end. -
Page 20: Product Loading
o p E r a t I n G I n s t r u c t I o n s p r o d u c t l o a d I n G STANdARd SpIT Insert whole chickens with the legs toward the square end of the spit. Load up to 3, 3-1/2 lb (1,6 kg) chickens per spit for a total of 21 chickens or 4, 2-1/2 lb (1,1 kg) chickens for a total of 28 whole chickens. -
Page 21: Care And Cleaning
c a r E a n d c l E a n I n G c l E a n I n G a n d p r E V E n t I V E M a I n t E n a n c E protEctInG staInlEss stEEl surfacEs clEanInG aGEnts It is important to guard against corrosion... -
Page 22: Ventless Hood Cleaning And Maintenance
c a r E a n d c l E a n I n G h o o d c l E a n I n G & M a I n t E n a n c E To ensure optimum performance d a n G E r from the ventless hood, it is important to establish and maintain a regular... -
Page 23: Rotisserie Cleaning And Maintenance
c a r E a n d c l E a n I n G r o t t I s s E r I E c l E a n I n G & M a I n t E n a n c E EQuIpMEnt carE Under normal circumstances, this oven should provide you with long and trouble free service. -
Page 24: Daily Gasket Cleaning
c a r E a n d c l E a n I n G d a I l y r o t t I s s E r I E G a s k E t c l E a n I n G It is important to prolong the life of the oven gasket Routine cleaning will help protect the composition of by cleaning this item on a daily basis. -
Page 25: Check Rotisserie Overall Condition
c a r E a n d c l E a n I n G c h E c k o V E r a l l c o n d I t I o n o f t h E r o t I s s E r I E o n c E a M o n t h Check for physical damage and loose screws. -
Page 26: Troubleshooting Guide
s E r V I c E t r o u b l E s h o o t I n G G u I d E Error code description possible cause Cavity air sensor reading < 5°F. Verify sensor integrity. E-10 cavity air sensor shorted See sensor test instructions below. -
Page 27: Ventless Hood, Final Floor
s E r V I c E s E r V I c E V E n t l E s s h o o d , f I n a l f l o o r ( r I G h t h a n d s h o w n ) P a rt n u mb er s a nd d r aw ings ar e s u bj e c t t o c h a n g e w i t h o u t n o t i c e . -
Page 28: Ventless Hood, Electrical Assembly
s E r V I c E s E r V I c E V E n t l E s s h o o d , f I n a l f l o o r & E l E c t r I c a l p a r t s l I s t not shown I tE M d Es c r Ip t Io n... -
Page 29: Ventless Hood, Parts List
s E r V I c E V E n t l E s s h o o d , f u l l a s s E M b l y ( r h , c u r V E d d o o r , p a s s t h r o u G h s h o w n ) Mo d E l >... -
Page 30: Rotisserie, Bulb Replacement Instructions
s E r V I c E r o t I s s E r I E , b u l b r E p l a c E M E n t I n s t r u c t I o n s to replace bulbs: A. -
Page 31: Rotisserie, Final Floor
s E r V I c E r o t I s s E r I E , f I n a l f l o o r ( r I G h t h a n d s h o w n ) P a rt n u mb er s a nd d r aw ings ar e s u bj e c t t o c h a n g e w i t h o u t n o t i c e . -
Page 32: Rotisserie, Final Floor Parts List
s E r V I c E r o t I s s E r I E , f I n a l f l o o r p a r t s l I s t Mo d E l > c u r VE d d o o r fl a t d o o r not shown... - Page 33 s E r V I c E r o t I s s E r I E , f I n a l f l o o r p a r t s l I s t ( c o n t i n u e d not shown Mo d E l >...
-
Page 34: Rotisserie, Full Assembly & Door Assembly
s E r V I c E r o t I s s E r I E , f u l l a s s E M b l y ( c u r V E d d o o r , f l a t b a c k s h o w n ) r o t I s s E r I E , d o o r a s s E M b l y ( c u r V E d d o o r , c o n t r o l s I d E s h o w n ) P a rt n u mb er s a nd d r aw ings ar e s u bj e c t t o c h a n g e w i t h o u t n o t i c e . -
Page 35: Rotisserie, Full & Door Assembly Parts Lists
s E r V I c E r o t I s s E r I E , f u l l a s s E M b l y p a r t s l I s t Mo d E l > c u r VE d d o o r f la t d o o r not shown... -
Page 36: Rotisserie, Interior View
s E r V I c E r o t I s s E r I E , I n t E r I o r V I E w Mo d E l > c u r VE d d o o r f la t d o o r I t EM d E sc r I p t Io n... -
Page 37: Rotisserie, Electrical Service
s E r V I c E r o t I s s E r I E , E l E c t r I c a l s E r V I c E V I E w Mo d E l > c u r VE d d o o r f la t d o o r not shown... -
Page 38: Rotisserie, Replacement Of Glass Door
s E r V I c E s E r V I c E r o t I s s E r I E , r E p l a c E M E n t o f G l a s s d o o r ( f l a t d o o r s h o w n ) “A”... -
Page 39: Rotisserie, Stainelss Steel Back Panel
s E r V I c E r o t I s s E r I E , s t a I n l E s s s t E E l b a c k p a n E l ( 5 0 0 6 2 1 4 ) “A”... -
Page 40: Wire Diagrams Ar-7E, 208-240V, 1Ph
AR- 7 EVH Ele ctr i c R oti sse r ie w it h Ve n tl ess Ho od O pe ra tion & Ca re Ma nu a l • 3 8... - Page 41 AR- 7 EVH Ele ctr i c R oti sse r ie w it h Ve n tl ess Ho od O pe ra tion & Ca re Ma nu a l • 3 9...
- Page 42 AR- 7 EVH Ele ctr i c R oti sse r ie w it h Ve n tl ess Ho od O pe ra tion & Ca re Ma nu a l • 4 0...
- Page 43 A R- 7EVH E lect ri c Rot isse ri e w it h Vent les s H ood Operat ion & Care Ma nual • 4 1...
-
Page 44: Transportation Damage And Claims
This warranty is exclusive and is in lieu of all other warranties, express or implied, including the implied warranties of merchantability and fitness for a particular purpose. In no event shall Alto-Shaam be liable for loss of use, loss of revenue or profit, or loss of product, or for any indirect, special, incidental, or consequential damages.
Need help?
Do you have a question about the AR-7EVH and is the answer not in the manual?
Questions and answers