
Related Manuals for A&D TM-2430


Summary of Contents for A&D TM-2430
- Page 1 TM-2430 TM-2430 RECORDER FOR AMBULATORY RECORDER FOR AMBULATORY BLOOD PRESSURE MONITOR BLOOD PRESSURE MONITOR INSTRUCTION MANUAL Ambulatory Blood Pressure Monitor WM:PD4000136 Rev. 1.1...
- Page 2 This mark informs you about the operation of the product. Note This manual and or the TM-2430 may be changed at any time to improve the product without notice. Windows is the registered trademark of the Microsoft Corporation. Macintosh is the registered trademark of Apple Computer, Inc. EXCEL is the registered trademark of the Microsoft Corporation.
-
Page 3: Table Of Contents
Contents Before use Compliance ----------------------------------------------------------------------------- Definitions ------------------------------------------------------------------------------- Precautions for Use ------------------------------------------------------------------- Notes on the Blood Pressure Recorder------------------------------------------ Welcome Welcome and Introduction ---------------------------------------------------------- Product overview Packing List and Component Names -------------------------------------------- Display ----------------------------------------------------------------------------------- Symbols ---------------------------------------------------------------------------------- Specifications Features --------------------------------------------------------------------------------- Functions and Specifications ------------------------------------------------------- Activating the Recorder Replacing Batteries ------------------------------------------------------------------- 12 Conditions When Recorder Switched On --------------------------------------- 13... -
Page 4: Before Use Compliance
Before use Compliance Compliance with European Directive 93/42 EEC for Medical Products The device conforms to the following requirements: European Directive 93/42 EEC for Medical Products; Medical Products Act; European Standards for Electrical Medical Equip- ment EN 60601-1 (General Safety Provisions), EN 60601-2-30 (Particular Requirements for the Safety of Automatic Cycling Indirect Blood Pressure Monitoring Equipment) , EN 60601- 1-2 and EN 55011 (Electromagnetic Compatibility);... -
Page 5: Precautions For Use
Precautions for Use Precautions Batteries Use alkaline batteries (LR6 type, AA type, Mignon) or suitable Ni-Cd batteries. Do not mix new and used batteries in the recorder. If the recorder will not be used for a long period of time, remove the batteries from the recorder unless there is no risk of a SAFETY HAZARD arising. -
Page 6: Notes On The Blood Pressure Recorder
Notes on the Blood Pressure Recorder Storage Do not store the recorder in the following places. Excessive moisture Excessive heat Direct sun light Excessive vibration Exposure to dust Exposure to corrosive chemicals Magnetic fields Before use Cover the RS-232C terminal using the rubber cap, to avoid dust. Confirm that the recorder works correctly. -
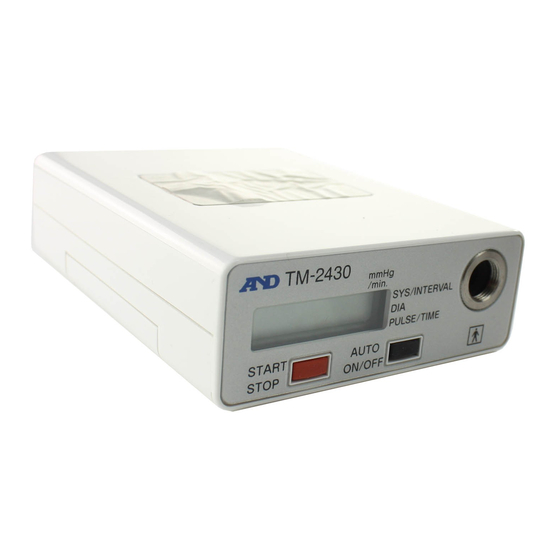
Page 7: Welcome
Welcome Welcome and Introduction Thank you for your Purchase! The A&D TM-2430 ambulatory blood pressure recorder enables you to accurately take a patient's blood pressure, automatically, at different preset times throughout a 24-hour period. Recently, in the treatment of patients with hypertension, there has been an increasing need to prescribe medication according to the particular blood pressure fluctuation pattern of the patient. - Page 8 Yellow mark Shoulder band Air hose Battery cover Adult cuff Auto ON/OFF key for left arm Start Stop key Air hose plug Air socket Carrying case Belt Reset key Power switch RS-232C terminal Alkaline batteries (type LR6, type AA, Mignon) The batteries are not included in this pack.
-
Page 9: Display
Display Sleep sign Auto mode sign SYS/INTERVAL Systolic Blood Low battery sign PULSE/TIME Pressure display Full memory sign Sign Setup sign of Diastolic Blood INTERVAL automatic measurement Pressure display Setup sign of Pulse display display and clock TIME PULSE Error display Clock display ex. -
Page 10: Specifications Features
Specifications Features Portability The recorder weighs approx. 215g (including batteries) and is compact. The recorder is powered by LR6 type (AA) alkaline batteries. It is possible to replace the batteries with Ni-Cd rechargeable batteries. Operation & management Clock and automatic measurement parameters may be set as needed. If you connect to a computer and use the optional software, clock and automatic measurement parameters can be easily set. - Page 11 Automatic measurement AUTO ON/OFF This measurement starts or stops using the key. When this measurement is started, the recorder begins to work in accordance with preset time intervals from the preset time of the internal clock. Refer to "Selection for the automatic measurement". In the automatic measurement, an "A"...
- Page 12 Performance specifications Measurement method Oscillometric Pressurization Display range 320 mmHg Interval measurement 85 ~ 300 mmHg (Fitted) Manual measurement 185 mmHg (Fixed) Measurement range Systolic Blood Pressure 60 ~ 280 mmHg Diastolic Blood Pressure 40 ~ 160 mmHg Pulse rate 30 ~ 200 bpm Accuracy...
- Page 13 Communications/Data Connected to a computer, you can output the data and enter Output parameters. Connected to a printer, you can print the data. Interface Specifications EIA RS-232C, Asynchronous, bi-directional, half duplex Baud rate 9600 bps Data bits 8 bits Stop bits 2 bits X parameter Used (for computer)
-
Page 14: Activating The Recorder Replacing Batteries
Activating the recorder Replacing Batteries Caution When "B" is displayed, the recorder can not take a measurement. Please replace the new batteries before using. If "B" is displayed during the measurement, replace with new batteries at once. Use alkaline batteries or the specified rechargeable batteries for the recorder. Do not mix new and used batteries in the device. -
Page 15: Conditions When Recorder Switched On
Conditions When Recorder Switched On The recorder can be turned on in 3 different modes. When recorder is Condition Actions turned on. The beeper sounds The recorder parameters You can use the re- once and the clock is are stored corder at once. - Page 16 Steps for setting the display and clock This explanation uses the following examples. ex. After reset, The measurement value is not displayed. The clock is adjusted to 1997/ 05/ 27 14:28. START STOP START STOP Step 1 Press and hold the key for approx.
-
Page 17: Selection For The Automatic Measurement
Selection for the Automatic Measurement This setting initializes measurement intervals that is based on the internal 24- hour clock. Mode mode I 07:00 ~ 21:59 The measurement is performed every quarter hour. 22:00 ~ 06:59 The measurement is performed every half hour. AUTO ON/OFF mode II key is pressed at rising and going to bed so that the... - Page 18 Mode III Settings Set up procedure Before you enter into mode III, read the procedure below. Also, refer to the example on the next page for the setting procedure. Each blocks starting time must match the previous blocks finish time. The end of block 6 automatically equalizes to start time of the block 1.
- Page 19 Steps for automatic measurement ex. First block 08:00 ~ 21:59 frequency is 30 minutes Second block 22:00 ~ 05:59 frequency is 60 minutes Third block 06:00 ~ 07:59 frequency is 10 minutes START STOP Step 1 Press and hold the key for approx.
- Page 20 From previous page START STOP Step13 Press the key. The current frequency of the third START STOP block is displayed. AUTO ON/OFF Step14 Press the key so as to display "10" for 10 AUTO ON/OFF minutes as the frequency of the third block. Step15 Press the START STOP...
-
Page 21: Deleting Old Data
Deleting Old Data Caution When the data is to be deleted, confirm that the data has already been transferred and saved. It is not possible to recover data that has been deleted. It is not possible to completely delete data, if the START STOP key is released while the beeper sounds at Step 2. -
Page 22: Preparing The Patient Patient Instructions
Preparing the patient Patient instructions Advise the patient on how to cope with mis-operation and contingencies. Cautions during automatic measurement Patient should relax and be quiet, when the recorder starts inflating the cuff. Minimize noise and movement during the measurements. The recorder displays the patient's blood pressure within one minute after the measurement. -
Page 23: Use Of The Cuff Cover
Use of the cuff cover Step 1 Pass the air hose through the slit. Step 2 Place the cover on the cuff as shown. Link them using the three velcro strips. Velcro Slit Cuff cover Velcro Velcro common use Slit Velcro Air hose Velcro... - Page 24 Step 3 Attach the cuff directly against the skin so that the yellow mark is directly over the brachialis artery and space it one inch above the inside of the elbow and the lower edge of the cuff . Step 4 Wrap the cuff so that the ring is within the slide range, it is flat and does not slip down, but has room to insert two fingers.
-
Page 25: Preparation Of The Carrying Case
Preparation of the Carrying Case Use the belt or shoulder band to attach the carrying case. We recommend the belt be used for added stability. Using the Belt Step 1 Insert the belt into the hole of Carrying case the carrying case. Step 2 Pull the belt from the hole of Step 2... -
Page 26: Operation
Operation Automatic Measurement Caution Automatic measurement uses the internal clock and parameters of automatic measurement. Refer to section "Parameters for the Display and Clock" and "Selection for the automatic measurement" for setting these parameters. AUTO ON/OFF Press and hold the key for approx. -
Page 27: Data Transfer
Data Transfer The recorder transfers data to a printer or computer using the RS-232C terminal. We recommend analysis of the data using the optional "Doctor Pro" analysis software. Caution Cap the RS-232C terminal to prevent dust and foreign matter from entering when this terminal is not in use. - Page 28 Steps for data transmission Setup for Step 1 Enter the parameters into the printer so that the data printer can be transmitted. Connection Step 2 Connect the cable to both the recorder and printer. Then the recorder displays . Refer to "Analy- sis Software and Communication Cable"...
-
Page 29: Data Transmission To A Computer Using Analysis Software
Data Transmission to a Computer Using Analysis Soft- ware Caution The recorder intensely consumes the battery power while connected to the RS-232C cable. Disconnect the cable when not actually transferring data. Maintain the power-on state while transmitting the data so that the data is not damaged. -
Page 30: Options And Accessories Analysis Software And Communication Cables
Options and accessories Analysis Software and Communication Cables The ABPM Data Analysis Software is a powerful tool for analyzing ambulatory blood pressure data. The following features are incorporated in this program: • Statistical Analysis Statistical data may be viewed in full, partial, sleep, and awake periods by switching between clearly labeled tabs. -
Page 31: Cuffs And Other Accessories
Cuffs and Other Accessories Cuffs ( for serial no. M0600001 to M0600500 ) Name Order code Large cuff for left arm, 28 ~ 36 cm (11 ~ 14 inches) TM2430-02 Adult cuff for left arm, 20 ~ 31 cm (18 ~ 12 inches) TM2430-06 Small cuff for left arm, 15 ~ 22 cm (16 ~ 18 inches) -
Page 32: Maintenance Checking Accuracy
Maintenance Checking Accuracy Required equipment ❏ Accurate office mercury sphygmomanometer or aneroid gauge with inflation system. ❏ TM-2430 Accuracy Diagnostic Kit (TM2430-90). ❏ A rigid cylinder sized to fit the cuff pressured. Steps for checking accuracy Step 1 Turn off the TM-2430 and remove the air hose from the unit. Step 2 Construct the check system as this drawing. -
Page 33: Cleaning The Cuff And Recorder
Cleaning the cuff and recorder ❏ Before cleaning the recorder, remove the battery cover and turn the power switch off. Remove the batteries. ❏ The recorder is not water resistant, do not allow liquids to splash on or get into the case while cleaning. -
Page 34: Error Codes
Error codes Caution The error code updates without announcement. Error Meaning Status Operation and Treatment code No clock All parameters are lost. Enter clock parameters. Refer to parameter Reset status. "Setup of display and clock" Pressure zero Release the air from the cuff An error code is displayed error without cuff inflation. - Page 35 Error Meaning Status Operation and Treatment code Repair is necessary because of slow Measurement is Air is exhausted from the inflation or slow constant exhaust. greater than 120 cuff, and an error code is seconds. displayed. Repair is necessary because of slow The constant Air is exhausted from the constant exhaust.
- Page 36 MEMO Page 34...
Need help?
Do you have a question about the TM-2430 and is the answer not in the manual?
Questions and answers