Edirol R-4 Owner's Manual
4-channel portable recorder and wave editor
Hide thumbs
Also See for R-4:
- Brochure & specs (4 pages) ,
- Owner's manual (116 pages) ,
- Specifications (3 pages)
Table of Contents
Advertisement
Owner's Manual
201a
Before using this unit, carefully read the sections entitled: "USING THE UNIT SAFELY" and "IMPORTANT
NOTES" (p. 3– p. 6). These sections provide important information concerning the proper operation of the unit.
Additionally, in order to feel assured that you have gained a good grasp of every feature provided by your new
unit, Owner's Manual should be read in its entirety. The manual should be saved and kept on hand as a
convenient reference.
Copyright © 2005 ROLAND CORPORATION
All rights reserved. No part of this publication may be reproduced in any form
without the written permission of ROLAND CORPORATION.
Advertisement
Chapters
Table of Contents

Related Manuals for Edirol R-4


Summary of Contents for Edirol R-4
- Page 1 Owner’s Manual 201a Before using this unit, carefully read the sections entitled: “USING THE UNIT SAFELY” and “IMPORTANT NOTES” (p. 3– p. 6). These sections provide important information concerning the proper operation of the unit. Additionally, in order to feel assured that you have gained a good grasp of every feature provided by your new unit, Owner’s Manual should be read in its entirety.
-
Page 2: Federal Communications Commission Radio Frequency Interference Statement
Apparatus containing Lithium batteries ADVARSEL! Lithiumbatteri - Eksplosionsfare ved fejlagtig håndtering. Udskiftning må kun ske med batteri af samme fabrikat og type. Levér det brugte batteri tilbage til leverandøren. ADVARSEL Eksplosjonsfare ved feilaktig skifte av batteri. Benytt samme batteritype eller en tilsvarende type anbefalt av apparatfabrikanten. - Page 3 USING THE UNIT SAFELY Used for instructions intended to alert the user to the risk of death or severe injury should improperly. Used for instructions intended to alert the user to the risk of injury or material damage should the unit be used improperly.
- Page 4 • In households with small children, an adult should provide supervision until the child is capable of following all the rules essential for the safe operation of the unit. • Protect the unit from strong impact. (Do not drop it!) •...
-
Page 5: Important Notes
Memory Backup 501b • The R-4 contains a battery that keeps the internal clock running even when the power is turned off. When this battery runs low, the message shown below will appear in the display. -
Page 6: Emergency Procedures
Important Notes 558a • To avoid disturbing your neighbors, try to keep the unit’s volume at reasonable levels. You may prefer to use headphones, so you do not need to be concerned about those around you (especially when it is late at night). 559a •... -
Page 7: Table Of Contents
Introducing the R-4 ... 9 The R-4’s controls and connectors ...9 Display...18 What is a project? ...21 Getting ready to use the R-4 ... 23 Basic connection examples ...23 Connecting the AC adaptor and turning the power on ...24 Installing batteries and turning the power on ...25... -
Page 8: Carrying Case
■ AC adaptor This AC adaptor is designed specifically for the R-4. Do not attempt to use any other adaptor with the R-4. “Connecting the AC adaptor and turning the power on” (p. 24) ■ USB cable (1 meter) You can use this cable to connect the R-4 to the USB connector of your computer. -
Page 9: Introducing The R-4
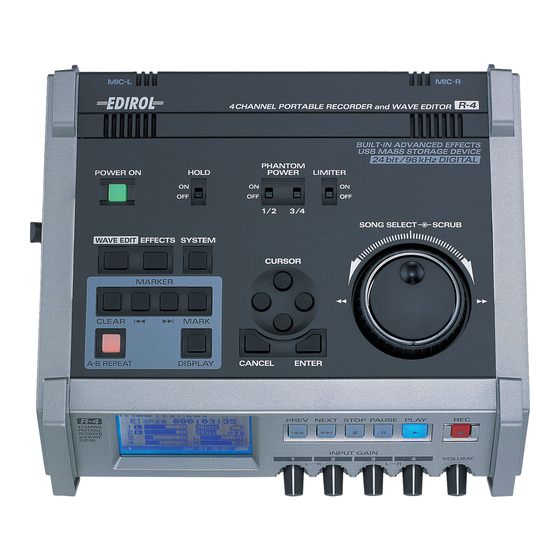
* The hard disk may be damaged if you turn off the power of the R-4 while data is being read from or written to the hard disk (such as during recording or playback). You must also be careful not to turn off the power while data is being transferred between the hard disk and the CompactFlash card. - Page 10 Introducing the R-4 fig.panel-1.eps_50 Hold switch [HOLD] By selecting the HOLD ON position, you can disable the panel buttons so that unwanted operations will not occur if a button is pressed accidentally. However, even if this switch is set to HOLD ON, the phantom power switches input level select switches operable.
- Page 11 This button takes you to Wave Edit mode, where you can edit the waveform using operations such as Trim, Divide, Combine, and Merge. For details, refer to “Editing” (p. 48). You won't be able to enter Wave Edit mode during playback or recording, or if the R-4’s hard disk contains no files that the R-4 can handle.
- Page 12 Introducing the R-4 fig.panel-1.eps_50 Cursor/Monitor Select buttons [CURSOR/MONITOR SELECT] Use these buttons to select items shown in the display. When you’re in the main screen, you can press the up/down buttons to select the channel that you want to monitor.
-
Page 13: Front Panel
Recording will begin immediately when you press the REC button. The REC button is lit red during recording. If you hold down the PAUSE button and press the REC button, the REC button will blink red, and the R-4 enters recording-standby mode. Recording will begin when you then press the REC button or PAUSE button. -
Page 14: Cord Hook
Memory card slot [MEMORY CARD] You can insert a CompactFlash card into this slot. Projects you record on the R-4 can be copied to a CompactFlash card for backup or to transfer them to a computer. The R-4 is able to use only TYPE 1 CompactFlash memory cards. Microdrive cards are not supported. -
Page 15: Grounding Terminal
Headphone jack [PHONES] Connect a set of headphones to this jack. Use the monitor level knob ( connect headphones, sound will not be heard from the internal speakers ( Introducing the R-4 ) to adjust the volume. If you... -
Page 16: Side Panel (Right)
Introducing the R-4 Side panel (right) fig.panel-3.eps_50 Input level select switches Set these switches to either the MIC or LINE position depending on the type of device connected to channels 1/L and 2/R or channels 3/L and 4/R. If a mic is connected... -
Page 17: Battery Compartment
Be sure to observe the correct polarity when installing the batteries. If you’re using the AC adaptor, there’s no need to install batteries. Make sure to switch off the R-4’s power before you change from AC adaptor operation to battery operation, or vice versa. -
Page 18: Display
Introducing the R-4 Display While playing or stopped The main screen The R-4’s main screen provides information about the project and the operational status of the R-4. You can press the [DISPLAY] button to switch the contents of the display. fig.play-disp.eps Time... -
Page 19: The Mixer Screen
From the left, the level meter is calibrated at -36, -24, -12, and -6 dBFS. Indicates how power is being supplied to the R-4. The plug icon is shown if power is being supplied by the AC adaptor, and the battery icon is shown if power is being supplied by batteries. -
Page 20: The Main Screen
Introducing the R-4 While recording The main screen The R-4’s main screen provides information about the project and the operational status of the R-4. You can press the [DISPLAY] button to switch the contents of the display. Time counter Time counter... -
Page 21: What Is A Project
What is a project? On the R-4, the data that you record and play back is handled as “projects.” On the hard disk, each project actually consists of a folder with one or more files, in the structure shown below. - Page 22 Limitations on file size The R-4 can handle files up to 2 GB in size. If the file size reaches 2 GB during recording, the file will be closed. Then, a new file will be created and recording will continue. When you finish recording, these files will appear as separate projects.
-
Page 23: Getting Ready To Use The R-4
Getting ready to use the R-4 Basic connection examples Before you make connections to other equipment, turn down the volume of all your equipment and turn off the power to prevent malfunctions or speaker damage. fig.basic.eps Digital connections Equipment that has a digital input jack MD player for recording/Amplified speakers, etc. -
Page 24: Connecting The Ac Adaptor And Turning The Power On
Turning the power on Connect the DC plug of the AC adaptor to the AC adaptor jack located on the left side panel of the R-4. * Use only the included AC adaptor. Plug the AC adaptor into an AC power outlet. -
Page 25: Installing Batteries And Turning The Power On
(The R-4 cannot recharge nickel metal-hydride batteries. You’ll need to use a separate charger.) * You must set the R-4’s System Settings menu item “5 System Setup” (p. 63) to specify the type of batteries you’ve installed. The R-4 will not operate correctly if you’ve specified a battery type that does not match the batteries you’ve actually installed. -
Page 26: Battery Life
Getting ready to use the R-4 Battery status indication If you’re using the R-4 on battery power, a battery icon is shown in the lower right of the display. As the battery runs down, the battery icon will change as follows. -
Page 27: Recording
Recording Recording from a connected mic Here’s how to record an audio source from a mic connected to the R-4’s combo input jack. fig.mic-1.eps Turn this ON if you're using a condenser mic. ● Connections Connect your mic to the combo input jack. - Page 28 Adjusting the input level Hold down the [PAUSE] button and press the [REC] (record) button. The R-4 will enter recording-standby mode. In recording-standby mode, the [REC] (record) button will blink, and the display will indicate REC STANDBY. Play sound into the microphone at the actual volume that you expect to record.
-
Page 29: Other Settings
In the worst case, irreparable damage may occur. Please be careful not to subject the R-4 to strong impact or continued vibration while using it. The following actions will cause malfunctions •... -
Page 30: Recording From The Internal Mics
Recording Recording from the internal mics Here’s how to record an audio source via the R-4’s internal mics. ● Phantom power switch Turn this OFF. fig.input-intmic.eps ● System settings Press the R-4's [SYSTEM] button. In 1 Recording Setup, set Input Select to Int-Mic. -
Page 31: Recording Digital Audio From A Digital Device
* For more about system settings, refer to “System settings” (p. 60). * The R-4 is not able to synchronize to the clock signal of the digital input connector. Regardless of the sampling frequency that is being input, the incoming digital audio data will be converted to the sampling frequency (Rec Freq.) and sample size (Rec Bit) that are specified in Recording Setup. -
Page 32: Recording Analog Audio
Recording Recording analog audio Here’s how to record from an audio device connected to the R-4’s combo input jacks. fig.LINE-1.eps Phantom power is not required, so turn this OFF Adjust the input level Raise slowly ● Connections Connect your audio device to the combo input jacks. - Page 33 ● Input level knobs Adjust the input level 1 (L) and 2 (R) knobs. If there are channels to which you have not connected anything, turn their input level knobs to the minimum position. Refer to “Adjusting the input level” (p. 28). ●...
-
Page 34: Playing Back
Next, switch on your speakers, and gradually increase the volume to the desired level. * The R-4 does not provide a way to adjust the volume of the audio that is output from its line output jacks. Connecting a mixer or other analog device (analog connection: line output jacks) Here’s how to connect a mixer or other audio device that has line input jacks. - Page 35 * You’ll need a separately available coaxial-type cable (not included) for connecting the R-4’s digital output jack to your digital device. Switch on the R-4’s power. Next, switch on your MD recorder. * The R-4 does not provide a way to adjust the volume of the digital audio signal. Playing back...
-
Page 36: Settings Before Playback
Playing back Settings before playback Player Setup fig.recording-1.eps Press the R-4’s [SYSTEM] button. The system menu screen appears in the display. fig.player-setup2.eps Use the [CURSOR] buttons to choose 2 Playing Setup, and press the [ENTER] button. The Recording Setup screen appears. - Page 37 Speaker You can use the R-4’s built-in speakers to monitor the sound without having to connect headphones or other equipment. fig.recording-1.eps Press the R-4’s [SYSTEM] button. The system menu screen appears in the display. fig.speaker-on.eps Use the [CURSOR] buttons to choose 3 Speaker Switch, and press the [ENTER] button.
-
Page 38: Playing Back
Playing back Playing back Normal playback After you’ve performed the steps described in “Connections before playback” (p. 34) and “Settings before playback” (p. 36), proceed as follows. Select the project that you want to play. In the main screen, press the [ENTER/FINDER] button. In the Finder screen that appears, use the up/ down [CURSOR] buttons and the [SCRUB] dial to select a project. - Page 39 Mark You can assign markers at desired locations in a project. Then you can use the button to move backward or forward to the location of a marker. You can use the Mark function either while playing or while recording. Use the [NEXT] button or the [SHUTTLE] dial to find the location at which you want to assign a marker.
-
Page 40: Please Note
Playing back Repeat playback (A-B REPEAT) You can repeatedly play back between two points (A-B) in the project. Simply assign points A and B during playback, and the playback will repeat between points A and B. fig.repeat-a Play back the project. During playback, press the [A-B REPEAT] button once. -
Page 41: The Finder Screen
The Finder screen The R-4 saves projects as files on its internal hard disk. If there are numerous folders or projects within folders, you can use the Finder screen to select the project that you want to play. In this screen you can also perform operations such as deleting an unwanted project or copying a project to a CompactFlash card. -
Page 42: Deleting A Project (Delete)
The Finder screen Deleting a project (Delete) fig.finder-1.eps With the main screen shown in the display, press the [ENTER/ FINDER] button. The Finder screen shown in the illustration will appear. Projects are shown in descending alphabetical order. fig.finder-select.eps In the Finder screen, use the [CURSOR] up/down buttons or the [SCRUB] dial to select the project you want to delete. -
Page 43: Renaming A Project (Rename)
Renaming a project (Rename) fig.finder-1.eps With the main screen shown in the display, press the [ENTER/ FINDER] button. The Finder screen shown in the illustration will appear. Projects are shown in descending alphabetical order. fig.finder-select.eps In the Finder screen, use the [CURSOR] up/down buttons or the [SCRUB] dial to select the project you want to rename. -
Page 44: Copying A Project (Copy)
The Finder screen Copying a project (Copy) fig.finder-1.eps With the main screen shown in the display, press the [ENTER/ FINDER] button. The Finder screen shown in the illustration will appear. Projects are shown in descending alphabetical order. fig.finder-select.eps In the Finder screen, use the [CURSOR] up/down buttons or the [SCRUB] dial to select the copy-source project (the project you want to copy). -
Page 45: Moving A Project (Move)
Moving a project (Move) * You can’t move a project between the hard disk and the CompactFlash card. If you need to do this, you can first copy the project, and then delete the copy-source project. fig.finder-1.eps With the main screen shown in the display, press the [ENTER/ FINDER] button. -
Page 46: Creating A New Folder (Make Folder)
The Finder screen Creating a new folder (Make Folder) fig.finder-1.eps With the main screen shown in the display, press the [ENTER/ FINDER] button. The Finder screen shown in the illustration will appear. Projects are shown in descending alphabetical order. fig.finder-make1.eps In the Finder screen, use the [CURSOR] up/down buttons or the [SCRUB] dial to select HD (hard disk) located at the top level. - Page 47 The Finder screen fig.new-folder.eps A folder named NewFolder will be created. Projects are shown in alphabetical order, and folders are shown in alphabetical order after the projects. Use the [CURSOR] up/down or the [SCRUB] dial to verify that the new folder was created. If an identically named folder already exists, a number will be added to the name of the newly created folder;...
-
Page 48: Editing
Editing Projects you record using the R-4 can be edited directly on the R-4. Editing command Trim Divide Combine Merge * Executing any of these editing commands will leave the original project file unchanged. * There is no Undo function. - Page 49 fig.wave-4.eps In the same way, move to the end (point want to extract, and press the [ENTER] button. * The value of point is shown in terms of samples (data). fig.wave-trim2.eps fig.wave-5.eps A screen asking you to confirm the specified points will appear. fig.wave-6.eps If you are satisfied with the points you specified, press the [ENTER] button to confirm the settings.
- Page 50 You can perform playback, stop, or operate the scrub dial and shuttle dial even while using this command. However, you cannot perform A-B Repeat or marker-related operations. fig.wave2-1.eps Press the R-4’s [WAVE EDIT] button. The Wave Edit Menu screen appears in the display. Use the [CURSOR] buttons to choose 2 Divide, and press the [ENTER] button.
- Page 51 fig.wave-divide.eps The divided project will be saved as two new projects with the same name as the original project but with “-1” and “-2” appended to the names. The original project will remain unchanged. For example, if the original project is named Project, the new projects will be named Project-1 and Project-2.
- Page 52 In the main screen, use the [NEXT] button or [PREV] button to select the desired project. Alternatively, you can use the cursor buttons in the Finder screen. fig.wave3-1.eps Press the R-4’s [WAVE EDIT] button. The display shows the Wave Edit Menu screen. Use the [CURSOR] buttons to choose 3 Combine, and press the [ENTER] button.
- Page 53 fig.wave-combine.eps The combined projects will be saved as a new project with the same name as the original project but with “-1” appended to it. The original project will remain unchanged. For example, if the original project is named Project, the new project will be named Project-1.
- Page 54 * Since MONO x1, STEREO x1, or 4 ch. projects cannot be merged, the Merge command will not appear in the menu if you’ve selected this type of project. fig.merge-1.eps Press the R-4’s [WAVE EDIT] button. The Wave Edit Menu screen will appear. Use the [CURSOR] buttons to choose 4 Merge, and press the [ENTER] button.
-
Page 55: Effects Setting
Effects setting The R-4 provides five types of effects. You can apply an effect to the incoming sound as it’s being recorded, or you can apply an effect to the playback. You can also change the effect settings for each channel. -
Page 56: Effects
Effects setting Effects 1: 3-Band EQ Parameter Range of values name LOW GAIN -12dB–0dB–+12dB 200Hz, 250Hz, 315Hz, 400Hz, 500Hz, 630Hz, 800Hz, 1kHz, 1.25Hz, MID FREQ. 1.6kHz, 2kHz, 2.5kHz, 3.15kHz, 4kHz, 5kHz, 6.3kHz MID Q 0.5, 1.0, 2.0, 4.0, 8.0 MID GAIN -12dB–0dB–+12dB HIGH GAIN -12dB–0dB–+12dB... - Page 57 4: Enhancer Parameter Range of values name SENSE 0–100 0–100 LEVEL 0–120 5: Comp&DeEsser Parameter Range of values name DE-ESSER OFF, ON THRESHOLD 0–100 1.0:1, 1.2:1, 1.5:1, 2.0:1, 2.8:1, RATIO 4.0:1, 8.0:1, 16.0:1, Inf:1 ATTACK 0.25–100ms RELEASE 50–5000ms -6.0dB–+18.0dB GAIN (The value will change in steps of 0.5dB) LEVEL...
-
Page 58: Using Effects
Effects setting Using effects You can adjust the R-4’s effects not only while standing-by for recording or playback, but also while you listen to the sound during actual playback or recording. This section explains how to adjust the effect settings while playing back or in recording-standby mode. - Page 59 Each effect has various settings (“parameters”) that you can adjust to alter the character of the effect. The settings you make are remembered even while the R-4’s power is switched off. However, if you change the effect type, these settings will be reset to the default values.
-
Page 60: System Settings
System settings Here you can make various settings that apply to the entire system of the R-4 as a whole, such as basic settings for recording or playback. Menu item Recording Setup Player Setup Speaker LCD Setup System Setup Date & Time... - Page 61 Rec Freq. Rec Bit Pre Record- OFF, 1–29 * The R-4 consumes power even during pre-recording. If you’re running on bat- teries, you’ll need to pay attention to the remaining battery amount. This selects the structure of the project file that is created when you record.
-
Page 62: Lcd Setup
Specifies the time after which the display backlight will be turned off when the R-4 has not been operated for a certain length of time. If you’re operating the R-4 on battery power, use this setting to conserve battery life. -
Page 63: System Setup
Name to Name 1–8. Available characters (space) !#$%&'()+,-.01234546789;=@ ABCDEFGHIJKLMNOPQRSTUVWXYZ[]^_` abcdefghijklmnopqrstuvwxyz{} 8 HDD Utility Here you can execute various utility commands with respect to the R-4’s internal hard disk. You can’t execute HDD Utility commands during recording or playback. Command Format Check Function Set this to the type of batteries you’re using. -
Page 64: Factory Reset
System settings 9 CF Utility Here you can execute various utility commands with respect to a CompactFlash card inserted on the R-4. You can’t execute CF Utility commands during recording or playback. Command Format Check 10 Factory Reset This command resets the following settings to their factory-set state. You can’t execute Factory Reset during recording or playback. -
Page 65: Example Operations
Player Setup Speaker LCD Setup System Setup fig.recording-1.eps Press the R-4’s [SYSTEM] button. The system menu screen appears in the display. fig.recording-2.eps Use the [CURSOR] buttons to choose 1 Recording Setup, and press the [ENTER] button. The Recording Setup screen appears. -
Page 66: Date And Time Settings
System settings Date & Time settings fig.recording-1.eps Press the R-4’s [SYSTEM] button. The system menu screen appears in the display. fig.data-1.eps Use the [CURSOR] buttons to choose 6 Date & Time, and press the [ENTER] button. The Date & Time screen appears. -
Page 67: Project Name Settings
Project Name settings fig.pj-name1.eps Press the R-4’s [SYSTEM] button. The system menu screen appears in the display. fig.pj-name2.eps Use the [CURSOR] buttons to choose 7 Project Name, and press the [ENTER] button. The Project Name screen appears. fig.pj-name3.eps Use the [CURSOR] buttons to choose the Name you want to edit, and press the [ENTER] button. - Page 68 As an example, we’ll show how to execute HD Utility commands. You can also use the same procedure to execute CF Utility commands. fig.hd-uti1.eps Press the R-4’s [SYSTEM] button. The system menu screen appears in the display. fig.hd-uti2.eps Use the [CURSOR] buttons to choose 8 HDD Utility, and press the [ENTER] button.
- Page 69 Executing Factory Reset (Restoring the factory settings) fig.Fact-uti1.eps Press the R-4’s [SYSTEM] button. The system menu screen appears in the display. fig.fact-reset.eps Use the [CURSOR] buttons to choose 10 Factory Reset, and press the [ENTER] button. The Factory Reset screen appears.
-
Page 70: Appendix
• Some models or makes of CompactFlash card may not work correctly with the R-4. • Microdrives cannot be used. * Don’t insert or remove a CompactFlash card while it is being accessed. Doing so may damage the data in the R-4 or in the CompactFlash card, and may damage the card itself. -
Page 71: Inserting And Removing A Card
Open the [MEMORY CARD] slot cover, press the eject button, and remove the CompactFlash card. Formatting a CompactFlash card Before you use a CompactFlash card with the R-4, you’ll need to format the card. For the formatting procedure, refer to page 68 of “Executing HDD Utility or CF Utility commands” (p. 68). -
Page 72: Connection To A Computer
Using battery power will not cause a malfunction, but we recommend that you always use the AC adaptor to prevent damage to the contents of the hard disk, which could occur if the batteries fail while the R-4 is connected to your computer. - Page 73 Close all software and windows (such as Explorer) that are referencing the R-4’s hard disk. * If any software or windows (such as Explorer) that are referencing the R-4’s hard disk are open when you close the USB connection between your computer and the R-4, an error will occur and the connection will not be closed correctly.
-
Page 74: Connecting A Video Device That Has A Lanc Connector
You can connect the R-4’s L connector to a video device that has a LANC connector, and make the R-4 operate in synchronization with the video device. * The R-4 does not record or synchronize to time code. Also, the recording time on the video device and the recording time on the R-4 may drift during long recordings. -
Page 75: Application Guide
Application guide Before you record using the R-4, you’ll need to make a variety of settings so it’s set up in a way that’s appropriate for your recording situation and purposes. This section gives several actual examples of applications. For details on connections refer to “Recording”... -
Page 76: Recording Birdsongs Outdoors
Application guide Recording birdsongs outdoors Here are basic settings for recording birdsongs or similar sounds outdoors. Since you’ll need to run on batteries outdoors, the settings take power conservation into account. ■ Panel settings Input level select switch Phantom power switch ■... -
Page 77: Recording Audio While Shooting Video
Recording audio while shooting video Here are the basic settings for using the R-4 to record audio while you’re shooting video. If you’re recording outdoors, the settings for “Recording birdsongs outdoors” (p. 76) can be used in this case as well, but other settings specific to video will also be necessary. -
Page 78: Simultaneously Recording Environmental Sounds (Ambience)
Simultaneously recording environmental sounds (ambience) You can take advantage of the R-4’s ability to record four channels simultaneously. You might use channels 1 and 2 to record the stage performance via line inputs, and channels 3 and 4 to record the sounds of the room or audience via mics. -
Page 79: File-Sys Error
Messages This section explains the most important messages that may appear in the R-4’s display Message Status Int-Batt Low! The internal battery has run low. The internal battery must be replaced. If it runs low, the internal clock will become inaccurate. Please contact one of the service locations list- ed on the warranty card to have the battery replaced. -
Page 80: Troubleshooting
If you’ve recorded via the internal mics, you may hear metallic, mechanical clicks in the recording. These sounds are the operating noises of the R-4’s internal hard disk. Due to how the R-4 is constructed, the hard disk operating sounds may affect the recording. - Page 81 Pan (stereo image) is not recorded correctly If the limiter is turned on, it will respond to the levels of each channel, meaning that when the level of a sound located toward the right (or left) side increases, the limiter for that channel will limit the volume. If you’re recording in stereo, the result will be that the left and right volume difference will diminish, causing the pan (stereo image) to move toward the center.
-
Page 82: Playback-Related Problems
A skip of several seconds occurs in the project playback If the R-4 is subjected to vibration or impact, writing to the hard disk may not occur in time, meaning that that portion of sound will not be recorded. When you listen to the recorded project, the time count during playback will not skip, but there will be a skip of several seconds in the sound of the project. -
Page 83: Problems With The R-4'S Operation
Device connected to the L connector does not work correctly The R-4’s L connector is only for reception. You cannot connect it to a controller that requires transmission functionality or power supply, and use it to operate the R-4. -
Page 84: Main Specifications
Main specifications Recorder Part ● Channels ● Signal Processing AD/DA Conversion: 24 bits Sampling Frequency: 44.1/48/96 kHz ● Data Type Format: Sampling Frequency: 44.1/48/96 kHz Bit Depth: 16/24 bits Audio Input and Output Part ● Analog Inputs Channel 1–4: XLR type (phantom powered), 1/4 inch TRS phone type (balanced/unbalanced) Internal Microphone (Stereo) ●... -
Page 85: Effect Unit Part
Other Input/Output Part ● USB Interface B Type Connector Supports USB 1.1 and 2.0 Mass Storage Device Class. ● CompactFlash Slot Supports Type I only. Effect Unit Part Effect Type: 3-BAND SHELVING EQ, 6-BAND GRAPHIC EQ, NOISE GATE, ENHANCER, COMPRESSOR AND DE-ESSER, NO EFFECT Control •... -
Page 86: Block Diagram
Block diagram... -
Page 87: Deutsch
Deutsch Beschreibung des R-4 ... p. 88 Français PrésentatioFrancaisn du R-4 ... p. 94 Italiano Presentazione dell’R-4 ... p. 100 Español Presentación del R-4 ... p. 106... -
Page 88: Beschreibung Des R-4
* Die Festplatte kann beschädigt werden, wenn Sie das R-4 ausschalten, während Daten auf der Festplatte gespei- chert oder von ihr gelesen werden (wie dies bei Aufnahme oder Wiedergabe der Fall ist). Außerdem darf das R-4 während der Datenübertragung von der Festplatte auf die CompactFlash-Karte nicht ausgeschaltet werden. - Page 89 Sie unter “Editing” (S. 48). Sie können den Wave-Edit-Modus nicht aufrufen, wenn auf der Festplatte des R-4 keine Dateien gespei- chert sind, die das R-4 verarbeiten kann. WAV-Dateien sind die einzigen Dateitypen, die das R-4 verarbei- ten kann. Effekt-Taste (EFFECTS) Details finden Sie unter “Effects setting”...
- Page 90 Beschreibung des R-4 Display-Taste (DISPLAY) Mit dieser Taste wird der Anzeigeinhalt des R-4 gewechselt. Details hierzu finden Sie unter “Display” (S. 18). Cursor/Monitor Auswahltasten (CURSOR / MONITOR SELECT) Mit diesen Tasten wählen Sie, was im Display angezeigt wird. Wenn Sie sich in der Hauptanzeige befinden, können Sie mit den Tasten AUF/AB den Kanal wählen, den Sie sehen möchten.
- Page 91 Aufnahme rot. Wenn Sie die PAUSE-Taste gedrückt halten und gleichzeitig die REC-Taste drü- cken, blinkt die REC-Taste rot und zeigt die Aufnahmebereitschaft des R-4 an. Die Aufnahme erfolgt un- mittelbar, wenn Sie dann die REC-Taste oder die PAUSE-Taste drücken.
- Page 92 Mit einem Mini-Stereokabel können Sie diesen Anschluss mit einem Videogerät verbinden, dass einen LANC-Anschluss hat. Wenn Sie mit dem Videogerät aufzeichnen, nimmt das R-4 parallel ebenfalls auf. Wenn Sie die Aufzeichnung am Videogerät anhalten, stoppt das R-4 ebenfalls die Aufnahme.
-
Page 93: Rechte Seite
Unterseite Batteriefach Legen Sie hier bitte Batterien ein, wenn Sie das R-4 netzunabhängig nutzen möchten. Wenn Sie das Netz- gerät anschließen, benötigen Sie keine Batterien. Bitte schalten Sie das R-4 aus, bevor Sie von Netzbetrieb zu Batteriebetrieb oder umgekehrt wechseln. -
Page 94: Présentation Du R-4
* La mise hors tension du R-4 pendant une phase d’accès au disque dur (par exemple pendant l’enregistrement ou la lecture) est susceptible d’endommager celui-ci. Veiller également à ne pas mettre l’appareil hors tension pendant le transfert de données entre le disque dur et la carte CompactFlash. - Page 95 Il est impossible d’entrer en mode Wave Edit lorsque le disque dur ne contient pas de fichiers susceptibles d’être pris en charge par le R-4. Seuls les fichiers au format WAV sont pris en charge par le R-4. Touche d’effets (EFFECTS) Pour plus de détails, voir le “Effects setting”...
- Page 96 PrésentatioFrancaisn du R-4 Touche d’affichage (DISPLAY) Cette touche commute les différents menus de l’écran du R-4. Pour plus d’informations, voir “Display” (p. 18). Touches Curseur/Sélection du moniteur (CURSOR / MONITOR SELECT) Ces touches permettent de sélectionner les éléments affichés. Dans le menu principal, une pression sur les touches haut/bas permet de sélectionner le canal à...
-
Page 97: Face Avant
L’enregistrement débute dès que la touche REC est enfoncée. La touche REC devient rouge durant l’en- registrement. En appuyant sur la touche PAUSE et sur la touche REC, la touche REC devient rouge et le R-4 passe en mode pause. Pour reprendre l’enregistrement, appuyer sur la touche REC ou la touche PAUSE . -
Page 98: Panneau Latéral (Gauche)
Un câble de type mini stéréo peut être utilisé pour brancher cet équipement à un équipement vidéo dispo- sant d’un connecteur LANC. Le R-4 se met à enregistrer en tandem au moment où l’équipement vidéo dé- bute l’enregistrement. De même, le R-4 arrête l’enregistrement en même temps que l’équipement vidéo. -
Page 99: Panneau Latéral (Droit)
Face inférieure Logement des piles Si le R-4 doit fonctionner sans être branché sur le secteur, insérer les piles dans le compartiment prévu à cet effet. Il n’est pas utile d’installer des piles lorsqu’un adaptateur AC est utilisé. Veiller à mettre le R-4 hors tension pour passer d’une alimentation par adaptateur AC au mode piles et vice versa. -
Page 100: Presentazione Dell'r-4
* Il disco fisso potrebbe risultare danneggiato nel caso in cui l’R-4 sia spento durante la lettura o la scrittura di dati sul disco fisso (come durante la registrazione o la riproduzione). Fare inoltre attenzione a non spegnere l’apparecchio durante il trasferimento dei dati tra il disco fisso e la scheda CompactFlash. - Page 101 Trim, Divide, Combine e Merge. Per maggiori informazioni fare riferimento alla sezione “Editing” (p. 48). Non è possibile attivare il Wave Edit mode se il disco fisso dell’R-4 non contiene nessun file compatibile con l'R-4. I file WAV sono l’unico tipo di file compatibili con l’R-4.
- Page 102 Presentazione dell’R-4 Pulsante display (DISPLAY) Questo pulsante cambia il contenuto di ciò che viene visualizzato sul display dell’R-4. Per maggiori informazioni fare riferimento alla sezione “Display” (p. 18). Pulsanti cursor/monitor select (CURSOR / MONITOR SELECT) Utilizzare questi pulsanti per selezionare le voci visualizzate sul display. Dalla schermata principale è...
-
Page 103: Pannello Frontale
Se si tiene premuto il pulsante PAUSE e si preme il pulsante REC, il pulsante REC si illumina di rosso e l'R-4 entra in modo standby di registrazione. La registrazione verrà avviata alla pressione del pulsante REC oppure del pulsante PAUSE. -
Page 104: Pannello Laterale (Sinistro)
È possibile utilizzare un cavo stereo tipo mini per il collegamento ad un dispositivo video dotato di connettore LANC. Quando si avvia la registrazione sul dispositivo video, l’R-4 avvierà la registrazione in serie. Quando si termina la registrazione sul dispositivo video, anche l’R-4 terminerà la registrazione. -
Page 105: Pannello Inferiore
Pannello inferiore Vano batterie Inserire le batterie in questo vano se si desidera alimentare l’R-4 mediante batterie. Se si utilizza l’adattatore AC, non è necessario inserire le batterie. Assicurarsi di avere spento l’R-4 prima di passare dall’alimentazione con l’adattatore AC all’alimentazione a batterie o viceversa. -
Page 106: Presentación Del R-4
* El disco duro puede sufrir daños si apaga la alimentación del R-4 mientras se están leyendo datos del disco duro o bien se están escribiendo datos en él (como durante la grabación o la reproducción). También deberá tener cuidado para no apagar la alimentación mientras se están transfiriendo datos entre el disco duro y la tarjeta CompactFlash. - Page 107 (fusionar). Para obtener más detalles, consulte “Editing” (pág. 48). No podrá acceder al modo Wave Edit (modificación de onda) si el disco duro del R-4 no contiene archivos que admita el R-4. Los archivos WAV son el único tipo de archivo que admite el R-4.
- Page 108 Presentación del R-4 Botón de la pantalla (DISPLAY) Con este botón se cambia el contenido de la pantalla de la unidad R-4. Para obtener más detalles, consulte “Display” (pág. 18). Botones de selección del cursor y del monitor (CURSOR / MONITOR SELECT) Utilice estos botones para seleccionar elementos que aparezcan en la pantalla.
-
Page 109: Panel Frontal
Si mantiene pulsado el botón PAUSE (pausa) y pulsa el botón REC (grabar), el botón REC (grabar) parpadeará en rojo, y el R-4 pasa al modo de grabación interrumpida. La grabación comenzará cuando pulse el botón REC (grabar) o el botón PAUSE (pausa). - Page 110 Puede utilizar un cable estéreo mini para conectarlo a un dispositivo de vídeo que esté equipado con un conector LANC. Al comenzar la grabación en el dispositivo de vídeo, el R-4 comenzará a grabar también. Cuando detenga la grabación en el dispositivo de vídeo, el R-4 también detendrá la grabación.
-
Page 111: Panel Inferior
Panel inferior Compartimento de las pilas Coloque las pilas en este lugar si desea que el R-4 funcione con pilas. Si está utilizando el adaptador de CA, no es necesario instalar las pilas. Asegúrese de que apaga el R-4 antes de cambiar la alimentación con el adaptador de CA a la alimentación con pilas y viceversa. -
Page 112: Index
Index Numerics 3-Band EQ ... 56 4CH ... 22 A-B REPEAT ... 11, 40 A-B Repeat button ... 11 AC adaptor ... 8, 24 AC adaptor jack ... 14 Adjusting the input level ... 28 Alkaline ... 25, 63 amplified speakers ... 34 Analog ... - Page 113 L connector ... 14 LANC ... 74 LANC Offline ... 79 LCD Setup ... 62 L-CONNECTOR ... 14 L-Connector ... 63, 77 Level ... 18 Level scale ... 18 LIMITER ... 10 Limiter ... 27, 33 Limiter switch ... 10 LINE OUT ...
- Page 114 Index Time counter ... 18, 20 Top panel ... 9 Total recording time ... 20 Total time ... 18 Trim ... 48 USB ... 14 USB cable ... 8 USB connector ... 14 wav ... 22 WAVE EDIT ... 11 Wave edit button ...
-
Page 115: Declaration Of Conformity
* Roland Corporation is an authorized licensee of the CompactFlash * Fugue © 2005 Kyoto Software Research, Inc. All rights reserved. fig.Fugue-logo.eps Model Name : 4-CHANNEL PORTABLE RECORDER and WAVE EDITOR Edirol Corporation North America Address : 425 Sequoia Drive, Suite 114, Bellingham, WA 98226 Telephone : (360) 594-4276 ®... - Page 116 Information When you need repair service, call your nearest EDIROL/Roland Service Center or authorized EDIROL/Roland distributor in your country as shown below. HONG KONG Parsons Music Ltd. 8th Floor, Railway Plaza, 39 EUROPE Chatham Road South, T.S.T, EDIROL (Europe) Ltd.
Need help?
Do you have a question about the R-4 and is the answer not in the manual?
Questions and answers