Table of Contents
Advertisement
Quick Links
Advertisement
Table of Contents

Subscribe to Our Youtube Channel
Related Manuals for Edirol R-4Pro


Summary of Contents for Edirol R-4Pro
-
Page 2: Federal Communications Commission Radio Frequency Interference Statement
Apparatus containing Lithium batteries ADVARSEL! Lithiumbatteri - Eksplosionsfare ved fejlagtig håndtering. Udskiftning må kun ske med batteri af samme fabrikat og type. Levér det brugte batteri tilbage til leverandøren. ADVARSEL Eksplosjonsfare ved feilaktig skifte av batteri. Benytt samme batteritype eller en tilsvarende type anbefalt av apparatfabrikanten. - Page 3 USING THE UNIT SAFELY Used for instructions intended to alert the user to the risk of death or severe injur y shoul d improperly. Used for instructions intended to alert the user to the risk of injury or material damage should the unit be used improperly.
- Page 4 • In households with small children, an adult should provide supervision until the child is capable of following all the rules essential for the safe operation of the unit. • Protect the unit from strong impact. (Do not drop it!) •...
-
Page 5: Important Notes
Important Notes 291a In addition to the items listed under “USING THE UNIT SAFELY” on page 3 and 4, please read and observe the following: Power Supply: Use of Batteries • Do not connect this unit to same electrical outlet that is being used by an electrical appliance that is controlled by an inverter (such as a refrigerator, washing machine, microwave oven, or air conditioner), or that contains a... -
Page 6: Emergency Procedures
Important Notes Handling Hard Disks Important Performance and Image Data • Once a hard disk fails to function normally, all data that has been stored on it could be destroyed. All hard disks eventually wear out. We recommend that you consider the hard disk not as a permanent storage site, but as a place to store data temporarily. -
Page 7: Table Of Contents
Contents Checking the included items ... 8 Introducing the R-4 Pro ... 9 The R-4 Pro’s controls and connectors... 9 Display... 18 What is a project? ... 22 Getting ready to use the R-4 Pro24 Basic connection examples ... 24 Connecting the AC adapter and turning the power on/off ... -
Page 8: Checking The Included Items
Checking the included items The R-4 pro comes with the following items. Immediately after opening the package, please check that you have all of these items. If any items are missing, please contact the dealer where you purchased the R-4. ■... -
Page 9: Introducing The R-4 Pro
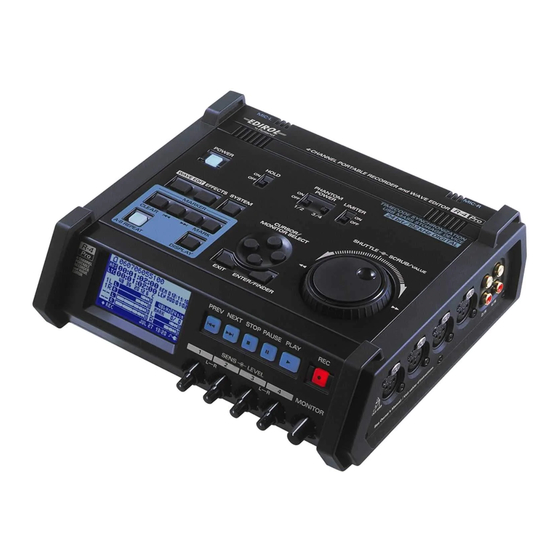
Introducing the R-4 Pro The R-4 Pro’s controls and connectors Top panel fig.panel-1.eps_50 Internal mics [MIC-L, MIC-R] These are stereo mics built into the R-4 Pro. The audio entering MIC-L is recorded on the 1L channel, while audio picked up by MIC-R is recorded on the 1R channel. If you’re recording via the internal mics, set the System Settings menu item Recording Setup to Int-Mic. - Page 10 Introducing the R-4 Pro fig.panel-1.eps_50 Hold switch [HOLD] By selecting the HOLD ON position, you can disable the panel buttons so that unwanted operations will not occur if a button is pressed accidentally. However, even if this switch is set to HOLD ON, the phantom power switches Input level knobs , and Monitor level knob Phantom power switches [PHANTOM POWER]...
- Page 11 Wave edit button [WAVE EDIT] This button takes you to Wave Edit mode, where you can edit the waveform using operations such as Trim, Divide, Combine, and Merge. For details, refer to “Editing” (p. 51). You won't be able to enter Wave Edit mode during playback or recording, or if the R-4 Pro’s hard disk contains no files that the R-4 Pro can handle.
- Page 12 Introducing the R-4 Pro fig.panel-1.eps_50 Cursor/Monitor Select buttons [CURSOR/MONITOR SELECT] Use these buttons to select items shown in the display. When you’re in the main screen, you can press the up/down buttons to select the channel that you want to monitor. For details, refer to “Display”...
-
Page 13: Front Panel
Front panel fig.panel-2.eps_50 Display This shows information about the R-4 Pro’s status. For details, refer to “Display” (p. 18). PREV button [PREV] Pressing the PREV button while a project is playing or stopped will take you to the beginning of the project (00:00:00:00F). -
Page 14: Side Panel (Left)
Introducing the R-4 Pro Side panel (left) Power connector [DC IN] You can connect either the included power conversion cable or a commercially available cable for an external power device. Digital output connector [DIGITAL OUT] This connector outputs a digital signal. You can digital devices, such as speakers or mixers, with an XLR type cable. -
Page 15: Grounding Terminal
Headphone jack [PHONES] You can connect a set of headphones with this jack. Use the monitor level knob ( volume. If you connect headphones, no sound is output from the internal speakers ( Grounding terminal Depending on the circumstances of a particular setup, you may experience a discomforting sensation, or perceive that the surface feels gritty to the touch when you touch this device, microphones connected to it, or the metal portions of other objects, such as guitars. -
Page 16: Side Panel (Right)
Introducing the R-4 Pro Side panel (right) fig.panel-3.eps_50 XLR input connectors 1–4 These are analog audio input connectors compatible with mic preamps. They accept either balanced or unbalanced connections. You can use XLR input connectors 1–4 as four channels of monaural input or as two stereo pairs, 1/2 and 3/4. -
Page 17: Battery Compartment
Introducing the R-4 Pro Bottom panel Battery compartment Install batteries here if you want to operate the R-4 Pro on battery power. The orientation in which you must insert the batteries is shown on the side of the battery compartment. Be sure to observe the correct polarity when installing the batteries. -
Page 18: Display
Introducing the R-4 Pro Display While playing or stopped The Main screen The R-4 Pro Main screen shows information about the project and the operational status of the R-4 Pro. You can press the [DISPLAY] button to switch the contents of the display. fig.play-disp.eps Time counter... -
Page 19: The Mixer Screen
Marker display Monitor level meters Clip level indicators Power source Date and time or timecode From the Main screen, you can press the [DISPLAY] button to switch the progress bar area so it shows the remaining project time (REM: REMAIN). fig.play-disp2.eps Remaining time The Mixer screen... -
Page 20: The Main Screen
Introducing the R-4 Pro While recording The Main screen The R-4 Pro Main screen displays information about the project and the operational status of the R-4 Pro. You can press the [DISPLAY] button to switch the contents of the display. Time counter Time counter Recordable time... - Page 21 When the [DISPLAY] button is pressed twice while the Main screen is showing, the display changes to show the recording buffer capacity (BUF: buffer gauge). The recording buffer is memory that temporarily stores the input sound before it is written to the hard disk. The buffer gauge indicates how much of the recording buffer has been used.
-
Page 22: What Is A Project
Introducing the R-4 Pro What is a project? On the R-4 Pro, the data that you record and play back is handled as a project. On the hard disk, each project actually consists of a folder with one or more files, as shown below. If you connect the R-4 Pro to your computer, you’ll be able to see how these folders and files are organized. - Page 23 Files created during recording and editing are in BWF (Broadcast Wave Format). BWF files contain information about the recording time and recording device (EDIROL R-4 Pro) in addition to the data of a conventional WAV file. Of course, BWF files can be loaded by playback devices or audio editing software as conventional WAV files.
-
Page 24: Getting Ready To Use The R-4 Pro24
Getting ready to use the R-4 Pro Basic connection examples To prevent malfunction and/or damage to speakers or other devices, always turn down the volume and turn off the power on all devices before making any connections. fig.basic.eps Digital connections Equipment that has a digital input connector (XLR) Amplified speakers/Mixers, etc. -
Page 25: Connecting The Ac Adapter And Turning The Power On/Off
Connecting the AC adapter and turning the power on/off * Once the connections have been completed, turn on power to your various devices in the order specified. By turning on devices in the wrong order, you risk causing malfunction and/or damage to speakers and other devices. * Reduce the volume before turning on power. -
Page 26: Installing Batteries And Turning On The Power
Getting ready to use the R-4 Pro Installing batteries and turning on the power ■ Types of batteries you can use • AA alkaline batteries (LR6) • AA nickel metal-hydride (HR15/51) (The R-4 Pro cannot recharge nickel metal-hydride batteries. You must use a separate charger.) * You must specify the type of batteries in the R-4 Pro System Settings menu item “5 System Setup”... - Page 27 ■ Caution when using battery power on the R-4 Pro • If you operate on battery power for an extended time, the batteries will become hot. Be careful not to burn yourself. • Please use alkaline batteries, which have a longer life. •...
-
Page 28: Battery Life
Getting ready to use the R-4 Pro Battery status When using the R-4 Pro on battery power, a battery icon is shown in the lower right of the display. As the battery runs down, the battery icon will change as follows. Remaining charge Level 4 (sufficient) Level 3... -
Page 29: Using External Power Sources
Using external power sources When using an external power supply, be sure to set the final voltage. The final voltage refers to the voltage when voltage can no longer be supplied because the capacity of the external power source is reduced and voltage decreases as electricity is consumed. If the final voltage is not properly set for the external power source, the remaining power display is not shown. -
Page 30: Recording
Recording Recording from a connected mic The following describes how to record audio from a mic connected to a R-4 Pro XLR input connector. fig.mic-1.eps Turn this ON if you're using a condenser mic. ● Connections Connect your mic to a XLR input connector. Howling could be produced depending on the location of microphones relative to speakers. -
Page 31: Adjusting The Input Level
● sensitivity/Input level knobs These knobs adjust sensitivity/input levels. When recording in stereo x2, these knobs control the following signals. Channel 1 STEREO 1 L-channel Channel 2 STEREO 1 R-channel Channel 3 STEREO 2 L-channel Channel 4 STEREO 2 R-channel Adjusting the input level Turn the input level knob [SENS] (outer) all the way left. -
Page 32: Other Settings
Recording ● Record button [REC] If you want to begin recording immediately, press the [REC] button. Recording standby If you want to put the R-4 Pro in recording standby mode to be ready to record, hold down the [PAUSE] button and press the [REC] button. The R-4 Pro enters recording standby mode. -
Page 33: Recording From The Internal Mics
Recording from the internal mics The following describes how to record an audio source via the R-4 Pro internal mics. ● Phantom power switch Turn this OFF. fig.input-intmic.eps ● System settings Press the R-4 Pro [SYSTEM] button. In 1 Recording Setup, set Input Select to IntMic. Set the other items in 1 Recording Setup as appropriate for the recording you want to make. -
Page 34: Recording Digital Audio From A Digital Device
Recording Recording digital audio from a digital device The following describes how to record from a digital device connected to the R-4 Pro digital input connector. fig.digital.eps CD player for playback ● Connections Connect your digital device to the digital input connector. You will need a separately available XLR type cable to connect your device to the R-4 Pro digital input connector. -
Page 35: Simultaneously Recording Sound From Connected Mics And A Digital Device
Simultaneously recording sound from connected mics and a digital device You can record sound from both mics connected to R-4 Pro XLR input connectors 3 and 4 and a digital device connected to the digital input connector. CD player for playback fig.input-analog.eps ●... -
Page 36: Simultaneously Recording Sound From Connected External Mics And The Internal Mics
Recording Simultaneously recording sound from connected external mics and the internal mics You can record sound both from the mics connected to R-4 Pro XLR input connectors 3 and 4 and the internal mics. fig.input-analog.eps ● System settings Press the R-4 Pro [SYSTEM] button. In 1 Recording Setup, set Input Select to Int+Ana. -
Page 37: Playing Back
Playing back This section explains how to play back audio recorded on the R-4 Pro and projects on the R-4 Pro internal hard disk. Make the correct settings and connections before playing anything back. • Connections before playback... (p. 37) •... - Page 38 Playing back Connecting a device having a digital input port (digital connection: R-4 Pro digital output connector) The following describes how to connect devices with digital input ports, such as mixers, speakers, or recording devices. fig.basic-disp.eps The sampling frequency of the project playing back will be the sampling frequency of the audio output from the digital output connector.
-
Page 39: Setup Before Playback
Setup before playback Player Setup fig.recording-1.eps Press the R-4 Pro [SYSTEM] button. The system menu screen appears in the display. fig.player-setup2.eps Use the [CURSOR] buttons to choose press the [ENTER] button. The Player Setup screen appears. Use the [SCRUB/VALUE] dial to choose the value. - Page 40 Playing back Speaker You can use the R-4 Pro internal speakers to monitor the sound without having to connect headphones or other equipment. fig.recording-1.eps Press the R-4 Pro [SYSTEM] button. The system menu screen appears in the display. fig.speaker-on.eps Use the [CURSOR] buttons to choose 3 Speaker, and press the [ENTER] button.
-
Page 41: Playing Back
Playing back Normal playback After performing the steps described in “Connections before playback” (p. 37) and “Setup before playback” (p. 39), proceed as follows. Select the project that you want to play. From the Main screen, press the [ENTER/FINDER] button. In the Finder screen that appears, use the [CURSOR] up/down buttons and the [SCRUB] dial to select a project. - Page 42 Playing back Markers You can assign markers at desired locations in a project. Then you can use the button to move backward or forward to a marker location. You can use the Mark function either while playing or while recording. Use the [NEXT] button or the [SHUTTLE] dial to find the location at which you want to assign a marker.
-
Page 43: Please Note
Repeat playback (A-B REPEAT) You can repeatedly play back between two points (A-B) in the project. Simply assign points A and B during playback, and the playback will repeat between points A and B. fig.repeat-a Play the project. During playback, press the [A-B REPEAT] button once. The [A-B REPEAT] button blinks, and that location becomes the starting point (A) for repeat playback. -
Page 44: Finder Functions
Finder functions The R-4 Pro saves projects as files on its internal hard disk. You can use the Finder functions to select a project from numerous folders or projects within folders, to delete an unwanted project, or to copy a project to an external memory device. -
Page 45: Deleting A Project (Delete)
Deleting a project (Delete) fig.finder-1.eps While the Main screen is shown on the display, press the [ENTER/FINDER] button. The Finder screen shown in the figure is displayed. Projects are shown in descending alphabetical order. fig.finder-select.eps In the Finder screen, use the [CURSOR] up/down buttons or the [SCRUB] dial to select the project you want to delete. -
Page 46: Renaming A Project (Rename)
Finder functions Renaming a project (Rename) fig.finder-1.eps While the Main screen is shown in the display, press the [ENTER/FINDER] button. The Finder screen shown in the figure is displayed. Projects are shown in descending alphabetical order. fig.finder-select.eps In the Finder screen, use the [CURSOR] up/down buttons or the [SCRUB] dial to select the project you want to rename. -
Page 47: Copying A Project (Copy)
Copying a project (Copy) fig.finder-1.eps While the Main screen is shown in the display, press the [ENTER/FINDER] button. The Finder screen shown in the figure is displayed. Projects are shown in descending alphabetical order. fig.finder-select.eps In the Finder screen, use the [CURSOR] up/down buttons or the [SCRUB] dial to select the copy source project (the project you want to copy). -
Page 48: Moving A Project (Move)
Finder functions Moving a project (Move) * You cannot move a project between the hard disk and an external memory device. If you need to do this, you can first copy the project, and then delete the copy source project. fig.finder-1.eps While the Main screen is shown in the display, press the [ENTER/FINDER] button. -
Page 49: Creating A New Folder (Make Folder)
Creating a new folder (Make Folder) fig.finder-1.eps While the Main screen is shown in the display, press the [ENTER/FINDER] button. The Finder screen shown in the illustration will appear. Projects are shown in descending alphabetical order. fig.finder-make1.eps In the Finder screen, use the [CURSOR] up/down buttons or the [SCRUB] dial to select located at the top level. - Page 50 Finder functions fig.new-folder.eps A folder named NewFolder is created. Projects are shown in alphabetical order, and folders are shown in alphabetical order after the projects. Use the [CURSOR] up/down or the [SCRUB] dial to verify that the new folder was created. If an identically named folder already exists, a number will be added to the name of the newly created folder, e.g., NewFolder-1, NewFolder-11, NewFolder-111, etc.
-
Page 51: Editing
Editing You can edit the projects that you have recorded with the R-4 Pro directly on the R-4 Pro. Editing command Trim Divide Combine Merge * Executing any of these editing commands leaves the original project file unchanged. * There is no Undo function. Editing procedure Trim This command extracts the region between the two points you specify in the waveform and creates a new... - Page 52 Editing fig.wave-4.eps In the same way, move to the end (point you want to extract, and press the [ENTER] button. * The value of point is displayed as a location in the sample (data). fig.wave-trim2.eps fig.wave-5.eps A screen asking you to confirm the specified points is shown.
- Page 53 Divide This command divides a project at the point you specify in the waveform. Two new projects are created. Playback, stop, scrub dial, shuttle dial, and marker operations may be performed even while using this command. However, you cannot perform A-B Repeat operations. fig.wave2-1.eps Press the R-4 Pro [WAVE EDIT] button.
- Page 54 Editing fig.wave-divide.eps The divided project is saved as two new projects with the same name as the original project but with appended to the names. The “-1” “-2” original project remains unchanged. For example, if the original project is named Project, the new projects is named Project-1 and Project-2.
- Page 55 Combine This command appends another project (of the same format) onto the end of the currently selected project. The two files are joined to create a single new file. You cannot perform playback, stop, or operate the scrub dial or shuttle dial while using this command. Select the project (the “base project”) to which you want to append another project.
- Page 56 Editing fig.wave-combine.eps The combined projects are saved as a new project with the same name as the original project but with appended to it. The original project remains “-1” unchanged. For example, if the original project is named Project, the new project is named Project-1.
- Page 57 Merge If the currently selected project consists of multiple files (MONO x2, MONO x3, MONO x4, STEREO x2), this command merges them into a single channel. How Rec Mode will change Before Merge After Merge MONOx2 MONOx1 MONOx3 MONOx4 STEREOx2 STEREOx1 * Since MONO x1, STEREO x1, or 4 ch.
- Page 58 Editing Edit Timecode This command changes the timecode for the data recorded in BWF format. * The Edit Timecode screen does not display for non-BWF formatted data. fig.merge-1.eps Press the R-4 Pro [WAVE EDIT] button. The Wave Edit Menu screen is shown. Use the [CURSOR] buttons to select press the [ENTER] button.
-
Page 59: Effects Settings
Effects settings The R-4 provides five types of effects. You can apply an effect to the incoming sound as it is being recorded, or you can apply an effect to the playback. You can also change the effect settings for each channel. * Effects are not available when the R-4 Pro is operating at 96 kHz. -
Page 60: Applying Effects
Effects settings Applying effects You can adjust the R-4 Pro effects not only while standing-by for recording or playback, but also while you listen to the sound during actual playback or recording. This section explains how to adjust the effect settings while playing back or in recording standby mode. fig.effect-set.eps fig.effect-1.eps Press the R-4 Pro [EFFECTS] button. - Page 61 fig.effect-link2.eps Use the [SCRUB/VALUE] dial to specify the channels to be linked. fig.effect-play2.eps In the same way, set the “PLAY” and “REC” fields. PLAY The effect are not applied during playback The effect are applied during playback fig.effect-rec.eps The effect are not applied during recording The effect are applied during recording fig.effect-para.eps Press the [DISPLAY] button.
-
Page 62: Effects
Effects settings Effects 1: 3-Band EQ Parameter name MID-F MID-Q HIGH LEVEL 2: Graphic EQ Parameter name 125Hz 250Hz 500Hz 1kHz 2kHz 4kHz Level 3: Noise Gate Parameter name LO-CUT THRESHOLD LEVEL Default Range of values values 200Hz, 250Hz, 315Hz, 400Hz, 500Hz, 630Hz, 800Hz, 1kHz, 1.25Hz, 1kHz... - Page 63 4: Enhancer Parameter Range of values name SENSE 0–100 0–100 LEVEL 0–120 5: Comp&DeEsser Parameter Range of values name DE-ESSER OFF, ON THRESHOLD 0–100 1.0:1, 1.2:1, 1.5:1, 2.0:1, 2.8:1, RATIO 4.0:1, 8.0:1, 16.0:1, Inf:1 ATTACK 0.25–100ms RELEASE 50–5000ms -6.0dB–+18.0dB GAIN (The value will change in steps of 0.5dB) LEVEL...
-
Page 64: System Setup
System setup You can make settings related to the R-4 Pro system when performing initial settings for recording or playback. Press the R-4 Pro [SYSTEM] button to enter the system setup menu. See “Example operations” (p. 65) for setup procedures. Menu item Recording Setup Player Setup... -
Page 65: Example Operations
Example operations Recording Setup settings You can use the same procedure to make the settings listed below. As an example, we will show how to make Recording Setup settings. Recording Setup Player Setup Speaker LCD Setup System Setup fig.recording-1.eps Press the R-4 Pro [SYSTEM] button. The System Menu screen is shown in the display. -
Page 66: Timecode Settings
System setup Timecode settings fig.recording-1.eps Press the R-4 Pro [SYSTEM] button. The System Menu screen is shown in the display. fig.recording-2.eps Use the [CURSOR] buttons to select press the [ENTER] button. The Recording Setup screen is shown. fig.recording-2.eps Use the [CURSOR] buttons to select the [ENTER] button. -
Page 67: Date And Time Settings
Date & Time settings fig.recording-1.eps Press the R-4 Pro [SYSTEM] button. The System Menu screen is shown in the display. fig.data-1.eps Use the [CURSOR] buttons to select press the [ENTER] button. The Date & Time screen is shown. fig.data-2.eps Use the [CURSOR] buttons and the [SCRUB/VALUE] dial to set the date and time. -
Page 68: Project Name Settings
System setup Project Name settings fig.pj-name1.eps Press the R-4 Pro [SYSTEM] button. The System Menu screen is shown in the display. fig.pj-name2.eps Use the [CURSOR] buttons to select press the [ENTER] button. The Project Name screen is shown. fig.pj-name3.eps Use the [CURSOR] buttons to select the name you want to edit, and press the [ENTER] button. - Page 69 Using the HDD Utility fig.hd-uti1.eps Press the R-4 Pro [SYSTEM] button. The System Menu screen is shown in the display. fig.hd-uti2.eps Use the [CURSOR] buttons to select press the [ENTER] button. The HDD Utility screen is shown. * If you decide to cancel, press the [EXIT] button. format Use the [CURSOR] buttons to select either “Format”...
- Page 70 System setup Using the USB Storage Utility fig.hd-uti1.eps Press the R-4 Pro [SYSTEM] button. The System Menu screen is shown in the display. fig.hd-uti2.eps Use the [CURSOR] buttons to select , and press the [ENTER] button. Utility When the connection to an external memory device is not mounted, the USB Storage Utility starts as shown in the figure to the right.
- Page 71 Executing Factory Reset (Restoring the factory default settings) fig.Fact-uti1.eps Press the R-4 Pro [SYSTEM] button. The System Menu screen is shown in the display. fig.fact-reset.eps Use the [CURSOR] buttons to select and press the [ENTER] button. The Factory Reset screen is shown. Press the [ENTER] button if to perform Factory Reset.
-
Page 72: System Menu
System setup System Menu 1 Recording Setup The values in boldface are the default values. * You cannot make Recording Setup settings during recording or playback. Menu item Value Analog Digital Input Select Dig + Ana IntMic Int + Ana 44.1 kHz, 448.0 kHz, Rec Freq. - Page 73 Menu item Value Function One-channel recording to MONOx1 one monaural file Two-channel recording to MONOx2 two monaural files Three-channel recording to MONOx3 three monaural files Four-channel recording to MONOx4 four monaural files Two-channel recording to STEREOx1 one stereo file Rec Mode Four-channel recording to STEREOx2 two stereo files...
- Page 74 System setup Menu item Value Pre Record- OFF, 1–29 Date, Project Name Name1–8 1/2/3/4 1+2/3+4 1+2+3+4 Limiter link 1+2/3/4 1/2/3+4 Function You can specify the length of time that the sound is captured “retroactively,” starting from before the moment you pressed the [REC] (record) button. This setting specifies the number of seconds that is captured retroactively.
-
Page 75: Lcd Setup
2 Player Setup Parameter Value Single Play Mode Sequential Repeat OFF, ON 3 Speaker Parameter Value Speaker OFF, ON Switch 4 LCD Setup Parameter Value Contrast 1–5–10 BackLight OFF, 1–10 OFF, 2 sec, BackLight 5 sec, 10 sec, Timer 20 sec 5 System Setup Parameter Value... -
Page 76: Date And Time
System setup 6 Timecode Menu item Parameter Mode Setup Frame Rate Out Select Chase MANUAL (H: M: S: F) Set Int TC JAM EXT (H: M: S: F) Set Rec-Run TARGET 7 Date & Time fig.date-1a.eps You can set the date and time. If Project Name is set to Date, the time you specify here is used to set the date in the project name. -
Page 77: Project Name
8 Project Name You can use Name 1–8 to specify eight different name types. The project name will consist of this name plus a consecutive number of 001, 002, 003, ... appended to it. For example, in the case of the default setting R4_Scene1, the project name will be R4_Scene1_001. -
Page 78: Factory Reset
System setup 10 USB Storage Utility You can perform utility commands on a external memory device connected to the R-4 Pro. You can not execute USB Storage Utility commands during recording or playback. When not mounted Command Mount Format When mounted Command Unmount Format... -
Page 79: Appendix
Appendix Handling external memory device An external memory device can be used to move project files on the R-4 Pro hard disk to a computer or to move WAV files from a computer to the R-4 Pro hard disk. See Finder functions (p. 44) for details on how to handle these files. - Page 80 Appendix fig.usb-mount.eps Use the [CURSOR] button to select 10 USB Storage Utility, and press the [ENTER] button. When the connection to an external memory device is not mounted, the USB Storage Utility starts as shown in the figure to the right. * To cancel, press the [EXIT] button.
- Page 81 fig.usb-unmo.eps Use the [CURSOR] button to select 10 USB Storage Utility, and press the [ENTER] button. The USB Storage Utility starts as shown in the figure to the right. * To cancel, press the [EXIT] button. Use the [CURSOR] button to select [Unmount], and press the [ENTER] button.
-
Page 82: Connecting To A Computer
[Cancel]. The computer will detect the R-4 Pro as follows. Windows When viewed from My Computer or Explorer, the R-4 Pro appears as R-4Pro. Mac OS The R-4 Pro appears as R-4Pro on the desktop. - Page 83 If you’re using Mac OS 9, drag the R-4Pro icon to the trash. When the icon has disappeared from the desktop, you can disconnect the USB cable between the R-4 Pro and your computer.
-
Page 84: Connecting To A Video Device With A Timecode Port
Appendix Connecting to a video device with a timecode port R-4 Pro supports synchronization with and recording of SMPTE timecode. The R-4 Pro can be synchronized with a device supporting timecode. SMPTE timecode SMPTE timecode was established by the Society of Motion Picture and Television Engineers (SMPTE) and is a transmitted signal used for synchronizing multiple video and/or audio devices. - Page 85 fig.time-code-2.eps Use the [CURSOR] button to select the [ENTER] button. The Timecode Setup screen is shown. fig.time-code-3.eps Use the [SCRUB/VALUE] dial to select Mode. The modes are as shown below.( The timecode is not recorded. The R-4 Pro timecode is used. The timecode operates normally. Uses the timecode sent from the connected device.
-
Page 86: Setting The Start Time
Appendix Setting the start time Setting the internal timecode start time fig.recording-1.eps Press the [SYSTEM] button on the R-4 Pro. The display shows the System Menu screen. fig.time-code-1.eps Use the [CURSOR] button [ENTER] button. The Timecode screen is shown. fig.time-code-2.eps Use the [CURSOR] button to select press the [ENTER] button. - Page 87 Synchronize to an external timecode source * Be sure to connect the timecode In connector on the R-4 Pro to the Timecode Out port on the device used for synchronization. fig.recording-1.eps Press the [SYSTEM] button on the R-4 Pro. The display shows the System Menu screen. fig.time-code-1.eps Use the [CURSOR] button to select press the...
- Page 88 Appendix Setting the REC-RUN timecode start time fig.recording-1.eps Press the [SYSTEM] button on the R-4 Pro. The display shows the System Menu screen. fig.time-code-1.eps Use the [CURSOR] button to select press the [ENTER] button. The Timecode screen is shown. fig.time-code-set-rec.eps Use the [CURSOR] button to select and press the [ENTER] button.
-
Page 89: Application Guide
Application guide Before you record using the R-4 Pro, you must set up the R-4 Pro to be appropriate to your recording environment and purpose. This section gives several actual examples of applications. For details on connections refer to “Recording” (p. -
Page 90: Recording Birdsongs Outdoors
Application guide Recording birdsongs outdoors These basic settings are used for recording birdsongs or similar outdoor sounds. Since batteries are required for outdoor use, these settings take power conservation into account. Panel settings Phantom power switch Recording Setup Input Select Rec Freq. -
Page 91: Recording Audio While Filming Video
Recording audio while filming video These basic settings are used for using the R-4 Pro to record audio while filming video. If recording outdoors, you can use the settings for “Recording birdsongs outdoors” (p. 90) in this case as well, but other settings specific to video are also necessary. -
Page 92: Simultaneously Recording Environmental Sounds (Ambience)
Application guide Simultaneously recording environmental sounds (ambience) You can take advantage of the R-4 Pro’s ability to record four channels simultaneously. You can use channels 1 and 2 to record a stage performance via digital inputs, and channels 3 and 4 to record the sounds of the room or audience via mics. -
Page 93: Recording Comments Simultaneously
Recording comments simultaneously You can use this feature to record four channels simultaneously. You can use channels 3 and 4 to record from the connected mics and channels 1 and 2 to record comments from the internal mics. Panel settings Phantom power switch Recording Setup Input Select... -
Page 94: Messages
Messages This section explains the most important messages that may appear in the R-4 Pro’s display Message Status Int-Batt Low! The remaining charge for the internal battery is low. The internal battery must be replaced. If the battery charge is insufficient, the internal clock will become inaccurate. -
Page 95: Troubleshooting
Troubleshooting If you experience difficulties, read this section first. It contains tips on how to resolve various problems. Computer-related problems Cannot close the connection with the R-4 Pro When using Windows and if Explorer or any other software referencing the R-4 Pro’s hard disk is open when you attempt to close the USB connection between the R-4 Pro and your computer, the error message “An error occurred while removing USB mass storage device –... - Page 96 Troubleshooting Pan (stereo image) is not stored correctly If the limiter is turned on, it will respond to the levels of each channel, meaning that when the level of a sound located toward the right (or left) side increases, the limiter for that channel will limit the volume. If you’re recording in stereo, the result will be that the left and right volume difference will diminish, causing the pan (stereo image) to move toward the center.
-
Page 97: Playback-Related Problems
Playback-related problems No sound If the monitor level knob is turned too far down, the volume may be too low for you to hear. Gradually raise the monitor level knob. Refer to: “Monitor level knob [MONITOR]” (p. 13) If the output assignments are not set appropriately, the sounds are not output. Reference: Output assignments (p. -
Page 98: Problems With The R-4 Pro Operation
Troubleshooting Problems with the R-4 Pro operation Power does not turn on Make sure that the AC adapter is correctly connected. If using batteries, make sure that each battery is securely in place and in the correct orientation. It is also possible that the batteries have run down, so you should obtain a new set of batteries. -
Page 99: Main Specifications
Main specifications Recorder ● Channels ● Signal Processing AD/DA Conversion: 24 bits Signal Processing Sampling Frequency: 44.1/48/88.2/96/192 kHz ● Data Types (both Recording and Playback) Format: BWF, WAV Sample Size: 16/24 bits Sampling Frequency: 44.1/48/88.2/96/192 kHz * The sample size and sampling frequency can be combined in any way. -
Page 100: Other Input/Output Part
Main specifications Other Input/Output Part ● USB Interface A Type Connector (For USB Storage device) Supports USB 1.1 and 2.0 Mass Storage Device Class. B Type Connector (For Computer connection) Effect Unit Part ● Effect Type: Select one of the types below. •... -
Page 101: Block Diagram
Block diagram... -
Page 102: Index
Index Numerics 3-Band EQ 4-indiv A-B REPEAT A-B Repeat button AC adapter AC adaptor Adjusting the input level Alkaline amplified speakers Analog analog device BackLight BackLight Timer batteries Battery compartment Battery life Battery Low Battery Time Block diagram Bottom panel Carrying case Channel level meters Channel level sliders... - Page 103 HDD Unformatted HDD Utility Headphone jack headphones HOLD HOLD ON Hold switch Improper Proj. INPUT GAIN Input level knobs Input level select switch Input Select Int + Ana Int-Batt Low Internal mics Internal speakers internal timecode Int-Mic JAN EXT LCD Setup Level Level scale LIMITER...
- Page 104 Index PREV PREV button Progress bar project Project exists Project Name Rec Bit Rec Freq. Rec Mode Record button Recordable time Recording Setup Recording-standby REC-RUN Remaining hard disk capacity Remaining time Rename Repeat Sample size Sampling frequency Scan Scrub dial SCRUB/VALUE Security Slot Select...
- Page 105 MEMO...
- Page 106 MEMO...
-
Page 107: Declaration Of Conformity
IMPORTANT: THE WIRES IN THIS MAINS LEAD ARE COLOURED IN ACCORDANCE WITH THE FOLLOWING CODE. BLUE: NEUTRAL BROWN: LIVE As the colours of the wires in the mains lead of this apparatus may not correspond with the coloured markings identifying the terminals in your plug, proceed as follows: The wire which is coloured BLUE must be connected to the terminal which is marked with the letter N or coloured BLACK. -
Page 108: Roland Corporation
Information When you need repair service, call your nearest EDIROL/Roland Service Center or authorized EDIROL/Roland distributor in your country as shown below. CENTRAL/LATIN ASIA AMERICA CHINA Roland Shanghai Electronics Co.,Ltd. Roland Systems Group U.S. 5F. No.1500 Pingliang Road 425 Sequoia Drive Suite 114,...
Need help?
Do you have a question about the R-4Pro and is the answer not in the manual?
Questions and answers