Advertisement
Quick Links
Download this manual
See also:
Owner's Manual
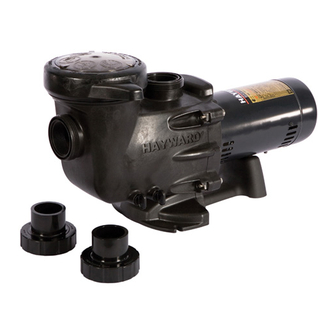
HAYWARD SELF-PRIMING MAX-FLO™ PUMP
INSTALLATION AND OPERATING INSTRUCTIONS
Your Hayward self-priming centrifugal pump has been quality-built and
engineered to give you many years of efficient, dependable, corrosion-free
service. The advanced design reduces operation and maintenance has been
reduced to simple, common-sense procedures.
IMPORTANT SAFETY INSTRUCTIONS
When installing and using this electrical equipment, basic safety precautions should always be followed,
READ AND FOLLOW ALL INSTRUCTIONS
1.
WARNING - To reduce risk of injury, do not permit children to use this product unless they are closely supervised at all times.
2.
CAUTION - This pump is U.L. listed for permanently installed pools and may also be used with hot tubs and spas if so marked.
It is not U.L. listed for storable pools. A permanently installed pool is constructed in or on the ground and cannot be readily
disassembled for storage. A storable pool is constructed so that it may be readily disassembled for storage and reassembled to
its original integrity.
3.
If installed within an outer enclosure or beneath the skirt of a hot tub or spa, adequate ventilation and free circulation of air must
be provided to prevent overheating of the motor.
4.
Use motor bonding lug to connect the motor with other bonding parts using a #8 AWG conductor as required by electrical codes.
NOTE: If your pump is equipped with a 3 ft. (1 m) cord and twist lock plug, items 5 through 8 apply.
5.
WARNING - Risk of Electric Shock. Connect only to a grounding-type receptacle protected by a ground fault circuit interrupter
(GFCI). Contact a qualified electrician if you cannot verify that the receptacle is protected by a GFCI.
6.
Do not bury cord. Locate cord to minimize abuse from lawn mowers, hedge trimmers, and other equipment.
7.
WARNING - To reduce the risk of electric shock, replace damaged cord immediately.
8.
WARNING - To reduce the risk of electric shock, do not use extension cord to connect unit to electric supply; provide a
properly located outlet.
GENERAL TIPS ON PUMP INSTALLATION
Locate the pump as close to pool as practical and run
suction line as direct as possible. This cuts down on
friction loss through pipe and fittings.
Never overtighten pipe connections—use only pipe
sealants formulated specifically for plastics, i.e., Teflon
tape, Permatex No. 2, etc.
Suction line should have continuous slope from lowest
point in line. Make sure suction joints are tight. Suction
pipe should be as large or larger than discharge pipe.
Damp, non-ventilated locations should be avoided.
Motors require free circulation of air to aid in cooling.
Insure that the electrical supply available agrees with the
motor's voltage, phase and cycle, and that wire size is
adequate for the HP (KW) rating and distance from power
source. Motor must always be properly grounded. If cord
connected, use only a properly grounded outlet. Electrical
circuits must be protected by proper size ground fault
circuit interrupter (GFCI) as required by applicable
including the following: Failure to follow instructions may result in injury.
SAVE THESE INSTRUCTIONS
electrical codes. All electrical wiring must be performed
by qualified personnel, and must conform to local codes
and regulations.
STARTING AND PRIMING INSTRUCTIONS
Fill strainer housing with water to suction pipe level.
Never operate the pump without water. Water acts as a
coolant and lubricant for the mechanical shaft seal.
Open all suction and discharge lines and valves, as well
as air bleed (if available) on filter. (The air that is to be
displaced from the suction line must have some place to
go.) CAUTION: All suction and discharge valves must
be open when starting the system. Failure to do so
could cause severe personal injury and/or property
damage.
Turn on power and allow a reasonable time for priming.
Five minutes is not unreasonable. (Priming time depends
on suction lift and horizontal length of suction piping.) If
the pump will not start, or will not prime, see TROUBLE
SHOOTING GUIDE on back page.
IS2800X5-99
Advertisement

Related Manuals for Hayward Max-Flo


Summary of Contents for Hayward Max-Flo
-
Page 1: Important Safety Instructions
IS2800X5-99 HAYWARD SELF-PRIMING MAX-FLO™ PUMP INSTALLATION AND OPERATING INSTRUCTIONS Your Hayward self-priming centrifugal pump has been quality-built and engineered to give you many years of efficient, dependable, corrosion-free service. The advanced design reduces operation and maintenance has been reduced to simple, common-sense procedures. - Page 2 SP1600Q Mounting Adapter. Optional with some motors. PART NUMBER REF. MODEL MODEL MODEL MODEL MODEL DESCRIPTION REQ’D. SP2800X5 SP2805X7 SP2807X10 SP2810X15 SP2815X20 Hand Knob SPX1600P SPX1600P SPX1600P SPX1600P SPX1600P Swivel Nut SPX1600N SPX1600N SPX1600N SPX1600N SPX1600N Strainer Cover SPX1250L SPX1250L SPX1250L SPX1250L SPX1250L...
- Page 3 Inspect strainer cover gasket strainer basket. regularly and replace as necessary. Disconnect electrical wires and pipe connections, Hayward pumps have self-lubricating motor bearings and store pump in dry, well-ventilated room. Or, as and shaft seals. No lubrication is necessary. a minimum precaution: Keep motor clean.
- Page 4 SERVICE & REPAIRS Block off suction as close to pump as possible and Consult your local authorized Hayward dealer or service center. determine if pump will develop a vacuum. No pumps or motors may be returned directly to the factory...