Table of Contents
Advertisement
Quick Links
Advertisement
Table of Contents

Related Manuals for Projecta AC080


Summarization of Contents
IMPORTANT SAFETY INFORMATION
WARNINGS
Essential safety precautions and warnings for operating the battery charger safely.
8-STAGE AUTOMATIC CHARGING
BATTERY RESCUE
High voltage stage to break down lead sulfate in sulfated batteries.
SOFT PULSE
Low current pulsing to help the battery accept charge.
PULSE CHARGE
Increased pulse current to aid battery charge acceptance.
SOFT START
Gentle introduction of power to protect the battery and extend life.
BULK (CONSTANT CURRENT)
Charges battery at maximum rate until approximately 80% charged.
ABSORPTION (CONSTANT VOLTAGE)
Charges battery to 100% by adjusting charge rate for maximum power absorption.
BATTERY TEST
Analyzes battery to ensure it has taken charge before proceeding to float stage.
FLOAT
Maintains battery at 100% charge indefinitely without overcharging.
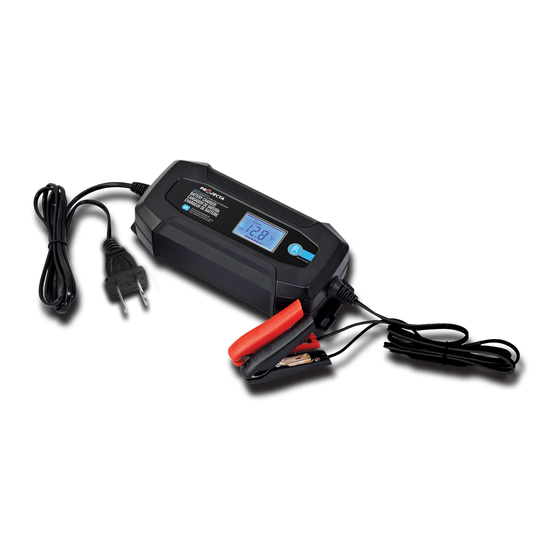
FEATURES
MODE BUTTON
Toggles through different charger features and settings on the LCD display.
INTERACTIVE LCD SCREEN
Displays battery voltage and charge status, useful during setup.
SWITCHMODE TECHNOLOGY
Uses electronic components to convert AC to DC, resulting in a lightweight charger.
SPARK-FREE AND POLARITY PROTECTED
Prevents sparks and damage from accidental reverse connection for safer use.
WEATHER PROOF IP65
Rated IP65, allowing use outdoors without damage, though plug must stay dry.
CHARGING INSTRUCTIONS
STEP 1 - CHECK THE ELECTROLYTE LEVEL
Check electrolyte level and top up with distilled water if low, before charging.
STEP 2 - CONNECT TO BATTERY
Details three options for connecting the charger to a battery.
STEP 2A - BATTERY OUT OF VEHICLE
Connect RED lead to Positive (+) and BLACK lead to Negative (-) battery posts.
STEP 2B - BATTERY IN VEHICLE
Instructions for connecting the charger to a battery installed in a vehicle.
Positively earthed
Connection instructions for vehicles with positively earthed battery systems.
STEP 2C - PERMANENT HARD WIRING
How to hard wire the DC charging leads to the battery for permanent installations.
STEP 3 - CONNECT TO 240V MAINS POWER
Connect the charger to a standard 240V mains socket and turn on power.
STEP 4 - SET CHARGE RATE
Set the charge rate by pressing the MODE button according to battery size.
STEP 5 - SET BATTERY TYPE
Set the appropriate battery type or mode, such as winter mode.
STEP 6 - CHARGING
Monitor charging progress via LCD screen and battery gauge. Explains RECON symbol.
STEP 7 - DISCONNECTION
Procedures for safely disconnecting the charger from the battery and mains power.
FAULTS & ERRORS
Explains possible error signals (F1-F4) displayed by the charger and their meanings.
SPECIFICATIONS
Charge Control
Details the specific charge control stages and voltage/current parameters.
Battery Range
Specifies the compatible battery types and capacities for the charger.
PRODUCT OVERVIEW
FREQUENTLY ASKED QUESTIONS
Answers common user questions regarding charger operation and battery charging.
WARRANTY STATEMENT
APPLICABLE ONLY TO PRODUCT SOLD IN AUSTRALIA
Specifies warranty terms and conditions applicable to products sold in Australia.
Need help?
Do you have a question about the AC080 and is the answer not in the manual?
Questions and answers