Table of Contents
Advertisement
Quick Links
Advertisement
Table of Contents

Related Manuals for CoolLED pE-400max


Summary of Contents for CoolLED pE-400max
- Page 1 User Manual pE-400 Series: pE-400 and pE-400 DOC-075 Iss 1...
-
Page 2: Table Of Contents
Table of Contents 1. Introduction ........1 2. Safety ..........1 3. pE-400 Series Product Range ....2 3.1. Light Source Models ......2 3.2. Wavelength Variants ......2 3.3. Light Delivery Variants...... 3 4. System Components ......3 5. Reference Diagrams ......4 5.1. -
Page 3: Introduction
1. Introduction Congratulations on the purchase of your new CoolLED pE-400 Series Illumination System. The pE-400 Series is a family of state-of-the-art four-wavelength LED Illumination Systems designed to meet the demands of cutting-edge microscopy applications. This User Manual provides all the information required for installation and safe operation. -
Page 4: Pe-400 Series Product Range
3. pE-400 Series Product Range 3.1. Light Source Models The pE-400 Series includes two models: the pE-400 and the pE-400 The pE-400 is a simple, cost-effective white light source and controllable replacement for mercury and metal halide lamps. The pE-400 permits the independent adjustment of channel irradiance and the ability to fit inline excitation filters. -
Page 5: Light Delivery Variants
Figure 2 – Liquid Light Guide Figure 1 – Direct Fit Output Output 4. System Components pE-400 Series Illumination Systems include various components necessary to meet the demands of specific microscope installations. At a minimum, the pE-400 Series Illumination System includes the following: •... -
Page 6: Reference Diagrams
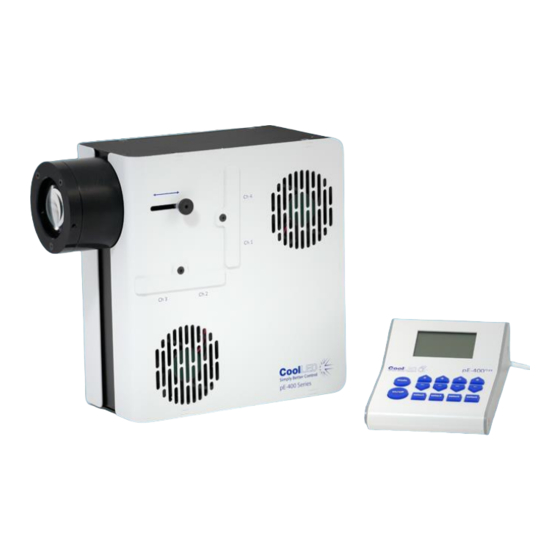
5. Reference Diagrams 5.1. pE-400 Light Sources Direct Fit Figure 4 Item Description Adaptor retention screws Focus adjustment On/off switch Grounding terminal Global TTL input (global shutter) Control Pod socket USB A socket Power socket Status indicator Bootload switch Table 2 DOC-075 Iss 1... - Page 7 Liquid Light Guide Figure 5 Item Description On/off switch Grounding terminal Global TTL input (global shutter) Control Pod socket USB A socket Power socket Status indicator Bootload switch Liquid light guide retention screws Table 3 DOC-075 Iss 1...
- Page 8 pE-400 Control Pod Figure 6 Item Button Description Mode On/off Increase global irradiance Decrease global irradiance Table 4 DOC-075 Iss 1...
-
Page 9: Pe-400 Max Light Sources
5.2. pE-400 Light Sources Direct Fit Figure 7 Item Description Adaptor retention screws Focus adjustment Filter slot 1 Filter slot 2 On/off switch Grounding terminal Channel TTL input 365/400 nm (channel shutter) Channel TTL input 450 nm (channel Shutter) Channel TTL input 550 nm (channel Shutter) Channel TTL input 635 nm (channel Shutter) Global TTL input (global shutter) Control Pod socket... - Page 10 Liquid Light Guide Figure 8 Item Description Filter slot 1 Filter slot 2 On/off switch Grounding terminal Channel TTL input 365/400 nm (channel shutter) Channel TTL input 450 nm (channel shutter) Channel TTL input 550 nm (channel shutter) Channel TTL input 635 nm (channel shutter) Global TTL input (global shutter) Control Pod socket USB A socket...
- Page 11 pE-400 Control Pod Figure 9 Item Button Description Mode On/off Increase irradiance channel 1 Decrease irradiance channel 1 Select channel 1 Increase irradiance channel 2 Decrease irradiance channel 2 Select channel 2 Increase irradiance channel 3 Decrease irradiance channel 3 Select channel 3 Increase irradiance channel 4 Decrease irradiance channel 4...
-
Page 12: Installation
6. Installation 6.1 Mounting the Light Source The procedure for mounting your pE-400 Series Light Source to a microscope depends on the light delivery variant. 6.1.1. Direct Fit Light Sources Attach the Light Sources directly to the epi-illumination port of the microscope using a suitable CoolLED pE-Adaptor. - Page 13 1. To establish which pE-Adaptor is required for your microscope, please visit https://www.coolled.com/products/adaptors/. 2. Insert the pE-Adaptor into the output of the pE-400 Series Light Source (Figure 11). 3. Secure the pE-Adaptor in place by gently fastening the adaptor retention grubs screws found at the output of the Direct Fit Light Sources.
-
Page 14: Electrical Connections
For microscopes that do not permit direct liquid light guide insertion, the free end of the liquid light guide must be fed into a collimator such as the CoolLED pE -Universal Collimator. For information on installation, optical adjustment and moving to a different microscope, please see: https://www.coolled.com/products/accessories/pe-... -
Page 15: Light Source Control
(right). 7. Light Source Control With the pE-400 Series Light Source installed and connections made, the following steps initiate and modulate illumination. The steps required depend on whether your Light Source is a pE-400 (with global irradiance control) or a pE-400 with individual channel irradiance control. - Page 16 Use the increase global irradiance button (+) and decrease global irradiance button (-) to input the desired irradiance. The Light Source output is off (extinguished) during this adjustment period , indicated by the OFF text and striped irradiance bar on the Control Pod. Figure 17 Press the on/off button once to switch the Light Source output on (illuminated).
- Page 17 Use the increase global irradiance button (+) and decrease global irradiance button (- ) to adjust the Contrast. To return to the main screen, either press and hold the mode button for 3 seconds Figure 20 or wait for 10 seconds and the screen will return automatically.
- Page 18 Press the on/off button once to switch the Light Source output on (illuminated) for all selected channels. The ON text and solid irradiance bar on the Control Pod indicate the on state. Figure 23 Press the on/off Button again to extinguish the Light Source. 7.1.4.
- Page 19 pE-400 firmware and hardware information. Figure 25 pE-400 firmware and hardware information. Figure 26 Channel and system runtime information. Figure 27 Channel diagnostic information. Figure 28 To return to the main screen, either press and hold the mode button for 3 seconds or wait for 10 seconds and the screen will return automatically.
-
Page 20: Ttl Triggering
7.2. TTL Triggering 7.2.1 Global Triggering All pE-400 Series Light Sources include a Global TTL Input (see Reference Diagrams in section 5 ). This provides the facility to control the overall illumination state of the Light Source using a TTL-output from a device such as a camera. - Page 21 Light Source using the LightBridge application. 1. Install the pE-400 LightBridge from the accompanying USB stick, or https://www.coolled.com/support/imaging-software/ 2. Connect a pE-400 Light Source to a Windows PC running the LightBridge application. 3. Check that the Light Source Status indicator shows as Online.
- Page 22 Clicking the up and down arrows of the numeric channel irradiance controls. Keying values into the numeric channel irradiance control boxes. 5. Select the required channels by clicking the channel select control boxes. 6. Click the ON/OFF status indicator button to illuminate the Light Source. 7.
-
Page 23: Sequence Runner
Figure 30 Figure 31 Figure 32 7.5. Sequence Runner (pE-400 The pE-400 allows sequential illumination of individual Light Source channels. This sequence cycles through automatically, with triggering synchronised via the global TTL input of the pE-400 and a single TTL output from a camera or other hardware. When operating in Sequence Runner mode, a TTL trigger signal injected into the global TTL input causes the Light Source to extinguish any illuminated channels and illuminate the next channel in the sequence. - Page 24 Pressing the increase irradiance button (+) and decrease irradiance button (-) on the Control Pod sets the irradiance value of the associated channel. With the order and irradiance values set, pressing the on/off button on the Control Pod initiates the sequence. Figure 35 Note that while a sequence is in progress (ON), changes to the channel order and...
- Page 25 Select the desired channels using the Channel Select Control Box. The order in which channels are selected and deselected determines the order that channels illuminate when a TTL signal is injected. The sequence number is displayed next to the Channel Select Control Box.
-
Page 26: Excitation Filters
For information on the applications and benefits of this feature, please see https://www.coolled.com/products/pe-400max/. Excitation filter holders natively accept 32 mm excitation filters, while 25 mm excitation filters must be installed into an adaptor ring before being fitted into the filter holder. - Page 27 Figure 42 Figure 41 Figure 44 Figure 43 Figure 45 Figure 46 Figure 47 DOC-075 Iss 1...
-
Page 28: Optical Adjustment
To optimise the pE-400 Series Light Source, take the following steps: 1. Loosen the focus adjustment thumbscrew by rotating the screw anti-clockwise. Figure 48 – A pE-400 Series Direct Fit Light Source focus adjustment thumbscrew. Rotating the thumbscrew anti-clockwise loosens the Light Source focus adjustment. -
Page 29: Product Options And Order Codes
Figure 50 – Focus the pE-400 Series Light Source by sliding the thumbscrew forwards and backwards. 4. With optimum focus achieved, the thumbscrew must be fastened (rotated clockwise) to retain the focus position. Figure 51 – Fasten the thumbscrew by rotating it clockwise. -
Page 30: Compliance
CoolLED Light Source you wish to recycle. CoolLED will arrange for the collection of the Light Source free of charge. If you are taking delivery of a replacement CoolLED Light Source, why not send the old one back in the packing box of the new one? -
Page 31: Contact Details
WEBSITE https://www.coolled.com 15. Product Specifications SUPPORTED OPERATION SYSTEMS Compatible Operating Windows 11 Systems Windows 10 Earlier Windows versions (with CoolLED pE-Driver) POWER Input 100 to 240 VAC, 50/60 Hz Power Consumption 80 Watts (max) 2 Watts (Idle) Power Supply Meanwell GS120A12-R7B... - Page 32 pE-400 Control Pod 125 x 90 x 40 mm pE-400 Control Pod 125 x 90 x 40 mm WEIGHTS pE-400 Direct Fit 1.8 kg pE-400 Liquid Light 1.9 kg Guide pE-400 Direct Fit 2.1 kg pE-400 Liquid Light 2.2 kg Guide pE-400 Direct Fit...
-
Page 33: Appendix
16. Appendix 16.1. Boot Load Procedure Occasionally it may be necessary to upgrade the firmware of the pE-400 Series Light Source. Should an upgrade be required, the following steps must be taken. 1. Contact support@coolled.com to secure the required binary (firmware) file. - Page 34 Figure 52 – Firmware update window is accessed through the Tools menu in LightBridge. Figure 53 – Firmware update window. 10. Click the ellipsis (...) button adjacent to the File: box to reveal a Windows file dialogue box. DOC-075 Iss 1...
- Page 35 Figure 54 – Windows file dialogue box. 11. Use the file dialogue box to locate and select the binary file copied in step 1. 12. With the file path populated in the File box, click the Start Flashing button (Figure 55).
- Page 36 Figure 56 – Firmware update window, ready to click Exit. 14. To complete the upgrade, power the Light Source down and back up again using the Power Switch. 15. Observe that the Light Source Status indicator again indicates Online. 16. The upgrade is now complete. Note: If attempting to initiate the boot loader procedure without the Light Source being in boot load mode, the following notification will appear:...
Need help?
Do you have a question about the pE-400max and is the answer not in the manual?
Questions and answers