Table of Contents
Advertisement
Advertisement
Table of Contents

Related Manuals for HighLine NT60


Summary of Contents for HighLine NT60
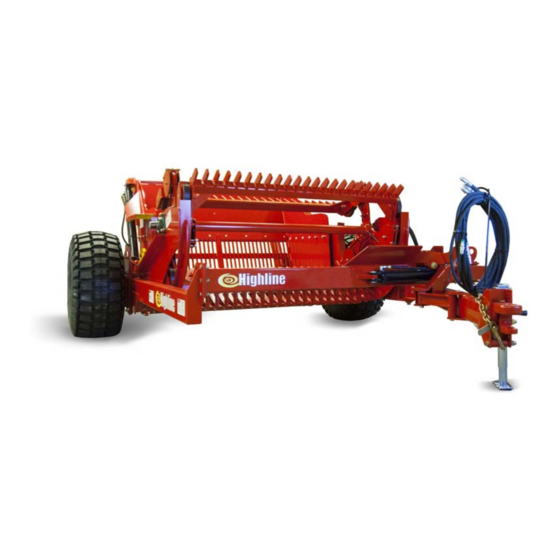
- Page 1 NT Rockpicker NT78 / NT60 / NT44 O p e r a t o r s M a n u a l E14128V3_A...
- Page 2 The content of this manual was based on the most current information available as of the date of copyright. It is the policy of Highline Manufacturing Limited to improve and develop our products continually. We reserve the right to make changes or add improvements, at any time, without incurring any obligation to make changes or improvements on machines previously sold.
- Page 3 If you find that you require information not covered in this manual, please feel free to consult your local dealer. Your dealer is always able to contact Highline for this technical information. Highline Manufacturing Ltd. thanks and congratulates you for selecting a NT Rockpicker as your machine of choice.
-
Page 4: Table Of Contents
Table of Contents Section 1 Safety Serial Number ..........1 Safety Sign-off Form . - Page 5 Section 4 - Operating the Rockpicker Field Preparation ......... . 2 Check the Condition of the Apron and the Rock Bucket .
- Page 6 GENERAL DESCRIPTION OF THE ROCKPICKER The Rockpicker is designed to pick up rocks while driving in a cultivated field without the need to stop to pick up the rocks. The hitch is hydraulically operated to move from the transport position to the working position. There are 2 hitch working positions.
- Page 7 This Page Left Blank...
-
Page 8: Serial Number
Section 1 - Safety SERIAL NUMBER Your serial number is found on the serial number plate (1) attached to the NT Rockpicker on the left front frame member. 215269C Serial Plate Location It is important to record the serial number for proof of ownership and for any service or maintenance assistance. -
Page 9: Safety Sign-Off Form
Highline Manufacturing Ltd. follows the general Safety Standards specified by the American Society of Agricultural Engineers (ASAE) and the Occupational Safety and Health Administration (OSHA). Anyone who will be operating and/or maintaining the Highline NT Rockpicker should read and clearly understand all Safety, Operating and Maintenance information presented in this manual. -
Page 10: Safety Alert Symbol
Section 1 - Safety SAFETY ALERT SYMBOL The Safety Alert Symbol means: ATTENTION! BECOME ALERT! YOUR SAFETY IS INVOLVED! The Safety Alert Symbol combined with a Signal Word alert to the presence of a hazard and the degree of possible injury. Indicates an imminently hazardous situation that, if not avoided, WILL result in DEATH OR SERIOUS INJURY. -
Page 11: General Safety
3. Replaced parts that displayed a decal should also display the current decal. 4. Decals are available from the Highline Parts Department. 5. Be familiar with the decals, the type of warning and the area or function(s) related to the area(s) that requires your awareness. - Page 12 Section 1 - Safety DO NOT ENTER THE PICKUP REEL APRON AREA Contact with the moving pickup reel or spring loaded bats will cause serious injury or death. The pickup bats are spring loaded. When a rock is lodged, the springs are under pressure.
- Page 13 Section 1 - Safety DO NOT RIDE ON ROCKPICKER Riders can fall from the machine which will cause serious injury or death. Riding on the Rockpicker while operating will result in serious injury or death from rocks that may be thrown. STAY BACK FROM ROCKPICKER WHILE IN OPERATION Rotating bats may throw rocks causing injury or death.
- Page 14 Section 1 - Safety DO NOT PLACE HANDS OR FEET IN THE APRON REST AREA Serious injury could result if hands or feet are clamped in this area. DO NOT PLACE HANDS IN THIS AREA WHEN RAISING OR LOWERING THE BUCKET Serious injury could result if hands are place in this clamping area.
- Page 15 Section 1 - Safety INSTALL APRON LOCKS ON BOTH SIDES Install the apron locks on both sides when transporting or when servicing the rockpicker. Serious injury from the apron lowering could result if both locks are not installed. SHUTDOWN THE TRACTOR BEFORE DISMOUNTING TRACTOR Shut down the tractor and remove the key before repairing, servicing, lubricating or cleaning the rockpicker.
-
Page 16: Safety Decal Locations
Section 1 - Safety SAFETY DECAL LOCATIONS NTV3Iso Page 1-9... - Page 17 Section 1 - Safety This Page Left Blank Page 1-10...
-
Page 18: Transporting The Rockpicker
Section 2 - Transporting the Rockpicker Transporting Only tow the Rockpicker behind a properly sized and equipped tractor or vehicle which exceeds weight loaded Rockpicker by 50%. Shut off tractor before attaching the rockpicker or hydraulics. Do not allow children or other people to ride on the tractor or Rockpicker. -
Page 19: Lift The Hitch With The Jack
Section 2 - Transporting the Rockpicker Install the 3 in 1 hitch using the following components if not using the clevis hitch. ITEM DESCRIPTION PLATE,TOP,CAST BOLT,HEX,3/4X2-1/2,UNC,GR5,ZP CUSHION,POLYURETHANE,90 BLOCK,V,CAST,80-55-06 2. Lift the hitch with the jack The hitch is heavy. Do not attempt to lift the hitch without using the jack. -
Page 20: Connect The Hydraulic Hoses
Section 2 - Transporting the Rockpicker 6. Connect the hydraulic hoses. One set of hydraulic hoses is used for adjusting the picker’s collecting apron height and dumping the bucket when full of rocks. The second set of hoses is used to drive the rock picker reel motor. - Page 21 Section 2 - Transporting the Rockpicker 9. Remove the left apron lock (1) from the storage position on the left side of the frame behind the motor. Remove the clip pin (2). Install the apron lock (1) on the left side of the apron.
-
Page 22: Move The Hitch Into The Transport Position
Section 2 - Transporting the Rockpicker Install the apron lock (1) on the right side of the apron. Place the pin of the lock into the hole of the apron. 216227C Install Apron Lock - Right Side Move the hitch into the transport position. -
Page 23: Ensure The Hitch Lock Is Lowered
Section 2 - Transporting the Rockpicker Ensure the hitch lock (3) is lowered and engaged in the hitch linkage before transporting. 216237C Hitch Lock Engaged Check the condition of the tires. 217209 Check Condition of the Tires Ensure that the lug nuts have the cone side of the lug nut against the wheel rim. -
Page 24: Preparing The Rockpicker
Section 3 - Preparing the Rockpicker Preparing the Rockpicker Do not ride on the rockpicker. Riders can fall from the machine which will cause serious injury or death. Riding on the Rockpicker while operating will result in serious injury or death from rocks being thrown. -
Page 25: Check The Condition Of The Apron And The Rock Bucket
Section 3 - Preparing the Rockpicker Shut down the tractor and remove the key before repairing, servicing, lubricating cleaning machine. Relieve all hydraulic pressure in the hoses before going near the machine. 1. Check the condition of the apron and the rock bucket. -
Page 26: Remove Any Rocks That Are Wedged In The Bat Teeth
Section 3 - Preparing the Rockpicker 3. Remove any rocks that are wedged in the bat teeth. 214021 Remove Rocks from Bat Teeth 4. Remove from the bucket any debris or rocks that would hinder soil from exiting. 214022 Remove Debris From Bucket 5. -
Page 27: Inspect The Motor, Hydraulic Cylinders And Hoses
Section 3 - Preparing the Rockpicker 6. Inspect the motor, hydraulic cylinders and hoses. Use a piece of cardboard or heavy paper to check for leaks. Do not use your hand. Wear proper hand and eye protection when searching for leaks. Relieve pressure on hydraulic system before repairing, adjusting or disconnecting. -
Page 28: Hitch Working Positions
Section 3 - Preparing the Rockpicker Hitch Working Positions There are 2 possible working positions for the hitch: Position 1 is for tractors using dual rear tires. 215248 Hitch Position 1 - Dual Tractor Tires 217008 This hitch position moves the rockpicker further to the right of the tractor (more than Position 2) to give greater visibility of the picking process. -
Page 29: Setting The Hitch For Position 1 - Dual Tractor Tires
Section 3 - Preparing the Rockpicker Setting the Hitch for Position 1 - Dual Tractor Tires For NT 78, NT60 and NT44 Remove the cylinder pin from the base of the cylinder (1). Remove the locking bolt and locknut (2) from the swing arm pin. Remove the swing arm pin (3). -
Page 30: Setting The Hitch For Position 2 - Single Tractor Tires
Section 3 - Preparing the Rockpicker Setting the Hitch for Position 2 - Single Tractor Tires For NT 78, NT60 and NT44 Remove the cylinder pin from the base of the cylinder (1). Remove the locking bolt and locknut (2) from the swing arm pin. Remove the swing arm pin (3). - Page 31 Section 3 - Preparing the Rockpicker This Page Left Blank Page 3-8...
-
Page 32: Operating The Rockpicker
Section 4 - Operating the Rockpicker Operating The Rockpicker Do not ride on the rockpicker. Riders can fall from the machine which will cause serious injury or death. Riding on the rockpicker while operating will result in serious injury or death from rocks being thrown. -
Page 33: Field Preparation
Section 4 - Operating the Rockpicker Field Preparation Field preparation plays a major role in the performance of the rock picker. For best picking conditions, the field should be cultivated prior to picking. 108184 Prepared Field With Rocks Exposed Cultivating brings stones to the surface and buries field residues. -
Page 34: Raise The Hitch Transport Lock
Section 4 - Operating the Rockpicker 2. Raise the hitch transport lock (1) from the hitch linkage to allow the hitch to move into the working position. 3. Fully raise the apron to remove any 214139-1C Raise the Hitch Lock pressure on the apron transport locks. - Page 35 Section 4 - Operating the Rockpicker 6. Remove the apron lock (1) on the right side of the apron. Remove the clip pin. Remove the lock from the apron. 216227C Remove the Apron Lock - Right Side 7. Place the right apron lock (1) into the storage position on the right side of the frame behind the motor.
-
Page 36: Move The Hitch Into The Working Position
Section 4 - Operating the Rockpicker 8. Move the hitch into the working position. Note: There are 2 possible working hitch positions: Position 1 is designed for use with a tractor having dual rear tires. 215248 Hitch Position 1 -Dual Tractor Tire Position 2 is designed for use with a tractor having single rear tires. -
Page 37: Operate The Rockpicker
Section 4 - Operating the Rockpicker 9. Lower the apron so that it is just at the surface of the dirt to pick up rocks but does not dig into the dirt. The apron height is adjusted through the bucket dump hydraulic cylinders. To lower the apron, extend the bucket dump cylinders. -
Page 38: Unloading The Rock Bucket
Section 4 - Operating the Rockpicker Dumping the Rocks Do not transport the rockpicker on public roadways with rocks in the bucket. Rocks may fall out of the bucket resulting in an accident. Stand clear when the bucket is being raised or lowered. A raised bucket can fall causing serious injury or death. -
Page 39: Removing Rocks Lodged In The Apron
Section 4 - Operating the Rockpicker Removing Rocks Lodged in the Apron Do not enter the pickup reel apron area! When rocks are lodged against the spring, the springs are under pressure. The bats could release rapidly causing serious injury or death. -
Page 40: Rock Removal Approach 2
Section 4 - Operating the Rockpicker Rock Removal Approach 2 Chain the Pickup Reel to Prevent All Movement Remove Spring Pressure from the Bat Note: Try Rock Removal Approach 1 before attempting Rock Removal Approach 2. Approach 2 involves entering the apron/reel pickup area. - Page 41 Section 4 - Operating the Rockpicker 5. Disconnect the hydraulic hoses from the tractor. 108008 Disconnect Hydraulics 6. Place a chain around the front top bat and around the front bar of the rockpicker. Tighten to prevent the reel from turning when the spring pressure of the lodged bat is released.
- Page 42 Section 4 - Operating the Rockpicker 8. Place a chain winch around the lower bat and the reel center rod. Tighten the winch to move the bat against the spring pressure until the rock is free to be moved. 9. Remove the lodged rock from the apron area.
- Page 43 Section 4 - Operating the Rockpicker This Page Left Blank Page 4-12...
-
Page 44: Maintaining The Rockpicker
Section 5 - Maintaining the Rockpicker Shut down the tractor and remove the key before repairing, servicing, lubricating cleaning machine. Relieve all hydraulic pressure in hoses. Disconnect hydraulic hoses from the tractor before going near the machine. Rock Bucket Do not work under a loaded bucket. -
Page 45: Removing The Bucket Lift Locks
Section 5 - Maintaining the Rockpicker 4. Install one lock (2) on each cylinder rod. Secure the lock in place with the retaining pin. 217208C Lock on Bucket Cylinder Removing the Bucket Lift Locks: Both locks must be removed before hydraulic pressure is applied to lower the bucket. -
Page 46: Lubrication
Section 5 - Maintaining the Rockpicker Lubrication Lubricate all grease fittings with a lithium soap compatible E.P. grease meeting the N.L.G.I. #2 specifications and containing no more than 1% molybdenum disulfide. Every 100 Hours ! Lubricate the pickup reel bearings - 2 points. -
Page 47: Check The Gearbox Oil
Section 5 - Maintaining the Rockpicker Check the Gearbox Oil Remove the lower plug (1) on the face of the gearbox to check the oil level. The oil should be at the bottom of the plug. If additional oil is needed, remove the top vent plug (2) and add #90 gear oil until the oil is at the bottom of the lower plug. -
Page 48: Visually Inspect Hydraulic Hoses/Fittings
Section 5 - Maintaining the Rockpicker Visually Inspect Hydraulic Hoses/Fittings Shut down the machine and replace the hydraulic hose assembly if any of the following conditions exist: Fitting slippage on hose. Damaged, cracked, cut or abraded cover (any reinforcement exposed). Hard, stiff, heat cracked or charred hose. -
Page 49: Changing The Reel Springs
Section 5 - Maintaining the Rockpicker Changing the Reel Springs Shut down the tractor and remove before repairing, servicing, lubricating or cleaning the machine. Relieve all hydraulic pressure in hoses. Disconnect hydraulic hoses from the tractor before going near the machine. Removing the Springs Before proceeding, ensure there is no spring pressure on any of the bats. -
Page 50: Installing The Springs
Section 5 - Maintaining the Rockpicker Installing the Springs Note: There are 2 types of spring holding assemblies: One type has 3 bolts on the spring plates. The other type has 2 bolts on the spring plates. The installation procedure is different depending on the type of spring holding assembly. - Page 51 Section 5 - Maintaining the Rockpicker 4. Insert the cover plate bolt (4) and nut. (Do not fully tighten at this time.) 5. Lubricate the threads of the spring tension bolt (5). 6. Fully tighten the spring tension bolt (5) to place tension onto the springs.
- Page 52 Section 5 - Maintaining the Rockpicker 4. Insert the cover plate bolt (4) and nut. (Do not fully tighten at this time.) 5. Lubricate the threads of the spring tension bolt (5). 6. Fully tighten the spring tension bolt (5) to place tension onto the springs.
- Page 53 Section 5 - Maintaining the Rockpicker This Page Left Blank Page 5 -10...
-
Page 54: Storing The Rockpicker
Section 6 - Storing the Rockpicker Storing the Rockpicker Instructions for storing longer than a week: 1. Remove the apron locks (if installed) to allow lifting of the rock bucket. The apron locks will be re-installed later. Fully raise the apron to remove any pressure on the apron transport locks. - Page 55 Section 6 - Storing the Rockpicker Right Lock Remove the apron lock (1) on the right side of the apron. Remove the clip pin. Remove the lock from the apron. 216227C Remove the Apron Lock - Right Side Place the right apron lock (1) into the storage position on the right side of the frame behind the motor.
-
Page 56: Empty The Bucket Of All The Rocks
Section 6 - Storing the Rockpicker 2. Empty the bucket of all the rocks. Do not disconnect the hitch when the bucket is lifted. There is an upending hazard at the hitch when the bucket is lifted. 215261-1 Empty The Bucket of All Rocks 3. -
Page 57: Move The Hitch To The Transport Position
Section 6 - Storing the Rockpicker 4. Park the rockpicker on level ground. 5. Move the hitch to the transport position with hitch cylinder completely retracted. Lower the hitch lock onto the hitch. 6. Raise the apron until the bucket lift cylinders are completely retracted. - Page 58 Section 6 - Storing the Rockpicker 9. Remove the right apron lock (1) from the storage position on the right side of the frame behind the motor. Remove the clip pin (2). 216235C Remove the Right Apron Lock Install the apron lock (1) on the right side of the apron.
-
Page 59: Place The Jack Onto The Hitch
Section 6 - Storing the Rockpicker Place the jack onto the hitch. Rotate the jack from the storage position. Pin the jack in place on the hitch. Ensure that the jack is resting on solid level ground or resting on a wood block. -
Page 60: Lubricate The Right And Left Reel Bearings
Section 6 - Storing the Rockpicker Lubricate the right and left reel bearings. (See Section 5). Change the oil in the gearbox. See Section 5 for the oil changing procedures. Fill the gearbox to the oil level as outlined Maintenance Section. - Page 61 Section 6 - Storing the Rockpicker This Page Left Blank Page 6-8...
-
Page 62: Troubleshooting
Section 7 - Troubleshooting Troubleshooting Hitch Symptom Problem Solution Hitch not moving into Hitch transport lock Lift hitch transport lock working position engaged Hydraulic cylinder Check hydraulic connections and lines. Check hydraulic cylinder is working Not moving into Position 1 Move hitch parts for Position (Dual Tractor Tires) 1 (See Section 3 - "Setting... - Page 63 Replace valve with Highline part Rock bat is flopping Bat springs Check for loose or broken springs. Tighten springs to full tension. Replace broken spring with Highline part Reel bolts loose Tighten bolts Apron Symptom Problem Solution Apron does not lower...
- Page 64 Section 7 - Troubleshooting Rock Bucket Symptom Problem Solution Bucket will not raise Hydraulic Check hydraulic connections, lines and cylinders Too much weight Remove some rocks Apron Locks Remove the apron locks to allow the apron to fully lower so the bucket can rise Rocks on Frame Rocks on frame preventing the apron from fully...
- Page 65 Section 7 - Troubleshooting This Page Left Blank Page 7-4...
- Page 66 Section 8 - Specifications Specifications NT78 NT60 NT44 7850 lbs 6910 lbs 6170 lbs Weight - Empty (Calculated) (3532 kg) (3109 kg) (2776 kg) 940 lb (423 kg) 820 lb (369 kg) 720 lb (324 kg) Tongue Weight 242" 245 1/4" 247 3/4"...
- Page 67 Section 8 - Specifications Hydraulic Outlets 2500 psi 2500 psi 2500 psi Pressure (17237 kPa) (17237 kPa) (17237 kPa) 18 gpm 18 gpm 18 gpm Flow Required (68 l/min) (68 l/min) (68 l/min) 2" (51 mm) 2" (51 mm) 2" (51 mm) Minimum Rock Diameter Pickup 24"...
- Page 68 (1) full year after initial purchase/retail sale. Highline will warrant its product for one (1) year parts and labour, if performed by a qualified Dealer. This Limited Warranty shall apply only to complete machines of Highline's manufacture. Parts are covered by a separate Limited Warranty.
- Page 69 12. Depreciation damage caused by normal wear, lack of reasonable and proper maintenance, failure to follow operating instructions, misuse, and/or lack of proper protection during storage. 13. Accessory systems and electronics not of Highline's manufacture are warranted only to the extent of such manufacturer's respective Limited Warranty if any.
Need help?
Do you have a question about the NT60 and is the answer not in the manual?
Questions and answers