Table of Contents
Advertisement
Quick Links
Advertisement
Table of Contents
Troubleshooting

Related Manuals for Precor Experience TRM600-18


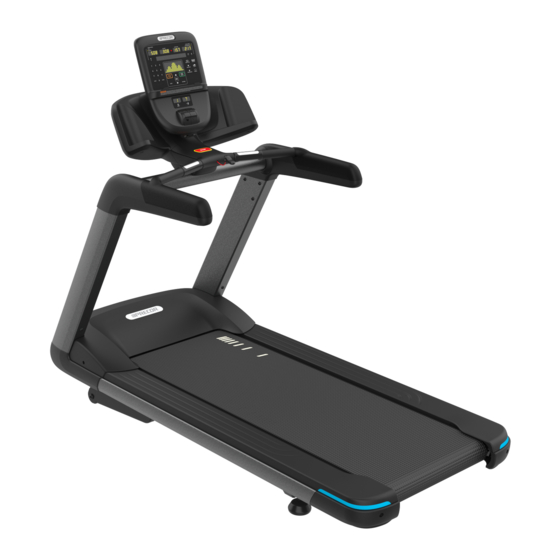
Summary of Contents for Precor Experience TRM600-18
- Page 1 Service Manual Experience™ Series 600 line TRM600-18 Treadmills...
-
Page 2: Table Of Contents
Fastener Torque Specification Calibration Specification Bolt Grade Identification Bolt Grade Markings Chart Parts Lubricants Cleaning Procedure Approved Cleaning Products Cleaning Procedure Power Requirements Equipment Power Requirements Plugs and Outlets Contact Precor Customer Support at support@precor.com or 800.786.8404 with Page ii any questions. - Page 3 Debug Information Report shortcut Navigating the Service Menus P10, P30, P30i and P31 LED consoles P10, P30 and P31 consoles P30i consoles P80 and P82 touchscreen consoles Contact Precor Customer Support at support@precor.com or 800.786.8404 with Page iii any questions.
- Page 4 Available Adjustment Procedures Drive Belt Tension and Alignment Adjustment About Specifications Procedure Running Belt Tension and Tracking Adjustment About Videos Tools Specification Procedure Lift Motor Calibration About Contact Precor Customer Support at support@precor.com or 800.786.8404 with Page iv any questions.
- Page 5 Side Arm Upper/Lower Covers Replacement Power Cord Replacement About Procedure ON/OFF Circuit Breaker Switch Replacement About Wire Diagram Procedure E-Stop "Emergency Switch" Replacement About Procedure Motor Controller (MC) Replacement About Contact Precor Customer Support at support@precor.com or 800.786.8404 with Page v any questions.
- Page 6 Procedure Drive Roller Replacement About Procedure Take-up Roller Replacement About Procedure Removal Installation Running Belt and Deck Replacement Procedure About Procedure Lift Motor Replacement About Videos Specification Contact Precor Customer Support at support@precor.com or 800.786.8404 with Page vi any questions.
- Page 7 Viewing Error Codes (Error Log & CPA Event Log) Error Code and Troubleshooting Guide Troubleshooting with Error Codes Error Log & CPA Event Log About Error Log CPA Event Log System Troubleshooting Procedures Contact Precor Customer Support at support@precor.com or 800.786.8404 with Page vii any questions.
- Page 8 TRM600, TRM700, TRM800 feature/components comparison Console Upper PCA and Base Lower PCA Operation Console - Upper PCA board (UPCA) Base - Lower PCA board (LPCA) TRM600/700/800 Common Frame Overview Contact Precor Customer Support at support@precor.com or 800.786.8404 with Page viii any questions.
- Page 9 Parts List - TRM600-18, 120 V Parts List - TRM600-18, 240 V Appendix A : Edition Information Edition Additional Documentation Copyright Appendix B : Notices and Safety Contact Precor Customer Support at support@precor.com or 800.786.8404 with Page ix any questions.
- Page 10 Trademarks Intellectual Property Warranty Safety Notices Service Safety Guidelines Contact Precor Customer Support at support@precor.com or 800.786.8404 with Page x any questions.
-
Page 11: Introduction
Introduction Only Precor certified technicians are authorized to service Precor equipment. If you are not a Precor certified servicer, you must not attempt to service any Precor product. Call your dealer for service information WARNING: This service documentation is for use by Precor certified servicer pro- viders only. -
Page 12: Service Manual Contents
"Preventive Maintenance (PM)" on page 225 "Theory of Operation" on page 232 "System Wiring Diagram" on page 244 "Parts " on page 251 "Service Safety Guidelines" on the facing page Contact Precor Customer Support at support@precor.com or 800.786.8404 with Page 2 any questions. -
Page 13: Service Safety Guidelines
Service Safety Guidelines WARNING: Only Precor certified servicers and technicians are permitted to ser- vice Precor products. Personal injury can result from electrical shock and/or mech- anical moving parts. Review the following safety information prior to servicing the equipment. This safety inform- ation will help to prevent personal injury or damage to the equipment while servicing the equipment. - Page 14 Remove jewelry (especially from ears and neck). Tie up long hair. Remove neck ties. Do not wear loose clothing. See Also "Notices and Safety" on page ii "Safety Notices" on page iii Contact Precor Customer Support at support@precor.com or 800.786.8404 with Page 4 any questions.
-
Page 15: General Information
52 lb / 23.6 kg high-density fiberboard core with phen- olic laminate bonded on both sides. Can be flipped to double life. Drive/Take-up Rollers Steel tapered rollers keep the belt centered to reduce main- tenance. Contact Precor Customer Support at support@precor.com or 800.786.8404 with Page 5 any questions. - Page 16 Ground Effects Impact Control System: Patented treadmill design that out performs a nat- ural running surface, absorbs high-impact movement, reduces joint stress and minimizes fatigue and supports a solid and controlled push off. Contact Precor Customer Support at support@precor.com or 800.786.8404 with Page 6 any questions.
-
Page 17: Model And Serial Numbers
6-P62 Arms : AMT 7-Experience Stand- 4-R40 : Upright 3-P30, P31 : Recumbent 6-Experience Good 2-P20/R20 Treadmill Elliptical Fitness Crosstrainer Adaptive Motion Trainer Upright Bike Recumbent Bike Contact Precor Customer Support at support@precor.com or 800.786.8404 with Page 7 any questions. -
Page 18: Serial Numbers
1 letter build month code, a 2 digit day built, a 2 digit year built and a four digit consecutive daily build number. Spinner Indoor Cycle Contact Precor Customer Support at support@precor.com or 800.786.8404 with Page 8 any questions. -
Page 19: Serial Number Label Location
Do not use a label attached to a plastic cover, the cover may have been replaced from a different machine. Orientation The equipment orientation (front, right, left, & back) is referenced to an exerciser standing on the machine facing the console. Contact Precor Customer Support at support@precor.com or 800.786.8404 with Page 9 any questions. -
Page 20: Tools And Supplies
5 NM torque is equivalent to 5 newton's of force applied one meter from the center of the bolt, 6 ft-lb is equivalent to 6 lbs of force applied 1 foot away from the center of the bolt. Heart Rate Contact Precor Customer Support at support@precor.com or 800.786.8404 with Page 10 any questions. -
Page 21: Specification Summary
Forbo - Running Belt: tension gauge dial reading 3.55 (0.55%) (percent %) Radio Frequency: Identifies electromagnetic signals with frequency spectrum between the 3 kHz (3,000 hertz) to 300 GHz (300 billion hertz) range. Contact Precor Customer Support at support@precor.com or 800.786.8404 with Page 11 any questions. -
Page 22: Bolt Grade Identification
BOLT. Bolt Grade Markings Chart Example bolt grades used on Precor equipment (may not represent all bolt grades). Always match the replacement bolt grade marking to the removed bolt grade marking. Contact Precor Customer Support at support@precor.com or 800.786.8404 with Page 12 any questions. -
Page 23: Parts
Parts IMPORTANT: Always purchase OEM replacement parts and hardware from Pre- cor. If you use parts not approved by Precor, you could void the Precor Limited War- ranty. Use of parts not approved by Precor may cause injury. There is a copy of the parts Exploded View Diagram and Parts Identification List included in the Parts chapter (see Parts)that you can use as a quick reference. -
Page 24: Cleaning Procedure
Generic cleaning procedure applicable to all Precor equipment: TIP: There are many product specific PREVENTATIVE MAINTENANCE cleaning videos available on the Precor Connect SERVICE VIDEOS web page. Log in to your Precor Connect servicer account and select SERVICE VIDEOS, see Personal Viewing System display. -
Page 25: Power Requirements
The hertz (symbol: Hz) is the derived unit of frequency in the International System of Units (SI) and is defined as one cycle per second. Contact Precor Customer Support at support@precor.com or 800.786.8404 with Page 15 any questions. -
Page 26: Plugs And Outlets
Individual branch circuit requirement (US and Canada installations) Each Precor treadmill must be connected to a separate 20 amp individual branch circuit out- let. No other devices can be connected to the same circuit outlet except for one optional PVS (Personal Viewing System) display if installed. - Page 27 IEC 320-C19 inlet supporting applicable country-specific power cord Device power cord connector or electrical cable male connector that is inserted into an electrical receptacle "outlet" (also called the plug-in). Contact Precor Customer Support at support@precor.com or 800.786.8404 with Page 17 any questions.
-
Page 28: Console & Pvs Display Power Requirements
The machine power cord must be plugged in and switched ON to power up and use the console. The console power is independent of the machine workout oper- ation. Contact Precor Customer Support at support@precor.com or 800.786.8404 with Page 18 any questions. -
Page 29: Touchscreen Consoles (P62, P80, And P82)
43 W max AC/DC adapter specification: AC/DC Adaptor Specification input voltage 100v-240v output power rating 60W/12Vdc/5A Direct Current: electrical current that only flows in one direction. Contact Precor Customer Support at support@precor.com or 800.786.8404 with Page 19 any questions. -
Page 30: Cable Tv Rf Power Requirements
N after the receiver filters: in terms of power: CNR = C/N, in terms of decibels CNR (dB) = 10Log(C/N) = C (dBm) – N (dBm). Contact Precor Customer Support at support@precor.com or 800.786.8404 with Page 20 any questions. -
Page 31: Ethernet (Lan) Input Signal Requirements
The touchscreen consoles P62, P80, and P82) use a security token for communication to the Precor servers. The security token is a hash string that is sent with every API call from the FE’s to the Amazon Cloud. The security token originates after the equipment is registered at the location. - Page 32 2 General Information Equipment Spacing Requirement Contact Precor Customer Support at support@precor.com or 800.786.8404 with Page 22 any questions.
-
Page 33: Operation Verification
1. Access the Service menu (51765761) and perform the following console System Tests (Settings > System Settings > System Tests): Touchscreen Calibration: Follow screen prompts to complete test. Touchscreen console Control Processing Assembly. Contact Precor Customer Support at support@precor.com or 800.786.8404 with Page 23 any questions. - Page 34 Verify that the lift motor operation is smooth while changing the INCLINE from minimum to maximum levels. Verify that the console INCLINE level indicators and user workout displays are showing correct information. Running Belt Test (Internet Only) Contact Precor Customer Support at support@precor.com or 800.786.8404 with Page 24 any questions.
- Page 35 Emergency Stop: Safety clip and lanyard attached to the stop switch to immediately turn off power bringing the treadmill to a stop. Handheld Handlebar Heart Rate Heart Rate Contact Precor Customer Support at support@precor.com or 800.786.8404 with Page 25 any questions.
- Page 36 4. On successful completion of all verification tests, return to service. ANT+ (pronounced ant plus) is a wireless protocol for monitoring sensor data such as a person's heart rate or a bicycle's tire pressure Contact Precor Customer Support at support@precor.com or 800.786.8404 with Page 26 any questions.
-
Page 37: Standard Service Menus
Standard Service Menus About There is a set of equipment Standard Service Menus that are supported across Precor car- dio product lines designed to allow servicers and clubs to manage, configure/setup, and maintain/test the equipment: The service menus are grouped into functional service cat-... -
Page 38: Touchscreen Consoles: P62, P80, And P82
Note: Service access code 65 "Information Display" is not used on touchscreen consoles. The Information Display menus are integrated into the Service Settings menus. Contact Precor Customer Support at support@precor.com or 800.786.8404 with Page 28 any questions. -
Page 39: How To Access The Standard Service Menus
Have the service access code ready and then use the following instructions to access the standard service menu: Steps: P10/P30/P31 Press the PAUSE hardkey and immediately use the keypad to type in consoles: the access code. Contact Precor Customer Support at support@precor.com or 800.786.8404 with Page 29 any questions. -
Page 40: P80 Touchscreen Console
3. Use the touch keypad to type in the service access code. P62 and P82 touchscreen consoles Diagnostics menu access Have the service access code ready and then use the following instructions to access the standard service menu: Contact Precor Customer Support at support@precor.com or 800.786.8404 with Page 30 any questions. -
Page 41: Touchscreen Display Calibration Shortcut
2. Press and hold the VOL down key while pressing CH up >CH down > CH down > CH up: 3. At the Sign-In screen, type in the service access code. Touchscreen Display Calibration shortcut Console shortcut to access the Touchscreen Calibration test. Contact Precor Customer Support at support@precor.com or 800.786.8404 with Page 31 any questions. -
Page 42: Debug Information Report Shortcut
Short for Universal Serial Bus, is an industry standard developed in the mid-1990s that defines the cables, connectors and communications protocols used in a bus for connection, communication, and power supply between computers and electronic devices. Contact Precor Customer Support at support@precor.com or 800.786.8404 with Page 32 any questions. - Page 43 4 Standard Service Menus How to Access the Standard Service Menus IMPORTANT: Do not remove the USB drive until the "Report was successful" mes- sage is shown, (approx. 1 min). Contact Precor Customer Support at support@precor.com or 800.786.8404 with Page 33 any questions.
-
Page 44: Navigating The Service Menus
Error Log or show the "Stuck Key" mes- sage when there are no logged errors. INCLINE numeric keys Use as the numeric keypad to type in numeric inputs (access codes etc.). Contact Precor Customer Support at support@precor.com or 800.786.8404 with Page 34 any questions. -
Page 45: P80 And P82 Touchscreen Consoles
Scroll Up/Dwn Use your finger to select while swiping your finger Up/Dwn to scroll through menu lists. Some menus provide an on-screen scroll bar to scroll Up/Dwn. Contact Precor Customer Support at support@precor.com or 800.786.8404 with Page 35 any questions. -
Page 46: Led Console Standard Service Menus
Tests the console LEDs. Successively press the OK key to DISPLAY TEST verify each group of LEDs and verify that all LEDs illuminate. Press Back to exit the test. Contact Precor Customer Support at support@precor.com or 800.786.8404 with Page 36 any questions. - Page 47 Active Status Light: Service and maintenance status light. Motor controller, motor controller unit, or motor controller module: used on treadmills, con- tains the LPCA and motor controller functionality. Contact Precor Customer Support at support@precor.com or 800.786.8404 with Page 37 any questions.
-
Page 48: Club Settings Menu (5651565)
(MCU). On self-powered units, it is the lower PCA console to base function inter- face. Emergency Stop: Safety clip and lanyard attached to the stop switch to immediately turn off power bringing the treadmill to a stop. Contact Precor Customer Support at support@precor.com or 800.786.8404 with Page 38 any questions. - Page 49 Either enabled or disabled, the setting allows the unit to access specialized fitness tests designed for police, fire fighters and the HIDDEN PROGRAMS military. Default: disabled Elliptical Fitness Crosstrainer Contact Precor Customer Support at support@precor.com or 800.786.8404 with Page 39 any questions.
-
Page 50: Information Display
TRM800 version 1 treadmills mfg. dates 2010 thru 2014. TRM800 version 1 treadmills mfg. dates 2010 thru 2014. Printed circuit assembly, generally referred to as either an upper PCA or lower PCA. Contact Precor Customer Support at support@precor.com or 800.786.8404 with Page 40 any questions. - Page 51 The console upper base software version information. MAIN CONSOLE SW* *P31 console only. Treadmill Alternating Current: electric current which periodically reverses direction between positive and negative polarity. Contact Precor Customer Support at support@precor.com or 800.786.8404 with Page 41 any questions.
- Page 52 (1) Only used on products with the ASL feature. Not included on the EFX600 series, the TRM600 series, or the TRM800-10 (TRM10/GEN06) series products. (2) TRM600 series treadmills only. Contact Precor Customer Support at support@precor.com or 800.786.8404 with Page 42 any questions.
-
Page 53: Touchscreen Console Standard Service Menus
LAN equipment carrying the Wi-Fi logo have been interoperability tested for compatibility with one (or more) 802.11 standards, and certified by the Wi-Fi Alliance to be sold under the Wi-Fi brand. Contact Precor Customer Support at support@precor.com or 800.786.8404 with Page 43 any questions. -
Page 54: About Menu
Note: Must be connected to the internet and register with ® (Preva Business Suite). menu: Settings > Partition Configuration Partition Con- OEM use only, contact Precor Customer Service for inform- figuration ation. menu: Settings > No Available Updates or Available Updates No Available Updates: No available software updates can be read from the USB flash drive. - Page 55 Network Time Protocol (NTP) is a networking protocol for clock synchronization between computer systems over packet-switched, variable-latency data networks. Contact Precor Customer Support at support@precor.com or 800.786.8404 with Page 45 any questions.
-
Page 56: Equipment Usage Menu
Menu: Service menu (51765761) > Settings > Maintenance Provides machine maintenance related information including: routine maintenance due status, machine operating condition, and ASL state. Adaptive Motion Trainer Upright Bike Recumbent Bike Contact Precor Customer Support at support@precor.com or 800.786.8404 with Page 46 any questions. - Page 57 • Treadmills: A belt rating of 0 or 1 will cause a blue pulsing ASL light indicating that there is a problem with the running belt/- deck and is in need of servicing or replacement. Contact Precor Customer Support at support@precor.com or 800.786.8404 with Page 47 any questions.
-
Page 58: System Settings Menu
System Settings > Connectivity > Network Type Settings: Wired, Wi-Fi Default: Wired » Network Type To connect to a network: 1. Select Network Type > Wired (or Wi-Fi) > Go. Contact Precor Customer Support at support@precor.com or 800.786.8404 with Page 48 any questions. - Page 59 Default: ON Show (enable) the Browser app. menu: System Settings > Display > News Reader Range: ON/OFF » News Reader Default: ON Show (enable) the News Reader app. Contact Precor Customer Support at support@precor.com or 800.786.8404 with Page 49 any questions.
- Page 60 Export/Import channel mapping using a USB .flash drive. Channels menu: System Settings > Audio Settings Specify the workout duration and equipment Limits for your Audio Settings menu facility. Contact Precor Customer Support at support@precor.com or 800.786.8404 with Page 50 any questions.
- Page 61 Bluetooth is a wireless technology standard for exchanging data over short distances (using short-wavelength UHF radio waves in the ISM band from 2.4 to 2.485 GHz from fixed and mobile devices, and building personal area networks (PANs). Contact Precor Customer Support at support@precor.com or 800.786.8404 with Page 51 any questions.
- Page 62 3. Follow the onscreen instructions to register the product. menu: System Settings > Manage Settings Save and restore the Connectivity, Display, Media, and Manage Settings Workout Limits settings. Contact Precor Customer Support at support@precor.com or 800.786.8404 with Page 52 any questions.
-
Page 63: System Tests Menu
RGB Test Tests the display color performance. menu: System Tests > Numeric Backlight Test Numeric Backlight Tests the movement controls LCD numeric displays backlight Test brightness level. Contact Precor Customer Support at support@precor.com or 800.786.8404 with Page 53 any questions. -
Page 64: Club Settings (5651565)
The Information Display (65) service menu found on LED consoles (P10, P30, P30i and P31) is NOT supported on touchscreen consoles (P62, P80, and P82). Refer to the following touchscreen console service menus for similar equipment inform- ation: Contact Precor Customer Support at support@precor.com or 800.786.8404 with Page 54 any questions. - Page 65 4 Standard Service Menus Touchscreen Console Standard Service Menus About menu, see "About menu" on page Equipment Usage, menu see "" on page Maintenance menu, see "" on page Contact Precor Customer Support at support@precor.com or 800.786.8404 with Page 55 any questions.
-
Page 66: Adjustment Procedures
Available Adjustment Procedures "Drive Belt Tension and Alignment Adjustment" on the facing page "Running Belt Tension and Tracking Adjustment" on page 62 "Lift Motor Calibration" on page 69 Contact Precor Customer Support at support@precor.com or 800.786.8404 with Page 56 any questions. -
Page 67: Drive Belt Tension And Alignment Adjustment
Verify that the drive belt is cor- rectly seated in the drive motor and drive roller pulley groves. Then remeasure Contact Precor Customer Support at support@precor.com or 800.786.8404 with Page 57 any questions. - Page 68 4. Place the belt tension gauge onto the Drive Belt mid distance between the drive motor and drive roller pulleys. 5. Verify that the measured Drive Belt tension is within the belt condition New or Used tension specification: Contact Precor Customer Support at support@precor.com or 800.786.8404 with Page 58 any questions.
- Page 69 6. Place the belt tension gauge onto the Drive Belt mid distance between the drive motor and drive roller pulleys. 7. Adjust the belt tension to specification: Contact Precor Customer Support at support@precor.com or 800.786.8404 with Page 59 any questions.
- Page 70 CAUTION: Only make small incremental changes to the motor position per ten- sion adjustment. Do not over tension the belt which could cause damage to the belt or motor pulley mechanism. Contact Precor Customer Support at support@precor.com or 800.786.8404 with Page 60 any questions.
- Page 71 "Drive belt alignment" on page 15. Reinstall the hood cover. 16. Switch the input power ON. 17. Verify operation and return to service, see "Operation Verification" on page Contact Precor Customer Support at support@precor.com or 800.786.8404 with Page 61 any questions.
-
Page 72: Running Belt Tension And Tracking Adjustment
Tools TOOL 5/16" Hex Key Socket and Ratchet Belt Tension Gauge (PPP000000020007101 or equivalent) (1) Proper tensioning of the belt requires the use of two tensioning gauges, Precor part number PPP000000020007101or equivalent. Specification Running Belt Specification Forbo brand running belt tension 3.55 (0.55%) -
Page 73: Procedure
Disconnect a device power cord plug or cable connector from the power receptacle or out- let. Contact Precor Customer Support at support@precor.com or 800.786.8404 with Page 63 any questions. - Page 74 8. Attach two running belt tension gauges, one on each side of the running belt and posi- tioned so that they are opposite each other. Place the gauges so that the trim landing mounting brackets do not interfere with the gauge movement. Contact Precor Customer Support at support@precor.com or 800.786.8404 with Page 64 any questions.
- Page 75 1/4 turn bolt method. Alternately adjust the left Contact Precor Customer Support at support@precor.com or 800.786.8404 with Page 65 any questions.
- Page 76 It is a belt that tracks steady and does not touch or rub the landing trim or any other frame or hardware parts. Always attempt to position the belt as close as possible to the cen- ter of the deck and rollers. Contact Precor Customer Support at support@precor.com or 800.786.8404 with Page 66 any questions.
- Page 77 Slowly turn the right side tension adjustment bolt counterclockwise in ¼ turn increments until the drifting stops. You may need to recenter the belt by care- fully bumping the belt to the right. Contact Precor Customer Support at support@precor.com or 800.786.8404 with Page 67 any questions.
- Page 78 7. Replace the hood, see "Covers and Panels Replacement" on page 8. Verify treadmill operation (see "Operation Verification" on page 23) and return to ser- vice. Contact Precor Customer Support at support@precor.com or 800.786.8404 with Page 68 any questions.
-
Page 79: Lift Motor Calibration
(by laying the treadmill on its side). Review each method and use the method that best fits your particular situation. "Front access" on page 74 (recommended) "Side access" on page Contact Precor Customer Support at support@precor.com or 800.786.8404 with Page 69 any questions. - Page 80 If the distance is within the specified limit, calibration is not required. Go to Oper- ation Verification, see "Operation Verification" on page b. If the distance is NOT within the specified limit, continue procedure and cal- ibrate the lift motor assembly. Contact Precor Customer Support at support@precor.com or 800.786.8404 with Page 70 any questions.
- Page 81 Lift motor calibration adjustment 6. Disconnect the extension tube from the lift platform weldment mounting bracket by removing the hitch pin and clevis pin. Retain part(s) and/or fastener(s) for installation. Contact Precor Customer Support at support@precor.com or 800.786.8404 with Page 71 any questions.
- Page 82 Make sure the calibration distance is within the specification limit 1 1/8 in - 1 3/16 in (2.8 cm - 3.0 cm). Contact Precor Customer Support at support@precor.com or 800.786.8404 with Page 72...
- Page 83 13. Review the Error Log and verify that there are no active Incline function related error codes. 14. Do the Operation Verification tests (see "Operation Verification" on page 23) and return to service. Contact Precor Customer Support at support@precor.com or 800.786.8404 with Page 73 any questions.
-
Page 84: How To Access The Lift Extension Tube & Jackscrew
Front access This method accesses the lift platform assembly and connected hardware from the front of the treadmill by raising and supporting the treadmill front frame weldment. Contact Precor Customer Support at support@precor.com or 800.786.8404 with Page 74 any questions. - Page 85 ON will cause the incline platform to move and return to the level "0" position Disconnect a device power cord plug or cable connector from the power receptacle or out- let. Contact Precor Customer Support at support@precor.com or 800.786.8404 with Page 75 any questions.
- Page 86 5. Tip the treadmill on its side while being careful to not damage or break off the rear lev- eling foot. You can use soft blocking material next to the leveling foot to support the frame weight as the treadmill is being tipped over. Contact Precor Customer Support at support@precor.com or 800.786.8404 with Page 76 any questions.
- Page 87 CAUTION: Protect the leveling feet from damage while tipping the treadmill to the upright position. See Also "Lift Motor Replacement" on page 156 "Lift Platform Replacement" on page 167 Contact Precor Customer Support at support@precor.com or 800.786.8404 with Page 77 any questions.
- Page 88 5 Adjustment Procedures Lift Motor Calibration Contact Precor Customer Support at support@precor.com or 800.786.8404 with Page 78 any questions.
-
Page 89: Replacement Procedures
"Take-up Roller Replacement" on page 144 "Running Belt and Deck Replacement Procedure" on page 149 "Lift Motor Replacement" on page 156 "Lift Platform Replacement" on page 167 Contact Precor Customer Support at support@precor.com or 800.786.8404 with Page 79 any questions. -
Page 90: Covers And Panels Replacement
"Dash Back Cover Replacement" on page 93 Dash Front Cover "Dash Front Cover Replacement" on page 94 Dash Top Cover "Dash Top and Bottom Replacement" on page 95 Treadmill Contact Precor Customer Support at support@precor.com or 800.786.8404 with Page 80 any questions. - Page 91 "Dash Top and Bottom Replacement" on page 95 Side Arm Upper Covers "Side Arm Upper/Lower Covers Replacement" on page 99 Side Arm Lower Covers "Side Arm Upper/Lower Covers Replacement" on page 99 Contact Precor Customer Support at support@precor.com or 800.786.8404 with Page 81 any questions.
-
Page 92: Hood Cover Replacement
2. Secure the hood cover using the four #3 Phillips screw fasteners and fully tighten. Contact Precor Customer Support at support@precor.com or 800.786.8404 with Page 82 any questions. -
Page 93: Hood Transition Cover Replacement
1. Position the hood transition cover top flange under the targa upright and press to lock tab clips in place. Secure using the two #3 Phillips fasteners and fully tighten. Contact Precor Customer Support at support@precor.com or 800.786.8404 with Page 83... - Page 94 6 Replacement Procedures Covers and Panels Replacement 2. Repeat procedure for both left and right covers. 3. Replace the hood cover, see "Hood Cover Replacement" on page Contact Precor Customer Support at support@precor.com or 800.786.8404 with Page 84 any questions.
-
Page 95: Trim Landing Covers Replacement
1. Remove the hood cover, see "Hood Cover Replacement" on page 2. Remove the trim landing cover #3 Phillips screw, washer, and bushing fastener hard- ware. Retain part(s) and/or fastener(s) for installation. Contact Precor Customer Support at support@precor.com or 800.786.8404 with Page 85 any questions. - Page 96 Covers and Panels Replacement 3. Then slide the cover rearward and lift to remove. 4. Repeat the same process to remove the left and right trim landing covers. Installation Instructions Contact Precor Customer Support at support@precor.com or 800.786.8404 with Page 86 any questions.
- Page 97 3. Repeat installation procedure for both the left and right trim landing covers. 4. Reinstall the hood cover, see "Hood Cover Replacement" on page Contact Precor Customer Support at support@precor.com or 800.786.8404 with Page 87 any questions.
-
Page 98: Trim End Cap Covers Replacement
Then slide the cover rearward to remove. Retain part(s) and/or fastener(s) for installation. TIP: Use a short stub #3 Phillips screwdriver to remove the bottom end cap fastener. Contact Precor Customer Support at support@precor.com or 800.786.8404 with Page 88 any questions. - Page 99 , see "Covers and Panels Replacement" on page 2. Remove the console, refer to the treadmill assembly guide on precor.com. 3. Remove the four #3 Phillips screw fasteners and remove the front cover Retain part(s) and/or fastener(s) for installation. 8. Reinstall the left and right trim landing covers, see "Covers and Panels Replacement"...
-
Page 100: Trim Side Cover Replacement
(unsnap) the top of the trim side cover from four anchor mount clips. Hold cover while releasing the upper anchor bracket clips and then pull down and away Contact Precor Customer Support at support@precor.com or 800.786.8404 with Page 90... - Page 101 "Trim End Cap Covers Replacement" on page 5. Reinstall the trim landing cover, see "Covers and Panels Replacement" on page 6. Reinstall the hood cover, see "Hood Cover Replacement" on page Contact Precor Customer Support at support@precor.com or 800.786.8404 with Page 91 any questions.
- Page 102 6 Replacement Procedures Covers and Panels Replacement Contact Precor Customer Support at support@precor.com or 800.786.8404 with Page 92 any questions.
-
Page 103: Dash Back Cover Replacement
1. Reinstall and hold the back cover into position. Then install the top four #3 Phillips screws first followed by the remaining three bottom screws. Fully tighten all fasteners. Contact Precor Customer Support at support@precor.com or 800.786.8404 with Page 93 any questions. -
Page 104: Dash Front Cover Replacement
Installation Instructions 1. Reinstall front cover and secure using the four #3 Phillips screw fasteners. 2. Reinstall the console, refer to the treadmill assembly guide on precor.com. 3. Reinstall the back cover and secure using the seven #3 screw fasteners, see "Covers and Panels Replacement"... -
Page 105: Dash Top And Bottom Cover Replacement
Carefully lay the E-Stop switch on the HHHR assy bracket and remove the dash top cover. Retain part(s) and/or fastener(s) for installation. Handheld Handlebar Heart Rate Contact Precor Customer Support at support@precor.com or 800.786.8404 with Page 95 any questions. - Page 106 6 Replacement Procedures Covers and Panels Replacement 3. Remove the dash bottom cover .from between the dash assembly weldment cross member and HHHR bar. Contact Precor Customer Support at support@precor.com or 800.786.8404 with Page 96 any questions.
- Page 107 6 Replacement Procedures Covers and Panels Replacement Installation Instructions 1. Install the dash bottom cover .into position between the dash assembly weldment cross member and HHHR bar. Contact Precor Customer Support at support@precor.com or 800.786.8404 with Page 97 any questions.
- Page 108 Phillips fasteners. Make sure the interface cable is routed correctly and not pinched. Make sure that the stop safety clip lanyard is correctly positioned in the cover cut out, is not pinched, and freely moves when pulled and retracted. Contact Precor Customer Support at support@precor.com or 800.786.8404 with Page 98 any questions.
-
Page 109: Side Arm Upper/Lower Covers Replacement
2. Position the lower side arm cover onto the side arm weldment and press to lock the tab clips in place. Secure using the four #3 Phillips screws. Contact Precor Customer Support at support@precor.com or 800.786.8404 with Page 99 any questions. -
Page 110: Power Cord Replacement
Access the service Hardware Validation (51765761) and use the CROSSRAMP/INCLINE Test to raise the incline and then remove power. Disconnect a device power cord plug or cable connector from the power receptacle or out- let. Contact Precor Customer Support at support@precor.com or 800.786.8404 with Page 100 any questions. - Page 111 5. Do the Operation Verification tests (see "Operation Verification" on page 23) and return to service. Alternating Current: electric current which periodically reverses direction between positive and negative polarity. Contact Precor Customer Support at support@precor.com or 800.786.8404 with Page 101 any questions.
-
Page 112: On/Off Circuit Breaker Switch Replacement
Breaker assembly. The Power Entry Assembly Bracket must be removed to access these components. Description Power Entry Assembly Bracket Power Cord Inlet Assy ON/OFF Switch Circuit Breaker Contact Precor Customer Support at support@precor.com or 800.786.8404 with Page 102 any questions. -
Page 113: Wire Diagram
6 Replacement Procedures ON/OFF Circuit Breaker Switch Replacement Wire Diagram Power Entry Assembly wire diagram. Procedure Review entire procedure before starting. Contact Precor Customer Support at support@precor.com or 800.786.8404 with Page 103 any questions. - Page 114 . Hold the bracket while removing to prevent wire cable damage. Retain part(s) and/or fastener(s) for installation. Disconnect a device power cord plug or cable connector from the power receptacle or out- let. Contact Precor Customer Support at support@precor.com or 800.786.8404 with Page 104 any questions.
- Page 115 5. Connect the power cord and switch the ON/OFF SW Circuit Breaker ON. 6. Do the Operation Verification tests (see "Operation Verification" on page 23) and return to service. Contact Precor Customer Support at support@precor.com or 800.786.8404 with Page 105 any questions.
-
Page 116: E-Stop "Emergency Switch" Replacement
1. The removal and installation procedures are included in the Dash Top and Bottom Cover Removal/Installation procedure, see "Dash Top and Bottom Replacement" on page 2. Verify operation and return to service, (see "Operation Verification" on page 23). Contact Precor Customer Support at support@precor.com or 800.786.8404 with Page 106 any questions. -
Page 117: Motor Controller (Mc) Replacement
Normally 120V/240V machines share the same MC. However, on the TRM600 Motor controller, motor controller unit, or motor controller module: used on treadmills, con- tains the LPCA and motor controller functionality. Treadmill Power Factor Correction Contact Precor Customer Support at support@precor.com or 800.786.8404 with Page 107 any questions. - Page 118 120V machines and one for the 240V machines. Motor controller, motor controller unit, or motor controller module: used on treadmills, con- tains the LPCA and motor controller functionality. Contact Precor Customer Support at support@precor.com or 800.786.8404 with Page 108 any questions.
-
Page 119: Mc Wire Diagram
6 Replacement Procedures Motor Controller (MC) Replacement MC Wire Diagram Contact Precor Customer Support at support@precor.com or 800.786.8404 with Page 109 any questions. -
Page 120: Mc Connector Definition
Motor Controller (MC) Replacement MC Connector Definition MC I/O connectors The MC interface input/output ports are located on the front and back sides of the MC hous- ing. Contact Precor Customer Support at support@precor.com or 800.786.8404 with Page 110 any questions. - Page 121 Emergency Stop: Safety clip and lanyard attached to the stop switch to immediately turn off power bringing the treadmill to a stop. treadmill dynamic break resistor. Contact Precor Customer Support at support@precor.com or 800.786.8404 with Page 111 any questions.
- Page 122 BLK - MOTOR RETRACT connector Active Status Light: Service and maintenance status light. Printed circuit assembly, generally referred to as either an upper PCA or lower PCA. Contact Precor Customer Support at support@precor.com or 800.786.8404 with Page 112 any questions.
- Page 123 Ground Effects Impact Control System: Patented treadmill design that out performs a nat- ural running surface, absorbs high-impact movement, reduces joint stress and minimizes fatigue and supports a solid and controlled push off. Contact Precor Customer Support at support@precor.com or 800.786.8404 with Page 113 any questions.
- Page 124 The fan motor interface cable connector is located under the MC top cover. Note: For MC Fan replacement, see "Motor Controller Fan Replacement" on page 120. Component Description Fan motor Black (24V GND) Yellow (Fault signal) Red (+24 Vdc) Contact Precor Customer Support at support@precor.com or 800.786.8404 with Page 114 any questions.
-
Page 125: Mc Status Light
5/16" hex head fasteners approximately 4 full turns. Slide the MC Touchscreen console Control Processing Assembly. Disconnect a device power cord plug or cable connector from the power receptacle or out- let. Contact Precor Customer Support at support@precor.com or 800.786.8404 with Page 115 any questions. - Page 126 Note: The COMM connector contacts have an application of dielectric grease to ensure proper electrical contact. Do not wipe off, clean, or remove the dielectric grease. Input and Output Interface. Contact Precor Customer Support at support@precor.com or 800.786.8404 with Page 116 any questions.
- Page 127 It will be easier to attach the cable connectors before installing the MC into the mounting bolts. Make sure the I/O cable connectors have the correct orientation and alignment before inserting into the MC I/O port. Contact Precor Customer Support at support@precor.com or 800.786.8404 with Page 117 any questions.
- Page 128 Contact Precor Customer Support at support@precor.com or 800.786.8404 with Page 118 any questions.
- Page 129 "Operation Verification" on page and return to service. Device power cord connector or electrical cable male connector that is inserted into an electrical receptacle "outlet" (also called the plug-in). Contact Precor Customer Support at support@precor.com or 800.786.8404 with Page 119 any questions.
-
Page 130: Motor Controller Fan Replacement
The fan motor interface cable connector is located under the MC top cover. Motor controller, motor controller unit, or motor controller module: used on treadmills, con- tains the LPCA and motor controller functionality. Contact Precor Customer Support at support@precor.com or 800.786.8404 with Page 120 any questions. - Page 131 6 Replacement Procedures Motor Controller Fan Replacement Component Description Fan motor Black (24V GND) Yellow (Fault signal) Red (+24 VDC) Contact Precor Customer Support at support@precor.com or 800.786.8404 with Page 121 any questions.
- Page 132 1. Make sure that the replacement fan is the current part number (PPP000000304461101), refer to service bulletin SB.TRM .20161014. Disconnect a device power cord plug or cable connector from the power receptacle or out- let. Treadmill Contact Precor Customer Support at support@precor.com or 800.786.8404 with Page 122 any questions.
- Page 133 Secure the top cover to the MC housing cover using the one screw fastener Contact Precor Customer Support at support@precor.com or 800.786.8404 with Page 123 any questions.
- Page 134 Device power cord connector or electrical cable male connector that is inserted into an electrical receptacle "outlet" (also called the plug-in). Touchscreen console Control Processing Assembly. Contact Precor Customer Support at support@precor.com or 800.786.8404 with Page 124 any questions.
-
Page 135: Drive Belt Replacement
Do not use power tools Disconnect a device power cord plug or cable connector from the power receptacle or out- let. Contact Precor Customer Support at support@precor.com or 800.786.8404 with Page 125 any questions. - Page 136 4. Use a 1/2" socket with 6" extension to loosen the four Drive Motor mount bolts enough so that the motor can slide forward and rearward in the mounting tray. Contact Precor Customer Support at support@precor.com or 800.786.8404 with Page 126...
- Page 137 6. Lift the drive roller from the frame mounting brackets and remove the belt off the drive roller pulley. Remove the drive motor belt and reinstall the roller into the frame mount- ing brackets. Contact Precor Customer Support at support@precor.com or 800.786.8404 with Page 127 any questions.
- Page 138 Measure the drive belt-to-frame rail distance at the drive roller pul- ley and at the drive motor pulley. The drive belt is correctly aligned when the two Contact Precor Customer Support at support@precor.com or 800.786.8404 with Page 128...
- Page 139 7. Reinstall the hood cover, see "Covers and Panels Replacement" on page 8. Do the Operation Verification tests (see "Operation Verification" on page 23) and return to service. Contact Precor Customer Support at support@precor.com or 800.786.8404 with Page 129 any questions.
-
Page 140: Drive Motor Replacement
Drive Motor Replacement Drive Motor Replacement About This procedure provides instruction to replace the Drive Motor. The Drive Motor is located under the front hood cover. Description Drive Motor Contact Precor Customer Support at support@precor.com or 800.786.8404 with Page 130 any questions. -
Page 141: Drive Motor Cable Schematic
Disconnect a device power cord plug or cable connector from the power receptacle or out- let. Motor controller, motor controller unit, or motor controller module: used on treadmills, con- tains the LPCA and motor controller functionality. Input and Output Interface. Contact Precor Customer Support at support@precor.com or 800.786.8404 with Page 131 any questions. - Page 142 4. Remove the Drive Motor static bleed resistor frame chassis ground wire (Orange wire). Use a 5/16" socket (or nut driver) to remove the green ground screw and two tooth lock washers. Retain part(s) and/or fastener(s) for installation. Contact Precor Customer Support at support@precor.com or 800.786.8404 with Page 132 any questions.
- Page 143 6. Loosen the 1/2" drive belt tension adjustment bolt to remove the drive belt tension. 7. Then walk the belt off the drive motor pulley. Contact Precor Customer Support at support@precor.com or 800.786.8404 with Page 133 any questions.
- Page 144 Add Loctite 243 threadlocker to each of the four 1/2" hex bolts. IMPORTANT: Add Loctite 243 to the 1/2" hex head motor mount bolts. Contact Precor Customer Support at support@precor.com or 800.786.8404 with Page 134 any questions.
- Page 145 Fully tighten using the 5/16 " hex head socket (or nut driver). Make sure to include the two tooth lock washers to ensure good electrical con- tact with the frame weldment. Contact Precor Customer Support at support@precor.com or 800.786.8404 with Page 135 any questions.
- Page 146 MC I/O ports. Make sure the cable connectors have the correct orientation and alignment before inserting into the MC I/O port. Contact Precor Customer Support at support@precor.com or 800.786.8404 with Page 136 any questions.
- Page 147 5. Install the drive belt onto the drive motor and drive roller pulleys. Make sure the belt is properly aligned, see "Drive Belt Replacement" on page 125. Contact Precor Customer Support at support@precor.com or 800.786.8404 with Page 137 any questions.
- Page 148 "Hood Cover Replacement" on page 8. Connect the power cord and switch the power ON. 9. Verify machine operation (see "Operation Verification" on page 23) and return to ser- vice. Contact Precor Customer Support at support@precor.com or 800.786.8404 with Page 138 any questions.
-
Page 149: Drive Roller Replacement
Disconnect a device power cord plug or cable connector from the power receptacle or out- let. Contact Precor Customer Support at support@precor.com or 800.786.8404 with Page 139 any questions. - Page 150 5. Lift the drive roller and running belt from the frame. Lift the roller left side from the frame bracket mount and then slide the roller right side from the frame pin mount and Contact Precor Customer Support at support@precor.com or 800.786.8404 with Page 140...
- Page 151 1. Slide the Drive Roller thru the Running Belt and then set the roller back into position in the frame mounting brackets. Slide the roller right side into the frame pin mount and then set the roller left side into the frame bracket mount. Contact Precor Customer Support at support@precor.com or 800.786.8404 with Page 141 any questions.
- Page 152 2. Install the drive belt onto the drive motor and drive roller pulleys. Make sure the belt is properly aligned, see "Drive Belt Replacement" on page 125. Contact Precor Customer Support at support@precor.com or 800.786.8404 with Page 142 any questions.
- Page 153 80 and the hood cover, see "Covers and Panels Replacement" on page 7. Verify Operation (see "Operation Verification" on page 23) and return to service. Contact Precor Customer Support at support@precor.com or 800.786.8404 with Page 143 any questions.
-
Page 154: Take-Up Roller Replacement
Both the TRM600, TRM700, and TRM800 use the same common frame. However, the TRM600 models use a smaller 2.5" diameter Take-up roller that is not compatible with the TRM700/800 models Procedure Review entire procedure before starting. Contact Precor Customer Support at support@precor.com or 800.786.8404 with Page 144 any questions. -
Page 155: Removal
The roller must be reinstalled with the same left/right orientation. Disconnect a device power cord plug or cable connector from the power receptacle or out- let. Contact Precor Customer Support at support@precor.com or 800.786.8404 with Page 145 any questions. - Page 156 CAUTION: Make sure the Take-up roller does not drag across the deck surface while removing causing damage to the deck surface. Contact Precor Customer Support at support@precor.com or 800.786.8404 with Page 146 any questions.
-
Page 157: Installation
3. Set the flat side of the roller shaft onto the Spacer block so that the tension adjust- ment bolt threads are horizontal. Make sure that the Spacer blocks are installed so that the direction arrows are pointing outward towards the frame rail. Contact Precor Customer Support at support@precor.com or 800.786.8404 with Page 147 any questions. - Page 158 80 and hood cover, see "Covers and Panels Replacement" on page 8. Do the Operation Verification tests (see "Operation Verification" on page 23) and return to service. Contact Precor Customer Support at support@precor.com or 800.786.8404 with Page 148 any questions.
-
Page 159: Running Belt And Deck Replacement Procedure
This procedure provides instruction to replace the Running Belt and Deck. The TRM600 uses the Forbo brand running belt with pre-waxed deck. Procedure Review entire procedure before starting. Removal Contact Precor Customer Support at support@precor.com or 800.786.8404 with Page 149 any questions. - Page 160 Pressing down to hard could push the nuts out of the pivot housing. If this occurs, .reinstall the nut into the pivot housing. Disconnect a device power cord plug or cable connector from the power receptacle or out- let. Contact Precor Customer Support at support@precor.com or 800.786.8404 with Page 150 any questions.
- Page 161 Ground Effects Impact Control System: Patented treadmill design that out performs a nat- ural running surface, absorbs high-impact movement, reduces joint stress and minimizes fatigue and supports a solid and controlled push off. Contact Precor Customer Support at support@precor.com or 800.786.8404 with Page 151 any questions.
- Page 162 If the bottom deck surface is in new condition, flip and reuse the deck (new side on top). ii. If the bottom deck surface is not in new condition, discard the deck and replace with a new deck. Contact Precor Customer Support at support@precor.com or 800.786.8404 with Page 152 any questions.
- Page 163 2) The distance between the slashes in the Precor Direction Logo get closer together as the logo progresses towards the rear of the machine, see the fol- lowing figure.
- Page 164 4. Reinstall the left/right rear deck belt tracker (2x) and secure using the #3 Phillips screws (2x). 5. Reinstall the left/right rear deck pine tree clips (2x). Contact Precor Customer Support at support@precor.com or 800.786.8404 with Page 154 any questions.
- Page 165 85) and the hood cover (see "Hood Cover Replacement" on page 82). 12. Do the Operation Verification tests (see "Operation Verification" on page 23) and return to service. Contact Precor Customer Support at support@precor.com or 800.786.8404 with Page 155 any questions.
-
Page 166: Lift Motor Replacement
(MCU). On self-powered units, it is the lower PCA console to base function inter- face. Motor controller, motor controller unit, or motor controller module: used on treadmills, con- tains the LPCA and motor controller functionality. Contact Precor Customer Support at support@precor.com or 800.786.8404 with Page 156 any questions. -
Page 167: Lift Motor Cable Schematic
2. Prepare the treadmill for service. To provide access to the lift extension tube, raise and block the front of the treadmill per the Front Access instructions, see "Front Contact Precor Customer Support at support@precor.com or 800.786.8404 with Page 157 any questions. - Page 168 5. Disconnect the lift motor interface cable from the MC "LIFT" connector. Then remove the interface cable from the frame cable routing clamp. Disconnect a device power cord plug or cable connector from the power receptacle or out- let. Contact Precor Customer Support at support@precor.com or 800.786.8404 with Page 158 any questions.
- Page 169 7. Remove the extension tube hitch pin and clevis pin fastener hardware from the lift plat- form mounting bracket. Hold the lift platform while removing the clevis pin and care- fully rest on the floor. Input and Output Interface. Contact Precor Customer Support at support@precor.com or 800.786.8404 with Page 159 any questions.
- Page 170 8. Remove the lift motor actuator housing mount hitch pin and clevis pin from the frame mounting bracket. Hold the lift motor while removing clevis pin and carefully remove from the treadmill. Contact Precor Customer Support at support@precor.com or 800.786.8404 with Page 160 any questions.
- Page 171 Lubricate the lift motor jackscrew 2. Lay the replacement lift motor on the floor in front of treadmill. Connect the lift motor interface cable to the MC "LIFT" connector. Contact Precor Customer Support at support@precor.com or 800.786.8404 with Page 161 any questions.
- Page 172 . Then install the pre-calibrated lift motor placing the treadmill actuator housing mount into the frame pan mounting bracket. Secure using the clevis pin and hitch pin. Contact Precor Customer Support at support@precor.com or 800.786.8404 with Page 162 any questions.
- Page 173 Choose an adjust- ment direction that will minimize the change to the extension tube calibration dis- tance. Firmly hold the jackscrew from turning while adjusting (rotating) the extension tube. Contact Precor Customer Support at support@precor.com or 800.786.8404 with Page 163 any questions.
- Page 174 10. Connect the lift motor I/O cable MC "LIFT" connector. Route cable and secure in the frame routing cable clamp. 11. Connect the ground wire (GRN or GRN/YEL) to the chassis ground screw and fully tighten. Contact Precor Customer Support at support@precor.com or 800.786.8404 with Page 164 any questions.
- Page 175 15. Remove the supports and clear any other items that might either block the treadmill from lowering or may be damaged as it lowers. 16. Lower the incline to level "0". Contact Precor Customer Support at support@precor.com or 800.786.8404 with Page 165 any questions.
- Page 176 19. Review the Error Log and verify that there are no active Incline function related error codes. 20. Do the Operation Verification tests (see "Operation Verification" on page 23) and return to service. Contact Precor Customer Support at support@precor.com or 800.786.8404 with Page 166 any questions.
-
Page 177: Lift Platform Replacement
14. b. Securely and safely place supports (e.g. car jack stands, blocks, etc.) under the left and right front corners of the frame weldment. Contact Precor Customer Support at support@precor.com or 800.786.8404 with Page 167 any questions. - Page 178 This will be the "extension tube installation ref- erence mark". Disconnect a device power cord plug or cable connector from the power receptacle or out- let. Contact Precor Customer Support at support@precor.com or 800.786.8404 with Page 168 any questions.
- Page 179 7. Remove the left and right lift pivot pin retainer clips (2x) and washers (2x). Retain part (s) and/or fastener(s) for installation. Contact Precor Customer Support at support@precor.com or 800.786.8404 with Page 169 any questions.
- Page 180 Then place the lift platform into position and slide the left and right lift pivot pins through the lift platform pivot brackets. Secure using the washers (2x) and retainer clips (2x). Contact Precor Customer Support at support@precor.com or 800.786.8404 with Page 170 any questions.
- Page 181 Remove the painters tape. Clean the jackscrew of any residual glue and apply a thin layer of synthetic lubricant Contact Precor Customer Support at support@precor.com or 800.786.8404 with Page 171 any questions.
- Page 182 10. Reinstall the left and right trim side covers see "Covers and Panels Replacement" on page Contact Precor Customer Support at support@precor.com or 800.786.8404 with Page 172 any questions.
- Page 183 12. Reinstall the hood cover, see "Hood Cover Replacement" on page 13. Do the Operation Verification tests (see "Operation Verification" on page 23) and return to service. Contact Precor Customer Support at support@precor.com or 800.786.8404 with Page 173 any questions.
-
Page 184: Troubleshooting
Use the following basic troubleshooting steps to help guide you through a systematic approach to troubleshoot and resolve equipment issues: "Validate the customer reported issue" on the facing page "Verify Input Power" on the facing page Contact Precor Customer Support at support@precor.com or 800.786.8404 with Page 174 any questions. -
Page 185: Validate The Customer Reported Issue
For power requirement information, refer to the Power Requirements topic. Contact Precor Customer Support at support@precor.com or 800.786.8404 with Page 175 any questions. -
Page 186: Verify (Reproduce) The Customer Issue
For power require- ment information, refer to the Power Requirements topic. Make sure that each Precor treadmill is connected to a separate 20 amp individual branch circuit outlet. No other devices can be connected to the same circuit outlet except for one optional (Personal Viewing System) display if installed. -
Page 187: Verify Console Operation
7 Troubleshooting Basic Troubleshooting Steps 1. Log in to your Precor Connect Servicer account ( Precor Connect Partner's 2. From the Connect Home page, select the DOCUMENTATION pane > SERVICE BULLETINS link to view the list of the equipment service bulletins and Tech-Tips. -
Page 188: Verify That There Are No Current Active Error Codes
Error Code Troubleshooting Guide for information to help resolve the issue. Also, when calling Precor customer service for assistance, refer to the Error Log or CPA Event Log for additional information to help the representative resolve the issue. Refer to Error Code & CPA Error Log, see "Error Log &... - Page 189 Also make sure that there are no related service bulletins that may resolve the issue. Browse the list of available Troubleshooting procedures for related Troubleshooting information. Contact Precor Customer Support at support@precor.com or 800.786.8404 with Page 179 any questions.
-
Page 190: Standard Error Codes
Standard Error Codes About There is a set of standard error codes implemented across Precor cardio exercise equip- ment. Error codes are system generated codes that identify specific machine fault con- ditions. The maintenance software monitors error code event conditions, when a fault is... -
Page 191: Viewing Error Codes (Error Log & Cpa Event Log)
Error Code and Troubleshooting Guide: Error Code Troubleshooting Guide. Contact Precor Customer Support at support@precor.com or 800.786.8404 with Page 181 any questions. -
Page 192: Troubleshooting With Error Codes
Note: Be aware that not all machine failures will cause an error code event. Use physical observation and mechanical troubleshooting skills to resolve non error code issues. Contact Precor Customer Support at support@precor.com or 800.786.8404 with Page 182 any questions. -
Page 193: Error Log & Cpa Event Log
(MCU). On self-powered units, it is the lower PCA console to base function inter- face. Printed circuit assembly, generally referred to as either an upper PCA or lower PCA. Contact Precor Customer Support at support@precor.com or 800.786.8404 with Page 183 any questions. -
Page 194: Error Log
The individual error code data metrics will scroll across the display. Use the Up/Down keys to scroll thru and view the individual error codes. Contact Precor Customer Support at support@precor.com or 800.786.8404 with Page 184 any questions. - Page 195 Input line voltage* Buss Voltage* Note: * machine dependent parameter. How to open the Error Log: Access the Information Display (65) Select Error Log Select OK hardkey Contact Precor Customer Support at support@precor.com or 800.786.8404 with Page 185 any questions.
-
Page 196: Cpa Event Log
"CPA ERROR" identifier tag. Make sure you only use error codes with the CPA ERROR identifier tag to troubleshoot a machine issue, see the Error Code Troubleshooting Guide. Contact Precor Customer Support at support@precor.com or 800.786.8404 with Page 186 any questions. - Page 197 How to open the CPA Event Log: Access the Service menu (51765761) Select About > CPA Event Log CPA Event Log Softkeys The CPA Event Log provides the following function softkeys Contact Precor Customer Support at support@precor.com or 800.786.8404 with Page 187 any questions.
- Page 198 The save CPA Event Error Log feature is used by Precor to investigate machine issues. Occasionally, Precor may request you to save the CPA Error Log error code data to a USB flash drive and then send the USB drive to Precor customer service.
-
Page 199: Available System Troubleshooting Procedures
"Running Belt Troubleshooting" on page 221 See Also "Troubleshooting" on page 174 "Standard Error Codes" on page 180 "Error Log & CPA Event Log" on page 183 Contact Precor Customer Support at support@precor.com or 800.786.8404 with Page 189 any questions. -
Page 200: Tripped Circuit Breaker
If more than one treadmill loses power, the treadmills are on the same breaker: If YES, advise the customer to have the facility wiring upgraded to provide one individual branch circuit outlet per machine, see Precor specifications, see ."" on page If NO, continue Troubleshooting. - Page 201 "Drive Motor Current Over- loading" error codes 27, 28, or 29, see “ Error Code Troubleshooting Guide” . If the treadmill ON/OFF circuit breaker is tripped: Contact Precor Customer Support at support@precor.com or 800.786.8404 with Page 191 any questions.
- Page 202 An individual branch circuit outlet will have its own load line, neutral line, and ground line. Have a certified electrician verify the treadmill is powered from an individual branch circuit: If YES, advise customer to have their facility wiring upgraded per Precor spe- cifications. If NO, continue Troubleshooting.
- Page 203 The deck/belt friction issue is also worsened by poor input line voltage. Overloading is often accompanied by error codes 27, 28, or 29. Verify the running belt condition. See Also "System Troubleshooting Procedures" on page 189 Contact Precor Customer Support at support@precor.com or 800.786.8404 with Page 193 any questions.
-
Page 204: Input Power Troubleshooting
Related Error Codes RELATED ERROR CODE DESCRIPTION Line Frequency Out Of Acceptable Range Low Voltage Watchdog (Upper PCA Upper printed circuit assembly; generally refers to the console. Contact Precor Customer Support at support@precor.com or 800.786.8404 with Page 194 any questions. - Page 205 Direct Current: electrical current that only flows in one direction. Alternating Current: electric current which periodically reverses direction between positive and negative polarity. Touchscreen console Control Processing Assembly. Contact Precor Customer Support at support@precor.com or 800.786.8404 with Page 195 any questions.
- Page 206 7 Troubleshooting System Troubleshooting Procedures Contact Precor Customer Support at support@precor.com or 800.786.8404 with Page 196 any questions.
-
Page 207: Console Power Troubleshooting
"" on page a. If NO, replace the breaker switch. b. If YES, continue troubleshooting. Alternating Current: electric current which periodically reverses direction between positive and negative polarity. Contact Precor Customer Support at support@precor.com or 800.786.8404 with Page 197 any questions. - Page 208 Upper printed circuit assembly; generally refers to the console. Contact Precor Customer Support at support@precor.com or 800.786.8404 with Page 198 any questions.
- Page 209 7 Troubleshooting System Troubleshooting Procedures See Also "System Troubleshooting Procedures" on page 189 Contact Precor Customer Support at support@precor.com or 800.786.8404 with Page 199 any questions.
-
Page 210: Communications Error Troubleshooting
(MCU). On self-powered units, it is the lower PCA console to base function inter- face. Printed circuit assembly, generally referred to as either an upper PCA or lower PCA. Communication Specification for Fitness Equipment protocol. Contact Precor Customer Support at support@precor.com or 800.786.8404 with Page 200 any questions. - Page 211 Error Code Troubleshooting Guide. See Also "System Troubleshooting Procedures" on page 189 Touchscreen console Control Processing Assembly. Contact Precor Customer Support at support@precor.com or 800.786.8404 with Page 201 any questions.
-
Page 212: Machine Controls Troubleshooting
Event Log and note any possible issue related error codes. Then use the Error Code and Troubleshooting Guide to learn about these error Adaptive Motion Trainer Touchscreen console Control Processing Assembly. Contact Precor Customer Support at support@precor.com or 800.786.8404 with Page 202 any questions. - Page 213 7 Troubleshooting System Troubleshooting Procedures codes and procedures to troubleshoot and repair the issue, see Error Code Troubleshooting Guide. See Also "System Troubleshooting Procedures" on page 189 Contact Precor Customer Support at support@precor.com or 800.786.8404 with Page 203 any questions.
-
Page 214: Auto Stop Troubleshooting
If the Auto Stop Feature did not pass the test replace the motor controller module. See Also TRM800 version 2 treadmills mfg. dates 2014 and later. TRM800 version 1 treadmills mfg. dates 2010 thru 2014. Contact Precor Customer Support at support@precor.com or 800.786.8404 with Page 204 any questions. - Page 215 7 Troubleshooting System Troubleshooting Procedures "System Troubleshooting Procedures" on page 189 Contact Precor Customer Support at support@precor.com or 800.786.8404 with Page 205 any questions.
-
Page 216: E-Stop Not Communicating Troubleshooting
On treadmills, it is the console to base function interface and the motor con- troller unit (MCU). On self-powered units, it is the lower PCA console to base function inter- face. Touchscreen console Control Processing Assembly. Contact Precor Customer Support at support@precor.com or 800.786.8404 with Page 206 any questions. -
Page 217: Heart Rate Monitor Troubleshooting
If the pulse sensors and/or electrical connection contacts have corrosion, replace the corroded HHHR hand pulse assembly. Handheld Handlebar Heart Rate Printed circuit assembly, generally referred to as either an upper PCA or lower PCA. Contact Precor Customer Support at support@precor.com or 800.786.8404 with Page 207 any questions. - Page 218 Wireless Heart Rate Does not Work 1. Grasp the handlebar HHHR pulse sensors and verify that the handheld HHHR feature is functioning correctly, showing a correct heart rate. Upper PCA board Contact Precor Customer Support at support@precor.com or 800.786.8404 with Page 208 any questions.
- Page 219 LAN equipment carrying the Wi-Fi logo have been interoperability tested for compatibility with one (or more) 802.11 standards, and certified by the Wi-Fi Alliance to be sold under the Wi-Fi brand. Contact Precor Customer Support at support@precor.com or 800.786.8404 with Page 209 any questions.
-
Page 220: Drive Motor System Troubleshooting
(MCU). On self-powered units, it is the lower PCA console to base function inter- face. Alternating Current: electric current which periodically reverses direction between positive and negative polarity. Contact Precor Customer Support at support@precor.com or 800.786.8404 with Page 210 any questions. - Page 221 (A multimeter with a hold feature is helpful for Motor controller, motor controller unit, or motor controller module: used on treadmills, con- tains the LPCA and motor controller functionality. Contact Precor Customer Support at support@precor.com or 800.786.8404 with Page 211 any questions.
- Page 222 5. If one or more of the previous MC MOTOR output voltage measurements are not present or very different, replace the MC. If the voltage measurements are approx- imately the same, continue the procedure. Contact Precor Customer Support at support@precor.com or 800.786.8404 with Page 212 any questions.
- Page 223 Drive Motor. 8. If you have performed all the troubleshooting procedures and have been unable to correct the problem, call Precor customer support. Contact Precor Customer Support at support@precor.com or 800.786.8404 with Page 213 any questions.
- Page 224 7 Troubleshooting System Troubleshooting Procedures See Also "System Troubleshooting Procedures" on page 189 Contact Precor Customer Support at support@precor.com or 800.786.8404 with Page 214 any questions.
-
Page 225: Incline Lift System Troubleshooting
Motor controller, motor controller unit, or motor controller module: used on treadmills, con- tains the LPCA and motor controller functionality. Touchscreen console Control Processing Assembly. Contact Precor Customer Support at support@precor.com or 800.786.8404 with Page 215 any questions. -
Page 226: Error Code 40 "No Lift Motion Detected
Error Code 40 "NO Lift Motion Detected" Use the Error Code Troubleshooting Guide (see Error Code Troubleshooting Guide) for troubleshooting and repair information. Input and Output Interface. Contact Precor Customer Support at support@precor.com or 800.786.8404 with Page 216 any questions. -
Page 227: Possible Fault Causes
On treadmills, it is the console to base function interface and the motor con- troller unit (MCU). On self-powered units, it is the lower PCA console to base function inter- face. Contact Precor Customer Support at support@precor.com or 800.786.8404 with Page 217 any questions. - Page 228 A shorted MC lift switch will cause uncommanded UP or DOWN lift movement as soon as the machine is powered up. Typically, this fault will cause the lift Contact Precor Customer Support at support@precor.com or 800.786.8404 with Page 218...
- Page 229 If the good lift motor does not work. replace the MC module. CAUTION: Do NOT substitute MC modules or the replacement MC could be dam- aged. See Also "System Troubleshooting Procedures" on page 189 Contact Precor Customer Support at support@precor.com or 800.786.8404 with Page 219 any questions.
- Page 230 7 Troubleshooting System Troubleshooting Procedures Contact Precor Customer Support at support@precor.com or 800.786.8404 with Page 220 any questions.
-
Page 231: Running Belt Troubleshooting
19 amp spec limit. Alternating Current: electric current which periodically reverses direction between positive and negative polarity. Contact Precor Customer Support at support@precor.com or 800.786.8404 with Page 221 any questions. - Page 232 240 VAC: < 8A condition 8-12 A 120V (4-6 A 240V): nor- mal condition 12-16 A 120V (6-8 A 240V): used condition voltage in an alternating current circuit Contact Precor Customer Support at support@precor.com or 800.786.8404 with Page 222 any questions.
- Page 233 The higher the current draw is, the more worn the belt and deck is. (2) Remember that the deck can be flipped, make sure both surfaces are worn prior to ordering a new deck. Contact Precor Customer Support at support@precor.com or 800.786.8404 with Page 223 any questions.
- Page 234 An amp draw test will verify this condition. Motor controller, motor controller unit, or motor controller module: used on treadmills, con- tains the LPCA and motor controller functionality. Contact Precor Customer Support at support@precor.com or 800.786.8404 with Page 224 any questions.
-
Page 235: Preventive Maintenance (Pm)
Precor product web page, see " PM Guides" below. There are also many PM ser- vice task instructional videos available to view from the Precor Connect servicer web site, " PM Service Videos" on page 227. Precor Customer PM Plans... - Page 236 (television, Ethernet, and power cables). Then place an OUT OF SERVICE sign on the equipment and make it clear that the machine must not be used. Contact Precor Customer Support at support@precor.com or 800.786.8404 with Page 226 any questions.
-
Page 237: Pm Service Videos
There are many products that have specific PM task instructional videos available on the Precor Connect > SERVICE VIDEOS web page. Review the SERVICE VIDEOS web page for a list of current available product PM task videos. Not all products currently include PM... - Page 238 8 Preventative Maintenance PM Service Videos Contact Precor Customer Support at support@precor.com or 800.786.8404 with Page 228 any questions.
-
Page 239: Running Belt And Deck Cleaning Procedure
Stand firmly on both ends of the towel keeping your feet off the treadmill running Disconnect a device power cord plug or cable connector from the power receptacle or out- let. Contact Precor Customer Support at support@precor.com or 800.786.8404 with Page 229 any questions. - Page 240 4. The treadmill will begin to run at 1 mph. Allow the treadmill to run for one minute while keeping the towel firmly in place. WARNING: Do not adjust the treadmill’s speed or run it higher than 1 mph. Contact Precor Customer Support at support@precor.com or 800.786.8404 with Page 230 any questions.
- Page 241 8. Remove the towel from beneath the belt. 9. Turn the power switch to ON. 10. Verify operation and return to service. Contact Precor Customer Support at support@precor.com or 800.786.8404 with Page 231 any questions.
-
Page 242: Theory Of Operation
Ground Effects Impact Control System: Patented treadmill design that out performs a nat- ural running surface, absorbs high-impact movement, reduces joint stress and minimizes fatigue and supports a solid and controlled push off. Contact Precor Customer Support at support@precor.com or 800.786.8404 with Page 232 any questions. - Page 243 Motor controller, motor controller unit, or motor controller module: used on treadmills, con- tains the LPCA and motor controller functionality. Power Factor Correction voltage in an alternating current circuit Contact Precor Customer Support at support@precor.com or 800.786.8404 with Page 233 any questions.
- Page 244 9 Theory of Operation What's New Contact Precor Customer Support at support@precor.com or 800.786.8404 with Page 234 any questions.
-
Page 245: Console Upper Pca And Base Lower Pca Operation
TRM600/700/800 Common Frame Overview About Precor has implemented a new common frame weldment that will be used across the TRM600, TRM700, and TRM800 Experience™ Series treadmills. The common frame was released on production units beginning 05/14/2019. It is the intent of this document to provide information about how the new common frame update has affected related service and maintenance tasks. -
Page 246: Ordering Parts
Redesigned front compartment dust guard (easier drive belt removal) Ordering Parts When ordering parts for the TRM700 and TRM800 series treadmills, you will need to provide the equipment frame type (legacy frame or common frame) to the Precor customer service representative. Ways to identify the common frame Use the equipment manufacture date: Treadmills built prior to 5/14/2019 use a legacy frame. - Page 247 9 Theory of Operation TRM600/700/800 Common Frame Overview TRM600 Drive Roller TRM700/800 Drive Roller TRM700/800 Drive Roller Installation Contact Precor Customer Support at support@precor.com or 800.786.8404 with Page 237 any questions.
-
Page 248: Common Frame Take-Up Roller
There is a new redesigned take-up roller for the TRM700/TRM800 common frame. It is a multi-use roller designed to work with the new common frame single bolt fastener/belt ten- sion adjustment mechanism and the legacy frame cassette style belt tension adjustment Contact Precor Customer Support at support@precor.com or 800.786.8404 with Page 238 any questions. - Page 249 TRM700/800Take-up Roller Installation The TRM700/800 common frame take-up roller installation and belt adjustment mechanism has changed from the legacy frame cassette style mechanism to the single bolt Contact Precor Customer Support at support@precor.com or 800.786.8404 with Page 239 any questions.
-
Page 250: Common Frame Running Deck
The running belt length is shorter due the smaller diameter drive and take-up rollers. Also the deck includes a rear belt alignment tracker. TRM700/800 Running Deck Contact Precor Customer Support at support@precor.com or 800.786.8404 with Page 240 any questions. -
Page 251: Landing Trim End Cap Covers
The new common frame has improved the drive belt adjustment process by adding a drive belt adjustment bolt mechanism. The new procedure is faster, easier, and less prone to Contact Precor Customer Support at support@precor.com or 800.786.8404 with Page 241... -
Page 252: Dust Guard
On the common frame, the dust cover no longer blocks the belt and does not need to be removed to remove the drive belt. Contact Precor Customer Support at support@precor.com or 800.786.8404 with Page 242... - Page 253 9 Theory of Operation TRM600/700/800 Common Frame Overview Contact Precor Customer Support at support@precor.com or 800.786.8404 with Page 243 any questions.
-
Page 254: System Wiring Diagram
10 System Wiring Diagram System Wiring Diagram System Wire Diagram Contact Precor Customer Support at support@precor.com or 800.786.8404 with Page 244 any questions. -
Page 255: Comm Cable Wire Diagram
10 System Wiring Diagram COMM Cable Wire Diagram COMM Cable Wire Diagram COMM Cable Wire Diagram Contact Precor Customer Support at support@precor.com or 800.786.8404 with Page 245 any questions. -
Page 256: Console Wire Diagram
10 System Wiring Diagram Console Wire Diagram Console Wire Diagram Console Wire Diagram Contact Precor Customer Support at support@precor.com or 800.786.8404 with Page 246 any questions. -
Page 257: Power Entry Assemble Wire Diagram
10 System Wiring Diagram Power Entry Assemble Wire Diagram Power Entry Assemble Wire Diagram Power Entry Assembly Wire Diagram Contact Precor Customer Support at support@precor.com or 800.786.8404 with Page 247 any questions. -
Page 258: Product Literature & Videos
• Part Numbers • Exploded View Diagrams • Service Bulletins • Software Updates • Service Videos Precor Technician Certification Training Service & Install Training Precor E-Learning Center E-Learning System Contact Precor Customer Support at support@precor.com or 800.786.8404 with Page 248 any questions. -
Page 259: Service Videos
Machine Leveling procedure Machine Leveling Pro- cedure * Always log in to your Precor connect servicer account. Guest login users do not have access to all features. Treadmill Emergency Stop: Safety clip and lanyard attached to the stop switch to immediately turn off power bringing the treadmill to a stop. - Page 260 11 Product Literature & Videos Service Videos Contact Precor Customer Support at support@precor.com or 800.786.8404 with Page 250 any questions.
-
Page 261: Parts
Pre- cor Connect Partner's website to view the equipment's most current Exploded View Dia- gram and Parts Identification List information. How to use Precor Connect to find part Information 1. Log in to the Precor Connect Partner website. Contact Precor Customer Support at support@precor.com or 800.786.8404 with Page 251 any questions. - Page 262 Then go to the Parts Identification Table, locate the bubble number in the "BUBBLE #" column and the associated part number in the "PART #" column Contact Precor Customer Support at support@precor.com or 800.786.8404 with Page 252 any questions.
- Page 263 12 Parts Precor Connect Partner's website Description Description Model Description Service Manual Link Serial Code Bubble Numbers Exploded View Link Part Numbers Contact Precor Customer Support at support@precor.com or 800.786.8404 with Page 253 any questions.
-
Page 264: Exploded View Diagrams And Parts List
"Exploded View Diagram" on the facing page Parts List: " Parts List - TRM600-18, 120 V" on page 262 " Parts List - TRM600-18, 240 V" on page 265 Contact Precor Customer Support at support@precor.com or 800.786.8404 with Page 254 any questions. -
Page 265: Exploded View Diagram
12 Parts Exploded View Diagram Exploded View Diagram Page 1 of 7 Contact Precor Customer Support at support@precor.com or 800.786.8404 with Page 255 any questions. - Page 266 12 Parts Exploded View Diagram Exploded View Diagram Page 2 of 7 Contact Precor Customer Support at support@precor.com or 800.786.8404 with Page 256 any questions.
- Page 267 12 Parts Exploded View Diagram Exploded View Diagram Page 3 of 7 Contact Precor Customer Support at support@precor.com or 800.786.8404 with Page 257 any questions.
- Page 268 12 Parts Exploded View Diagram Exploded View Diagram Page 4 of 7 Contact Precor Customer Support at support@precor.com or 800.786.8404 with Page 258 any questions.
- Page 269 12 Parts Exploded View Diagram Exploded View Diagram Page 5 of 7 Contact Precor Customer Support at support@precor.com or 800.786.8404 with Page 259 any questions.
- Page 270 12 Parts Exploded View Diagram Exploded View Diagram Page 6 of 7 Contact Precor Customer Support at support@precor.com or 800.786.8404 with Page 260 any questions.
- Page 271 12 Parts Exploded View Diagram Exploded View Diagram Page 7 of 7 Contact Precor Customer Support at support@precor.com or 800.786.8404 with Page 261 any questions.
-
Page 272: Parts List - Trm600-18, 120 V
12 Parts Parts List - TRM600-18, 120 V Parts List - TRM600-18, 120 V Page 1 of 3 Contact Precor Customer Support at support@precor.com or 800.786.8404 with Page 262 any questions. - Page 273 12 Parts Parts List - TRM600-18, 120 V Parts List - TRM600-18, 120 V Page 2 of 3 Contact Precor Customer Support at support@precor.com or 800.786.8404 with Page 263 any questions.
- Page 274 12 Parts Parts List - TRM600-18, 120 V Parts List - TRM600-18, 120 V Page 3 of 3 Contact Precor Customer Support at support@precor.com or 800.786.8404 with Page 264 any questions.
-
Page 275: Parts List - Trm600-18, 240 V
12 Parts Parts List - TRM600-18, 240 V Parts List - TRM600-18, 240 V Page 1 of 3 Contact Precor Customer Support at support@precor.com or 800.786.8404 with Page 265 any questions. - Page 276 12 Parts Parts List - TRM600-18, 240 V Parts List - TRM600-18, 240 V Page 2 of 3 Contact Precor Customer Support at support@precor.com or 800.786.8404 with Page 266 any questions.
- Page 277 12 Parts Parts List - TRM600-18, 240 V Parts List - TRM600-18, 240 V Page 3 of 3 Contact Precor Customer Support at support@precor.com or 800.786.8404 with Page 267 any questions.
-
Page 278: Appendix A : Edition Information
No part of this manual may be reproduced in any form or by any means (including electronic storage and retrieval or translation into a foreign language) without prior agreement and writ- ten consent from Precor Incorporated as governed by United States and international copy- right laws. -
Page 279: Appendix B : Notices And Safety
Any party contemplating the use of Precor product designs is hereby forewarned that Precor considers the unauthorized appro- priation of its proprietary rights to be a very serious matter. Precor will vigorously pursue all unauthorized appropriation of its proprietary rights. - Page 280 Service Safety Guidelines Prior to doing any machine service, review the Service Safety Guidelines, see "Service Safety Guidelines" on page Contact Precor Customer Support at support@precor.com or 800.786.8404 with Page iii any questions.
Need help?
Do you have a question about the Experience TRM600-18 and is the answer not in the manual?
Questions and answers