Table of Contents
Advertisement
Advertisement
Table of Contents

Related Manuals for Phonak Audeo B70-R


Summary of Contents for Phonak Audeo B70-R
- Page 1 Phonak Audéo (B90/B70/B50) User Guide...
- Page 2 2016 Celsius (33° to 104° Fahrenheit) Hearing aid model Earpieces Non wireless charging accessories Audéo B90-R Dome Audéo B70-R SlimTip Phonak Charger Case RIC 2016 Audéo B50-R cShell c Phonak Power Pack 2016 Phonak Mini Charger RIC 2016 Charging accessories Charger Case RIC incl.
-
Page 3: Table Of Contents
Contents Your hearing aid and charger Your hearing aids and chargers have been developed by Phonak – the world leader in hearing solutions based in 1. Quick guide Zurich, Switzerland. 2. Parts of the hearing aid & charger Using the charger These premium products are the result of decades of 3. -
Page 4: Quick Guide
1. Quick guide Charging your hearing aids Push button with indicator light After placing your The push button has two functions: A short push can have various hearing aid in the charger, the functions. The function for your indicator light will hearing aid is indicated in your slowly blink until individual instructions. -
Page 5: Parts Of The Hearing Aid & Charger
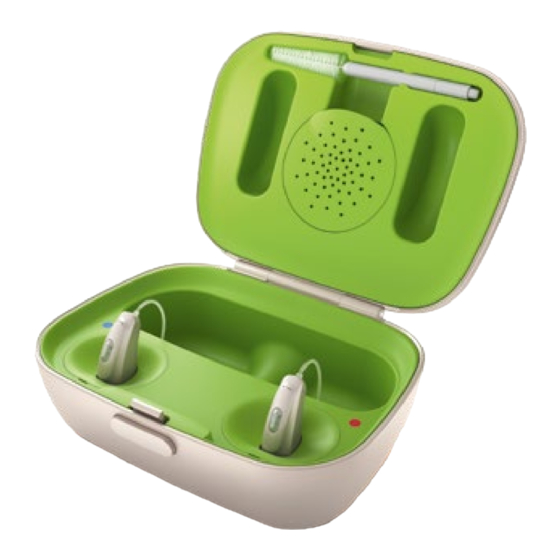
2. Parts of the hearing aid & charger Charger Case RIC The following pictures show the hearing aid model and charger accessories described in this user guide. You can identify your personal models by: Cleaning tool • Checking “Your hearing aid & charger details” on page 3. - Page 6 Charger Case RIC with optional Power Pack Mini Charger RIC Hearing aid charging inserts Charger Case RIC with left/right indicators Indicator light for power micro-USB connection to external power supply Power Pack micro-USB connection to external power supply micro-USB connection to external power supply Indicator light for power Battery check button Indicator light for battery status...
-
Page 7: Preparing The Charger
3. Preparing the charger 3.1 Setting up the power supply 3.2 Connecting the power supply Select the adapter that corresponds to your country. a) Insert the top round end of the a) Plug the larger end of the charging cable into the power adapter into the round corner of supply. -
Page 8: Charging The Hearing Aids
4. Charging the hearing aids 4.1 Using the Charger Case RIC or Mini Charger RIC Please refer to chapter 3 for how to set up the charger. Insert the hearing aid into the charging inserts. Make sure the left and right hearing aid markings match the left (blue)/right (red) indicators next to the charging inserts. - Page 9 The indicator light will slowly blink until the hearing aid Remove the hearing aids from the charging inserts and is fully charged. When fully charged the indicator light switch them on, refer to chapter 7. will remain on, i.e. solid green light. The charging process will automatically stop when the Audéo B-R charging times batteries are fully charged, so the hearing aids can be...
- Page 10 4.2 Using the optional Power Pack micro-USB connection to external power source Note: The Power Pack is only compatible with the Charger Case RIC. Indicator light battery status: 0%-29% • 30%-59% •• 60%-100% ••• Attach the Power Pack to the Battery check push button Charger Case RIC and lock it.
-
Page 11: Left & Right Hearing Aid Markings
5. Left & right hearing aid markings 6. Push button There is a red or blue marking on the back of the hearing The push button has two functions: aid and on the speaker. This will tell you if it is a left or a Short push right hearing aid. -
Page 12: On/Off
7. On/Off 8. Putting on the hearing aid To switch the hearing aid on or off, firmly press the button using the tip of your finger for 3 seconds until the indicator light blinks. Place the hearing aid behind your ear. One short blink = hearing aid turns on Two short blinks =... -
Page 13: Removing The Hearing Aid
9. Removing the hearing aid 10. Operating conditions The product is designed such that it functions without problems or restrictions if used as intended, unless Pull on the bend of the tube otherwise noted in these user guides. and remove the hearing aid from behind the ear. -
Page 14: Care And Maintenance
11. Care and maintenance Daily Hearing aid: Inspect the earpiece for earwax and Diligent and routine care of your hearing aid and chargers moisture deposits. Clean the surfaces with a lint-free contribute to outstanding performance and a long service cloth or use the small brush provided in the Charger Case life. -
Page 15: Exchanging The Earwax Protection
12. Exchanging the earwax protection Your hearing aid is equipped with an earwax protection to protect the speaker from earwax damage. Please check the earwax protector regularly and exchange Gently pull on the earpiece it if it looks dirty or if the hearing aid volume or sound to remove. - Page 16 12.2 Exchanging the earwax protection Insert the removal side of the To insert the new earwax exchange tool into the used protector, gently push the earwax protector. The shaft of insertion side of the exchange the holder should touch the rim tool straight into the hole of the of the earwax protector.
-
Page 17: Wireless Accessories
The speaker and the earpiece should fit perfectly together. * The Phonak ComPilot II with neckloop or ComPilot Air II with clip to attach to clothing. They also have basic remote control functionalities. For advanced control they can be used with the Phonak RemoteControl App. -
Page 18: Service And Warranty
This warranty International warranty does not include any services performed by a hearing care Phonak offers a one year limited international professional in their office. warranty, valid from the date of purchase. This... -
Page 19: Compliance Information
Terminal Equipment Directive 1999/5/EC. The full text of the Declaration of Conformity can be obtained from the manufacturer or the local Phonak representative whose address can be taken from the list on www.phonak.com (Phonak worldwide locations). Australia/New Zealand: Indicates a device’s compliance with applicable Radio Spectrum Management’s (RSM) and... - Page 20 Changes or modifications made to this device not • Connect the device into an outlet on a circuit expressly approved by Phonak may void the FCC different from that to which the receiver is connected. authorization to operate this device.
- Page 21 Radio information of your wireless hearing aid Antenna type Integrated ferrite coil antenna (inductive) Operation frequency 10.6 MHz Occupied bandwidth 498 kHz (99% BW) Modulation DQPSK Channel Single channel radio Operating range 18 cm (7”) Use case Streaming of audio signal to receiving hearing aid on the other ear Magnetic field strength...
-
Page 22: Information And Description Of Symbols
16. Information and description of symbols With the CE symbol, Phonak AG confirms that This symbol indicates that it is important for this Phonak product – including accessories the user to read and take into account the – meets the requirements of the Medical relevant information in these user guides. - Page 23 This symbol indicates that it is important for The symbol with the crossed-out garbage bin the user to read and take into account the is to make you aware that this hearing aid as relevant information in this user guide. well as chargers and Power Pack may not be thrown away as normal household waste.
-
Page 24: Troubleshooting
17. Troubleshooting 17.1 Troubleshooting hearing aid Problem Causes What to do Hearing aid not functioning Blocked speaker/earpiece Clean speaker opening/earpiece Hearing aid switched off Press push button for 3 seconds (chapter 1+7) Electromagnetic disturbances Press push button occurred Insert hearing aid into the charger Battery fully discharged Charge hearing aid (chapter 4) Hearing aid whistles... - Page 25 Problem Causes What to do The indicator light on the hearing Hearing aid not inserted correctly Insert hearing aid correctly into charger (chapter 4) aid is off when placed in the into charger charging inserts Charger not connected to power Connect charger to external power supply source Battery does not last the whole...
-
Page 26: Important Safety Information
Changes or modifications inflamed or if skin irritation to the hearing aid that and accelerated were not explicitly accumulations of earwax approved by Phonak are occur, please check with not permitted. Such your hearing care changes may damage your professional or physician. - Page 27 The following is only • If using a Phonak wireless suppressed. hospital immediately. applicable for persons with accessory, consult the active implantable medical chapter “Important safety devices (i.e.
- Page 28 Use of this equipment Portable RF The USB port of the Hearing aids should not be adjacent to or stacked with communications charger is to be used for fitted with domes / wax other equipment should be equipment (including the described purpose only. protection systems when avoided because it could peripherals such as...
- Page 29 Phonak hearing aids are not drying methods. • Medical or dental specifically designed for examination with X-ray extended periods of water The dome should be (also CT scan).
- Page 30 The hearing aids have to be Audéo B-R and Power Pack dry before charging. contain lithium-ion Otherwise the charging batteries tested according reliability cannot be to the UN 38.3 standard guaranteed. and should be shipped according to the rules and Only use approved regulations of safe chargers and Power Pack...
- Page 31 Notes...
- Page 32 Your hearing care professional: Manufacturer: Phonak AG Laubisrütistrasse 28 CH-8712 Stäfa Switzerland www.phonak.com...
Need help?
Do you have a question about the Audeo B70-R and is the answer not in the manual?
Questions and answers