Table of Contents
Advertisement
Advertisement
Table of Contents

Related Manuals for WhisperKool 4000i


Summary of Contents for WhisperKool 4000i
- Page 1 OWNER’S MANUAL The Coolest Thing In Wine Storage...
- Page 2 WhisperKOOL. Every effort has been made to ensure that the information in this manual is accurate. WhisperKOOL is not responsible for printing or clerical errors.
-
Page 3: Table Of Contents
TABLE OF CONTENTS Quick Reference Guide Unit ........... . . Controller &... -
Page 4: Quick Reference Guide
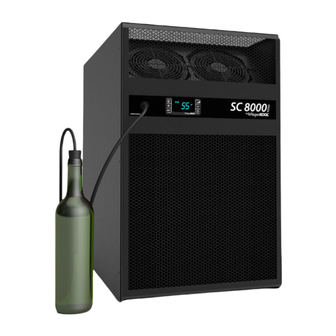
QUICK REFERENCE GUIDE Front / Side View Controller Probe Input Power Panel (see page 10 for details) Bottle Probe Rear / Side View Rear Power Inlet Drain Port Page 2 041612 XLTP... -
Page 5: Unit Specifications
*Press and hold to enter the parameter menu. Compressor On Alarm is Present Unit is in Anti-Frost Mode Temperature Measurement Fans are On UNIT SPECIFICATIONS Model 2000i 3000i 4000i 6000i 8000i Cellar Size (cu. ft.) 1000 1500 2000 Dimensions 14.25w x 15.75h x 17.5d 14.25w x 22.56h x 21.64d... -
Page 6: Introduction
INTRODUCTION Customer Service Thank you for purchasing a WhisperKOOL cooling unit. We strive to provide the highest quality products and the best possible customer service. If you have any questions about your WhisperKOOL unit, please call us at 1(800) 343-9463 or visit whisperkool.com. -
Page 7: Receiving & Inspecting The Unit
Connection “T” (1) Please leave the WhisperKOOL unit in its original box until you are ready for installation. This will allow you to move the product safely without damaging it. When you are ready to remove the product from the box, refer to the installa- tion instructions. -
Page 8: Quick Start Guide
Do not use a GFI (Ground Fault Interrupter) line. 4. For your convenience, the WhisperKOOL unit has two power inlets, one on the side of the unit and the other on the back. Use the selector switch, located on the right side of the unit, to select the inlet you would like to use. -
Page 9: Preparing The Wine Cellar
Insulation Insulation is REQUIRED with the use of the WhisperKOOL product. Standard fiberglass or rigid foam insulation is nor- mally used in cellar construction or, in some cases, “blown-in” insulation is used. It is very important that all walls and ceilings are insulated to keep the cellar temperature as consistent as possible during the summer and winter months. - Page 10 In cases where glass doors are used and the room size is close to the recommended unit size, the next larger size WhisperKOOL should be used. This will compensate for the insulation loss due to the lower insu- lating rating of glass.
- Page 11 However, you must have a fresh air inlet as well. If your unit requires ducting, please contact WhisperKOOL to obtain a specially designed ducting plenum for the unit. Using any other ducting system will void the warranty.
-
Page 12: Pre-Installation
Electrical Needs The WhisperKOOL Unit requires a dedicated 115-volt 20-amp circuit. The unit draws a large amount of amps at initial start up. By designating a dedicated circuit breaker, you will guarantee the unit has enough power to run effec- tively. -
Page 13: Preparing The Installation Location
Using two 2x4s at 14.5” in length and eight 6d nails, secure the upper and lower supports to the right and left studs, just inside the sheetrock. Make sure that the internal height remains at 16” (1600/3000/4200) or 22.25” (6000/8000) so that the WhisperKOOL unit will fit snugly through the framed cut-out. Page 11... -
Page 14: Preparing The Unit For Installation
1/2” self tapping screws to fasten the bracket to the unit. It is imperative to not use self tapping screws longer than 1/2” in length. 5” inch thick wall Mounting Bracket (wall thickness may vary) Wine Cellar Exhaust Area 2000i/3000i/4000i 5-6” inches In Cellar 6000i/8000i 9.5-10.5” inches In Cellar 2000i/3000i/4000i 9-10” inches In Cellar 6000i/8000i 14-15”... -
Page 15: Installing The Unit
The screws should penetrate the studs as well as the upper and lower supports to provide adequate support for the WhisperKOOL unit (see illustration). Seal all cracks and gaps around the Whis- perKOOL unit with an air-tight sealant or caulking to prevent air leakage. -
Page 16: Drain Line
DRAIN LINE Condensation Drain Line Tube The condensation drain line tube is used to remove excess condensation from the unit to a proper discharge location. It is important that the drain line tube is properly connected and used to prevent leakage and other problems associ- ated with excess condensation. -
Page 17: Liquid Measuring Thermostat System
LIQUID MEASURING THERMOSTAT SYSTEM The WhisperKOOL Series cooling units come equipped with a liquid temperature measuring thermostat system. This system incorporates the following advantages: Self-Calibrating Probe The probe contains a sensor chip, which actually communicates back and forth to the thermostat. This results in a consistent temperature setting and accuracy. -
Page 18: Unit Operation
Set Point: condenser probe temperatures can all be access by pushing The set point is set from the factory (WhisperKool) at 55°. It the set button and scrolling through PB1 (bottle probe), PB2 can be adjusted by the customer between 50° and 70° in (evaporator probe), and PB3 (condenser probe). -
Page 19: Control Functions
CONTROLLER FUNCTIONS Button/Symbol Normal Functions • ON/OFF Press and hold the on/off button for approximately 3 seconds to turn the unit on or off. Note: This does not disconnect power from the unit. In order for the power to be shut off from the unit, the power cord must be unplugged from the wall receptacle. -
Page 20: Alarm Codes
Alarm The Alarm symbol is shown and a audible buzzer will sound when the unit encounters an issue that needs attention, the displayed alarm codes are explained below. To silence the buzzer press any button, the alarm code will remain displayed until corrected. Alarm Codes Message Cause... -
Page 21: Wiring Schematic
WIRING SCHEMATIC Probe Cond. Probe Bottle Probe Evap. Page 19... -
Page 22: Maintenance Schedule
MAINTENANCE SCHEDULE Monthly 1. Check coils 2. Check for unusual noise or vibration 3. Check the drain line to see if it is above the waterline if draining into a vessel. Quarterly 1. Use a vacuum with brush attachment to clean coils. Be careful not to crush coil fins when cleaning. -
Page 23: Troubleshooting Guide
TROUBLESHOOTING GUIDE Unit has ice forming on the evaporator Possible Cause Solution Clean coil with a vacuum. Evaporator coil is dirty. If coil is very dirty, use a spray bottle with a small amount of liquid dish washing detergent. Spray coil, let set for 5 min, then flush with fresh water. - Page 24 TROUBLESHOOTING GUIDE Unit leaks water Possible Cause Solution Unit is not level Unit should be level in wall to prevent leaking Drain line clogged or kinked Check drain line to make sure water can flow freely. Drain is clogged preventing water form escaping Disconnect drain and clear out, open access door and check drain for blockage Fix Drain line so there is a downward slope from the unit to the drain.
-
Page 25: Technical Assistance & Accessories
TECHNICAL ASSISTANCE WhisperKOOL Customer Service is available Monday through Friday from 8:00 a.m. to 4:00 p.m. Pacific Time. The customer service representative will be able to assist you with your questions and warranty information more ef- fectively if you provide them with the following: •... -
Page 26: Installation Terms And Conditions
A. Two (2) Year Limited Warranty. For the period of TWO (2) YEARS (the “Limited Warranty Period”) from the date of original sale of a Product by WhisperKOOL, if a WhisperKOOL Product is found to be defective in material or workmanship after undergoing WhisperKOOL’s customer service troubleshooting, then, subject to the WhisperKOOL Product Limited Warranty Limitations and Exclusions as well as the other Terms and Conditions stated herein, WhisperKOOL will do the following, as appropriate, for the end user (“End User”) who has... - Page 27 (5) Proof of purchase of the Product in the form of a bill of sale or receipted invoice, which is evidence that the Product is within the Limited Warranty Period, must be presented by the End User to WhisperKOOL in order to obtain limited warranty service.
- Page 28 WhisperKOOL, Purchaser and End User, hereby irrevocably submit to the personal jurisdiction of such courts for that purpose. No waiver by WhisperKOOL of any breach or default of the contract of sale (including these Terms and Conditions) concerning a Product will be deemed to be a waiver of any preceding or subsequent breach or default.
- Page 29 NOTES...
- Page 30 WhisperKOOL 1738 E. Alpine Ave Stockton, CA 95205 1(800) 343-9463 www.whisperkool.com...
Need help?
Do you have a question about the 4000i and is the answer not in the manual?
Questions and answers