Philips HC9490 Manual
- Manual (164 pages) ,
- User manual (144 pages) ,
- Quick start manual (5 pages)
Advertisement
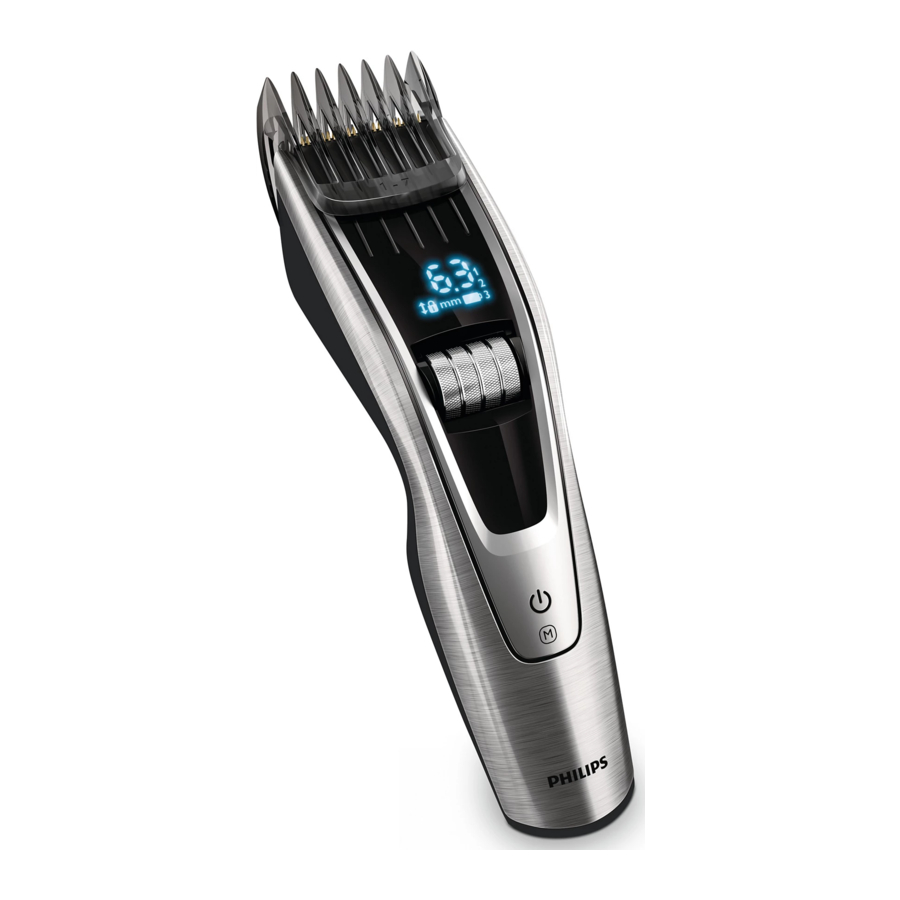
General description

(Fig. 1)
- Cutting unit
- Flywheel
- On/off button
- M-symbol
- Length setting lock
- Charging light
- Length settings
- Display
- Trimming comb 1-7 mm
- Trimming comb 7-24 mm
- Trimming comb 24-42 mm
- Adapter
- Small plug
- Charging stand
- Cleaning brush
- Pouch
Charging
Charge the appliance fully before you use it for the first time or after a long period of disuse.
When it is charged for 1 hour, the appliance has a cordless operating time of up to 180 minutes.
Note: After charging the appliance once fully for the first time, you can also use the appliance directly from the mains. Simply connect the appliance to the mains.
Charging indications
Battery low indication
- When the battery is almost empty, the charging light starts to flash orange.
![]()

Charging
- When the appliance is charging, the charging light flashes blue.
Battery fully charged
- When the battery is fully charged, the charging light lights up blue continuously
![]()

Note: After 30 minutes, the charging light goes out.
Charging in the charging stand
- Put the small plug in the charging stand.
![]()
- Put the adapter in the wall socket.
- Place the appliance in the charging stand.
![]()
- After charging, remove the adapter from the wall socket and pull the appliance plug out of the charging stand.


Charging with the adapter

- Make sure the appliance is switched off.
- Insert the small plug into the appliance.
- Put the adapter in the wall socket.
- After charging, remove the adapter from the wall socket and pull the small plug out of the appliance.
Optimising the lifetime of the rechargeable battery
When you have charged the appliance for the first time, we advise you to use it until the battery is completely empty. Continue to use the appliance until the motor almost stops operating during a session. Then recharge the battery. Follow this procedure at least twice a year.
Using the appliance
The hair length settings are indicated in millimeters. The settings correspond to the remaining hair length after trimming.
Be careful when you trim for the first time. Do not move the trimmer too fast. Make smooth and gentle movements.
Tip: Start trimming at a high length setting and reduce the length setting gradually until you have reached the desired hair length.
Trimming with comb
There are 3 different combs.
- 1-7mm
- 7-24mm
- 24-42mm
- Attach one of the combs to the appliance.
![]()
- Scroll upwards or downwards to select the desired length setting.
Note: When you trim for the first time, start at the highest length setting to familiarise yourself with the appliance.
![]()
- Switch on the appliance.
![]()
- To trim most effectively, move the trimmer against the hair growth direction. Make sure the surface of the comb always stays in contact with the skin.
![]()


Trimming without comb
Use the trimmer without the trimming comb to trim hair close to the skin (0.5mm) or to contour the neckline and sideburns.
Be careful when you trim without comb because the cutting element removes every hair it touches.
- Push the comb off the appliance.
![]()
- Switch on the appliance.
![]()
- Touch the hair lightly with the trimmer. Make well-controlled movements
![]()


Features
Memory settings
The appliance has a memory which allows you to save three frequently used length settings for each comb. Each comb has different length ranges.
Saving a setting
- Scroll upwards or downwards to select the desired length setting.
![]()
- To enter the memory, press the on/off button for 2 seconds.
![]()
- Number 1 starts to flash.


Note: If you want to save a setting as number 2 or 3 of the memory, scroll upwards or downwards to select number 2 or 3.
- To save a length setting as number 1,2 or 3 of the memory settings, press the on/off button for 2 seconds.
![]()
- The display shows the word 'SEt' when the length setting is correctly, saved. Memory setting number 1,2 or 3 lights up continuously.

Selecting a memory setting
- To enter the memory, press the on/off button for 2 seconds.
![]()
- Number 1 starts to flash.

Note: To select number 2 or 3 in the memory, scroll upwards or downwards until number 2 or 3 flashes on the display.
- Press the on/off button to confirm the selected memory setting.
- The number of the selected setting lights up continuously.
Length setting lock
This feature prevents accidental changing of the length setting during trimming. Every time you switch on the appliance, the length setting lock is activated. You can only change the length setting if you switch off the appliance.
- Scroll upwards and downwards to select the desired length setting.
![]()
- Switch on the appliance.
![]()
- The lock symbol starts to flash. You cannot change the length setting anymore.


Note: If you want to select a different length setting, switch off the appliance. Scroll upwards or downwards to select the desired length setting and switch on the appliance again.
Cleaning
Never use scouring pads, abrasive cleaning agents or aggressive liquids such as alcohol, petrol or acetone to clean the appliance.
Never immerse the appliance or the charging stand in water or rinse it under the tap.
- Make sure the appliance is switched off and disconnected from the mains.
- Wipe the housing of the appliance with a dry cloth.
- Remove the comb and clean it with the cleaning brush.
![]()
- Press the release button (1). The cutting unit comes off the appliance (2).
![]()
- Clean the cutting unit with the cleaning brush.
![]()
- Clean the inside of the appliance with the cleaning brush.
![]()
- To reattach the cutting unit, insert the lug of the cutting unit into the guiding slot.
- Insert the lug of the cutting unit into the guiding slot (1) and push the cutting unit back onto the appliance (2).
![]()
- Wipe the charging stand with a dry cloth.


Note: If the message 'CL' is shown on the display, too much hair has collected between the comb and the cutting unit. Remove the comb and cutting unit and clean them with the cleaning brush supplied. Also clean the top edge of the handle with the cleaning brush supplied.
Replacement
Only replace a worn or damaged cutting unit with an original Philips cutting unit, available from authorised Philips service centre.
- Press the release button (1). The cutting unit comes off the appliance (2).
![]()
- Insert the lug of the new cutting unit into the guiding slot (1) and push the cutting unit onto the appliance (2).
![]()


Ordering accessories
To buy accessories or spare parts, visit www.shop.philips.com/service or go to your Philips dealer. You can also contact the Philips Consumer Care Centre in your country (see the worldwide guarantee leaflet for contact details).
Removing the rechargeable battery
Note: We strongly advise you to have a professional remove the rechargeable battery.
Only remove the rechargeable battery if it is completely empty.
- Disconnect the appliance from the mains and let the appliance operate until the motor stops.
- Press the release button (1) and remove the cutting unit (2).
![]()
- Insert the screwdriver between the motor unit and the back panel of the appliance. Press down the screwdriver as far as it will go
![]()
- Tilt the handle of the screwdriver downwards (1) and separate the back panel from the appliance (2).
![]()
- Remove the side panels. Pull the bottom part of the printed circuit board with the rechargeable battery attached from the appliance.
![]()
- Cut the wires to separate the rechargeable battery from the appliance.
![]()


Do not connect the appliance to the mains again after you have opened it.
Important
Read this user manual carefully before you use the appliance and save it for future reference.
![]()
Keep the appliance, the adapter and the charging stand dry.


- The adapter contains a transformer. Do not cut off the adapter to replace it with another plug, as this causes a hazardous situation.
- This appliance can be used by children aged from 8 years and above and persons with reduced physical, sensory or mental capabilities or lack of experience and knowledge if they have been given supervision or instruction concerning use of the appliance in a safe way and if they understand the hazards involved. Children shall not play with the appliance. Cleaning and user maintenance shall not be made by children without supervision..

- This appliance is not washable. Never immerse the appliance or charging stand in water, nor rinse it under the tap.
![]()
- Always check the appliance before you use it. Do not use the appliance, adapter, charging stand or any other part if it is damaged, as this may cause injury. Always replace a damaged adapter, charging stand or part with one of the original type.
- Always replace a damaged adapter or part with one of the original type.
- Only use this appliance for its intended purpose as shown in the user manual.
- Never use compressed air, scouring pads, abrasive cleaning agents or aggressive liquids such as petrol or acetone to clean the appliance.

Electromagnetic fields (EMF)
This Philips appliance complies with all applicable standards and regulations regarding exposure to electromagnetic fields (EMF).
General
- The appliance is equipped with an automatic voltage selector and is suitable for mains voltages ranging from 100 to 240 volts.
- The adapter transforms 100-240 volts to a safe low voltage of less than 24 volts.
- Maximum noise level: Lc = 75dB(A)
To fully benefit from the support that Philips offers, register your product at www.philips.com/welcome.
Documents / Resources
References
Download manual
Here you can download full pdf version of manual, it may contain additional safety instructions, warranty information, FCC rules, etc.
Advertisement


Need help?
Do you have a question about the HC9490 and is the answer not in the manual?
Questions and answers