Melitta CUP Manual
- Operating instructions manual (20 pages) ,
- Operating instructions manual (44 pages)
Advertisement
- 1 General
- 2 Safety
- 3 Technical data
- 4 Installation
- 5 Operation
- 6 Dispensing products
- 7 Settings
-
8
Cleaning
- 8.1 Safety measures
- 8.2 Cleaning intervals
- 8.3 Cleaning prompt and dispensing lock
- 8.4 Cleaning agents
- 8.5 When using canisters
- 8.6 Cleaning the coffee grounds drawer
- 8.7 Running the cleaning program
- 8.8 Cleaning the instant system
- 8.9 Rinsing the mixer unit
- 8.10 Cleaning the instant container
- 8.11 Cleaning the touch screen
- 8.12 External cleaning
- 9 Maintenance
- 10 Documents / Resources
General
Manufacturer information
Melitta Professional Coffee Solutions GmbH & Co. KG
Zechenstr. 60
32429 Minden
Germany
Internet: www.melitta-professional.de
About these instructions
These instructions form part of the equipment. They contain important information on safety, installation, usage, and cleaning. Observing these instructions helps preserve your safety and helps avoid damage to the product.
We reserve the right to make changes to these instructions due to technical modifications. Reprints, translations, and reproductions in any form, including excerpts, require written agreement from the publisher.
The copyright is held by the manufacturer.
Explanation of symbols

Danger of death!
Identifies hazards that could result in serious injury or even death if the corresponding hazard notice is not observed.

Personal injury!
Identifies hazards that could result in injury if the corresponding warning notice is not observed.

Minor injuries!
Identifies hazards that could result in minor injuries.
 ATTENTION
Property damage!
Identifies the risk of possible property damage.
 Note
Note
Identifies usage tips and useful information.
Description
This machine is a fully automatic coffee machine. Depending on the machine equipment level, the following products can be dispensed:
- Coffee products
- Instant products
- Hot water
The housing consists of stainless steel and high-quality plastic. The design of this machine facilitates compliance with the following operator requirements:
- HACCP hygiene guidelines
- Accident prevention regulations for electrical safety in the commercial sector
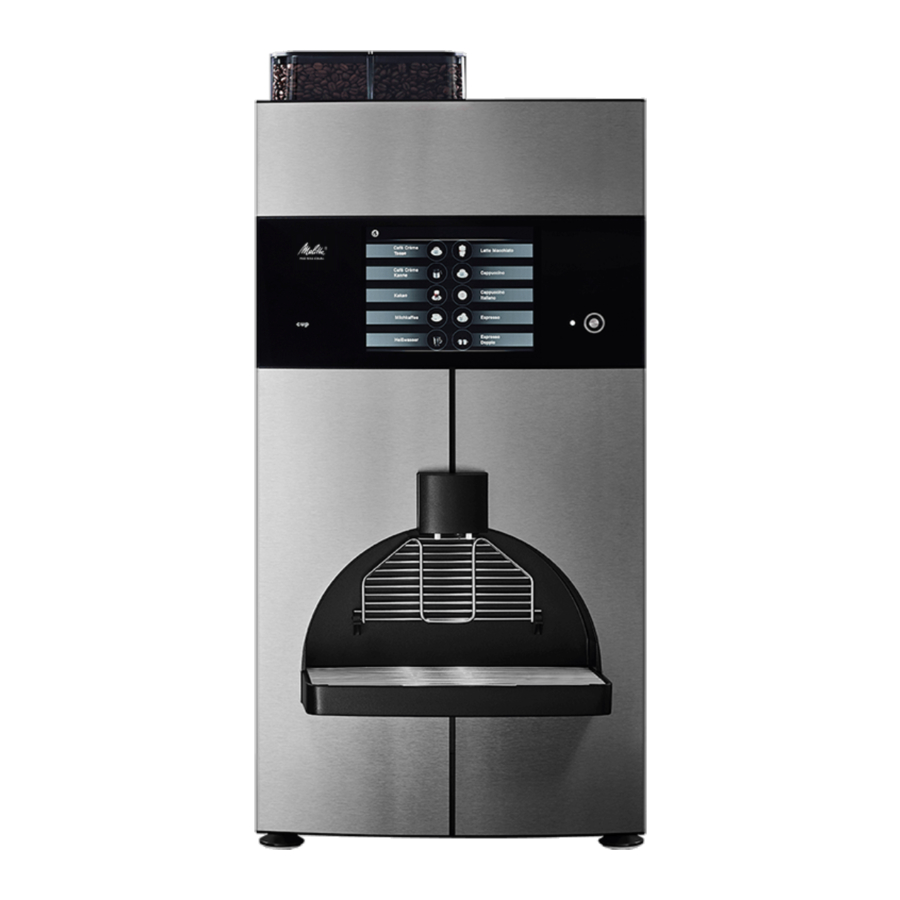
Fig. 1: Overview

- Bean container 1 (left)
- Bean container 2 (right)
- Instant container (behind the machine door)
- Chip key contact surface
- Mixer unit (behind the machine door)
- Beverage outlet
- Cup tray
- Coffee grounds drawer (behind the machine door)
- Drip grid
- Main switch (behind the machine door)
- Machine door with display (touch screen)
The nameplate is located behind the machine door.
Accessories Accessories supplied
- 2 green user chip keys
- 1 yellow manager chip key
- 1 removal tool
- 1 microfiber cloth
- 1 tin of Melitta® Cafina® Multi TF-Tabs (art. no. 31547)
- 1 set of operating instructions
Accessories available
| Cup warmer | cup CW |
| Billing systems | Coin acceptor, coin changer, card reader |
| Grounds disposal | Container discharge |
| Quantity outlet | Jug outlet with or without jug tray |
Safety
Intended use
This machine is a fully automatic coffee machine for dispensing coffee and milk products (instant) as well as hot water at increased daily requirements of beverages in the gastronomic sector.
The following operating modes are available:
- Operation by trained personnel
- Supervised self-service operation
- Operation with fixed water connection
- Non-pressurized operation via fresh water and waste water canisters
- Stationary installation within dry, enclosed rooms
This machine is not intended for the following uses:
- In areas with high air humidity (e.g., areas with considerable amounts of steam) or outdoors.
- On board vehicles or mobile facilities (please contact the manufacturer).
Safety information
General
The following safety information relates to the machine only. In addition, there may be legal requirements in place for the owner/operator, e.g., regarding food hygiene and safety at work.
- Only use the machine when you have read and understood these instructions in full.
- When operating the machine, always observe all information and guidelines in these instructions.
- Keep these instructions at the place of use of the machine.
Personnel
- This machine can be used by children of 8 years and above as well as persons with reduced physical, sensory, or mental capabilities if supervised or when they have been trained in the safe use of the equipment.
- Children under 8 years of age must be kept away from the machine.
- Children must not be permitted to play with the equipment.
- Cleaning and user maintenance must not be performed by children.
- Persons with limited experience and knowledge must be able to recognize hazards arising from incorrect operation.
- A user is only permitted to operate the machine without supervision if it has been explained in such a way so that the user knows how to operate it safely.
- In self-service operation, the machine must be supervised by trained personnel.
- Repairs and maintenance work may only be carried out by Melitta customer service or by specialist personnel authorized by the manufacturer. Incorrectly performed repair work can result in considerable risk to the user.
- The area reserved specifically for customer service is only to be accessed by persons who have sufficient knowledge and practical experience of the equipment, particularly with regard to safety and hygiene.
- Settings may only be made, and cleaning and preparation work may only be carried out on the machine by persons who have been trained by the installation engineer or by the manufacturer.
- Faulty components may only be replaced with original spare parts. Otherwise warranty claims will be void.
Correct use
- The machine can be damaged by penetrating water. The machine is not protected against jets of water. Protect the machine against water and spray water.
- Never pour water over the machine.
- Do not use any water jets, high-pressure cleaners, or steam cleaners to clean the machine.
- The machine is not suitable for installation on a surface where a water jet might be used.
- When the machine is unattended for extended periods, switch it off at the main switch and close the water tap.
- Never open the covers unless explicitly instructed to do so. Similarly, never remove bolts and the housing parts that they hold in place. Contact with live parts poses a danger of death due to electrical voltage.
- Never reach into a machine opening when the machine is running.
- Do not hold any body parts under the outlets when hot liquids or steam are being dispensed. This occurs in the following situations:
- After switching on
- When beverages are being dispensed
- During automatic cleaning
- During rinsing processes (e.g., when switching off)
- Do not touch any hot parts.
- When products are being dispensed, there is a risk of scalding from the actual products. Always take care when handling hot beverages.
- Take note of any visible damage or malfunctions. Obvious malfunctions include water leaks, odors and heat formation, unusual noises, as well as error messages on the display. In the event of any unusual situation:
- Disconnect the mains plug
- Switch off the water supply
- Contact customer service
- Have the machine checked and repaired by customer service
- Clean the machine at least once per day, especially the parts in contact with milk. Impurities could cause health problems.
- Comply with all intervals for cleaning, inspection, and maintenance, as specified in the instructions. Otherwise, the safety, functional reliability, and durability may be impaired.
Technical data
Machine specifications
| Dimensions (W x D x H) | 400 x 510 x 860 mm |
| Weight | approx. 50 kg |
| Coffee supply | 2 x 5 l / 2 x approx. 1600 g |
| Instant supply | 2 x 1.7 l / 2 x approx. 1300 g |
| Coffee grounds drawer capacity | For approx. 30 portions |
Operating data
| Hourly output | approx. 25 l hot water or approx. 100 cups of Café Crème (125 ml) |
| Permissible ambient temperature | + 5-30°C |
| Permissible air humidity | < 80% non-condensing |
| Noise level | < 70 dB(A) |
Electrical connection
| Power supply | 200-240 V, 50-60 Hz |
| Power consumption | 2100-2900 W |
| Fuse protection provided by customer | 16 A (required) |
| Connection | 2 m mains cable with shockproof mains plug |
Water connection
| Fresh water connection | G ¾" outer thread |
| Fresh water pressure | At least 0.25 MPa (2.5 bar) at approx. 2 l/min, a pressure reducer is required for static pressures higher than 0.6 MPa (6 bar) |
| Fresh water carbonate hardness | 1-3 °dKH: no action required, 4-5 °dKH: Everpure filter, 6 °dKH and above: decarbonization system required (e.g., BRITA-Purity), less than 1 °dKH: consult manufacturer |
| Waste water connection | At least DN 25 - NW 1" |
Installation
The machine is set up, installed, and handed over ready for use by customer service. Due to the associated hazards, modifications to the installation or setup must be carried out by customer service only.
Prerequisites
Make sure that the following prerequisites are met before you use the machine.
Water connection
The water connection must be easy to shut off at any time during operation (shut-off valve). The equipment is to be installed to comply with the applicable federal, state, or local plumbing codes and regulations, e.g., EN 61770.
The limit values for water pressure and carbonate hardness as given in the technical data must be observed.
Only use a new hose set. Old or used hose sets are not permitted to be reconnected.
The water drain must only be installed via a fixed connection with odor trap that is protected against backwater and backflow. This prevents contamination in the machine due to backflowing waste water.
Electrical connection
The supply voltage must match the specifications on the nameplate.
The supply line must be protected at the site using a residual current circuit breaker (RCCB) (max. 30 mA)
For connection via a mains plug, the socket must be easily accessible during operation so that the plug can be disconnected in the event of a fault.
Due to the high power, a separately fused circuit is required for the machine.
Installation location
The machine is only to be installed and used in enclosed, dry areas; it must not be operated outdoors.
The effects of humidity and temperature may adversely affect the function and safety of the equipment.
The machine must always be installed and stored in frostfree locations.
The installation area must provide sufficient distances from walls and objects due to the heat generated and for operation of the machine.
Distances
| To the back | At least 5 cm |
| To the top | At least 20 cm |
In self-service operation, the machine and all accessory units must be installed in such a way that they can be permanently supervised by trained personnel.
The machine must be positioned level and free of vibrations. Adjustable feet are provided so that the unit can be leveled out on slightly uneven surfaces.
Product material
Coffee beans must be suitable for use in commercial coffee machines.
Extraneous matter, such as pieces of wood, stones, or metal, etc., must be removed to prevent damage to the grinder.
The instant powder must be suitable for use in commercial machines. Only use dry and loose material without clumps.
Canister operation (option)
If your machine cannot be permanently connected to the fresh water and waste water system, you can also operate it with two canisters.
Also observe the limit values for the water carbonate hardness in this process. Where necessary, the fresh water supply must be topped up via a water filter (e.g., BRITA-Purity).
The canisters must always be installed by customer service.
Note
Particular care with regard to hygiene is required for canister operation. Observe the relevant notes.
Fig. 2: Canister operation

In daily operation, the fresh water canister must be filled with sufficient water and the waste water canister must be drained when necessary.
Filling the fresh water canister
- Pull the suction lance (1) together with the cover disk (3) out of the canister lid.
- Unscrew the lid from the canister.
- Before filling, clean the fresh water canister and its lid area with standard dishwashing detergent and rinse off the cleaner residues thoroughly.
- Fill the canister with fresh water.
- Observe the limit values for the water carbonate hardness. Where necessary, the fresh water supply must be topped up via a water filter (e.g., BRITA-Purity).
- Screw the lid back onto the canister.
- Slide the suction lance (1) through the hole in the canister lid.
- Make sure that the suction lance touches the bottom of the canister.
- Place the cover disk (3) on the lid.
![]() The fresh water canister is ready for operation.
The fresh water canister is ready for operation.
Emptying the waste water canister
- Remove the drain tube (2) from the canister lid.
- Unscrew the lid from the canister.
- Empty the canister.
- Screw the lid back onto the canister.
- Insert the drain tube (2) through the hole in the canister lid.
![]() The waste water canister is ready for operation.
The waste water canister is ready for operation.
Operation
Initial commissioning is carried out by customer service. If you want to put the machine back into operation following a standstill, clean the machine.
Chip keys
Included with the machine are two green user chip keys and one yellow manager chip key.
Green user chip key
The green user chip keys can be used to carry out the following actions:
- Switching on/off the machine.
- Changing the filling levels.
- Carrying out a full cleaning of the machine.
- Cleaning the touch screen.
- Rinsing the mixer unit.
- Viewing and editing the weekly planner.
Yellow manager chip key
The yellow manager chip key provides the same options as the user chip key. The following additional actions can be carried out:
- Making settings on the machine.
- Editing the dispensing products.
- Creating/editing product groups.
- Displaying consumption and product statistics.
Without chip key Waiter operation
Without a chip key, the following options are available in waiter operation:
- Dispensing preset products.
- Switching on/off the machine.
- Changing the filling levels.
- Carrying out a full cleaning of the machine.
- Cleaning the touch screen.
- Rinsing the mixer unit.
- Viewing and editing the weekly planner.
Self-service operation
Without a chip key, you can only dispense preset products in self-service operation.
Logging in with a chip key
Fig. 3: Logging in with a chip key

- Hold one of the chip keys on the contact surface (1) at the front of the machine so that the inner and outer contact surfaces are fully connected to one another by the chip key.
![]() You are logged in and can use the corresponding functions.
You are logged in and can use the corresponding functions.
LED status indication
An LED (2) (see Fig. 3) next to the chip key contact surface shows the current status of the machine:
| LED | State |
| Off | Machine is switched off and can be switched on with the main switch. |
| White flashing | Machine switches on. |
| White permanently | Machine is ready for dispensing. |
| Red | Machine is in stand-by operation. |
| Blue flashing or permanently | Malfunction: Switch off the machine with the main switch and switch it on again. If this occurs repeatedly, contact customer service. |
Switching the machine on and off
Switching on
Fig. 4: Switching on the machine

- Check that the water supply is on.
- Open the machine door (3) using the key (1).
- Switch the machine on using the main switch (2).
- Close the machine door.
- Continue as described in chapter.
Note
The main switch can be used to switch the machine off entirely, e.g., during extended standstills.
Stand-by operation
In daily operation, it is sufficient to switch the machine on and off via the display only (stand-by operation):
- Depending on the operating mode, proceed as follows:
- Self-service operation: Hold one of the chip keys on the contact area at the front of the machine.
- Waiter operation: Touch the display.
The question "Switch on unit?" is shown on the display.
Fig. 5: Switching on the machine

- Confirm this using "Yes".
The switch-on process is started and takes several minutes.

Danger of burns on the beverage outlet!
Hot water runs out of the beverage outlet when the lines are rinsed.
- Do not reach underneath the outlets.
- The lines are rinsed.
- The machine is heated to the required temperature.
The switch-on process is displayed by a flashing white LED next to the chip key contact surface. The LED lights up in white permanently when the machine is ready for dispensing.
 The machine is ready for operation.
Note
After switching on the machine, the filling levels of the supply containers must be checked. If necessary, the supply containers must be filled and the filling levels confirmed.
Switching off
Note
For hygiene reasons, the machine must be switched off only in a cleaned state.
Always use the "Clean and switch off full system" function. The "Switch off" function (in the manager menu) is permitted to be used only if a cleaning process of the full system has been carried out and no further products have been dispensed.
When switching off, the machine goes into stand-by mode.
Fig. 6: Switching off the machine

- On the display, press the menu symbol "≡" (1) and then "Cleaning".
- In self-service operation, you must first log in with a user chip key.
- Press the "Clean and switch off full system" button (2).
- The next steps are described in chapter.
![]() The cleaning program is carried out. The machine is then switched off.
The cleaning program is carried out. The machine is then switched off.
- The next steps are described in chapter.
For an extended standstill
If the machine will not be used for an extended period, turn off the water supply and switch off the main switch.
Note
For hygiene reasons, the machine must be switched off only in a cleaned state.
If you want to take the machine out of operation, contact customer service.
Filling
Note
The filling level must be confirmed at the machine each time a supply container is filled.
Fig. 7: Filling the bean container

- Open the lid of the bean container using the key (4).
- Remove the lid (3) on the bean container.
- Fill the correct beans into the corresponding bean container, e.g., espresso beans in container 1 (1) and coffee beans in container 2 (2).
- Refit the lid.
![]() The bean container has been filled.
The bean container has been filled.
Note
The coffee grounds drawer should also be emptied every time the coffee supply is filled.
Filling the instant powder
Fig. 8: Opening the machine door

- Open the machine door using the key (1).
Fig. 9: Instant container
![]()
- Turn the powder chute (2) upwards so that no powder can fall out.
- Remove the instant container (1).
- Remove the lid on the instant container.
- Fill the right instant powder into the corresponding container, e.g., cocoa.
- Ensure that the powder is not compressed.
- Refit the lid.
- Refit the instant container.
- The pin on the bottom side of the instant container must engage in the hole in the floor of the insert compartment.
- Turn the powder chute downwards to direct it into the mixer housing.
- Close the machine door.
If the machine door has been open for more than ten seconds, a prompt to confirm whether or not the mixer unit should be rinsed appears on the display once the door has been closed.
![]()
Danger of burns on the beverage outlet! Hot water runs out of the beverage outlet when the mixer unit is rinsed.- Do not reach underneath the outlets.
- Confirm the prompt by pressing the "Yes" button.
![]() The instant container has been filled.
The instant container has been filled.

Confirming filling levels
The filling level must be confirmed at the machine each time a supply container is filled.
Fig. 10: Confirming filling levels

- On the display, press the menu symbol "≡" (1) and then "Filling levels".
- In self-service operation, you must first log in with a user chip key.
- Press the required "T" button (3) above the filling level displays to mark the following containers as full (from left to right and top to bottom):
- Bean container 1 (front)
- Bean container 2 (rear)
- Instant container 1 (left)
- Instant container 2 (right)
- Fresh water canister
![]() The filling levels have been confirmed.
The filling levels have been confirmed.
To return to the start screen, proceed as follows:
- Self-service operation: On the display, press the menu symbol "≡" (1) and then "Logout".
- Waiter operation: On the display, press the menu symbol "≡" (1) and then "Selection"
You can adjust the filling levels even more accurately.
- Press the required filling level display, e.g., of the bean container 1 (2).
- A new window opens.
Fig. 11: Adjusting filling levels more accurately

- A new window opens.
- Select one of the following options:
- Press the "T" button (1) to mark the container as full.
- Touch the filling level display above or below the bar (2) to adjust the filling level in steps.
- Slide the bar (2).
- Press the "Apply" button (3) to adopt the settings and return to the previous screen.
![]() The filling levels have been confirmed.
The filling levels have been confirmed.

If the filling level for a consumable drops below a set value, a warning will appear on the display. If you confirm that the consumable has been refilled, you can then adjust the new filling level straight away in a similar dialog as shown in Fig. 11.
Emptying the coffee grounds drawer
The coffee grounds drawer must be emptied if the coffee grounds are not disposed of via the optional container discharge.
When the coffee grounds drawer is full or almost full, the message is displayed that the grounds drawer must be emptied:
- If the coffee grounds drawer is 75% full, only a few more brewing processes can be carried out.
- If the coffee grounds drawer is 100% full, only products that do not release coffee grounds can be dispensed. All other products are grayed out and cannot be selected.
Fig. 12: Emptying the coffee grounds drawer

- Open the machine door using the key (1) (see Fig. 8).
- Pull out the coffee grounds drawer (1).
- Empty the coffee grounds into the household waste.
- Reinsert the coffee grounds drawer.
- Close the machine door.
After reinserting the emptied coffee grounds drawer, a prompt to confirm whether or not the grounds drawer has been emptied appears on the display. - Confirm the prompt by pressing the "Yes" button.
![]() The coffee grounds drawer has been emptied.
The coffee grounds drawer has been emptied.
Viewing the weekly planner
If this function is enabled by customer service, you can view and edit the timetable for the fully automatic operation of the machine with the weekly planner.
Fig. 13: Weekly planner

- On the display, press the menu symbol "≡" (1) and then "Weekly planner".
- In self-service operation, you must first log in with a user chip key.
The fully automatic operation can be configured per weekday. Each row is one operating parameter which can be set over the course of one week:![]()
Cleaning times ![]()
Switching on/off ![information]() Note
Note
If enabled by customer service, you can edit the weekly planner here.
The symbols (2) indicate whether the fully automatic operation by the weekly planner is activated or deactivated for the corresponding parameter.
The field next to the symbols determines the base setting of the parameter, for example, for "switching on/off", if the base setting of the machine is principally "on" and switch-off times are specified, or "off" and switch-on times are specified.
- In self-service operation, you must first log in with a user chip key.
- Press a row (5) to view the events set for the parameter in question.
- The check mark at the bottom right closes the display of the events for the corresponding parameter.
- Press a weekday (6) to display the selected weekday in 24 hours.
- When pressing a time of day, you can zoom in on the timeline further and out again.
- With the buttons "<" and ">" you can scroll the timeline.
- Press the title (4) to return to the previous display.
![]() The weekly planner has been viewed.
The weekly planner has been viewed.


Locking product dispensing
You can lock product dispensing temporarily.
- Hold the manager chip key on the contact area at the front of the machine.
- On the display, press the "Unit" button.
- On the display, press the "Lock product selection" button.
![]() Product dispensing has been locked.
Product dispensing has been locked.
To activate product dispensing again, hold one of the chip keys on the contact surface at the front of the machine.
System messages
Messages in self-service operation
In self-service operation, system messages are indicated by a notice symbol.
Fig. 14: System messages

You can view the system messages by pressing the symbol (1).
Messages in waiter operation
In waiter operation, system messages are displayed, for example, if a product material has run out (e.g., "Bean container empty"), directly on the display.
A notice symbol to the right of the lower bar will then refer you to any system messages that have not been rectified. You can view the system messages by pressing the symbol.
Dispensing products
Note
Before dispensing products, all supply containers must be inserted and filled as otherwise no more products can be dispensed.
Once the machine has heated up, the products that can be dispensed are listed on the display. Products that are not available, e.g., due to a shortage, are grayed out.
Danger of burns due to hot products!
Contact with the product dispensed can result in burns.
- Do not reach underneath the outlets during operation.
Product dispensing
To dispense a product, press the corresponding product button on the display.
Fig. 15: Product dispensing in waiter operation

Groups and dispensing settings are labeled using the following symbols:
- Pressing a product button without a symbol dispenses the listed product (1) once.
- Pressing and holding a product button with the "○" symbol dispenses the product (3) until contact is ceased.
- The symbol "
![]() " identifies a product group (2).
" identifies a product group (2).
You can select dispensing products sorted into groups by opening the specified group via touch and accessing the required product for dispensing. After a product from a group has been dispensed, use the "←" symbol (4) (top left in self-service operation) to return to the start screen, or wait for a short while until the start screen appears automatically.
Display language
The display language which is displayed by default and the languages available for self-service operation are determined via the machine settings in the manager menu.
Fig. 16: Product dispensing in self-service operation

In self-service operation, the user can change the display language temporarily via the language selection symbol (1).
Canceling the product dispensing
Depending on the product preset, you can cancel the ongoing product output by pressing "X" during dispensing (see Fig. 22).
Dispensing coffee products, instant products and hot water
Fig. 17: Dispensing products

- Select one of the following options:
- Position cups, pots, or glasses underneath the beverage outlet (3) on the drip grid (1).
- Position small cups on the cup tray (2) by folding it down.
- Press the corresponding product button on the display.
![]() The product is dispensed.
The product is dispensed.
Dispensing products via jug outlet (option)
Depending on the equipment, a jug outlet may be available. With the jug outlet, you can dispense products in larger receptacles.
Fig. 18: Jug outlet with jug tray

- Beneath the beverage outlet hook the jug outlet (3) into the recess (4) at the rear of the dispensing area.
- If required and available, hook the jug tray (1) beneath the jug outlet into the drip grid (2).
Fig. 19: Dispensing coffee via the jug outlet

- Position or hold the receptacle (1) under the outlet of the jug outlet (2).
- Press the corresponding product button for a product via the jug outlet on the display.
![]() The product is dispensed via the jug outlet.
The product is dispensed via the jug outlet.

Dispensing a double product
If this function is enabled by customer service, you can request two portions of a coffee/milk product and fill two cups simultaneously.
Fig. 20: Dispensing a double product

- Position a cup (1) in the center underneath each dispensing nozzle (2).
- Press the corresponding product button on the display.
The following prompt appears on the display:
Fig. 21: Dispensing a double product

- Select one of the following options:
- Press the product with the symbol "
![]() " (1) to dispense two portions of the requested product.
" (1) to dispense two portions of the requested product. - Press the product with the symbol "
![]() " (2) to dispense a single portion of the requested product.
" (2) to dispense a single portion of the requested product.
![information]() Note
Note
If neither of the product buttons is pressed, then a single portion of the product is dispensed automatically after a short time.
![]() The product is dispensed.
The product is dispensed.
Fig. 22: Product dispensing

- Press the product with the symbol "


Dispensing multiplicator products
Under product settings, you can set up products as multiplicator products. With this you can issue multiple portions of a product in succession if required, for example, to fill a larger cup.
Note
In order to dispense a multiplicator product, there must be enough product material and capacity in the coffee grounds drawer.
- Position a cup underneath the beverage outlet.
- Press the corresponding product button on the display.
- While the product is being dispensed, the display shows how many single products are included in the multiplicator product and which single product is currently being dispensed (e.g., "1 / 4", the first product of four single products).
- The products are prepared and dispensed in succession.
![]() The dispensing of the multiplicator product is complete.
The dispensing of the multiplicator product is complete.
Multiple dispensing of a single product
Multiple portions of a product can be requested as necessary and dispensed directly in sequence. The advantage of multiple dispensing is that you do not need to select the product again for every subsequent portion.
- Position a cup underneath the beverage outlet.
- Press the corresponding product button on the display.
- While the product is being dispensed, press "+" (see Fig. 22) multiple times in succession depending on the number of additional portions that you would like to dispense.
- The products are prepared and dispensed in succession.
- Once a portion has been dispensed, put the cup aside and place another cup underneath the beverage outlet.
![]() The multiple dispensing operation is complete.
The multiple dispensing operation is complete.
Batch mode
If this function is enabled by customer service, you can preselect several products with the batch mode and dispense them in sequence.
Fig. 23: Batch mode

Depending on the preset in the manager menu, the batch mode (1) can be open or closed by default.
To open or close the batch mode manually, press the symbol "«" (open) or "»" (close) (3) to the right of the lower bar.
Product dispensing in batch mode
- With the batch mode open, press the products to be dispensed in sequence.
- Press the "}" button (2) (see Fig. 23) on the display to start dispensing the first product.
Fig. 24: Dispensed product in batch mode

- Once a product has been dispensed from the batch, remove it and position a suitable container for the next product underneath the corresponding beverage outlet.
- Press the "
![]() " button (1) to continue dispensing the products.
" button (1) to continue dispensing the products. - Once all products from the batch have been dispensed, the machine returns to the start screen.

 " button (1) to continue dispensing the products.
 You can bring forward the dispensing of a product or multiple selection of a product from the batch so that it is the next in the sequence:
- Press the required product or the multiple selection of a product in the batch.
- Press the "
![]() " button (1) to continue dispensing the products with the selection.
" button (1) to continue dispensing the products with the selection. - Once all products from the batch have been dispensed, the machine returns to the start screen.
![]() The products have been dispensed and the batch mode is finished.
The products have been dispensed and the batch mode is finished.
- Once all products from the batch have been dispensed, the machine returns to the start screen.
Adding or removing products in batch mode
Products which are already in the batch can be added or removed.
Fig. 25: Product dispensing in batch mode

- Press the required product or the multiple selection of a product in the batch.
- Press the "+" (add) or "–" (remove) button (1) to add or remove the product once each time.
![]() The product is added to or removed from the batch.
The product is added to or removed from the batch.
Products which are not already in the batch can be added.
- Select one of the following options:
- Once a product has been dispensed from the batch, close and open the batch with the symbol in the bar (2) (see Fig. 24).
- While the product is being dispensed, press the "Pre-set batch input" button (2).
- Press the products to be dispensed in succession.
![]() The products are added to the batch.
The products are added to the batch.
Settings
The machine is preset to ensure that it is ready for immediate use for normal operation.
The functions described here are only accessible if enabled by customer service.
Opening the manager menu
The manager menu gives you access to advanced settings. You can find them in the bar at the bottom of the screen.
| Button | Function |
| Selection | Activate products for dispensing, create/manage product groups |
| Product | Edit dispensing products |
| Unit | Clean/switch off the machine and change the filling levels |
| Operation | Set up the machine, show dispensing statistics, and display important events |
Fig. 26: Manager menu

- Hold the manager chip key on the contact area at the front of the machine.
![]() The display shows the manager menu.
The display shows the manager menu.
Carrying out inputs
The machine allows you to enter designations and quantities via a screen keyboard.
When the screen keyboard appears on the display, you can use the following functions:
Fig. 27: Carrying out inputs

- Write using the letter/number field (2).
- Delete the entered characters (3).
- Save the input (4).
- Switch between upper and lower case (5).
- Cancel the input (1).
Some keys are also assigned with special characters (e.g., "S" key). Press the keys for a longer time to display the special characters.
Exiting the manager menu
- Once you have carried out the required function, press the "Logout" button.
![]() The manager menu is closed.
The manager menu is closed.
Menu option "Selection"
Here you can select which pre-programmed products are displayed for dispensing.
Fig. 28: Menu option "Selection"

For self-service and waiter operation you can manage or create different dispensing products and product groups. You therefore always need to start by selecting the operating mode (1) for which you would like to create, delete, or edit products or product groups.
Product groups
In self-service and waiter operation, you have the option to group related products together. This means you can display and output more than ten assigned products.
Creating product groups
- Tap a free dispensing position.
- On the display, press the "Create new group" button (4).
- A new group appears on the display.
- To name the group, press the button for the first or second line of the name (2).
- A new window opens.
Fig. 29: Selecting or entering a name

- A new window opens.
- Under "Language selection" (4), select the language that should be used for the name.
- You can adjust the languages available for selection under the machine settings.
- Select one of the following options to enter a name for the line in question:
- Select a default name: Under "Category models" (2), select a category and then select a name from the list below (1).
- Enter your own name: Press the corresponding line (3) and enter a name using the screen keyboard.
- Confirm the name with the "OK" button.
- Press the "Release" button (3) (see Fig. 28) to activate the created group for dispensing.
- If you do not release the group, it will not be displayed on the dispensing interface.
![]() The new product group has been created.
The new product group has been created.
- If you do not release the group, it will not be displayed on the dispensing interface.

Adding dispensing products
- If you wish to add a dispensing product to a product group, open the required product group by pressing the product group twice.
- Tap a free dispensing position.
- Press the "Create new product" button (5) (see Fig. 28).
- Select the required dispensing product from the product list.
- Press the "Release" button (3) (see Fig. 28) to activate the created product for dispensing.
- If you do not release the product, it will not be displayed on the dispensing interface.
- If you are in a product group, you can return to the start screen with the button "Overview" (2) (see Fig. 31).
![]() The dispensing product has been added.
The dispensing product has been added.
Sorting the dispensing view
- Press the required product group or product button.
- Press the "Down" button (6) (see Fig. 28) to move the product group or product button downward.
- Sort the dispensing view.
- Start with the last product group or product button at the bottom and end with the first product group or product button at the top.
![]() The dispensing view has been sorted.
The dispensing view has been sorted.
- Start with the last product group or product button at the bottom and end with the first product group or product button at the top.
Editing the dispensing view
- Press the required product group or product button.
- Select one of the following options to edit the display of a product group or dispensing product:
| Button | Function |
| Release | Activate/deactivate for dispensing |
| Select receptacle | Assign an icon or image to a group |
| Change color | Change the color of the button or the text; you can specify your own colors in the machine settings |
The dispensing view has been edited.
Delete displays
- Press the required product group or product button.
- Press the delete symbol (7) (see Fig. 28).
- If prompted to confirm the deletion, press the "Delete" button to delete the product group or product button.
Note
Only the display on the screen is deleted. The products remain stored on the machine.
The display for the product group or dispensing product has been deleted.
Menu option "Product"
Here you can change the values for product components, if enabled by customer service.
Fig. 30: Product list

Changing products
- Select the "Product" menu to display a list of all products.
- Use the "
![]() " and "
" and "![]() " buttons to move the list to display all the programmed products.
" buttons to move the list to display all the programmed products. - Press on a product to edit it.
- A new window opens.
Fig. 31: Product settings

- A new window opens.
- Use the "
![]() " and "
" and "![]() " buttons to scroll through the various settings options.
" buttons to scroll through the various settings options. - Select the component to be modified or value to be changed.
- The naming is made in a similar dialog as in Fig. 29.
- Change the values for the product using the screen keyboard.
![information]() Note
Note
Products marked with an * in the ID cannot be edited. These products are pre-programmed in the basic settings for the machine. - Save your changes using the "Save" button.
- Otherwise you will be prompted to confirm whether you want to discard the changes or whether you want to go back to save the changes.
![]() The values of the product components have been changed.
The values of the product components have been changed.
- Otherwise you will be prompted to confirm whether you want to discard the changes or whether you want to go back to save the changes.
 " and "
 " buttons to move the list to display all the programmed products.
Duplicating a product
You can duplicate an existing product and then use it as a basis for a new product.
- Select the required product from the product list.
- Press the button (1) (see Fig. 31).
- The prompt "Duplicate product" is shown on the display.
- Confirm the prompt with "Duplicate".
You can now change the various components in the duplicated product. - Save your changes using the "Save" button.
- Otherwise you will be prompted to confirm whether you want to discard the changes or whether you want to go back to save the changes.
![]() The product has been duplicated.
The product has been duplicated.
- Otherwise you will be prompted to confirm whether you want to discard the changes or whether you want to go back to save the changes.
Menu option "Unit"
Here you have the option of adjusting the filling levels, cleaning the machine, or switching it off, as well as programming a fully automatic operation.
Menu option "Filling levels"
Besides confirming the filling levels, you can also make further settings on the filling levels in the manager menu.
Fig. 32: Filling levels

- Press the button "Filling levels" (1).
- Press the required filling level display, e.g., of the bean container 1 (2).
- A new window opens.
Fig. 33: Further filling settings

- A new window opens.
- The "Designation" button (2) can be used to change the name of the container.
If the filling level for a consumable drops below a set value, a warning will appear on the display. - The "Limit value" button (1) is used to set a percentage at which a warning is issued for the filling level.
- Enter the number "Zero" to switch this warning off.
- Press the "Apply" button (3) to adopt the settings and return to the previous screen.
- Save your changes using the "Save" button (3) (see Fig. 32).
- Otherwise you will be prompted to confirm whether you want to discard the changes or whether you want to go back to save the changes.
![]() The filling level settings have been changed.
The filling level settings have been changed.
- Otherwise you will be prompted to confirm whether you want to discard the changes or whether you want to go back to save the changes.

Menu option "Maintenance"
Here you have the option of cleaning the machine or switching it off.
Fig. 34: Maintenance

- Press the "Maintenance" button (1).
- A time until the next cleaning and the time of the next prompt for cleaning are shown on the display. The cleaning that should be performed next is highlighted in color.
- Carry out the required option:
![information]() Note
Note
For hygiene reasons, the machine must be switched off only in a cleaned state.
The "Switch off" function is permitted to be used only if a cleaning process of the full system has been carried out and no further products have been dispensed.
| Option | Options |
| Clean touch screen | Clean the touch screen while the display is locked |
| Clean full system | Clean the brewing system, then continue machine operation |
| Rinse mixer | If required, rinse the mixer unit |
| Clean and switch off full system | Clean the brewing system, then switch off the machine |
| Lock product selection | Lock product dispensing temporarily |
| Switch off | Switch off the machine |
The selected option is carried out.
Menu option "Weekly planner"
Besides viewing the weekly planner, you can configure the fully automatic operation if enabled by customer service.
Fig. 35: Weekly planner

- Press the "Weekly planner" button (1).
- Activate or deactivate a parameter for the fully automatic operation by pressing the symbol (3).
- In case the preceding line is horizontal, you cannot change the operating state of this parameter.
- Cleaning times cannot be deactivated.
- Determine the base setting of the parameter with the field next to the symbol (4).
Parameter Base setting Cleaning times Once per day a cleaning of the full system is required. For the automatic cleaning prompt on the display either set cleaning times ("Times") or state the latest time of day ("1x / day").
Additionally, if enabled by customer service, set a weekend operation. With this you can temporarily suspend the daily cleaning prompt (machine components will be deactivated if necessary). The begin of a weekend operation must be confirmed. If required, a cleaning will be performed.Switching on/off Machine is principally "on" and switch-off times are specified, or machine is principally "off" and switch-on times are specified. - Press a row (5) to set up or edit events.
![information]() Note
Note
If you cannot confirm an event and if it is shown in red in the timeline, the event is in conflict with an already configured event.
![]() The weekly planner has been edited.
The weekly planner has been edited.
Menu option "Operation"
Here you can read off the consumption and product statistics and adjust settings for the machine.
Opening usage statistics
Fig. 36: Usage statistics

- Press the "Usage statistics" button (1) to open the usage statistics for ground coffee and instant powder.
- Press the line containing the statistics symbol (2) to view statistics on the weight of sample and brew duration.
- Select the corresponding grinder and product.
- You can use the filter to display statistics according to various criteria.
![]() The usage statistics are opened.
The usage statistics are opened.
Opening product statistics
Fig. 37: Product statistics

- Press the "Product statistics" button (3) to see how many times a product has been dispensed.
- Use the "
![]() " and "
" and "![]() " buttons to move the list to display all the programmed products.
" buttons to move the list to display all the programmed products. - Press the "Filter" button (1) to display products according to various criteria.
![]() The product statistics are opened.
The product statistics are opened.
You can export the product statistics list to a USB stick, e.g., for further processing. The exported data will be stored in CSV format in the USB stick's root directory. - Open the machine door using the key.
Fig. 38: Inserting the USB stick

- Insert a suitable USB stick (1) into the USB slot (2).
- Not every USB stick is suitable for use. The machine door must be able to close when the USB stick is inserted.
- Close the machine door.
- Press the "Export" button (2) (see Fig. 37).
- Select one of the following options:
- Press the "Filtered" button to only export the displayed, filtered section of the product statistics.
- Press the "All" button to export the entire product statistics list.
- Open the machine door.
- Remove the USB stick.
- Close the machine door.
![]() The product statistics list has been exported.
The product statistics list has been exported.

Machine settings
Fig. 39: Machine settings

- Press the "Settings" button (1) to display and edit the basic settings for the machine.
- Use the "
![]() " and "
" and "![]() " buttons to move the list to show all the settings options:
" buttons to move the list to show all the settings options:
| Button | Settings |
| Current language | Set the display language. |
| Standard language | Language to be displayed by default in self-service operation. If a different language has been set, this language will be displayed again after five minutes without any input. |
| Configure language selection and location | Select the languages for "Current language" and "Standard language" and set the location (country). |
| Operating mode | Set the default mode for the machine: Self-service operation or waiter operation. |
| Waiter operation settings | For waiter operation, set whether the batch processing should be open by default. |
| Accounting | If a billing system is connected, adjust settings for an accounting. You can choose between "Off", "Normal billing", and "Free operation". |
| Date | Set the current date using the screen keyboard. |
| Time | Set the current time using the screen keyboard. |
| Access control setting | Set up of a prompt for a PIN code in order to dispense a product. |
| Display brightness | Set the display brightness. |
| Display brightness (standby) | Set the display brightness for stand-by mode. |
| Dispensing lighting | Set the brightness for the lighting of the dispensing area. |
| User interface | Select the visual style of the dispensing view from different presets and specify colors for the product buttons and the background of the dispensing view. |
| Screensaver | Select the screensaver. |
| Touch calibration | Calibrate the touch screen. To finish the calibration, press the center of the display. |
| User-defined localization | Adjust the decimal point and the thousands separator, the time and date format, or currency symbol to local requirements. |
- Save your changes using the "Save" button.
- Otherwise you will be prompted to confirm whether you want to discard the changes or whether you want to go back to save the changes.
![]() The machine settings have been changed.
The machine settings have been changed.
- Otherwise you will be prompted to confirm whether you want to discard the changes or whether you want to go back to save the changes.
Logging
- Press the "Logging" button (2) to display important events or error messages on the machine.
- You can use the filter to display events according to various criteria.
![]() The log is displayed.
The log is displayed.
- You can use the filter to display events according to various criteria.
Cleaning
Clean the coffee machine carefully in accordance with the following specifications to maintain the value and hygiene of the machine.
Note
The following website provides all specific information on the machine and cleaning agents: www.planerhandbuch.de
Safety measures

Risk of fatal electric shock!
Contact with live parts poses a danger of death.
- Never open covers unless explicitly instructed to do so.
- Never remove bolts and the housing parts that they hold in place.
- Do not clean the machine or the installation area of the machine with a water jet, high-pressure cleaner, or steam cleaner.
- Never pour water over the machine.
- Only clean the machine with a damp cloth.
ATTENTION
Machine damage!
Water penetration can damage the machine and cause a short circuit.
- Do not clean the machine or the installation area of the machine with a water jet, high-pressure cleaner, or steam cleaner.
- Never pour water over the machine.
- Only clean the machine with a damp cloth.
Cleaning intervals
| Interval | Which parts? | How to clean |
| Daily | Brewing system | Start cleaning program. |
| Daily | Instant system | Clean. |
| Daily | Coffee grounds drawer | Clean. |
| Daily | All systems/parts that have been used at least once | Clean with a clean, damp cloth. |
| 1x weekly | Bottom of beverage outlet | Clean with a clean, damp cloth; use a damp brush if necessary. |
| Following an extended standstill | Brewing system | Start cleaning program. |
| As required | Mixer unit of instant system | Rinse mixer unit. |
| As required (at least once a week) | Instant containers | Clean. |
| As required (at least once a month) | Housing parts
| Clean externally with a clean, damp cloth. |
Cleaning prompt and dispensing lock
If cleaning is required (e.g., one of the programmed cleaning times has been exceeded), the cleaning prompt appears on the display. Products can then only be dispensed for a limited time or number of products.
If no cleaning work is carried out, product dispensing is then locked. The products are no longer displayed and cannot be dispensed.
To reset the cleaning prompt or dispensing lock, the machine must be cleaned.
Cleaning agents
Only use the cleaning agents listed as these are best suited to the automatic cleaning program:
- Melitta® Cafina® Multi TF-Tabs (art. no. 31547)
Damage to health due to cleaning agents!
The components in the cleaning agents may irritate eyes and skin, and may be harmful to health if inhaled or swallowed.
- Keep all information about the cleaning agents easily accessible in case of emergency.
- Always keep cleaning agents out of the reach of children.
- Only use the cleaning agents listed in the instructions, otherwise the legal warranty will become void.
- Wear gloves when handling cleaning tablets.
- Observe warning notes on the packaging of the cleaning agents.
- Observe the recommended usage quantity.
When using canisters
- Empty both canisters daily.
- Do not leave any water residue in the canisters; even fresh water quickly becomes contaminated.
- Also observe the limit values for water carbonate hardness during canister operation.
- Where necessary, the fresh water supply must be topped up via a water filter (e.g., BRITA-Purity).
- Before filling, clean the fresh water canister and its lid area with standard dishwashing detergent and rinse off the cleaner residues thoroughly.
- Also clean the waste water tank daily with detergent to prevent unpleasant odors forming due to organic waste in the waste water.
- At least once a month clean the suction lance with detergent and rinse off the cleaner residues thoroughly.
- Make sure that the filter insert in the intake piece at the bottom end of the suction lance is clean and free.
- Ensure that the fresh water canister is filled with sufficient water and that the waste water canister is empty before you start the cleaning program.
Cleaning the coffee grounds drawer
The coffee grounds drawer must be cleaned daily if the coffee grounds are not disposed of via the optional container discharge.
- Empty the coffee grounds drawer.
- Clean the coffee grounds drawer.
- Rinse the coffee grounds drawer with water.
- Dishwasher cleaning is possible at max. 60°C.
- Wipe the insert compartment of the coffee grounds drawer with a damp cleaning cloth.
- Reinsert the coffee grounds drawer.
- Follow the instructions on the display.
![]() The coffee grounds drawer has been cleaned.
The coffee grounds drawer has been cleaned.
Running the cleaning program
No products can be dispensed during the cleaning process. Product dispensing can be continued only after the cleaning program has been ended and all containers have been refitted.
Danger of burns!
There is a danger of burns from hot components or due to hot liquids.
- Do not hold any body parts underneath the beverage outlet while the cleaning program is running or during the rinsing processes.
- Note that the water in the drip tray may be hot.
Starting the cleaning program
The machine cleaning program runs to the greatest possible extent automatically.
Fig. 40: Starting the cleaning program

- On the display, press the menu symbol "≡" (1) and then "Cleaning".
- In self-service operation, you must first log in with a user chip key.
- Select one of the following options:
| Button | Function |
| Clean full system | Clean the brewing system, then continue machine operation |
| Clean and switch off full system | Clean the brewing system, then the machine switches off |
- Clean the coffee grounds drawer.
If prompted to clean the instant system, clean the machine parts of the instant system and afterwards confirm that it has been fully reinstalled: - First confirm "Cleaning the instant system" and then "Instant system fully installed?" with the "OK" button.
Cleaning the brewing system
The prompt "Cleaning agent brewing system" is shown on the display.
Fig. 41: Adding cleaning tablets

Fig. 42: Tab holder

- Open the machine door (3) using the key (1).
- Remove the tab holder (2) with a quarter turn counterclockwise.
Fig. 43: Cleaning tablet

- Put a cleaning tablet (1) into the tab holder.
- Turn the tab holder a quarter turn clockwise firmly back into the machine (2).
- Close the machine door.
- Press the "OK" button (1) (see Fig. 41) to confirm that the cleaning tablet has been added.

- The machine starts the automatic cleaning process.
- The cleaning process takes a few minutes.
Note
The touch screen can be cleaned while the cleaning program is running without the need to deactivate the display for inputs beforehand.
The machine is then switched off or, depending on the selection, it goes back to operational readiness mode.
Final activities
- Clean the dispensing area once the automatic cleaning process is complete.
![]() The cleaning is complete.
The cleaning is complete.
Cleaning the instant system
Fig. 44: Opening the machine door

- Open the machine door using the key (1).
- Carry out the steps as described below.
Removing the mixer unit
Fig. 45: Mixer unit

- Turn the powder chute (2) upwards so that no powder can fall out.
- Remove the instant container (1).
- Remove the powder chute (2).
- Repeat the steps 1 to 3 for the second instant container.
- Remove the tube (6) on the mixer housing and on the beverage outlet.
- Turn the mixer flange (5) counterclockwise as far as it will go.
- Remove the entire mixer housing (4) towards the front.
- Remove the cover (3).
Fig. 46: Removing the mixer wheel

- Remove the mixer wheel (1) from the axle either by hand or using the removal tool (2) provided.
- Turn the mixer flange (3) counterclockwise further and remove it towards the front.
![]() The mixer unit has been removed.
The mixer unit has been removed.

Cleaning the mixer unit and powder chutes
- Remove rough dirt with water and a brush.
- To clean the mixer unit and powder chutes, proceed with one of the following options:
- Clean all parts in a dishwasher at a maximum of 60°C.
- Clean all parts thoroughly with hot water and a cleaner suitable for milk products.
- Rinse all parts thoroughly with clean water.
- Dry the parts completely.
- To prevent the instant powder from forming clumps, the parts must be absolutely dry.
- Damp-clean the area around the axle.
- This is the area where the mixer flange is located.
![]() The mixer unit has been cleaned.
The mixer unit has been cleaned.
- This is the area where the mixer flange is located.
Assembling the mixer unit
Assembly is carried out by reversing the order of the removal process.
- Slide the mixer flange onto the axle and into the housing.
- Turn it clockwise in the housing up to the position shown in Fig. 46.
Fig. 47: Fitting the mixer wheel

- Insert the mixer wheel onto the axle as far as it will go.
- Ensure that the flattened side (1) matches up with the marking (2) on the mixer wheel.
Fig. 48: Mixer unit

- Ensure that the flattened side (1) matches up with the marking (2) on the mixer wheel.
- Refit the cover (3).
- Fit the mixer housing (4).
- Turn the mixer flange (5) clockwise as far as it will go.
- Fit the tube (6) fully onto the nozzle of the mixer unit and into the beverage outlet.
- Press the tube at the beverage outlet at the front completely down.
- Check that the tube is fitted securely.
- Fit the powder chute (2) so that it is pointing upwards.
- Do not reach into the cleaned powder chute with your fingers.
- Refit the instant container (1).
- The pin on the bottom side of the instant container must engage in the hole in the floor of the insert compartment.
- Turn the powder chute downwards to direct it into the mixer housing.
- Repeat the steps 8 to 10 for the second instant container.
- Clean the area of the instant system from instant powder and residues.
![]() The mixer unit has been installed.
The mixer unit has been installed.

Rinsing the mixer unit
If necessary, e.g., if instant powder has found its way into the mixer housing, you should clean the mixer unit.
Danger of burns on the beverage outlet! Hot water runs out of the beverage outlet when the mixer unit is rinsed.
- Do not reach underneath the outlets.
- Make sure that the instant system is fully installed.
- On the display, press the menu symbol "≡" (1) (see Fig. 40) and then "Cleaning".
- In self-service operation, you must first log in with a user chip key.
- Press the "Rinse mixer" button.
![]() The mixer unit is rinsed.
The mixer unit is rinsed.
Cleaning the instant container
The instant container must be cleaned once a week, in case of heavier use or visible dirt even more than once.
- Open the machine door using the key (2) (see Fig. 44).
Fig. 49: Instant container

- Turn the powder chute (2) upwards so that no powder can fall out.
- Remove the instant container (1).
- Empty the instant container.
Fig. 50: Cleaning of the instant container

- Remove the screw conveyor (1).
- For this loosen the screw connection at the rear and pull out the parts.
- Clean all parts thoroughly with hot water and a detergent.
- Dishwasher cleaning is possible at max. 60°C.
- Dry the parts completely.
- To prevent the instant powder from forming clumps, the parts must be absolutely dry.
- Remove the plate (2) from the insert compartment of the instant containers.
- Clean the plate as well as in the insert compartment the area under the plate from instant powder and residues.
- Refit the plate.
- Reassemble the screw conveyor and screw it together.
- If you want to continue using the machine, refill the instant powder.
![]() The instant container has been cleaned.
The instant container has been cleaned.


Cleaning the touch screen
Cleaning is required if there is any visible dirt.
- On the display, press the menu symbol "≡" (1) (see Fig. 40) and then "Cleaning".
- In self-service operation, you must first log in with a user chip key.
- Press the "Clean touch screen" button.
- The display is now blocked for inputs.
- Clean the screen with a microfiber cloth or a damp cloth.
- If you use a damp cloth, make sure that the touch screen is completely dry and free of streaks before you continue using the unit.
- After cleaning, enable the display for inputs again by touching the numbers 1-4 in the corners of the display.
Fig. 51: Cleaning the touch screen


The cleaning of the touch screen is complete.
External cleaning
Note
Do not use any abrasive agents or sharp objects.
- Clean the parts with a clean, damp cloth only.
- Wipe down the plastic parts, painted surfaces, and surfaces with a damp cloth.
Fig. 52: External cleaning

- Clean the bottom of the beverage outlet (2) thoroughly with a clean, damp cloth, and a standard, damp brush if necessary.
- Remove the drip grid (3).
- For this press on the back of the drip grid, so that it rises at the front and can be easily removed.
![]()
Risk of scalding!
The water in the drip tray may still be hot.
- For this press on the back of the drip grid, so that it rises at the front and can be easily removed.

- Allow the water to cool down.
- Wipe the drip tray (1) thoroughly.
Fig. 53: Cleaning the cup tray


- Lift the cup tray up to remove.
- The side guides are only plugged, they can be removed for cleaning.
- Clean all parts thoroughly with hot water and a detergent.
- Dishwasher cleaning is possible at max. 60°C.
- Refit the cup tray.
![]() The external cleaning is complete.
The external cleaning is complete.
Maintenance
If you have any questions concerning service, maintenance, or disposal, please contact your official dealer. Repairs and maintenance may only be carried out by Melitta customer service or by specialist personnel authorized by the manufacturer.
When contacting, have the following details from the nameplate (behind the machine door) at hand:
- Type/Typ
- Serial no./Geräte-Nr.
Intervals
After every 30,000 cups or twelve months of operation (whichever occurs first), the machine and all accessory units must be serviced by customer service (for a fee).
- Ensure that the maintenance work date is scheduled in due time to avoid unnecessary wear.
- Observe the intervals given in the manufacturer's instructions for changing the filter.
- Replace the water filter every twelve months at the latest to prevent germs and water contamination.
On request, the manufacturer offers a comprehensive maintenance contract that also ensures that all inspection and maintenance intervals are observed.
By law, commercial operators are required to have their systems inspected by an authorized electrical engineer once every four years to make sure that everything is in order. These inspections must be performed and documented accordingly. Customer service can take care of this for you and certify that everything has been completed correctly (no other inspection is required prior to initial commissioning).
Faults
In the event of faults, have the unit inspected and, where applicable, repaired by customer service before you start using it again. Incorrectly performed repair work can result in considerable risk to the user.
Malfunctions!
If there are visible signs of damage or any obvious malfunctions, some key safety functions might not be working properly.
Obvious malfunctions include water leaks, odors, and heat formation, as well as error messages on the display.
In the event of a malfunction:
- Disconnect the mains plug.
- Switch off the water supply.
- Have the machine checked and repaired by customer service.
Documents / Resources
References
Download manual
Here you can download full pdf version of manual, it may contain additional safety instructions, warranty information, FCC rules, etc.
Advertisement


Need help?
Do you have a question about the CUP and is the answer not in the manual?
Questions and answers