Melitta CAFFEO CI Operating Instructions Manual
Hide thumbs
Also See for CAFFEO CI:
- Operating instructions manual (240 pages) ,
- Operating instructions manual (199 pages) ,
- Operating instructions manual (23 pages)

Related Manuals for Melitta CAFFEO CI


Summary of Contents for Melitta CAFFEO CI
- Page 1 Version 2.0 08/2011 Bedienungsanleitung Guide d’utilisation Melitta Haushaltsprodukte Gebruiksaanwijzing GmbH & Co. KG Manual de Instrucciones D-32372 Minden Istruzioni per l'uso...
- Page 3 Whatever your preference - espresso, café crème, cappuccino or latte macchiato - indulge all your senses with your favourite specialty coffee. In order that you and your guests can enjoy the Melitta CAFFEO ® ®...
-
Page 4: Table Of Contents
Table of contents 1 Information about these operating instructions ........4 Symbols in the text of these operating instructions ........4 Intended use....................5 Non-intended use ..................5 2 General safety instructions ..............6 3 Appliance description ................7 Key for Figure A ..................7 Key for Figure B .................. - Page 5 8 Overview and operation of menus ............20 Accessing the main menu ................ 20 Overview of sub-menus ................20 “My Coffee” sub-menu ................21 "Care" sub-menu ..................23 "Energy-saving mode" sub-menu ............. 24 "Set clock" sub-menu ................25 "Auto-OFF" sub-menu ................25 "Water hardness"...
-
Page 6: Information About These Operating Instructions
For a clearer overview, unfold the fold-out pages on the front and back of these operating instructions. Symbols in the text of these operating instructions The symbols in these operating instructions indicate specific hazards associated with operating your Melitta CAFFEO , or provide you with useful tips. ® ®... -
Page 7: Intended Use
Proper use means: • that you carefully read, understand, and comply with the operating instructions. • that you especially comply with the safety instructions. • that you use the Melitta CAFFEO within the operating conditions ® ®... -
Page 8: General Safety Instructions
– Only use the appliance if it is in faultless condition. – Never attempt to repair the appliance yourself. If repairs are necessary, contact the Melitta Service Hotline only. ® – Do not make any alterations in or on the appliance, on its components or on the supplied accessories. -
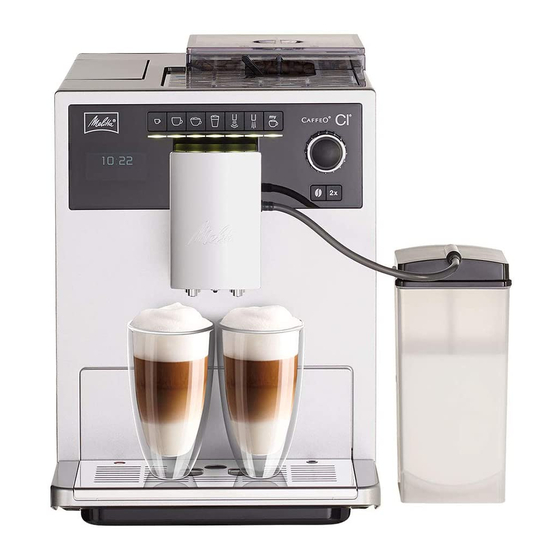
Page 9: Appliance Description
Appliance description Key for Figure A Fig. number Explanation Drip tray with cup plate and coffee grounds container (internal) Float for the water level indicator in the drip tray Height-adjustable outlet with LED cup illumination Graphic display ON /OFF button Water tank Two-chamber "Bean Select"... -
Page 10: Overview Of Buttons
Overview of buttons Button Meaning Function Espresso Press to dispense an espresso. Café crème Press to dispense a café crème. Cappuccino Press to dispense a cappuccino. Latte Press to dispense a latte macchiato. macchiato Milk froth/ Press briefly to dispense milk froth. warm milk Press and hold to dispense hot milk. -
Page 11: Starting Up
Starting up When starting the appliance for the first time, please carry out the following steps. • Placement • Connecting • Switching on for the first time • Selecting a language • Setting the time • Filling the bean container • Filling the water tank When you have completed these steps, the appliance is ready for operation. You can now prepare coffee. -
Page 12: Connecting
Never use damaged power cables (damaged insulation, bare wires). – During the guarantee period, have the damaged power cable replaced only by the manufacturer; only after the guarantee period have it replaced by qualified specialists. Switching on for the first time Note When switching on the Melitta CAFFEO for the first time, only do so ® ® ® without the water filter. -
Page 13: Filling The Bean Container
• Fill the bean container (see page 11) and press the rotary switch to confirm. → The prompt to fill the water tank will appear on the graphic display. • Fill the water tank and reinsert it in the appliance (see page 12). → The rotary switch flashes and System start appears on the graphic display. • Place a vessel under the outlet and press on the rotary switch. →... -
Page 14: Filling The Water Tank
Note When the tilt lever is vertical during the brewing process, no beans fall into the grinder. Filling the water tank • Flip up the lid of the water tank (Fig. A, No. 6) and pull the water tank up and out of the appliance. • Fill the water tank to the maximum mark with fresh tap water and reinsert it. -
Page 15: Preparing Beverages, Adjusting Settings Immediately Before Dispensing
Preparing beverages, adjusting settings immediately before dispensing Two options are available for preparing beverages. • Standard dispensing: Settings such as coffee strength, quantity of coffee and milk and can be changed directly before dispensing. • My Coffee button : Personal settings that are already entered and saved can be called with the My Coffee button (see page 19). -
Page 16: Preparing A Cappuccino
12). • Place a suitable vessel under the outlet. • Push the outlet downwards as far as it will go. • Connect the short tube with the outlet and the supplied Melitta ® CAFFEO milk container (Fig. C) or use the long tube for ®... -
Page 17: Preparing A Latte Macchiato
12). • Place a suitable vessel under the outlet. • Push the outlet downwards as far as it will go. • Connect the short tube with the outlet and the supplied Melitta ® CAFFEO milk container (Fig. C) or use the long tube for ®... -
Page 18: Preparing Milk Froth Or Warm Milk
Prerequisite: The appliance must be ready for operation (see „Switching on and off“ on page 12). • Place a suitable vessel under the outlet. • Connect the short tube with the outlet and the supplied Melitta ® CAFFEO milk container (Fig. C) or use the long tube for ®... -
Page 19: Preparing Hot Water
Preparing hot water Prerequisite: The appliance must be ready for operation (see „Switching on and off“ on page 12). • Place a suitable vessel under the outlet. • Press the button for hot water → Hot water will start dispensing. Dispensing ends automatically when the set water quantity is reached. - Page 20 • Turn the rotary switch to adjust the dispensed quantity while the coffee is being dispensed. • To stop dispensing coffee before the programmed amount is reached, press the button for café crème or the rotary switch. Note If you do not dispense coffee from the appliance within 3 minutes after opening the ground coffee chute, the appliance will automatically switch back to coffee bean operation and will discard the ground coffee into the coffee grounds container to prevent later risk of overfilling the brewing chamber.
-
Page 21: My Coffee Button: Preparing Beverages With Personal Settings
My Coffee button: Preparing beverages with personal settings Prerequisite: The appliance must be ready for operation (see „Switching on and off“ on page 12). • If necessary, create a user in the menu and save personal beverage settings for this user, see page 21. • Place a suitable vessel under the outlet. -
Page 22: Overview And Operation Of Menus
Overview and operation of menus Accessing the main menu Prerequisite: The appliance must be ready for operation (see „Switching on and off“ on page 12). • Press and hold the rotary switch for more than two seconds. Settings → The main menu will appear on the graphic display. Exit My Coffee Care... -
Page 23: My Coffee" Sub-Menu
Note By pressing any of the dispensing buttons, you can exit every sub-menu directly and return to standby mode. “My Coffee” sub-menu In this sub-menu, you can set and save different beverage settings for standard dispensing and for "My Coffee" dispensing. Settings for standard dispensing: Personal settings such as dispensed quantity, coffee strength, brewing temperature, milk froth and milk quantities can be saved in the Standard profile and can be directly accessed through the respective dispensing... - Page 24 Entering user settings for beverages • Turn the rotary switch until the beverage is highlighted for which you want to adjust the user settings, e.g. Latte macchiato and press it to confirm the selection. Latte Macchiato • Turn the rotary switch until the property is Exit Milk quantity highlighted for which you want to save a setting...
-
Page 25: Care" Sub-Menu
Switching user to enabled/disabled You can disable a stored user name, for example if the user has not used the appliance over a long period. The user remains stored but cannot be selected using the My Coffee button. • Select the user name you wish to switch to disable. -
Page 26: Energy-Saving Mode" Sub-Menu
Starting the care and cleaning programme • Select the Care sub-menu. → The care and cleaning programmes are displayed on the graphic display. Care • Turn the rotary switch until the care and cleaning Easy Cleaning Intensive Cleaning programme you wish to start is highlighted, e.g. Cleaning Intensive Cleaning and press it to confirm the selection. -
Page 27: Set Clock" Sub-Menu
"Set clock" sub-menu You can change or deactivate the time in this sub-menu. • Select the Set clock sub-menu. Set clock • Turn the rotary switch to select the desired hour : 10 : 07 and press it to confirm. • Turn the rotary switch to select the desired minutes and press it to confirm. -
Page 28: Water Hardness" Sub-Menu
Auto OFF at • Turn the rotary switch until OFF at... is highlighted if you want to program a switch-off time. • Turn the rotary switch to select the desired hour and press it to confirm. • Turn the rotary switch to select the desired minutes and press it to confirm. → The time is saved. The appliance automatically returns to the main menu. Note It is not possible to fully disable the Auto-OFF function. -
Page 29: Language" Sub-Menu
"Language" sub-menu In this sub-menu, you can set the language for the graphic display. • Select the Language sub-menu. • Turn the rotary switch until the desired language is highlighted and press it to save the selected language. Language → The question Change language? is displayed. Exit English√... - Page 30 Overview of default settings: Dispensed quantity 50 ml Espresso Coffee strength Strong Brewing temperature Normal Dispensed quantity 120 ml Café Crème Coffee strength Normal Brewing temperature Normal Dispensed quantity 60 ml Milk froth quantity 80 ml Cappuccino Coffee strength Strong Brewing temperature High Dispensed quantity...
-
Page 31: Adjusting The Grinding Fineness
Warning! Danger of burning and scalding from hot steam The machine releases hot steam when it is vented. Never allow any part of your body, e.g. your face to come into contact with the hot steam. • Lift the lid of the water tank (Fig. A, No. 6) and Venting pull the water tank up and out of the appliance. -
Page 32: Care And Maintenance
Care and maintenance General cleaning • Clean the outside of the appliance with a soft, damp cloth and ordinary dishwashing liquid. • Empty and clean the drip tray regularly, at the latest when the float (Fig. A, No. 2) projects out of the cup plate. • Clean the coffee grounds container regularly. Caution! To avoid damage to the appliance surface, do not use scouring cloths, sponges or cleaning products. -
Page 33: Rinsing The Coffee Unit (Rinsing)
Caution! Never clean the brewing unit in the dishwasher. • Let the brewing unit drip dry. • If necessary, remove coffee residues from the surfaces in the interior of the appliance where the brewing unit is inserted. • Reinsert the brewing unit into the appliance and turn the handle of the brewing unit anti-clockwise to stop to lock. -
Page 34: Cleaning The Milk Unit ("Intensive Cleaning" Programme)
Caution! Only use the Melitta milk system cleaning agent for fully automatic coffee ® makers. This cleaning agent is specially designed for the Melitta CAFFEO ® ® . The use of other cleaning agents can damage the appliance. - Page 35 • Fill the milk container with 50 ml of milk system cleaning agent and then fill it up to the 0.5 l mark with warm tap water. • Connect the tube to the milk container and to the outlet and press the rotary switch to confirm. → The “Intensive Cleaning” programme will start. This will release steam from the machine and hot cleaning liquid will flow out of the outlet.
-
Page 36: Integrated Cleaning Programme
(see page 30). Caution! – Run the integrated cleaning programme every 2 months or after approximately 200 brewed cups of coffee; at the latest, however, when the symbol for cleaning appears on the graphic display. – Only use Melitta cleaning tabs for fully automatic coffee makers. These ® cleaning tabs are specifically designed for the Melitta CAFFEO . The ®... - Page 37 7 Empty the drip tray and the coffee grounds container and then reinsert them. 8 Place a vessel with a capacity of about 0.7 l or the coffee grounds container under the outlet and press the rotary switch to continue. →...
-
Page 38: Integrated Descaling Programme
Remove water tank 6 If you are using a water filter, remove it from the water tank. 7 Add the descaling agent (e.g. Melitta ANTI ® CALC Espresso Machines liquid descaling agent) to the water tank according to the instructions on... - Page 39 Warning! Comply with the safety instructions and the dosing information specified on the descaling agent packaging. 8 Reinsert the water tank. 9 Place a vessel with a capacity of about 0.7 l or the coffee grounds container under the outlet and press the rotary switch to continue. 10 Connect the tube to the drip tray and to the outlet (Fig.
-
Page 40: Inserting, Changing And Removing The Water Filter
17 Empty the drip tray and the coffee grounds container and then reinsert them. → The integrated descaling programme has finished. The appliance is ready for operation. Inserting, changing and removing the water filter A Melitta Claris water filter is supplied with the appliance for filtering out lime scale ® ® and other contaminants. Using the filter helps to reduce the required frequency of descaling. The service life of your appliance will be extended thanks to the reliable protection from lime scale. The water filter should be changed regularly, however;... -
Page 41: Changing The Water Filter
Change filter • Flip up the lid of the water tank (Fig. A, No. 6) and pull the water tank up and out of the appliance. • Unscrew the water filter from the thread on the base of the water filter. • Carefully screw the new Melitta Claris water filter into the thread on ® ® the base of the water tank using the screw-in aid at the bottom end of the coffee scoop provided. -
Page 42: Removing The Water Filter
→ The appliance returns to the main menu. Note The Melitta Claris water filter should not remain dry over an extended period ® ® of time. We therefore recommend storing the Melitta Claris water filter in ® ® the refrigerator in a glass of water when the appliance will not be in use for extended periods. -
Page 43: Transport And Disposal
Transport and disposal 11.1 Transport • Clean the drip tray and coffee grounds container. • Vent the appliance, page 28. • Empty the bean container. • Secure loose parts (cup plate et cetera) with suitable adhesive tape. • Transport the appliance in the original packaging if possible, including the hard foam elements, to prevent transport damage. -
Page 44: Troubleshooting
Troubleshooting Problem Cause Solution Coffee only flows drop Grinding fineness is Set the grinding fineness by drop. too fine. coarser. Clean the brewing unit. Descale, if necessary. Run the integrated cleaning programme, if necessary. Coffee does not flow. Water tank not filled or Fill the water tank and make incorrectly inserted. sure it is inserted correctly. Brewing unit is Clean the brewing unit obstructed. - Page 45 Please contact the Melitta hotline, if the above mentioned solutions do not help to ® solve the problem: +49 571/ 86 1900 Warning! Risk of crushing injury Never reach into the interior of the appliance when it is in operation.
Need help?
Do you have a question about the CAFFEO CI and is the answer not in the manual?
Questions and answers