Table of Contents
Advertisement
Available languages
Available languages
Quick Links
Technical Support and E-Warranty Certificate
www.vevor.com/support
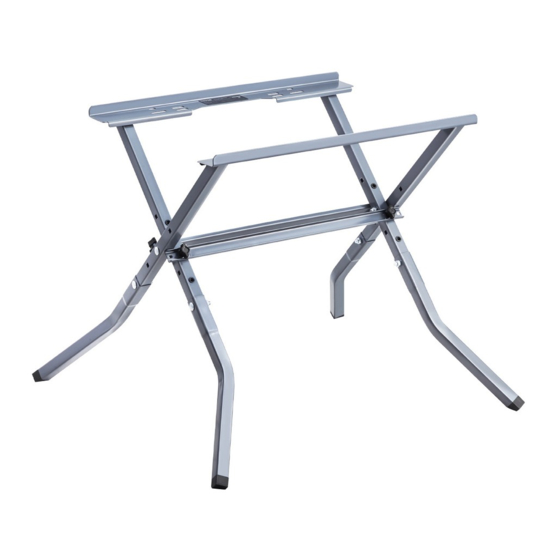
Table Saw Stand
USER MANUAL
MODEL:HS6804
We continue to be committed to provide you tools with competitive price.
"Save Half", "Half Price" or any other similar expressions used by us only
represents an estimate of savings you might benefit from buying certain tools
with us compared to the major top brands and does not necessarily mean to cover
all categories of tools offered by us. You are kindly reminded to verify carefully
when you are placing an order with us if you are actually Saving
Half in comparison with the top major brands.
Advertisement
Table of Contents

Related Manuals for VEVOR HS6804


Summary of Contents for VEVOR HS6804
- Page 1 Table Saw Stand USER MANUAL MODEL:HS6804 We continue to be committed to provide you tools with competitive price. "Save Half", "Half Price" or any other similar expressions used by us only represents an estimate of savings you might benefit from buying certain tools with us compared to the major top brands and does not necessarily mean to cover all categories of tools offered by us.
- Page 2 This is the original instruction, please read all manual instructions carefully before operating. VEVOR reserves a clear interpretation of our user manual. The appearance of the product shall be subject to the product you received. Please forgive us that we won't inform you again if there are any technology or software updates on our product.
-
Page 3: Safety Instructions
The folding stand is intended for mounting DEWALT table saw DCS7485、 DCS7485T1、 DWE7485、 DWE7491RS and VEVOR table saw M1H-ZP7-254A-1、WTS210F. Future DEWALT power tools may be compatible with this stand,It • can also adapt to various brands of table saws in the market. - Page 4 Disconnect the tool from power source before assembling or making • adjustments. Unintentional activation of the tool is the cause of many accidents. • Always confirm the tool is mounted securely and is stable before use. • Perform a dry run of the cutting operation just to make sure that no problems will occur when the cut is made.
-
Page 5: Specifications
SPECIFICATIONS Operating height 21.7’’(550mm) Max. capacity (tool + work piece) 350 lbs. (160 kg) UNPACKING Carefully unpack all parts as illustrated in Fig. 2 from the carton. Examine all parts to make sure that parts have not been damaged during shipping. If any parts are missing or damaged, contact your dealer to replace them before attempting to assemble the stand. - Page 6 c. If you need to install brackets according to the dimensions shown in Figure B and Figure C, you need to follow these steps: loosen the nylon nut of A1 and remove the plastic washer and M8 screw. Install them into hole B1 or C1 according to your needs, first thread the M8 screw through the outer steel pipe, add the plastic washer, and then thread it through the inner steel pipe, and tighten the nylon nut(Diagram D) .Install the bolt on...
- Page 7 ATTACHING THE CROSS BARS Loosen and remove the wing bolts preinstalled on the stand assembly Place the cross bar onto the stand assembly,Select A2/B2/C2 hole positions according to your needs align the holes on the bars with the holes on the stand assembly ecure the cross bar to the stand assembly using 2 wing bolts.
- Page 8 TIP: The stand may be uneven at first – do not tighten the wing nuts on the legs right away. Securely tighten the four wing nuts once the adjustable legs are all aligned evenly. MOUNTING DEWALT and VEVOR TABLE SAWTO THE STAND Disconnect the table saw from the power source before assembling WARNING or making adjustments.
- Page 9 DWE7485 DWE7491 210F 7H254 FOLDING THE STAND AND STORAGE Fold the stand slightly. Store the stand indoors in a dry and locked-up place, out of reach of children.
- Page 10 Manufacturer: Shanghaimuxinmuyeyouxiangongsi Address: Shuangchenglu 803nong11hao1602A-1609shi, baoshanqu, shanghai 200000 CN. Imported to AUS: SIHAO PTY LTD, 1 ROKEVA STREETEASTWOOD NSW 2122 Australia Imported to USA: Sanven Technology Ltd., Suite 250, 9166 Anaheim Place, Rancho Cucamonga, CA 91730 E-CrossStu GmbH Mainzer Landstr.69, 60329 Frankfurt am Main. YH CONSULTING LIMITED.
- Page 11 Technical Support and E-Warranty Certificate www.vevor.com/support...
-
Page 12: Manuel D'utilisation
Machine Translated by Google Assistance t echnique e t c ertificat d e g arantie électronique w ww.vevor.com/support Support p our s cie c irculaire à t able MANUEL D 'UTILISATION MODÈLE : H S6804 Nous c ontinuons à n ous e ngager à v ous f ournir d es o utils à d es p rix c ompétitifs. - Page 13 à n ous c ontacter : A ssistance t echnique e t c ertificat d e g arantie électronique w ww.vevor.com/support Il s 'agit d e l a n otice d 'utilisation d 'origine. V euillez l ire a ttentivement t outes l es ...
-
Page 14: Consignes De Sécurité
Machine Translated by Google Avertissement P our r éduire l e r isque d e b lessure, l 'utilisateur d oit l ire a ttentivement le m anuel d 'instructions. Ce p roduit e st s oumis a ux d ispositions d e l a d irective e uropéenne 2 012/19/CE. L e symbole ... - Page 15 Machine Translated by Google • D ébranchez l ’outil d e l a s ource d ’alimentation a vant d e l ’assembler o u d ’effectuer d es r églages. • L ’activation i nvolontaire d e l ’outil e st l a c ause d e n ombreux a ccidents. • ...
-
Page 16: Caractéristiques
Machine Translated by Google CARACTÉRISTIQUES Hauteur d e t ravail 21,7'' ( 550 m m) Capacité m ax. ( outil + p ièce à u siner) 3 50 l b ( 160 k g) DÉBALLAGE Déballez s oigneusement t outes l es p ièces d u c arton c omme i llustré à l a F ig. 2 . E xaminez t outes les ... - Page 17 Machine Translated by Google c. S i v ous d evez i nstaller d es s upports s elon l es d imensions i ndiquées d ans Figure B e t F igure C , v ous d evez s uivre c es é tapes : d esserrez l 'écrou e n n ylon d e A1 ...
- Page 18 Machine Translated by Google FIXATION D ES B ARRES T RANSVERSALES a. D esserrez e t r etirez l es b oulons à o reilles p réinstallés s ur l 'assemblage d u s upport b. P lacez l a b arre t ransversale s ur l 'assemblage d u s upport, s électionnez l e t rou A 2/B2/C2 positions ...
- Page 19 Machine Translated by Google REMARQUE : l es b oulons o nt d es c ols c arrés. A ssurezvous q ue l es c ols c arrés s 'insèrent d ans trous c arrés d ans l 'assemblage d u s upport. La ...
- Page 20 Machine Translated by Google DWE7485 DWE7491 210F 7H254 PLIAGE D U S UPPORT E T R ANGEMENT a. P liez l égèrement l e s upport. b . Rangez l e s upport à l 'intérieur d ans u n e ndroit s ec e t endroit ...
- Page 21 Machine Translated by Google Fabricant : S hanghaimuxinmuyeyouxiangongsi Adresse : S huangchenglu 8 03nong11hao1602A1609shi, b aoshanqu, S hanghai 200000 C N. Importé e n A ustralie : S IHAO P TY L TD, 1 R OKEVA S TREET, A STWOOD N SW 2122 ...
- Page 22 Machine Translated by Google Assistance t echnique e t c ertificat d e g arantie électronique w ww.vevor.com/support...
- Page 23 Tischkreissägenständer BENUTZERHANDBUCH MODELL: HS6804 Wir sind weiterhin bestrebt, Ihnen Werkzeuge zu wettbewerbsfähigen Preisen anzubieten. „Sparen Sie die Hälfte“, „Halber Preis“ oder andere ähnliche Ausdrücke, die wir verwenden, stellen nur eine Schätzung der Ersparnis dar, die Sie beim Kauf bestimmter Werkzeuge bei uns im Vergleich zu den großen Topmarken erzielen können, und decken nicht unbedingt alle von uns...
- Page 24 Dies ist die Originalanleitung. Bitte lesen Sie alle Anweisungen sorgfältig durch, bevor Sie das Gerät in Betrieb nehmen. VEVOR behält sich eine klare Auslegung unserer Bedienungsanleitung vor. Das Erscheinungsbild des Produkts richtet sich nach dem Produkt, das Sie erhalten haben. Bitte verzeihen Sie uns, dass wir Sie nicht erneut informieren, wenn es Technologie- oder Software-Updates für unser Produkt gibt.
- Page 25 Der Klappständer ist für die Montage der DEWALT-Tischkreissäge DCS7485, DCS7485T1, DWE7485, DWE7491RS vorgesehen. und VEVOR Tischkreissäge M1H-ZP7-254A-1, WTS210F. • Zukünftige Elektrowerkzeuge von DEWALT sind möglicherweise mit diesem Ständer kompatibel. kann auch an Tischsägen verschiedener Marken auf dem Markt angepasst werden.
- Page 26 Machine Translated by Google • Trennen Sie das Werkzeug von der Stromquelle, bevor Sie es zusammenbauen oder Einstellungen vornehmen. • Die unbeabsichtigte Aktivierung des Werkzeugs ist die Ursache vieler Unfälle. • Vergewissern Sie sich vor der Verwendung stets, dass das Werkzeug sicher montiert und stabil ist. Führen Sie einen Probedurchlauf des Schneidvorgangs durch, um sicherzustellen, dass beim Schneiden keine Probleme auftreten.
- Page 27 Machine Translated by Google Spezifikationen Arbeitshöhe 21,7'' (550 mm) Max. Tragkraft (Werkzeug + Werkstück) 350 lbs. (160 kg) AUSPACKEN Packen Sie alle Teile vorsichtig aus dem Karton aus, wie in Abb. 2 dargestellt. Überprüfen Sie alle Teile, um sicherzustellen, dass sie beim Transport nicht beschädigt wurden. Wenn Teile fehlen oder beschädigt sind, wenden Sie sich an Ihren Händler, um sie ersetzen zu lassen, bevor Sie versuchen, den Ständer zusammenzubauen.
- Page 28 Machine Translated by Google c. Wenn Sie Halterungen gemäß den in Abbildung B und Abbildung C, Sie müssen diese Schritte befolgen: Lösen Sie die Nylonmutter von A1 und entfernen Sie die Kunststoffscheibe und die M8-Schraube. Installieren Sie sie je nach Bedarf in Loch B1 oder C1, schrauben Sie zuerst die M8-Schraube durch das äußere Stahlrohr, fügen Sie die Kunststoffscheibe hinzu und schrauben Sie sie dann durch das innere Stahlrohr und ziehen Sie die Nylonmutter fest (Abbildung D).
- Page 29 Machine Translated by Google BEFESTIGUNG DER QUERSTANGEN a. Lösen und entfernen Sie die Flügelschrauben, die an der Ständerbaugruppe vorinstalliert sind b. Platzieren Sie die Querstange auf der Ständerbaugruppe und wählen Sie das Loch A2/B2/C2 Positionen nach Ihren Bedürfnissen c. Richten Sie die Löcher an den Stangen mit den Löchern an der Ständerbaugruppe aus Befestigen Sie die Querstange mit zwei Flügelschrauben an der Ständerbaugruppe.
- Page 30 TIPP: Der Ständer kann anfangs uneben sein – ziehen Sie die Flügelmuttern am Beine sofort. Ziehen Sie die vier Flügelmuttern fest an, sobald alle verstellbaren Beine ausgerichtet sind gleichmäßig. MONTAGE DER TISCHKREISSÄGE VON DEWALT und VEVOR AM STÄNDER Trennen Sie die Tischkreissäge von der Stromquelle, bevor Sie sie zusammenbauen WARNUNG oder Anpassungen vornehmen.
- Page 31 Machine Translated by Google DWE7485 DWE7491 210F 7H254 Zusammenklappen des Ständers und Aufbewahrung Klappen Sie den Ständer leicht zusammen. Lagern Sie den Ständer in einem trockenen und verschlossenen Ort, außerhalb der Reichweite von Kindern.
- Page 32 Machine Translated by Google Hersteller: Shanghaimuxinmuyeyouxiangongsi Adresse: Shuangchenglu 803nong11hao1602A-1609shi, baoshanqu, Shanghai 200000 CN. Nach AUS importiert: SIHAO PTY LTD, 1 ROKEVA STREETEASTWOOD NSW 2122 Australien Importiert in die USA: Sanven Technology Ltd., Suite 250, 9166 Anaheim Place, Rancho Cucamonga, CA 91730 E-CrossStu GmbH Vertreter der EG Mainzer Landstr.69, 60329 Frankfurt am Main.
- Page 33 Machine Translated by Google Technischer Support und E-Garantie-Zertifikat www.vevor.com/support...
- Page 34 Supporto per sega da tavolo MANUALE D'USO MODELLO: HS6804 Continuiamo a impegnarci per fornirvi strumenti a prezzi competitivi. "Risparmia la metà", "Metà prezzo" o qualsiasi altra espressione simile da noi utilizzata rappresenta solo una stima del risparmio che potresti ottenere acquistando determinati utensili con noi rispetto ai principali marchi principali e non significa necessariamente coprire tutte le categorie di utensili da noi offerti.
- Page 35 Questa è l'istruzione originale, si prega di leggere attentamente tutte le istruzioni del manuale prima di utilizzare. VEVOR si riserva una chiara interpretazione del nostro manuale utente. L'aspetto del prodotto sarà soggetto al prodotto ricevuto. Vi preghiamo di perdonarci se non vi informeremo di nuovo se ci sono aggiornamenti tecnologici o software sul nostro prodotto.
-
Page 36: Istruzioni Di Sicurezza
Il supporto pieghevole è progettato per montare la sega da tavolo DEWALT DCS7485ÿDCS7485T1ÿDWE7485ÿDWE7491RS e la sega circolare VEVOR M1H-ZP7-254A-1ÿWTS210F. • I futuri elettroutensili DEWALT potrebbero essere compatibili con questo supporto, può anche adattarsi a vari marchi di seghe da tavolo sul mercato. - Page 37 Machine Translated by Google • Scollegare l'utensile dalla fonte di alimentazione prima di montarlo o di effettuare regolazioni. • L'attivazione involontaria dell'utensile è la causa di molti incidenti. • Prima dell'uso, verificare sempre che l'utensile sia montato saldamente e sia stabile. Eseguire una prova a vuoto dell'operazione di taglio solo per assicurarsi che non si verifichino problemi quando si esegue il taglio.
-
Page 38: Montaggio Del Supporto
Machine Translated by Google SPECIFICHE Altezza di lavoro 21,7'' (550 mm) Capacità massima (utensile + pezzo da lavorare) 350 libbre (160 kg) DISIMBALLAGGIO Disimballare con cura tutte le parti come illustrato nella Fig. 2 dalla scatola. Esaminare tutte le parti per assicurarsi che non siano state danneggiate durante la spedizione. Se alcune parti sono mancanti o danneggiate, contattare il rivenditore per sostituirle prima di tentare di montare il supporto. - Page 39 Machine Translated by Google c. Se è necessario installare le staffe secondo le dimensioni indicate in Figura B e Figura C, è necessario seguire questi passaggi: allentare il dado in nylon di A1 e rimuovere la rondella di plastica e la vite M8. Installarli nel foro B1 o C1 in base alle proprie esigenze, prima infilare la vite M8 attraverso il tubo di acciaio esterno, aggiungere la rondella di plastica, quindi infilarla attraverso il tubo di acciaio interno e stringere il dado in nylon (Diagramma D).
- Page 40 Machine Translated by Google FISSAGGIO DELLE BARRE TRASVERSALI a. Allentare e rimuovere i bulloni ad alette preinstallati sul gruppo del supporto b. Posizionare la barra trasversale sul gruppo supporto, selezionare il foro A2/B2/C2 posizioni in base alle tue esigenze c. allineare i fori sulle barre con i fori sul gruppo supporto Fissare la barra trasversale al supporto utilizzando 2 bulloni ad alette.
- Page 41 Stringere saldamente i quattro dadi ad alette una volta che le gambe regolabili sono tutte allineate in modo uniforme. MONTAGGIO DELLA SEGA DA TAVOLO DEWALT E VEVOR SUL SUPPORTO Scollegare la sega circolare dalla fonte di alimentazione prima del montaggio AVVERTIMENTO o apportare modifiche.
- Page 42 Machine Translated by Google DWE7485 DWE7491 210F 7H254 RIPIEGAMENTO DEL SUPPORTO E CONSERVAZIONE Piegare leggermente il supporto. Conservare il supporto in un luogo chiuso, asciutto e luogo chiuso a chiave, fuori dalla portata dei bambini.
- Page 43 Machine Translated by Google Produttore: Shanghaimuxinmuyeyouxiangongsi Indirizzo: Shuangchenglu 803nong11hao1602A-1609shi, baoshanqu, shanghai 200000 CN. Importato in AUS: SIHAO PTY LTD, 1 ROKEVA STREETEASTWOOD NSW 2122 Australia Importato negli USA: Sanven Technology Ltd., Suite 250, 9166 Anaheim Place, Rancho Cucamonga, CA 91730 E-CrossStu GmbH Rappresentante della CE Mainzer Landstr.69, 60329 Francoforte sul Meno.
- Page 44 Machine Translated by Google Supporto tecnico e certificato di garanzia elettronica www.vevor.com/support...
-
Page 45: Manual Del Usuario
Machine Translated by Google Soporte t écnico y c ertificado d e g arantía electrónica w ww.vevor.com/support Soporte p ara s ierra d e m esa MANUAL D EL U SUARIO MODELO: H S6804 Seguimos c omprometidos a b rindarle h erramientas a p recios c ompetitivos. - Page 46 A sistencia t écnica y c ertificado d e g arantía e lectrónica www.vevor.com/support Estas s on l as i nstrucciones o riginales, l ea a tentamente t odas l as i nstrucciones d el manual a ntes d e u tilizar e l p roducto. V EVOR s e r eserva u na i nterpretación c lara d e n uestro ...
- Page 47 Machine Translated by Google Advertencia: P ara r educir e l r iesgo d e l esiones, e l u suario d ebe l eer a tentamente e l manual d e i nstrucciones. Este p roducto e stá s ujeto a l as d isposiciones d e l a D irectiva E uropea 2 012/19/CE. El ...
- Page 48 Machine Translated by Google • D esconecte l a h erramienta d e l a f uente d e a limentación a ntes d e e nsamblarla o r ealizar ajustes. • L a a ctivación i nvoluntaria d e l a h erramienta e s c ausa d e m uchos a ccidentes. • ...
-
Page 49: Montaje D El S Oporte
Machine Translated by Google PRESUPUESTO Altura d e o peración 21,7'' ( 550 m m) Capacidad m áxima ( herramienta + p ieza d e t rabajo) 3 50 l b ( 160 k g) DESEMBALAJE Desembale c uidadosamente t odas l as p iezas c omo s e m uestra e n l a F ig. 2 d e l a c aja. Examine ... - Page 50 Machine Translated by Google c. S i n ecesita i nstalar s oportes d e a cuerdo c on l as d imensiones q ue s e m uestran e n Figura B y F igura C , d ebe s eguir e stos p asos: a floje l a t uerca d e n ailon d e A 1 y r etire l a a randela de ...
- Page 51 Machine Translated by Google COLOCACIÓN D E L AS B ARRAS T RANSVERSALES a. A floje y r etire l os p ernos d e m ariposa p reinstalados e n e l c onjunto d el s oporte. b. ...
- Page 52 Machine Translated by Google NOTA: L os p ernos t ienen c uellos c uadrados. A segúrese d e q ue l os c uellos c uadrados e ncajen e n agujeros c uadrados e n e l c onjunto d el s oporte. La ...
- Page 53 Machine Translated by Google DWE7485 DWE7491 210 ° F 7H254 PLEGADO D EL S OPORTE Y A LMACENAMIENTO a. D oble l igeramente e l s oporte. b . Guarde e l s oporte e n u n l ugar c errado, s eco y p rotegido. lugar ...
- Page 54 Machine Translated by Google Fabricante: S hanghaimuxinmuyeyouxiangongsi Dirección: S huangchenglu 8 03nong11hao1602A1609shi, b aoshanqu, s hanghai 200000 C N. Importado a A ustralia: S IHAO P TY L TD, 1 R OKEVA S TREETEASTWOOD N SW 2122 A ustralia Importado ...
- Page 55 Machine Translated by Google Soporte t écnico y c ertificado d e g arantía electrónica w ww.vevor.com/support...
-
Page 56: Instrukcja Obsługi
Stojak do piły stołowej INSTRUKCJA OBSŁUGI MODEL: HS6804 Nadal staramy się oferować Państwu narzędzia w konkurencyjnych cenach. „Oszczędź połowę”, „Połowa ceny” lub inne podobne wyrażenia używane przez nas stanowią jedynie szacunkowe oszczędności, jakie możesz uzyskać, kupując u nas określone narzędzia w porównaniu z głównymi markami i niekoniecznie oznaczają... - Page 57 E-Gwarancji www.vevor.com/support To jest oryginalna instrukcja, przed użyciem należy uważnie przeczytać wszystkie instrukcje. VEVOR zastrzega sobie jasną interpretację naszej instrukcji obsługi. Wygląd produktu będzie zależał od produktu, który otrzymałeś. Prosimy o wybaczenie, że nie poinformujemy Cię ponownie, jeśli w naszym produkcie pojawią...
- Page 58 Składany stojak przeznaczony jest do montażu pił stołowych DEWALT DCS7485, DCS7485T1, DWE7485, DWE7491RS i piła stołowa VEVOR M1H-ZP7-254A-1WTS210F. • Przyszłe elektronarzędzia DEWALT mogą być kompatybilne z tym stojakiem. Może on również pasować do różnych marek pił stołowych dostępnych na rynku.
- Page 59 Machine Translated by Google • Przed montażem lub regulacją należy odłączyć narzędzie od źródła zasilania. • Niezamierzone uruchomienie narzędzia jest przyczyną wielu wypadków. • Przed użyciem należy zawsze sprawdzić, czy narzędzie jest solidnie zamocowane i stabilne. Wykonaj próbę cięcia, aby upewnić się, że nie wystąpią żadne problemy podczas cięcia.
- Page 60 Machine Translated by Google SPECYFIKACJE Wysokość robocza 21,7'' (550 mm) Maksymalna nośność (narzędzie + przedmiot obrabiany) 350 funtów (160 kg) ROZPAKOWYWANIE Ostrożnie wypakuj wszystkie części, jak pokazano na rys. 2, z kartonu. Sprawdź wszystkie części, aby upewnić się, że nie zostały uszkodzone podczas transportu. Jeśli brakuje jakichkolwiek części lub są...
- Page 61 Machine Translated by Google c. Jeśli musisz zainstalować wsporniki zgodnie z wymiarami pokazanymi w Rysunek B i Rysunek C, musisz wykonać następujące kroki: poluzuj nakrętkę nylonową A1 i usuń plastikową podkładkę i śrubę M8. Zainstaluj je w otworze B1 lub C1 zgodnie z potrzebami, najpierw przewlecz śrubę...
- Page 62 Machine Translated by Google MOCOWANIE POPRZECZEK a. Odkręć i wyjmij śruby skrzydełkowe zamontowane fabrycznie na zestawie stojaka b. Umieść poprzeczkę na stojaku, wybierz otwór A2/B2/C2 pozycje dostosowane do Twoich potrzeb c. wyrównaj otwory na prętach z otworami na zestawie stojaka Przymocuj poprzeczkę...
- Page 63 WSKAZÓWKA: Na początku stojak może być nierówny – nie dokręcaj nakrętek skrzydełkowych na nogi natychmiast. Mocno dokręć cztery nakrętki skrzydełkowe, gdy regulowane nogi będą wyrównane równomiernie. MONTAŻ PIŁY STOŁOWEJ DEWALT I VEVOR DO STOJAKA Przed montażem odłącz piłę stołową od źródła zasilania.
- Page 64 Machine Translated by Google DWE7485 DWE7491 7H254 210 stopni Fahrenheita SKŁADANIE I PRZECHOWYWANIE STOJAKA Lekko złóż stojak. Przechowuj stojak w suchym i suchym pomieszczeniu. miejsce zamknięte, poza zasięgiem dzieci.
- Page 65 Machine Translated by Google Producent: Shanghaimuxinmuyeyouxiangongsi Adres: Shuangchenglu 803nong11hao1602A-1609shi, baoshanqu, szanghaj 200000 CN. Importowane do AUS: SIHAO PTY LTD, 1 ROKEVA STREETEASTWOOD NSW 2122 Australia Importowane do USA: Sanven Technology Ltd., Suite 250, 9166 Anaheim Place, Rancho Cucamonga, CA 91730 E-CrossStu GmbH Przedstawiciel UE Mainzer Landstr.69, 60329 Frankfurt nad Menem.
- Page 66 Machine Translated by Google Wsparcie techniczne i certyfikat gwarancji elektronicznej www.vevor.com/support...
- Page 67 Tafelzaagstandaard GEBRUIKERSHANDLEIDING MODEL: HS6804 Wij streven er voortdurend naar om u gereedschappen tegen concurrerende prijzen te leveren. "Save Half", "Half Price" of andere soortgelijke uitdrukkingen die wij gebruiken, geven alleen een schatting weer van de besparingen die u kunt behalen door bepaalde gereedschappen bij ons te kopen in vergelijking met de grote topmerken en betekent niet noodzakelijkerwijs dat alle categorieën...
- Page 68 Dit is de originele instructie, lees alle handleidingen zorgvuldig door voordat u het product gebruikt. VEVOR behoudt zich een duidelijke interpretatie van onze gebruikershandleiding voor. Het uiterlijk van het product is afhankelijk van het product dat u hebt ontvangen.
- Page 69 De opvouwbare standaard is bedoeld voor het monteren van de DEWALT tafelzaag DCS7485, DCS7485T1, DWE7485, DWE7491RS en VEVOR tafelzaag M1H-ZP7-254A-1ÿWTS210F. • Toekomstige DEWALT-gereedschappen zijn mogelijk compatibel met deze standaard. Deze ook worden aangepast aan verschillende merken tafelzagen op de markt.
- Page 70 Machine Translated by Google • Koppel het gereedschap los van de stroombron voordat u het monteert of aanpassingen uitvoert. • Onbedoelde activering van het gereedschap is de oorzaak van veel ongelukken. • Controleer altijd of het gereedschap stevig is bevestigd en stabiel is voordat u het gebruikt. Voer een proefrun uit van de snijbewerking om er zeker van te zijn dat er geen problemen zullen optreden wanneer de snede wordt gemaakt.
- Page 71 Machine Translated by Google SPECIFICATIES Bedrijfshoogte 21,7'' (550 mm) Max. capaciteit (gereedschap + werkstuk) 350 lbs. (160 kg) UITPAKKEN Pak alle onderdelen voorzichtig uit zoals afgebeeld in Afb. 2 uit de doos. Controleer alle onderdelen om er zeker van te zijn dat er geen onderdelen beschadigd zijn geraakt tijdens de verzending. Als er onderdelen ontbreken of beschadigd zijn, neem dan contact op met uw dealer om ze te vervangen voordat u de standaard probeert te monteren.
- Page 72 Machine Translated by Google c. Als u beugels moet installeren volgens de afmetingen die in Afbeelding B en Afbeelding C, u moet deze stappen volgen: maak de nylon moer van A1 los en verwijder de plastic ring en M8 schroef. Installeer ze in gat B1 of C1 volgens uw behoeften, draai eerst de M8 schroef door de buitenste stalen buis, voeg de plastic ring toe en draai deze vervolgens door de binnenste stalen buis en draai de nylon moer vast (Diagram D).
- Page 73 Machine Translated by Google DE DWARSSTANGEN BEVESTIGEN a. Maak de vleugelbouten los die vooraf op de standaard zijn gemonteerd en verwijder ze b. Plaats de dwarsbalk op de standaardconstructie, selecteer A2/B2/C2-gat posities volgens uw behoeften c. Lijn de gaten op de staven uit met de gaten op de standaardconstructie Bevestig de dwarsbalk met 2 vleugelbouten aan de standaardconstructie.
- Page 74 TIP: De standaard kan in het begin ongelijk zijn – draai de vleugelmoeren op de standaard niet te vast. benen direct. Draai de vier vleugelmoeren stevig vast zodra de verstelbare poten allemaal uitgelijnd zijn gelijkmatig. MONTAGE VAN DEWALT EN VEVOR TAFELZAAG OP DE STANDAARD Koppel de tafelzaag los van de stroombron voordat u met de montage begint. WAARSCHUWING of aanpassingen maken.
- Page 75 Machine Translated by Google DWE7485 DWE7491 210F 7H254 OPVOUWEN VAN DE STANDAARD EN OPSLAG Vouw de standaard lichtjes op. Bewaar de standaard binnenshuis op een droge en op een afgesloten plaats, buiten bereik van kinderen.
- Page 76 Machine Translated by Google Fabrikant: Shanghaimuxinmuyeyouxiangongsi Adres: Shuangchenglu 803nong11hao1602A-1609shi, baoshanqu, shanghai 200000 CN. Geïmporteerd naar AUS: SIHAO PTY LTD, 1 ROKEVA STREETEASTWOOD NSW 2122 Australië Geïmporteerd naar de VS: Sanven Technology Ltd., Suite 250, 9166 Anaheim Place, Rancho Cucamonga, CA 91730 E-CrossStu GmbH EC-REP Mainzer Landstr.69, 60329 Frankfurt am Main.
- Page 77 Machine Translated by Google Technische ondersteuning en e- garantiecertificaat www.vevor.com/support...
- Page 78 Bordssågstativ ANVÄNDARMANUAL MODELL: HS6804 Vi fortsätter att vara engagerade i att ge dig verktyg till konkurrenskraftiga priser. "Spara hälften", "halva priset" eller andra liknande uttryck som används av oss representerar bara en uppskattning av besparingar du kan dra nytta av att köpa vissa verktyg hos oss jämfört med de stora toppmärkena och betyder inte nödvändigtvis att täcka...
- Page 79 Detta är den ursprungliga instruktionen, läs alla instruktioner noggrant innan du använder den. VEVOR reserverar sig för en tydlig tolkning av vår användarmanual. Utseendet på produkten är beroende av den produkt du fått. Ursäkta oss att vi inte kommer att informera dig igen om det finns någon teknik eller mjukvaruuppdateringar på...
- Page 80 Det fällbara stativet är avsett för montering av DEWALT bordssåg DCS7485ÿ DCS7485T1ÿDWE7485ÿDWE7491RS och VEVOR bordsåg M1H-ZP7-254A-1ÿWTS210F. • Framtida DEWALT elverktyg kan vara kompatibla med detta stativ. Det kan också anpassas till olika märken av bordssågar på marknaden.
- Page 81 Machine Translated by Google • Koppla bort verktyget från strömkällan innan du monterar eller gör justeringar. • Oavsiktlig aktivering av verktyget är orsaken till många olyckor. • Kontrollera alltid att verktyget är säkert monterat och är stabilt före användning. Utför en torrkörning av skäroperationen bara för att säkerställa att inga problem uppstår när skärningen görs.
- Page 82 Machine Translated by Google SPECIFIKATIONER Arbetshöjd 21,7 tum (550 mm) Max. kapacitet (verktyg + arbetsstycke) 350 lbs. (160 kg) UPPACKNING Packa försiktigt upp alla delar enligt bild 2 från kartongen. Undersök alla delar för att säkerställa att delar inte har skadats under transporten. Om några delar saknas eller är skadade, kontakta din återförsäljare för att byta ut dem innan du försöker montera stativet.
- Page 83 Machine Translated by Google c. Om du behöver installera konsoler enligt måtten som visas i Figur B och Figur C, du måste följa dessa steg: lossa nylonmuttern på A1 och ta bort plastbrickan och M8-skruven. Installera dem i hål B1 eller C1 enligt dina behov, skruva först M8-skruven genom det yttre stålröret, lägg till plastbrickan och trä...
- Page 84 Machine Translated by Google FÄSTNING AV KORSSTAVEN a. Lossa och ta bort vingbultarna som är förinstallerade på stativet b. Placera tvärstången på stativet, välj A2/B2/C2-hål positioner efter dina behov c. rikta in hålen på stängerna med hålen på stativet Fäst tvärstången på stativet med två vingbultar. d.
- Page 85 TIPS: Stativet kan vara ojämnt i början – dra inte åt vingmuttrarna på ben direkt. Dra åt de fyra vingmuttrarna ordentligt när alla de justerbara benen är i linje jämnt. MONTERING AV DEWALT och VEVOR BORDSSÅG TILL STÄLLEN Koppla bort bordssågen från strömkällan innan montering VARNING eller göra justeringar.
- Page 86 Machine Translated by Google DWE7485 DWE7491 210F 7H254 FÄLLNING AV STÄLL OCH FÖRVARING Vik stativet något. Förvara stativet inomhus i en torr och låst ställe, utom räckhåll för barn.
- Page 87 Machine Translated by Google Tillverkare: Shanghaimuxinmuyeyouxiangongsi Adress: Shuangchenglu 803nong11hao1602A-1609shi, baoshanqu, shanghai 200000 CN. Importerad till AUS: SIHAO PTY LTD, 1 ROKEVA STREETEASTWOOD NSW 2122 Australien Importerad till USA: Sanven Technology Ltd., Suite 250, 9166 Anaheim Place, Rancho Cucamonga, CA 91730 E-CrossStu GmbH EC REP Mainzer Landstr.69, 60329 Frankfurt am Main.
- Page 88 Machine Translated by Google Teknisk support och e-garanticertifikat www.vevor.com/support...
Need help?
Do you have a question about the HS6804 and is the answer not in the manual?
Questions and answers