Advertisement
- 1 Product Overview
- 2 Control Panel & Power Button
- 3 Package Contents
- 4 Assembly and Set-up
- 5 Charge Your Scooter
- 6 Connect with Xiaomi Home App
- 7 Unpairing
- 8 How to Ride
- 9 Lock & Unlock Your Scooter
- 10 Folding & Carrying & Unfolding
- 11 Adjust the Mechanical Brake
- 12 Inflate the Tire
- 13 Safety Reminder
- 14 Documents / Resources
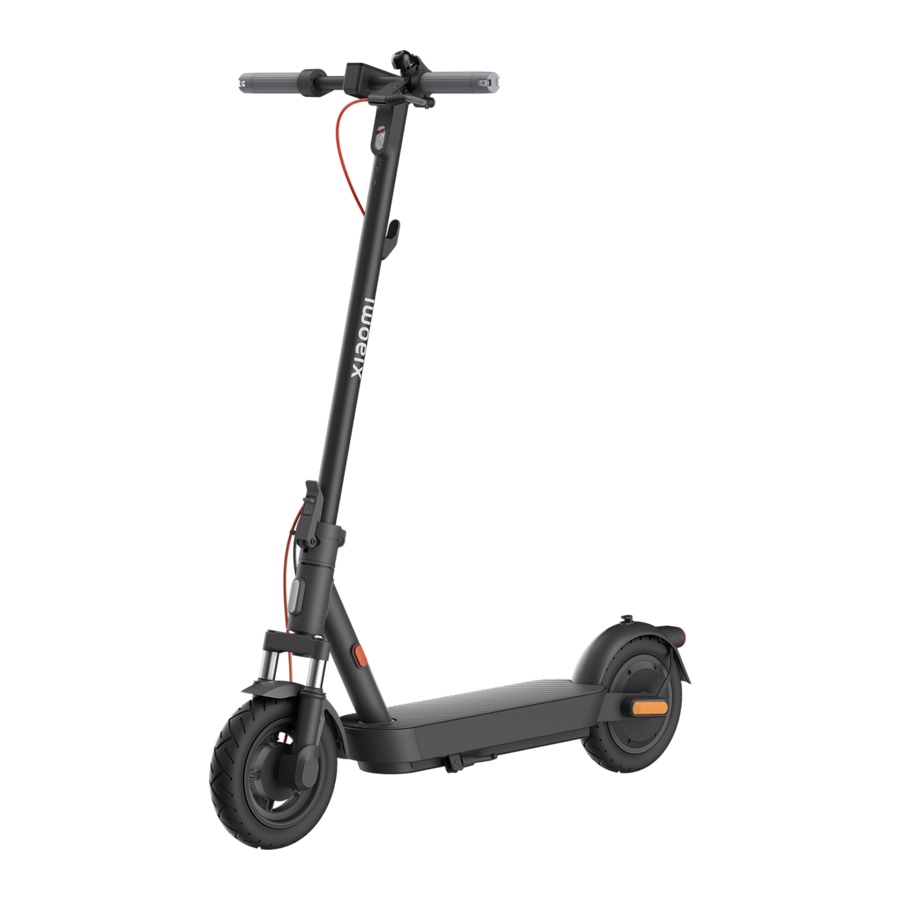
Product Overview

- Right Winglight
- Handlebar
- Headlight
- Brake Lever
- Hook
- Stem
- Quick Release Lever Lock
- Quick Release Lever
- Front Reflector
- Front Shock Absorber
- Charging Port
- Mechanical Brake
- Accelerator
- Control Panel & Power Button
- Left Winglight
- Scooter Bell
- Buckle & Bell Lever
- Winglinght Buttons
- Deck
- Hook
- Taillight & Rear Reflector
- Wheel Motor
- Side Reflector
- Battery Compartment
- Kickstand
Control Panel & Power Button

| 1 | Speedometer: It displays the current speed when the scooter is working. When the scooter has an issue, it displays an error code. When the scooter is charging, it displays the current battery level. |
| 2 | Temperature Warning: If the battery temperature is too high or too low, the thermometer icon will be on. This will result in reduced acceleration and possibly charging issues. Use or charge the scooter after its battery temperature returns to the normal operating range. |
| 3 | Light: lighting up means the headlight and taillight are on, and going out indicates the headlight and taillight are off. Turn on the scooter, and press the power button to turn the headlight and taillight on or off. lighting up means the headlight and taillight are on, and going out indicates the headlight and taillight are off. Turn on the scooter, and press the power button to turn the headlight and taillight on or off. |
| 4 | Bluetooth: When the icon lights up, it indicates the scooter has been successfully connected to the mobile device. |
| 5 | Motor Lock:  lighting up means the motor is locked, and going out indicates the motor is unlocked. You can only lock or unlock the motor via the Xiaomi Home app. For detailed instructions, see the section of Lock & Unlock Your Scooter. lighting up means the motor is locked, and going out indicates the motor is unlocked. You can only lock or unlock the motor via the Xiaomi Home app. For detailed instructions, see the section of Lock & Unlock Your Scooter. |
| 6 | Power Button: Press the button to turn the scooter on, and hold the button for 2 to 3 seconds to turn the scooter off. When the scooter is on, press the button to turn on/off the headlight and taillight, and press twice to cycle through the modes. Note: The scooter will turn off automatically when it enters standby mode for more than 10 minutes. The standby mode means that the scooter is not being charged or not locked when it is on and not running. |
| 7 | TCS anti-slip reminder: When the TCS (traction control system) anti-slip function is enabled, the scooter can prevent the tires from slipping excessively to maintain stability during operations such as starting, accelerating, or turning. The TCS anti-slip function is enabled when  is on, and disabled when is off. This function can be enabled or disabled via the Xiaomi Home app. is on, and disabled when is off. This function can be enabled or disabled via the Xiaomi Home app. |
| 8 | Inflation reminder: When  is on, it indicates that the tire maintenance reminder cycle has been reached. Please check the tire pressure and inflate the tires in time to avoid damage due to insufficient tire pressure. The recommended tire pressure is 45–50 psi. is on, it indicates that the tire maintenance reminder cycle has been reached. Please check the tire pressure and inflate the tires in time to avoid damage due to insufficient tire pressure. The recommended tire pressure is 45–50 psi.Note: After completing maintenance, follow the instructions in the app to disable the maintenance reminder on the control panel. |
| 9 | Winglight Indicating: When the scooter is on, press the left or right winglight button, then the corresponding winglight and the indicator on the control panel will blink. Meanwhile, the buzzer will respond at the same frequency. Press the button again to turn off the winglight. |
| 10 | Auto lights on/off: When  is on, it indicates that the scooter is in the auto lights on/off mode, and then the front light and the taillight will be automatically turned on or off according to the ambient brightness. You can enable or disable this function via the Xiaomi Home app. is on, it indicates that the scooter is in the auto lights on/off mode, and then the front light and the taillight will be automatically turned on or off according to the ambient brightness. You can enable or disable this function via the Xiaomi Home app.Note: When the function of auto lights on/off is enabled in the app, pressing the power button will temporarily disable it. You can restart the scooter to resume using this function, or enable it in the app. |
| 11 | Battery Level: The battery power is indicated by 5 bars, each representing approximately 20% of a full battery. |
| 12 | Error Notification: When the wrench icon displays red, it indicates that the scooter has an error. |
| 13 | Modes:  is for walking mode, and its maximum speed is 6 km/h; the headlight and the tail light will remain on when this mode is enabled. D is for standard mode. S is for sport mode, and the scooter has high speed in this mode; it is recommended to use this mode after mastering the riding skills. When the scooter is on, double press the power button to switch riding modes. is for walking mode, and its maximum speed is 6 km/h; the headlight and the tail light will remain on when this mode is enabled. D is for standard mode. S is for sport mode, and the scooter has high speed in this mode; it is recommended to use this mode after mastering the riding skills. When the scooter is on, double press the power button to switch riding modes. |
Package Contents

Electric Scooter

User Manual
Specifications

Screw × 5 (1 is spare)
Important Information

Allen Key

Battery Charger
Assembly and Set-up
- Put down the kickstand. Then hold up the stem and push it forward until you hear a click. Push the quick release lever upwards to secure the stem.

- Install the handlebar onto the stem, and make sure to install the handlebar in the correct direction.
Note: Make sure the power cord inside the handlebar and the stem is connected.

- Follow the number order as illustrated to pre-tighten the four screws with the included Allen key. Make sure the handlebar is correctly installed and then tighten the screws thoroughly.


Charge Your Scooter

- Lift up the rubber flap.
- Connect the battery charger to the charging port.
- Disconnect the battery charger from the charging port when charging is completed.
- Put back the rubber flap.

The scooter is fully charged when the LED on the battery charger changes from red to green.

Do not charge the non-rechargeable batteries. Use only with T2336-BD4A battery. Use only with NBW54D601D3D power supply unit. Never use a non-original battery charger. The scooter's baseplate should only be opened by a professional or personnel from a qualified service center. Make sure the battery charger is properly connected to the scooter. Charge your scooter indoors, and never expose it to rain.

When the scooter is turned off for about a month with the battery level of the scooter being lower than 30%, the scooter will enter sleep mode. In this case, the scooter cannot be turned on. To exit the sleep mode, charge the scooter for about three seconds to activate the battery.
Connect with Xiaomi Home App
- Before being activated, the scooter will keep beeping when turned on and is limited to 10 km/h. When the scooter is used for the first time, it must be activated via the Xiaomi Home app.

- Scan the QR code on the label attached to the control panel, on the right side of the deck, or on the back cover of the user manual to download the Xiaomi Home app.
Note: The QR code is unique to your scooter, please keep it safe.
![]()
- Open the Xiaomi Home app.
![]()
- Tap "+" on the top right corner and open "Scan" to scan the QR code on the label attached to the control panel, on the right side of the deck, or on the back cover of the user manual again. Then follow the instructions in the app to add the scooter.
![]()
- Watch the riding guide video. Do not exit the video before finishing it. Otherwise, the activation will fail.
![]()
- Tap "Activate" to activate the scooter. Once the scooter is activated, the beeping will stop and the speed restriction will be lifted.
![]()


Note: The app is referred to as Xiaomi Home app in Europe (except for Russia). The name of the app displayed on your device should be taken as the default.
Unpairing
Method 1: Reset the scooter's Bluetooth
- Delete the added scooter from the Xiaomi Home app.
![]()
- Make sure the scooter is turned on. Press the accelerator and simultaneously press the power button 5 times to reset. When the scooter beeps, it has been reset successfully.


Method 2: Restore the scooter to the factory settings
- Delete the added scooter from the Xiaomi Home app.
![]()
- Make sure the scooter is turned on. Squeeze the brake lever, and simultaneously press and hold the accelerator and the power button for 7 seconds. When you hear a beep, the scooter has been restored to factory settings. This operation will completely delete the data stored in the scooter, please proceed with caution.
Note: When the scooter is locked or during riding, the factory settings cannot be restored.


How to Ride
- Before Riding
Wear a helmet, elbow pads and knee pads before riding.
Note: Check the tire pressure before riding. The recommended tire pressure is 45–50 psi.
![]()
- Starting & Accelerating
Wear a helmet, elbow pads and knee pads before riding.
Note: Check the tire pressure before riding. The recommended tire pressure is 45–50 psi.
![]()
When the scooter starts to coast, put both feet on the deck and gently press the accelerator. The accelerator can be used once the scooter is going over 5 km/h.

- Steering
Tilt your body to the steering direction as you turn, and slowly turn the handlebar.
![]()
- Decelerating & Braking & Parking
Release the accelerator to slow down, and you can enable the energy recovery function to help reduce the speed. Press the brake lever to brake.

When the scooter slows down or stops, put one foot on the ground to get off the scooter. Put down the kickstand when parking the scooter.
![]()


 To avoid others using the scooter without your permission, you can lock the scooter when it is parked.
Lock & Unlock Your Scooter

Tap ![]() to lock the motor.
to lock the motor.

Tap ![]() to unlock the motor.
to unlock the motor.
- When the motor is locked, all the icons on the control panel will automatically go out except the Bluetooth and the motor lock icon. If the scooter goes beyond the Bluetooth connection range, the Bluetooth will be disconnected and the Bluetooth icon will go out.
- Tap
![]() in the app to lock the motor and then the power button will not function. If the scooter is moved forcibly, its rear wheel cannot move normally, accompanied by the buzzer alarm and a vibrating alert on the phone. This function cannot prevent the scooter from being stolen, please keep your scooter safe. The scooter will automatically turn off after the motor has been locked for 24 hours, and the motor will remain locked when the scooter is turned on again. You need to unlock the motor in the app to use the scooter. Locking the motor will consume the scooter's power, please use this function properly. Note: The phone will vibrate only if the page of the scooter in the Xiaomi Home app is open.
in the app to lock the motor and then the power button will not function. If the scooter is moved forcibly, its rear wheel cannot move normally, accompanied by the buzzer alarm and a vibrating alert on the phone. This function cannot prevent the scooter from being stolen, please keep your scooter safe. The scooter will automatically turn off after the motor has been locked for 24 hours, and the motor will remain locked when the scooter is turned on again. You need to unlock the motor in the app to use the scooter. Locking the motor will consume the scooter's power, please use this function properly. Note: The phone will vibrate only if the page of the scooter in the Xiaomi Home app is open.
Folding & Carrying & Unfolding
Do not perform the following operations until the scooter is turned off.
- Hold the stem, lift the quick release lever lock, and pull the quick release lever outward.

- Fold the stem.

- Align the buckle with the hook and secure them together.

- Hold the stem with either one hand or both hands to carry.

- When unfolding the scooter, pull the buckle upwards to release it from the hook.

- Lift up the stem and push it forward until you hear a click, and then push the quick release lever upwards to secure the stem.


Note: When unfolding or folding, do not put your hands in the gap between different parts to avoid the risk of pinching.
Adjust the Mechanical Brake

Tool: 14 mm T-handle socket wrench (the tool needs to be prepared by the user).
Before adjustment, make sure the scooter is powered off and not charging. When the brake is too tight, use the tool to turn the nut on the screw rod counterclockwise, so as to slightly shorten the brake line's exposed bottom part. When the brake is too loose, use the tool to turn the nut on the screw rod clockwise, so as to slightly lengthen the brake line's exposed bottom part.
Do not adjust the brake too tightly; otherwise, the front wheel may lock up when braking, resulting in the scooter tipping forward.
Inflate the Tire
- Remove the tire valve cap, and connect the pump and the valve securely together.

- Inflate the tire.
![]()
- Remove the pump and install the tire valve cap.


Check the tire pressure every month, and inflate the tires if the pressure is too low. The recommended tire pressure is 45–50 psi.
For further information, please go to www.mi.com
Safety Reminder

Watch out for hand crush and pinch points hazards in the following positions during use:
- Between the handlebar and the stem when installing the handlebar.
- Openings on the wheels.
- Between the front mudguard and the deck.
- Between the quick release lever and the quick release lever lock, and between the folding joint and the stem when folding or unfolding.
- Between the mudguards and the wheels.
Always steer clear of obstacles.

Avoid hitting your head on door frames, elevators, and other overhead obstacles.

Watch out for Safety Risk
 Do not press the accelerator when you are walking alongside the scooter.

Unless otherwise authorized by the local laws, it is forbidden and illegal to ride on public roads, motorways, and expressways.

![]() Do not abruptly change the steering direction at high speed.
Do not abruptly change the steering direction at high speed.

![]() Do not hang bags or other heavy stuff on the handlebar.
Do not hang bags or other heavy stuff on the handlebar.

Do not Try Dangerous Actions
 Do not ride on one foot.

Do not accelerate when going downhill, and brake in time to slow down. When on a steep slope, you need to step off the scooter and push.

Do not use mobile phone or wear earphones when operating the scooter.

Do not ride in the rain. Do not ride through puddles or any other (water) obstacles.

Do not ride with anyone else, including children.

Do not keep your feet on the rear mudguard.

Do not let go of the handlebar while riding.

Do not try riding up or down stairs, nor try jumping over obstacles.

Do not touch the mechanical brake.

Do not directly ride through puddles. If there is a puddle, avoid it at a low speed.

Documents / Resources
References
Download manual
Here you can download full pdf version of manual, it may contain additional safety instructions, warranty information, FCC rules, etc.
Advertisement


Need help?
Do you have a question about the mi 5 and is the answer not in the manual?
Questions and answers