VTech IS8251, IS8251-2, IS8251-3, IS8251-4, IS8251-5 Manual
- Quick start manual (43 pages) ,
- Quick start manual (61 pages)
Advertisement
- 1 Install | Set up
- 2 Smart keys
- 3 Bluetooth
- 4 Operate
- 5 Caller ID
- 6 Phonebook
- 7 Answering system
- 8 Countdown timer
- 9 LCD language setting
- 10 Need help?
- 11 Warranty
- 12 Important safety instructions
- 13 Documents / Resources
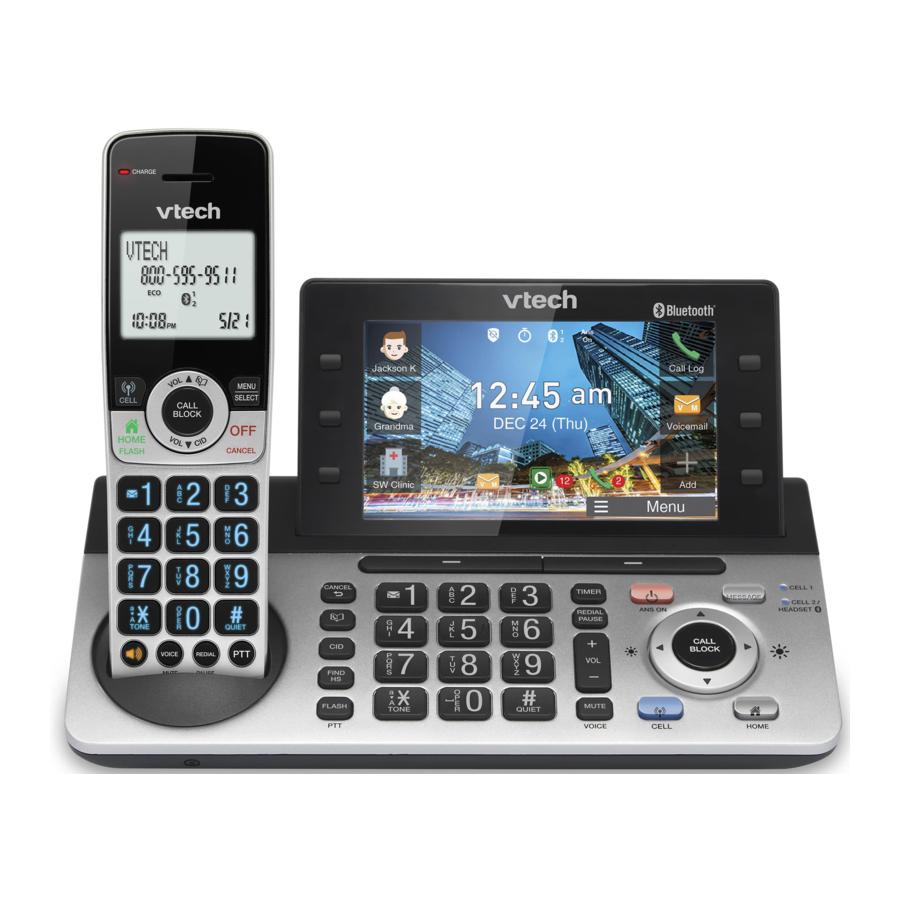
Install | Set up
What's in the box
Your telephone package contains the following items. Save your sales receipt and original packaging in case it is necessary to ship your telephone for warranty service.
You can add new handsets (IS8251/ IS8251-2/ IS8251-3/ IS8251-4/ IS8251-5) to your telephone system. All accessories are sold separately. Your telephone base supports a maximum of five devices
 NOTE
NOTE
- To purchase replacement batteries or power adapters, visit our website at www.vtechphones.com or call 1 (800) 595-9511. In Canada, go to phones.vtechcanada.com or dial 1 (800) 267-7377.


Your telephone base is ready for tabletop use. If you wall-mount bracket (sold separately) to attach to a standard dual-stud telephone wall-mounting plate. If you do not have this wall-mounting plate, you can purchase one from many hardware or consumer electronics retailers. You may need a professional to install the wall-mounting plate.
Connect the telephone base and charger

 TIPS
TIPS
- If you want to mount the base, make sure telephone line pass through the mounting bracket before connecting to the DSL filter.
- If you subscribe to digital subscriber line (DSL) high-speed Internet service through your telephone line, make sure you connect a DSL filter (not included) to the telephone wall jack.
Install the battery

- Plug the battery connector securely into the socket inside the handset battery compartment.
- Make sure the battery label THIS SIDE UP is facing up, as indicated.
- Align the cover flat against the battery compartment, then slide it upwards until it clicks into place.
Charge the battery

The following table summarizes th battery indicators and actions to take.
| Battery indicators | Battery status | Action |
|
|
|
|
|
|
|
|
|
 flashes.
When it is fully charged, you can expect the following performance:
| Operation | Operating time * |
| Talk time (cordless handset) | 10 hours |
| Talk time (cordless handset speakerphone) | 4.5 hours |
| Standby | 5 days |
* Operating times vary depending on your actual use and the age of the battery.
Check for a dial tone
Press ![]() on the handset or
on the handset or ![]() on the base. If you hear a dial tone, the installation is successful.
on the base. If you hear a dial tone, the installation is successful.
If you do not hear a dial tone
- Make sure the installation procedures are properly done.
- The handset may take a second or two to find the telephone base and produce a dial tone. This is normal. Wait an extra second before dialing.
- If the previous suggestions do not work, disconnect the telephone line cord from your telephone and connect the telephone line cord to another telephone.
- If there is no dial tone on that other telephone either, your telephone line cord may be defective. Install a new telephone line cord.
If changing the telephone line cord does not help, the wall jack (or the wiring to this wall jack) may be defective. Try using a different wall jack in your home to connect your IS8251, IS82512, IS8251-3, IS8251-4, and IS8251-5 telephone, or contact your telephone service provider (charges may apply).
Overview
Telephone base

| 1 |
| |
| 2 |
| |
| 3 |
| |
| 4 |  |
|
| 5 |  |
|

| 6 |  |
|
 |
| |
 |
| |
 |
| |
 | FLASH
PTT
|
Keypad
| 7 |  |
|
 |
| |
 |
| |
 |
| |
| 8 |  |
|
 | REDIAL
PAUSE
| |
 | VOL +
VOL -
| |
 | MUTE
VOICE
| |
| 9 |  |
|
 |
| |
 | CALL BLOCK
| |
 |
| |
 |
| |
 |
|


Handset

| 1 |  |
|
| 2 |  | VOL  
|
CALL BLOCK
| ||
VOL  CID CID
| ||
| 3 |  |
|
| 4 |  |
|
| 5 |  |
|
| 6 |  |
|
| 7 |  | VOICE
|
| MUTE
DELETE
| ||
| 8 |  |
|
| 9 |  |
|
| 10 |  |
|
| 11 |  |
|
| 12 |  |
|
| 13 |  |
|
Display
Handset

 |
|
 |
|
 |
|
| ECO |
|
 |
|
 |
|
 |
|
 |
|
| NEW |
|
| ANS ON |
|
 |
|
 |
|
 |
|
Telephone base

 |
|
 |
|
 |
|
 |
|
 |
|
 |
|
 |
|
 |
|
 |
|
 |
|
 |
|
 |
|
 |
|
 |
|
Before use
Set date and time with voice guide
After you install your telephone or power returns following a power outage and battery depletion, the telephone system will prompt you to set the date and time, and to configure the Smart call blocker and answering system through voice guide.
NOTE
- Make sure you set the date and time including the year correctly; otherwise the answering system does not announce the correct day of the week for your recorded messages time stamp.
For example: July 25, 2021 and the time is 12:05PM.
Handset
- Enter the date.
![]()
- Press
![]() .
.
![]()
- Enter the time.
![]()
- Press
![]() .
.
![]()


Base

- Use the dialing keys (0-9) to enter the month (--), date (--) and year (--). Then, press
![]() .
. - Use the dialing keys (0-9) to enter the hour (HH) and minute (MM). Then, press
![]() to choose AM or PM.
to choose AM or PM. - Press
![]() to save.
to save.
 .
. to choose AM or PM.
 to save.
 TIP
• To skip setting the date and time, press ![]() on the base.
on the base.
Set up Smart call blocker
After the date and time setting is done or skipped, the base will prompt if you want to set Smart call blocker. Press  to start the Smart call blocker setup via voice guide.

This feature is an easy and alternative way for you to do the basic setup of Smart call blocker. You can follow the voice guide to set your telephone system to allow or to screen all incoming home calls, or to screen home calls that do not display a phone number.
You hear a voice prompt "Hello! This voice guide will assist you with the basic setup of Smart call blocker..."
Set up your Smart call blocker feature by inputting the designated numbers, as instructed in the voice guide.
- To skip the set up, press
![]() .
. - Press 1 if you want to screen home calls with telephone numbers that are not saved in your phonebook, allow list or star name list; or
- Press 2 if you do not want to screen calls, and want to allow all incoming calls to get through.
 .
. NOTE
- The screening feature of Smart call blocker is applicable to home calls only. All incoming cell calls will get through and ring. If you want to block a cell call, add the number to the block list.
Answering system
After the Smart call blocker setting is done or skipped, the base will then prompt and ask whether you want to set up the answering system.
Press  to start the answering system setup via voice guide. You hear a voice prompt "This voice guide will assist you with the basic setup of your answering system..."
- To skip the set up, press
![]() .
.
You can record your own announcement, set the number of rings, and set the message alert tone.
Set your own announcement
- Press 7 to record your own announcement, or press 9 to use the standard announcement "Hello! Please leave a message after the tone..." and skip to next item - Set number of rings.
Set number of rings
- Press 2, 3, 4, 5 or 6 for your preferred number of rings, or 8 for toll saver.
- Displays and confirms the number of rings being set.
Set message alert tone
When there is at least one new message, the base beeps every 10 seconds. You can press 1 for On or 0 for Off.
Smart keys
On the telephone base, there are six Smart keys along the left and right of the LCD screen. Smart keys allow you to access the speed dial number, emergency number and other menu options quickly. You can reset the Smart keys anytime you want.
Add a speed dial number
- Press
![]() to add a Smart key function.
to add a Smart key function. - Press
![]() .
.
![]()
- Enter the speed dial number, and then press
![]() .
. - Enter the name, and then press
![]() .
. - Press
![]() to select a desired profile picture, and then press
to select a desired profile picture, and then press ![]() .
.
![]()
- Press
![]() to select a desired color tone, then press
to select a desired color tone, then press ![]() .
.
![]()
- Press
![]() to save.
to save.
![]()
 to add a Smart key function.
 .
.
 .
.


Add a speed dial number via phonebook
- Press
![]() to add a Smart key function.
to add a Smart key function. - Press
![]()
![]()
- Press
![]() .
.
![]()
- Press
![]() smart key next to your desired entry.
smart key next to your desired entry.
![]()
- Press
![]() to save.
to save.
![]()

 .
.
 smart key next to your desired entry.

Add an emergency number
- Press
![]() to add a Smart key function.
to add a Smart key function. - Press
![]()
- Enter the emergency number, and then press
![]() .
.

 .
.Add a menu option
- Press
![]() to add a Smart key function.
to add a Smart key function. - Press
![]() .
. - Press
![]() to choose your desired menu option, and then press
to choose your desired menu option, and then press ![]() .
.
![]()
 .
.
Change a smart key function
You may want to change your existing smart key to another. For instance, from Phonebook to a speed dial number, an emergency number, or another menu option.
- Press softkey
![]() on the telephone base.
on the telephone base. - Press △/▽ to scroll to the
![]() , and then press its smart key to enter.
, and then press its smart key to enter. - Press the smart key you want to change.
For instance:![]()
![]()
- Press
![]() to confirm changing.
to confirm changing.
![]()
 on the telephone base.
 , and then press its smart key to enter.


- Now, select your desired Smart key function. Follow the steps in Add a speed dial number, Add an emergency number, or Add a menu option sections to change.
Bluetooth
Pair and connect your Bluetooth cellular phone or headset with the telephone base. Before you begin, make sure that you have cellular coverage and your Bluetooth enabled cell phone or handset is not connected to any other Bluetooth device.
Add a Bluetooth cell phone / headset
- Press
![]() on the telephone base.
on the telephone base. - Press △/▽ to scroll to the next page, and then select
![]() .
.
![]()
- Press
![]() .
.
![]()
- Press
![]() or
or ![]() .
. - For cellular, go to "Cell phone".
- For headset, go to "Headset".
![]()
 on the telephone base.
 .
.
 .
.
 or
or  .
. 
Cell phone
- Follow the on-screen instructions and press
![]() .
.
![]()
![]()
- Your telephone (VTech DECT 6.0) starts searching and pairing with your cell phone, press the appropriate key on your cell phone to continue the pairing process.
- The CELL 1 | CELL 2 HEADSET
![]() lights on the base flash while pairing.
lights on the base flash while pairing.
![]()
- The CELL 1 | CELL 2 HEADSET
 .
.


Headset
- Follow the on-screen instructions and press
![]() .
.
![]()
![]()
- Place your headset next to the base and start pairing.
![]()


Once your cell phones or headset are paired,  1 and/or 2 display on the base LCD screen.

Download your cell phone phonebook using the base
NOTE
- Before downloading the phonebook, make sure cell phone is paired, active, and connected to the system.
- Press
![]() on the telephone base.
on the telephone base. - Press △/▽ to scroll to the next page, and then select
![]() .
.
![]()
- Press Phonebook download
![]() smart key.
smart key.
![]()
![]()
 on the telephone base.
 .
.


Once your Phonebook entries are added, the LCD screen displays:-

Disconnect/ reconnect your Bluetooth device
- Press
![]() on the telephone base.
on the telephone base. - Press △/▽ to scroll to the next page, and then select
![]() .
. - Press the respective smart key
![]()
![]() to disconnect and connect.
to disconnect and connect.
-OR-
Press the softkey![]() to reconnect.
to reconnect.

 to disconnect and
NOTE
- Make sure to connect the Bluetooth function of your device if you need to reconnect.
Edit / remove Bluetooth cell phone or headset
- Press
![]() on the telephone base.
on the telephone base. - Press △/▽ to scroll to the next page, and then select
![]() .
. - Press
![]() .
.
![]()
 .
.
- Press the respective smart key X to select and remove the bluetooth device, or press
![]() to delete all devices from the list.
to delete all devices from the list.
![]()
 to delete all devices from the list.
Activate remote voice control
NOTE
- Make sure cell phone is paired, active, and connected to the system via Bluetooth.
Handset
- Press
![]() .
. - You will hear the confirmation tone from handset via the cell phone's voice app.
![]()
- You will hear the confirmation tone from handset via the cell phone's voice app.
- Speak toward the handset and wait for feedback.

Base
- Press
![]() .
. - You will hear the confirmation tone from handset via the cell phone's voice app.
![]()
- Speak toward the base and wait for feedback.
- You will hear the confirmation tone from handset via the cell phone's voice app.

Operate
Make a home call
- Press
![]() (handset) or
(handset) or ![]() (base).
(base). - Enter the telephone number.
 (handset) or
 Make a cell call
- Press
![]() (handset) or
(handset) or ![]() (base).
(base). - Enter the telephone number.
 (handset) or
 Make a smart key speed dial
TIP
- Make sure you have the speed dial contact first.
Press smart key of your speed dial contact and dial.

Answer a home call
Press  (handset) or
  (base).
Answer a cell call
Press  (handset) or
  (base).
End a home call
Press ![]() (handset) or
(handset) or ![]() (base).
(base).
End a cell call
Press ![]() (handset) or (base).
(handset) or (base).
Adjust volume Handset

Caller ID
If you subscribe to caller ID service, information about each caller appears after the first or second ring. The caller ID log stores up to 50 entries. Each entry has up to 24 digits for the phone number and 15 characters for the name.
Review caller ID log entries
Handset
- Press
![]() .
.
![]()
- Press
![]() to browse the entries.
to browse the entries.
![]()
 .
.
 to browse the entries.
Base
- Press
![]() .
. - Press △/▽ to browse the entries.
![]()
 .
.
Save a caller ID log entry to phonebook
When your desired caller ID entry displays on the handset or base LCD screen:-
Handset
- Press
![]() , and press
, and press ![]() to browse the entries.
to browse the entries.
![]()
- At your desired entry, press
![]() to choose To Phonebook.
to choose To Phonebook.
![]()

 to choose To Phonebook.
- Edit the telephone number if needed, and then press
![]() to save.
to save.
![]()
- Edit the name if needed, and then press
![]() to save.
to save.
![]()


Base
- Press
![]() and △/▽ to browse the entries.
and △/▽ to browse the entries. - Press the
![]() smart key next to your desired entry.
smart key next to your desired entry.
![]()
- On the entry page, press
![]() .
.
![]()
- Press
![]() to save the telephone number to the Phonebook.
to save the telephone number to the Phonebook.
![]()
 and △/▽ to browse the entries.
 smart key next to your desired entry.
 .
.
 to save the telephone number to the Phonebook.
You can also edit the number if needed.
- Press the smart key
![]() .
. - Edit the number if needed, and then press
![]() .
.
![]()
- Edit the name if needed, and then press
![]() .
.
![]()
- Press
![]() to select a desire profile picture and then press
to select a desire profile picture and then press ![]() .
.
![]()
- Press
![]() to select a preferred color, and then press
to select a preferred color, and then press ![]() .
.
![]()
 .
. .
.
 .
.
 to select a desire profile picture and then press
  .
.

- Press
![]() to save at Preview.
to save at Preview.
 to save at Preview.
Dial a caller ID log entry
When your desired caller ID entry displays on the handset or base LCD screen:-
Handset
- Press
![]() , and press
, and press ![]() to scroll to your desired entry.
to scroll to your desired entry.
![]()
- Press
![]() , or
, or ![]() to dial.
to dial.

 , or
, or  to dial.
Base
- Press
![]() .
. - Press △/▽ to browse the entries.
![]()
 .
.
- Press
![]() next to call your desired entry directly.
next to call your desired entry directly.
-OR-
Press![]() smart key of your desired entry to go to the caller entry page.
smart key of your desired entry to go to the caller entry page.
 next to call your desired entry
Press  , or
, or  .
.

Delete a caller ID log entry
When your desired caller ID entry displays on the handset or base LCD screen:-
Handset
- Press
![]() , and press
, and press ![]() to scroll to your desired entry.
to scroll to your desired entry.
![]()
- Press
![]() .
.
 to scroll to your desired entry.
Base
- Press
![]() and
and ![]() to browse the entries.
to browse the entries. - Press the
![]() smart key next to your desired entry.
smart key next to your desired entry.
![]()
- On the entry page, press
![]() X.
X.
![]()
 and
and  to browse the entries.
 X.
X.
Phonebook
The phonebook can store up to 1,000 entries, which are shared by all handsets and the telephone base. Each entry may consist of a telephone number up to 30 digits, and a name up to 15 characters.
Add a phonebook entry
Handset
- Press
![]() .
.
![]()
- Press
![]() to scroll to Phonebook, and then press
to scroll to Phonebook, and then press ![]() .
.
![]()
- Press
![]() to select Add new entry.
to select Add new entry.
![]()
- Enter the number, and then press
![]() .
.
![]()
- Enter the name, and then press
![]() to save.
to save.
![]()
 .
.
 to scroll to Phonebook, and then press


Base
There are 3 ways to access Phonebook before adding an entry.
- Press
![]() to access phonebook directly;
to access phonebook directly; - If you have set up phonebook smart key (
![]() ), you can press and access directly; or
), you can press and access directly; or - Press
![]() softkey, and then go to
softkey, and then go to ![]() menu option.
menu option.
![]()
 to access phonebook directly;
 ), you can press and access directly; or

At the Phonebook, follow the steps below:-
- Press
![]() .
.
![]()
- Enter the telephone number, and then press
![]() .
.
![]()
- Enter the contact name, and then press
![]() .
.
![]()
- Press◁/△/▽/▷ to select a desired profile Review phonebook picture, and then press
![]() .
.
![]()
- Press ◁/△/▽/▷ to select a desired color, and then press
![]() .
.
![]()
- Press
![]() to save the entry at Preview.
to save the entry at Preview.
![]()
 .
.


 .
.


Review phonebook entries
Handset
- Press
![]() .
.
![]()
- Press
![]() to browse the entries.
to browse the entries.
![]()
 .
.
 to browse the entries.
Base
There are 3 ways to access and review Phonebook entries.
- Press
![]() directly;
directly; - If you have set up phonebook smart key (
![]() ), press it;
), press it;
or - Press
![]() softkey, and then go to
softkey, and then go to ![]() menu option.
menu option.
![]()
 directly;
 softkey, and then go to
Dial a phonebook entry
Handset
- Press
![]() , and then press
, and then press ![]() to scroll to your desired entry.
to scroll to your desired entry.
![]()
- Press
![]() , or
, or ![]() to dial
to dial

 , or
, or  to dial
Base
There are 2 ways to dial a phonebook entry.
Option 1
- Press
![]() and △/▽ to scroll to your desired entry. Then, press
and △/▽ to scroll to your desired entry. Then, press ![]() smart key next to your desired entry to dial.
smart key next to your desired entry to dial.
![]()
- While calling, you can press
![]() to mute, or press
to mute, or press ![]() to end the call when you are done.
to end the call when you are done.
![]()

 smart key
 to
to 

Option 2
- Press
![]() and △/▽ to scroll to your desired entry. Then, press
and △/▽ to scroll to your desired entry. Then, press ![]() smart key next to your desired entry.
smart key next to your desired entry.
![]()
- Press
![]() . -OR-
. -OR-
Press![]() or
or ![]() to call.
to call.
![]()
 and △/▽ to scroll to your desired entry. Then, press
  smart key next to your desired entry.
 . -OR-
  or
or  to call.
Delete a phonebook entry
Handset
- Press
![]() , and then press
, and then press ![]() to scroll to your desired entry.
to scroll to your desired entry.
![]()
- Press
![]() .
. - Press
![]() to confirm deleting the entry.
to confirm deleting the entry.
![]()
 , and then press
  to scroll to your desired entry.
 .
. to confirm deleting the entry.
Base
- Press
![]() and △/▽ to scroll to your desired entry. Then, press
and △/▽ to scroll to your desired entry. Then, press ![]() smart key next to your desired entry.
smart key next to your desired entry.
![]()
- Press
![]() .
.
![]()
- Press
![]() to confirm deleting the entry.
to confirm deleting the entry.
![]()
 smart key next to your desired entry.
 .
.
 to confirm deleting the entry.
Answering system
About the built-in answering system and voicemail service
For message recording, your telephone has a built-in answering system, and it also supports voicemail service offered by your telephone service provider (subscription is required, and fee may apply).
Built-in answering system VS Voicemail service
Built-in Answering system  | Voicemail service  | |
| Support by | Telephone system | Telephone service provider |
| Susbscrption | No | Yes |
| Fees | No | May apply |
| Answer incoming calls |
|
|
| Storage | Telephone base | Server or System |
| Display new messages |
|
|
| Retrieve messages |
|
|


 on the telephone base;
 on the handset, and then select Play messages; or
 on the dialpad, and enter an access number from your telephone service provider or dial to access voicemail.
Set number of rings
You can set your answering system to answer calls at least two rings earlier than your voicemail service. For example, if your voicemail service answers after six rings, set your answering system to answer after four rings. Thus, if you are on a call, or if the answering system is busy recording a message and you receive another call, the second caller can leave a voicemail message.
Handset
- Press
![]() .
. - Press
![]() to scroll to Answering sys, and then press
to scroll to Answering sys, and then press![]()
![]() .
. - Press
![]() to scroll to Ans sys setup, and then press
to scroll to Ans sys setup, and then press ![]() .
.
![]()
- Press
![]() to scroll to # of rings, and then press
to scroll to # of rings, and then press ![]() .
.
![]()
- Press
![]() to scroll to the desired number of rings, and then press
to scroll to the desired number of rings, and then press ![]() .
.
![]()
 to scroll to Answering sys, and then press
 .
.


Base
- Press
![]() softkey.
softkey. - Press
![]() .
.
![]()
- Press △/▽ to scroll to the next page, and then select
![]() .
.
![]()
- Press your desired number of rings.
![]()
 softkey.
 .
.
 .
.

Turn the built-in Options while message answering system on or playback
Base
- Pres
![]() s to turn on.
s to turn on. - Press it again to turn off.
 s to turn on.
Message playback
Handset
- Press
![]() .
. - Press
![]() to select Play messages.
to select Play messages.
![]()
 .
.
Base
Press 

Options while message playback
Skip a message

Repeat the playing message

Play the previous message

Delete all old messages
Handset
- Press
![]() .
.
![]()
- Press
![]() to scroll to Answering sys, and then press
to scroll to Answering sys, and then press ![]() .
.
![]()
- Press
![]() to scroll to Delete all old, and then press
to scroll to Delete all old, and then press ![]() .
.
![]()
 .
.


Base
- Press
![]() .
. - Press
![]() .
.
![]()
- Press
![]() .
.
![]()
- Press
![]() .
.
![]()
 .
. .
.
 .
.
 .
.
Countdown timer
You can use the timer, which is only available on the telephone base, to count down from a specified time. There are several ways to set the duration of time. When time is up, the alert sounds and a text message pops up.
Set the countdown timer
- Press
![]() .
. - Enter your desired number of minutes and seconds with numeric keys. You can also press △/▽ to edit the number of minute and second, and press ◁/▷ to move between MINUTES and SECONDS.
![]()
- You will see the MINUTES start flashing.
- Press
![]() to start counting down.
to start counting down.
![]()

 to start counting down.
- Press
![]() to temporary stop the countdown. You can resume the counting by pressing
to temporary stop the countdown. You can resume the counting by pressing ![]() .
.
If you want to Stop the countdown, press![]() .
.
![]()
 to temporary stop the countdown. You can resume the counting by pressing
  .
. .
.
LCD language setting
If you accidentally set the LCD language to Spanish or French, you can change the LCD language back to English while the telephone is not in use:
- On the telephone base, press
![]() and then enter 364#.
and then enter 364#. - On the handset, press
![]() and then enter 364#.
and then enter 364#.
 and then enter 364#.
 and then enter 364#.
Need help?
For operations and guides to help you using your telephone system, and for latest information and supports, go and check the online help topics and online FAQs.
Use your smartphone or mobile device to access our online help.
- Go to https://help.vtechphones.com/ is8251;
OR - Scan the QR code:
![]()
Launch the camera app or QR code scanner app on your smartphone or tablet. Hold the device's camera up to the QR code and frame it. Tap the notification to trigger the redirection of the online help.

If the QR code is not clearly displayed, adjust your camera's focus by moving your device closer or further away until it is clear.
You can also call our Customer Support at 1 (800) 595-9511 [in US] or 1 (800) 267-7377 [in Canada] for help.
Go to www.vtechphones.com (US) to register your product for enhanced warranty support and latest VTech product news.
Go to phones.vtechcanada.com (Canada) for the latest VTech product news.
Scan the QR code for support information

Warranty
How do you get warranty service?
To obtain warranty service in the USA, please visit our website at www.vtechphones.com or call 1 (800) 5959511.
To obtain warranty service in Canada, go to phones.vtechcanada.com or dial 1 (800) 267-7377.
NOTE: Before calling for service, please review the user's manual - a check of the Product's controls and features may save you a service call.
Important safety instructions
When using your telephone equipment, basic safety precautions should always be followed to reduce the risk of fire, electric shock and injury, including the following:
- Read and understand all instructions.
- Follow all warnings and instructions marked on the product.
- Unplug this product from the wall outlet before cleaning. Do not use liquid or aerosol cleaners. Use a damp cloth for cleaning.
![]()
Do not install the telephone base at a height above 2 meters.- Do not use this product near water such as near a bath tub, wash bowl, kitchen sink, laundry tub or a swimming pool, or in a wet basement or shower.
- Do not place this product on an unstable table, shelf, stand or other unstable surfaces.
- Avoid placing the telephone system in places with extreme temperature, direct sunlight, or other electrical devices. Protect your phone from moisture, dust, corrosive liquids and fumes.
- Slots and openings in the back or bottom of the telephone base and handset are provided for ventilation. To protect them from overheating, these openings must not be blocked by placing the product on a soft surface such as a bed, sofa or rug. This product should never be placed near or over a radiator or heat register. This product should not be placed in any area where proper ventilation is not provided.
- This product should be operated only from the type of power source indicated on the marking label. If you are not sure of the type of power supply in your home or office, consult your dealer or local power company.
- Do not allow anything to rest on the power cord. Do not install this product where the cord may be walked on.
- Never push objects of any kind into this product through the slots in the telephone base or handset because they may touch dangerous voltage points or create a short circuit. Never spill liquid of any kind on the product.
- To reduce the risk of electric shock, do not disassemble this product, but take it to an authorized service facility. Opening or removing parts of the telephone base or handset other than specified access doors may expose you to dangerous voltages or other risks. Incorrect reassembling can cause electric shock when the product is subsequently used.
- Do not overload wall outlets and extension cords.
- Unplug this product from the wall outlet and refer servicing to an authorized service facility under the following conditions:
- When the power supply cord or plug is damaged or frayed.
- If liquid has been spilled onto the product.
- If the product has been exposed to rain or water.
- If the product does not operate normally by following the operating instructions. Adjust only those controls that are covered by the operation instructions. Improper adjustment of other controls may result in damage and often requires extensive work by an authorized technician to restore the product to normal operation.
- If the product has been dropped and the telephone base and/or handset has been damaged.
- If the product exhibits a distinct change in performance.
- Avoid using a telephone (other than cordless) during an electrical storm. There is a remote risk of electric shock from lightning.
- Do not use the telephone to report a gas leak in the vicinity of the leak. Under certain circumstances, a spark may be created when the adapter is plugged into the power outlet, or when the handset is replaced in its cradle. This is a common event associated with the closing of any electrical circuit. The user should not plug the phone into a power outlet, and should not put a charged handset into the cradle, if the phone is located in an environment containing concentrations of flammable or flame-supporting gases, unless there is adequate ventilation. A spark in such an environment could create a fire or explosion. Such environments might include: medical use of oxygen without adequate ventilation; industrial gases (cleaning solvents; gasoline vapors; etc.); a leak of natural gas; etc.
- Only put the handset of your telephone next to your ear when it is in normal talk mode.
- The power adapter is intended to be correctly oriented in a vertical or floor mount position. The prongs are not designed to hold the plug in place if it is plugged into a ceiling, under-the-table or cabinet outlet.
- For pluggable equipment, the socket-outlet shall be installed near the equipment and shall be easily accessible.
![]()
Use only the batteries indicated in this manual. There may be a risk of explosion if a wrong type of battery is used for the handset. Use only the supplied rechargeable batteries or replacement batteries (BT162342/ BT262342) for the handset. Do not dispose of batteries in a fire. They may explode.- Use only the adapter included with this product. Incorrect adapter polarity or voltage can seriously damage the product.
- Base unit power adapter: Output: 6V DC @ 600mA.
- Charger power adapter: Output: 6V DC @ 400mA.

SAVE THESE INSTRUCTIONS
Battery
- Use only the batteries provided or equivalent. To order a replacement, visit our website at www.vtechphones.com or call 1 (800) 595-9511.
- In Canada, go to phones.vtechcanada.com or call 1 (800) 2677377.
- Do not dispose of the battery in a fire. Check with local waste management codes for special disposal instructions.
- Do not open or mutilate the battery. Released electrolyte is corrosive and may cause burns or injury to the eyes or skin. The electrolyte may be toxic if swallowed.
- Exercise care in handling batteries in order not to create a short circuit with conductive materials.
- Charge the battery provided with this product only in accordance with the instructions and limitations specified in this manual.
Precautions for users of implanted cardiac pacemakers
Cardiac pacemakers (applies only to digital cordless telephones): Wireless Technology Research, LLC (WTR), an independent research entity, led a multidisciplinary evaluation of the interference between portable wireless telephones and implanted cardiac pacemakers. Supported by the U.S. Food and Drug Administration, WTR recommends to physicians that:
Pacemaker patients
- Should keep wireless telephones at least six inches from the pacemaker.
- Should NOT place wireless telephones directly over the pacemaker, such as in a breast pocket, when it is turned ON.
- Should use the wireless telephone at the ear opposite the pacemaker. WTR's evaluation did not identify any risk to bystanders with pacemakers from other persons using wireless telephones.
About cordless telephones
- Privacy: The same features that make a cordless telephone convenient create some limitations. Telephone calls are transmitted between the telephone base and the cordless handset by radio waves, so there is a possibility that the cordless telephone conversations could be intercepted by radio receiving equipment within range of the cordless handset. For this reason, you should not think of cordless telephone conversations as being as private as those on corded telephones.
- Electrical power: The telephone base of this cordless telephone must be connected to a working electrical outlet. The electrical outlet should not be controlled by a wall switch. Calls cannot be made from the cordless handset if the telephone base is unplugged, switched off or if the electrical power is interrupted.
- Potential TV interference: Some cordless telephones operate at frequencies that may cause interference to televisions and VCRs. To minimize or prevent such interference, do not place the telephone base of the cordless telephone near or on top of a TV or VCR. If interference is experienced, moving the cordless telephone farther away from the TV or VCR often reduces or eliminates the interference.
- Rechargeable batteries: Exercise care in handling batteries in order not to create a short circuit with conducting material such as rings, bracelets and keys. The battery or conductor may overheat and cause harm. Observe proper polarity between the battery and the battery charger.
- Nickel-metal hydride rechargeable batteries: Dispose of these batteries in a safe manner. Do not burn or puncture the battery. Like other batteries of this type, if burned or punctured, they could release caustic material which could cause injury.
ECO mode
This power conserving technology reduces power consumption for optimal battery performance. The ECO mode activities automatically whenever the handset is synchronized with the telephone base.
Documents / ResourcesDownload manual
Here you can download full pdf version of manual, it may contain additional safety instructions, warranty information, FCC rules, etc.
Download VTech IS8251, IS8251-2, IS8251-3, IS8251-4, IS8251-5 Manual
Advertisement


Need help?
Do you have a question about the IS8251 and is the answer not in the manual?
Questions and answers