Table of Contents
Advertisement
Advertisement
Table of Contents

Related Manuals for VTech IS8151


Summary of Contents for VTech IS8151
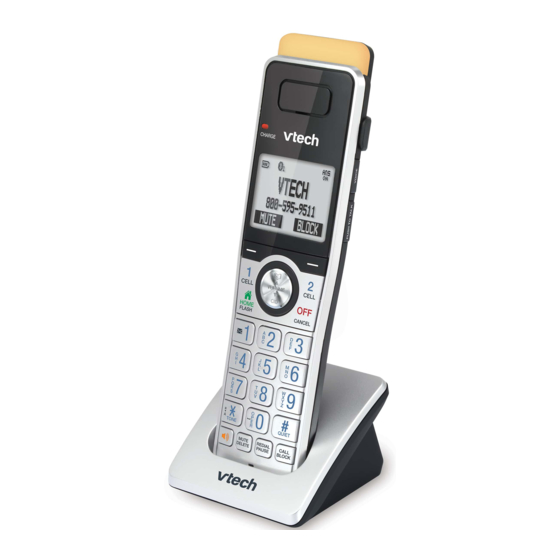
- Page 1 Go to www.vtechphones.com IS8151 IS8152-5 to register your product for IS8151-2 enhanced warranty support and IS8151-3 the latest VTech product news. IS8151-4 IS8151-43 IS8151-47 IS8151-5 DECT 6.0 Cordless telephone with BLUETOOTH® wireless technology For more support information Quick start guide...
-
Page 2: Important Safety Instructions
Important safety 8. Slots and openings in the back or bottom of the telephone base instructions and handset are provided for ventilation. To protect them from overheating, these openings must When using your telephone not be blocked by placing the equipment, basic safety precautions product on a soft surface such as should always be followed to reduce... - Page 3 other than specified access doors 15. Avoid using a telephone (other may expose you to dangerous than cordless) during an electrical voltages or other risks. Incorrect storm. There is a remote risk of reassembling can cause electric electric shock from lightning. shock when the product is 16.
-
Page 4: Battery
into a ceiling, under-the-table or surrounding environment cabinet outlet. that can result in an explosion or the leakage of flammable 19. For pluggable equipment, the liquid or gas. socket-outlet shall be installed » A battery subjected to near the equipment and shall be extremely low air pressure easily accessible. -
Page 5: Precautions For Users Of Implanted Cardiac Pacemakers
The electrolyte may be toxic if pocket, when it is turned ON. swallowed. • Should use the wireless • Exercise care in handling batteries telephone at the ear opposite the in order not to create a short pacemaker. circuit with conductive materials. About cordless •... - Page 6 at frequencies that may cause interference to televisions and VCRs. To minimize or prevent such interference, do not place the telephone base of the cordless telephone near or on top of a TV or VCR. If interference is experienced, moving the cordless telephone farther away from the TV or VCR often reduces or eliminates the interference.
-
Page 7: Table Of Contents
Important safety instructions Battery Precautions for users of implanted cardiac pacemakers About cordless telephones What’s in the box Connect and install Connect the telephone base Install the battery Connect the charger Charge the battery Install belt clip Improve the telephone signal strength Display Set up Date and time... - Page 8 Phonebook Add a phonebook entry Review phonebook entries Delete a phonebook entry Caller ID Review caller ID log entries Delete a caller ID log entry Save a caller ID log entry to the phonebook Dial a caller ID log entry Answering system About the built in answering system and voicemail service Built-in answering system VS Voicemail service...
- Page 9 California energy comission battery charging testing instructions Limited Warranty Disclaimer and Limitation of Liability Technical specifications...
-
Page 10: What's In The Box
What’s in the box 1 set for IS8151 2 sets for IS8151-2 3 sets for IS8151-3 4 sets for IS8151-4 5 sets for IS8151-5/ IS8152-5 1 set for IS8151-2 2 sets for IS8151-3 3 sets for IS8151-4 4 sets for IS8151-5/... -
Page 11: Connect And Install
Connect and install Connect the telephone base If you subscribe to digital subscriber line (DSL) high-speed Internet service through your telephone line, make sure you connect a DSL filter (not included) to the telephone wall jack. Install the battery Connect the charger... -
Page 12: Charge The Battery
Charge the battery 12 hrs Install belt clip Attach the belt clip Snap the belt clip into the slots on both sides of the cordless handset. Remove the belt clip Lift either of the belt clip tabs outwards from the handset. -
Page 13: Improve The Telephone Signal Strength
Improve the telephone signal strength Note NOTES NOTE • To avoid interference, place the telephone base in a central location of the house and at least 3 feet (1 meter) away from thick walls as well as other household appliances such as, TV, radio, microwave oven, Wi-Fi router, large mirror, metal furniture and fish tank. -
Page 14: Display
Display Handset Telephone base 12:05PM 12:05PM HANDSET Jun 13 Jun 13 REDIAL MENU 12:05 7/25 MENU MENU HANDSET • Option displayed above a softkey. 7/25 MENU • Press to select. The handset battery low and needs charging. The handset battery is charging. Handset indicated the handset number. -
Page 15: Set Up
Set up 1. Enter the After you install your date. telephone or power returns following a power outage and battery depletion, the handset and telephone 2. Press base will prompt you to NEXT. set the date and time, and to configure the Smart call blocker* and answering 3. -
Page 16: Voice Guide For Smart Call Blocker / Answering System
Voice guide for Smart When the handset and telephone base prompt call blocker / Answering you to set up the Smart call system blocker through voice guide, press YES. After setting the date and time, the handset and telephone base will prompt if you want to set Smart call blocker and the answering system. -
Page 17: Operate
Operate When the handset and telephone base prompt you Make a home call to set up the Answering system through voice guide, Handset press YES. 1. Press 2. Enter the phone number. Telephone base 1. Press You will hear:- 2. Enter the phone number. “This voice guide will assist Make a cell call you with the basic setup of your... -
Page 18: Answer A Cell Call
Handset Telephone base Press Press End a cell call Telephone base Return the handset to the Press telephone base or charger. -OR- Answer a cell call Handset Press any dialing keys on the handset / telephone base to Press answer. -OR- Telephone base Handset Press... -
Page 19: Lcd Language Setting
LCD language Add a Blueooth cell phone setting Telephone base If you accidentally set the LCD language to Spanish or French, press MENU and then enter 364# to change the handset LCD language back to English while the handset is not in use. -
Page 20: Add A Blueooth Headset
1. Press MENU. 2. Press p/q to scroll to Bluetooth, then press SELECT. 5. Press NEXT. 6. Press NEXT. SELECT to select Add 3. Press 7. Once your cellphone device. finds your telephone (VTech DECT 6.0), press appropriate key on your... -
Page 21: Download A Cell Phone Phonebook
Download a cell phone phonebook Telephone base Before downloading a phonebook, make sure the cell phone is paired, active, and connected to your IS8151. 5. Press NEXT. 1. Press MENU. 6. Press NEXT. 2. Press p/q to scroll to Bluetooth, then press... -
Page 22: Activate Remote Voice Control
Activate remote voice control Make sure your cell phone is paired and connected to your telephone system through Bluetooth. 3. Press p/q to scroll to 1. Press VOICE. Download PB, then press SELECT. Handset Telephone base 4. Press NEXT. • The cell phone phonebook is downloading. -
Page 23: Phonebook
3. Press NEXT. 4. Press to scroll 3. Press END. to the Phonebook desired label then The phonebook can store press up to 4200 entries, including NEXT. downloaded cellphone phonebooks, which are shared by all handsets and the telephone base. Each entry 5. -
Page 24: Review Phonebook Entries
Review phonebook Delete a phonebook entries entry When your desired phonebook entry displays: 1. Press 2. Press p/q to choose the desired 1. Press on the phonebook, handset, or press DELETE then press on the base. REVIEW. 3. Press p/q to browse the entries. -
Page 25: Caller Id
Caller ID Telephone base If you subscribe to caller ID service, information about each caller appears after the first or second ring. The caller ID log stores up to 50 entries. Each entry has up to 24 digits for the phone 1. -
Page 26: Save A Caller Id Log Entry To The Phonebook
Telephone base 3. Edit the phone number if needed, then press NEXT. 4. Press p/q to scroll to the desired Press DELETE to delete. label, then Save a caller ID log press NEXT. entry to the phonebook 5. Edit the name if When you desired caller needed,... -
Page 27: Answering System
Answering system About the built in answering system and voicemail service For message recording, your telephone has a built-in answering system, and it also supports voicemail service offered by your telephone service provider (subscription is required, and fee may apply). Built-in answering system VS Voicemail service Built-in answering Voicemail service... -
Page 28: Turn On Or Off The Built-In Answering System
• Press on the telephone base; OR • Press on the • Press MENU, and dialpad, and enter then select Play Retrieve messages an access number messages on the from your telephone handset; OR service provider. • Access remotely with an access code. -
Page 29: Message Playback
Message playback 2. Press p/q to Handset scroll to Answering sys, then press SELECT. 3. Press p/q to Press MENU, then press scroll to SELECT to select Play Ans sys messages. setup, Telephone base then press SELECT. 4. Press p/q to Press PLAY/STOP scroll to # of rings,... -
Page 30: Repeat The Current Message
Play the previous Telephone base message Handset Press SKIP Repeat the current message Handset REPEAT Press twice to play the previous message. Telephone base Press REPEAT to repeat the current message. Press REPEAT twice. Telephone base Press REPEAT... -
Page 31: Delete All Messages
Delete all messages Telephone base Handset 1. Press Press DELETE MENU. twice. 2. Press p/q to scroll to Answering sys, then press SELECT. 3. Press p/q to scroll to Delete all old, then press SELECT. 4. Press YES. -
Page 32: Need Help
• 1 (800) 267-7377 [in Canada] for help. • Go to https://help. vtechphones.com/is8151; • Scan the QR code on the right. Launch the camera app or QR code scanner app on your smartphone or tablet. -
Page 33: For C-Ul Compliance Only
For C-UL compliance tomber et être sérieusement endommagé. only 7. Évitez d’installer le système téléphonique dans les endroits Mesures de sécurité soumis à une température importantes extrême, à la lumière directe du soleil ou à proximité immédiate d’autres appareils électriques ou Afin de réduire les risques électroniques. - Page 34 électrocution. prise de courant et communiquez avec le département de service à 16. N’utilisez pas le téléphone pour la clientèle de VTech dans les cas rapporter une fuite de gaz à suivants: proximité de la fuite. En certaines »...
- Page 35 l’adaptateur est branché à une PRISE DE COURANT, le socle de prise de courant, ou lorsque le prise de courant doit etre installe a combiné est déposé sur le socle. proximite du materiel et doit etre Ceci est un événement commun aisement accessible.
-
Page 36: Pile
haute température pouvant • N’ouvrez pas et ne mutilez pas provoquer une explosion ou la pile. L’électrolyte qui s’en la fuite de liquide ou de gaz échapperait est corrosif et pourrait inflammables. causer des brûlures ou des blessures aux yeux ou à la peau. »... -
Page 37: À Propos Des Téléphones Sans Fil
• Ils doivent tenir le téléphone sans combiné sans fil. Pour cette raison, fil à une distance d’au moins six vous ne devez pas percevoir les pouces du stimulateur cardiaque. communications téléphoniques sans fil comme étant aussi • Ils ne doivent PAS placer le confidentielles. -
Page 38: The Rbrc® Seal
(800) 8 BATTERY® for information on Ni-MH battery recycling and disposal • Les bloc-piles rechargeables à bans/restrictions in your area. VTech’s l’hydrure métallique de nickel: involvement in this program is part Jetez ces blocs-piles de manière of its commitment to protecting our écologique et sécuritaire. -
Page 39: Fcc Part 68 And Acta
interference to radio or television amount of radio frequency energy reception, which can be determined that can be safely absorbed by a by turning the equipment off and user or bystander according to the on, the user is encouraged to try to intended usage of the product. - Page 40 The plug and jack used to connect qualified installer. this equipment to premises wiring If this equipment is malfunctioning, and the telephone network must it must be unplugged from the comply with applicable Part 68 rules modular jack until the problem and technical requirements adopted has been corrected.
-
Page 41: Industry Canada
emergency telephone numbers (REN) for this terminal equipment is (e.g., police, fire, medical) in these 0.1. The REN indicates the maximum locations. If you do store or test number of devices allowed to be emergency numbers, please: connected to a telephone interface. The termination of an interface may Remain on the line and briefly explain consist of any combination of devices... - Page 42 Canada. 2. Put the handsets on the telephone base cradle to begin registration. What will VTech do if the 3. The telephone base shows Product is not free from Registering... Please wait, defects in materials and...
- Page 43 The limited warranty period Product”)? for the Product extends for ONE (1) YEAR from the date During the limited warranty of purchase. If VTech repairs period, VTech’s authorized or replaces a Materially service representative will Defective Product under the repair or replace at VTech’s...
- Page 44 5. Product to the extent that extreme humidity or heavy the problem is caused perspiration, sand, dirt or by use with non-VTech the like; but then only to accessories; the extent the damage was 6. Product whose warranty/...
- Page 45 1 (800) 595-9511. VTech will notify you and will In Canada, go to www. request that you authorize vtechcanada.com or call 1 the cost of repair prior to any (800) 267-7377.
- Page 46 This warranty is the complete Some states/provinces do and exclusive agreement not allow limitations on how between you and VTech. It long an implied warranty supersedes all other written lasts, so the above limitation or oral communications may not apply to you.
- Page 47 Please retain your original sales receipt as proof of purchase Disclaimer and Limitation of Liability VTech Communications, Inc. and its suppliers assume no responsibility for any damage or loss resulting from the use of this user’s manual. VTech Communications, Inc.
- Page 48 The Bluetooth® word mark and logos are owned by Bluetooth SIG, Inc. and any use of such marks by VTech Holdings Limited is under license. VTech Holdings Limited is a member of Bluetooth SIG, Inc. Other trademarks and trade names are those of their respective owners.
Need help?
Do you have a question about the IS8151 and is the answer not in the manual?
Questions and answers