Insignia NS-P10DVD11 Quick Setup Manual
10" portable dvd player
Hide thumbs
Also See for NS-P10DVD11:
- Manual de l'utilisateur (29 pages) ,
- Guía del usuario (29 pages) ,
- User manual (27 pages)
Table of Contents
Advertisement
Quick Links
Download this manual
See also:
User Manual
Features
Congratulations on your purchase of a
high-quality Insignia product. Your
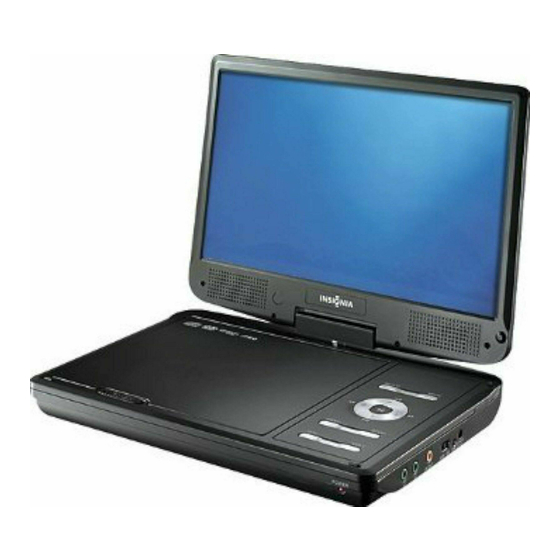
Front
10" Portable DVD Player is designed
for reliable and trouble-free
performance. Use this guide for initial
setup. See your User Guide for more
information.
Package contents
• 10" DVD player
• Remote control with battery
• AC to DC adapter (for wall outlet)
• Car adapter
• A/V cable
• Quick Setup Guide
Side
Top
S E T U P
W ID E
ME N U
S TO P
V O L -
V O L +
1 Headphone jacks Plug headphones into either jack. Note: When headphones are plugged in
the internal speakers are muted.
2 AV OUT jack
Connect a remote monitor, TV, or amplifier to this jack using the supplied
A/V cable and an RCA cable (not supplied).
3 On/Off switch
Slide to turn your DVD player on or off.
4 Charge indicator
Lights red when the battery is charging. Turns off when the battery is charged.
5 DC IN jack
Connect the AC to DC adapter or car adapter to this jack.
1 OPEN switch
Slide to the right to open the disc tray.
2 LCD screen switch
Press to turn LCD screen o .
3 SETUP button
Press to open or close the Setup menu.
4 WIDE button
Press to switch between a 16:9 and 4:3 picture size (aspect ratio).
5
(play/pause) button
In menu mode, press to con rm a selection.
In playback mode, press to play or pause a disc.
6 ◄◄ (fast rev)/◄ (left) button
Press to fast reverse or move left on a menu.
►►(fast fwd)/ ►(right) button Press to fast forward or move right on a menu.
(prev)/ ▲(up) button
Press to go to the previous chapter, track, or scene during
playback, or to navigate up on a menu.
(next)/ ▼(down) button
Press to go to the next chapter, track, or scene during playback,
or to navigate down on a menu.
7 MENU button
Press to open the root or title menu on a disc.
8 STOP button
Press to stop disc playback.
9 VOL–/+ button
Press to adjust the volume.
10" Portable DVD Player I NS-P10DVD11
1 IR sensor
Receives signals from the
remote control. Do not block.
2 POWER indicator Lights green when your
player is turned on. Blinks
green when the battery
needs charging.
Quick Setup Guide
Setting up your player
Connecting to AC power
To connect to AC power:
• Plug one end of the AC to DC power adapter into the DC IN jack on the side of
your player, and the other end into an AC outlet.
Connecting to a 12V car power outlet
To connect to a 12V car power outlet:
1 Plug one end of the car power adapter into the DC IN jack on the side of your
player.
2 Plug the other end of the adapter into a 12V car power outlet or car cigarette
lighter socket.
Charging and using the built-in battery
To charge and use the built-in battery:
1 Connect the supplied AC power adapter or car power adapter to the DC input
jack on the player, then plug the adapter into an AC power outlet or car
power outlet. When the battery is charging, the charge indicator LED turns
red. When the battery is fully charged, the indicator turns o .
2 Unplug the power adapter when the battery is fully charged, then you can
use your player by using the built-in battery.
Note
During playback, an icon
appears on the screen, and the power
indicator LED ashes green, which means the battery has low power and
you should recharge the built-in battery now.
Advertisement
Table of Contents

Subscribe to Our Youtube Channel
Related Manuals for Insignia NS-P10DVD11


Summary of Contents for Insignia NS-P10DVD11
-
Page 1: Setting Up Your Player
Quick Setup Guide 10" Portable DVD Player I NS-P10DVD11 Features Setting up your player Congratulations on your purchase of a Connecting to AC power high-quality Insignia product. Your Front To connect to AC power: 10" Portable DVD Player is designed... - Page 2 2 to 4 to 8 to 16 to 32 times the normal speed. other end of the supplied AV cable. Make sure that the colors on the © 2011 BBY Solutions, Inc., Inc. All rights reserved. INSIGNIA is a trademark of BBY Solutions, Inc. • Press to fast-reverse on the disc.
Need help?
Do you have a question about the NS-P10DVD11 and is the answer not in the manual?
Questions and answers