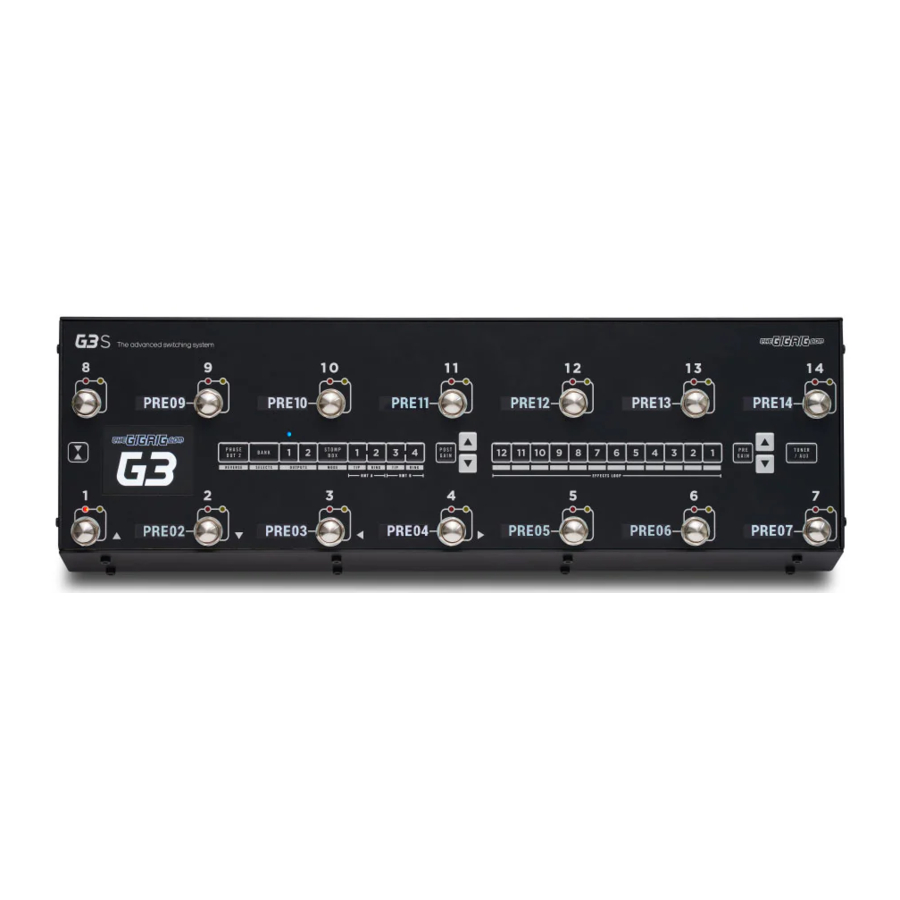
GigRig G3, G3S Manual
- Quick start manual ,
- User manual (32 pages) ,
- User manual (25 pages)
Advertisement
INTRODUCTION
On behalf of myself and my team, thank you for buying G3/ G3S. When we launched G3 in 2020 we introduced the world to a new level of control over effects pedals. We started from scratch and designed G3 from the ground up, obsessively testing and retesting every aspect of its design to ensure we delivered the most robust, fully featured, tonally transparent switching system in the world. However, there was one feature that we were continually asked for, a feature I had wanted for the longest time and this is when in 2023 we introduced G3S.
G3S functions the same in every regard as G3 with the addition of digital scribble strips in the form of OLED screens next to each footswitch. G3 and G3S are an expression of our passion: we compromised on nothing.
After years of design and testing G3/G3S with every scenario imaginable, I can honestly say I'm so excited for you to dive in and explore its possibilities. Using a mix of the fully movable loops, phase reversible parallel blend, programable stereo output voltage-controlled amplifiers and stereo trails, I've been achieving some of the most inspirational sounds I've ever had. I cannot wait to see what you do with it.
I am so proud to head a team who are passionate about ensuring you have the best experience possible using our gear. If there's any way we can help you, please get in touch Daniel Steinhardt
CONNECTIONS

All of G3/S' connections are made via the back panel.
- INPUT - Connect your guitar here. Seems obvious, but this is the input.
- TUNER/ AUX OUT - This is where we would send a signal to our tuner so we can tune silently on stage, but this send includes a TRS Return, so effectively you can use it as another effects loop.
- EFFECTS LOOPS - There are 12 mono effects loops in G3/S that can be configured in any way you like. You can pair them for stereo effects, connect them to your amplifier's preamp (four cable method), connect your volume pedal, basically anything that you would use in effects loop gets connected here. The loops can also be re-ordered in any sequence you like. The loops can also be configurated in parallel, wet/dry, or sending different effects to different outputs.
- OUTPUTS - These two outputs are where we connect to our amplifiers, or audio interface.
- REMOTE SWITCHES - This pair of TRS remote switches which is programmable from the front panel G3/S is ideal for changing the channels in your amplifier, controlling tap tempo effects, the control of anything that uses the latching or momentary switches.
- BANK REMOTE SWITCH - Simply connect a momentary switch into the BANK input and you will be able to control your G3/S banks remotely. BANKING up is a simple as tapping the momentary switch and banking down simply hold the switch down and you will see the bank numbers start to descend. PLEASE NOTE – a latching switch will NOT work here.
- MIDI IN & OUT - This is where you connect your midi in and midi out cables from G3/S to control your midi effects. The connection is a standard five pin DIN cable.
- POWER - 9V DC - G3/S uses a standard sent a -9 V DC input connection. G3/S operates around 850 mA of current so it is important that your power supply can provide enough carrots otherwise G3/S will not operate correctly. The GigRig generator power supply is included with your G3/S other suppliers that do work include Strymon, pedal power, true tone.
- EXPRESSION PEDALS - EXP1 & EXP2 - G3/S has two expression pedal ports, using a TRS connector. This can be used to control MIDI CC info as well as being able to control the PRE GAIN and POST GAIN levels.
CONNECTION EXAMPLES:
- CONNECTING MONO EFFECTS
The way we'll mostly be using these effects loops is to connect our pedals. So the effects SEND from a G3/S loop is connected to the pedal INPUT, then the pedal OUTPUT is connected to the G3/S effects loop RETURN. So, if you are using a single amp or dual mono setup as per the above diagram you have 12 effects loops that you can use.

- CONNECTING STEREO EFFECTS
We designed G3/S to be able to PAIR mono loops to be used in stereo. If you don't use stereo you have 12 mono loops. If you use one stereo effect, you can simply pair 2 loops.
If you want 3 stereo effects, you can pair loops 7/8, 9/10, 11/12 to be stereo and still be left with 6 mono loops, you can have 5 stereo effects and 2 mono loops, or 6 stereo effects, its entirely up to you.
To pair loops to be used with stereo effects, simply go into the menu, then to GLOBAL. Scroll to STEREO PAIRS and select the loops you want to pair. You'll see a small red LED between the pairs indicating that those two loops are now set up in stereo. Select the stereo loop by pressing either of the paired loops.

- CONNECTING AMPLIFIERS' EFFECTS LOOP
There are three important steps to connecting to your amplifier's effects loop.
The best way I find to explain this is to think of your amp's preamp as another pedal. Your preamp is connected to your amp's power amp section, and this is where the amp's FX LOOP sits, between the preamp and power amp.

- First, workout which G3/S loop you want to use to connect to your amp's FX LOOP. Any G3/S effects loops BEFORE the loop you connect to your amplifier will effectively be BEFORE the amp's preamp. Any G3/S loops AFTER the G3/S loop connected to the amp will effectively be AFTER the amp's preamp.
- Connect the SEND from the chosen G3/S effects loop to the input of the amplifier.
- Connect the EFFECTS SEND from the amplifier to the G3/S loop RETURN. The preamp is now in that loop of G3/S.
- Connect OUT1 to the effects RETURN.


Now that the amplifiers effects loop is connected to G3/S, we have to turn it on. You'll need to go through every pre-set and turn on your chosen loop. If you don't do this your signal from G3/S will head straight to your amps POWER AMP, bypassing the preamp and its not going to sound great.
PROGRAMMING
Most of the programming of G3/S is done via the top panel.
Everything is laid out in a simple, logical order to keep the experience as intuitive as possible.
PRE-SET PROGRAMMING
Pre-sets are at the heart of G3/S's functionality. Whether you are controlling MIDI or adding stomp box mode, it all happens within a pre-set.

- Starting with a simple pre-set. Select the pre-set that you want to programme using the footswitches on G3/S.
![]()
- Having selected the pre-set, turn on the loops and functions you want to associate within that pre-set. Your pre-set is now stored - there is no save button.

- Move to a new pre-set and do the same thing. Simply turn on The loops and G3/S functions that you want to access with the new pre-set. Now as we switch between those two programmed pre-sets, you will see that from one pre-set to the other the loops and functions automatically turn on and off depending on what you have programmed in each pre-set.


There are 14 standard pre-sets plus 14 hidden presets in each of G3/S's 99 banks.
STOMP BOX MODE

One of our favourite features of G2 was stomp box mode, so we have expanded on this in G3/S to make it even more powerful. Stomp box mode allows you to add a loop or any combination of loops and functions on top of a G3/S preset. For example, Let's say I have a rhythm sound setup and all I want to do is boost that rhythm sound. There's no need for me to create a new pre-set, all I need to do is to create a stomp box mode preset that has a boost in it. That way I can boost any standard preset simply by adding my stop box mode preset. (In DEEP EDIT mode you can choose between 3 different types of Stomp – Standard, Sticky and Flash (check in the deep edit guide for more info).

- Select the preset that you want to create a stomp box mode preset using the footswitches.
- Turn on the loop or the function that you want to add to another preset. It is important that you only select the function or loop that you want to add and turn everything else off including the outputs. If your boost is in loop 7 and that is what you want to be able to add in stompbox mode, simply turn on loop 7 and make sure that every other function and loop is turned off.

- Now press stompbox. You will see a yellow light turn on next to the preset, this indicates that this preset is now in stompbox mode.
![]()
- Go to a normal preset, you will see the yellow light of the stompbox mode preset stays indicating that this is a stompbox mode preset and is ready to use.
![]()
- Now try adding your stompbox mode preset to your normal preset you will see loop 7 is to whatever loops you already had programmed in your normal preset.


You can create as many stompbox mode presets as you like. In Standard Stompbox mode, as soon as you go back to a normal preset you clear the stompbox mode presets.
The Stompbox modes are as follows:
'Normal' - Meaning the Stompbox mode enabled footswitch is latching and can be added onto of other stompbox mode enabled footswitches as well as 'regular' (no orange light) footswitches, when you press a regular footswitch any 'normal' stompbox mode enabled footswitches will be bypassed.
Sticky - Same function as normal, except footswitches in the 'sticky' mode will only dis-engage when it's footswitch is pressed a second time (it will remain on regardless of regular or stompbox enabled footswitch presses)
Flash - Makes a Stompbox enabled footswitch momentary
Flip Flop 1 - This mode enables you to A/B between other flip flop enabled stompbox mode footswitches. This means that if for example footswitches 5/6 are setup in the flip flop 1 mode. You could press footswitch 5 to 'add it' (add any functionality) to an existing footswitch. If however you then pressed footswitch 6, this would dis-engage footswitch 5 and engage footswitch 6.
If you then pressed another 'regular' footswitch, FootSwitch 6 would be disengaged.
Flip Flop 2 - Gives you a second group of 'A/B-able' Stompbox mode FootSwitches in the same bank.
Flip Flop 1 Sticky - combines flip flop and sticky meaning, it has the same functionality as the flip flop mode, but doesn't disengage when you press 'regular' footswitches.
Flip Flop 2 Sticky - give you a second group of flip flop sticky stompbox's on the same bank.
CHANGING BANKS
You can access G3/S's 99 Banks in one of three ways:

- Press the 'Bank Select' switch once on the top panel. Pressing it once. It will scroll up the Banks and pressing and holding will scroll down the Banks. (Please note that whatever preset you are on you will stay on until you have selected a new preset in your newly chosen bank)

- Bank Remote Switch (on back panel) - Use the remote bank switch on the back of G3. Here you can connect the GigRig Bank Manager or any momentary switch to control access to your G3/S banks.
![]()
- Footswitch Assign - In the Deep Edit menu, in global settings, you have the option to assign a bank up and a bank down switch to a G3/S footswitch. Once done, simply tap the foot switch to go up a Bank / press and hold to go down the Banks.
![]()


DEEP EDIT
INTRO TO THE DEEP EDIT FUNCTIONS
To the left-hand side of the LCD screen you will see the Deep Edit button.
This button gives you access to the deeper level of functionality that G3/S has to offer.
Except for the Global Setup, the Deep Edit functions are associated within each preset, so before we jump into the deep edit functions, we must first choose the preset we want to edit.

NAVIGATING DEEP EDIT
Next to footswitches 1,2,3 and 4 you will see these symbols - 

You will use these footswitches to navigate around the Deep Edit menu.
On pressing the ![]() button, the LCD screen will display the following:
button, the LCD screen will display the following:
- NAME - This is where we edit the name of the preset
- MIDI - This is where we edit the G3/S's MIDI functionality
- EXPRESSION - Assign your Expression Pedal parameters
- LOOP ORDER - Change the order of your effect's loops
- STOMPBOX – Determine if Stompbox mode on this preset is Standard, Sticky, Flash, Flip-Flop1/2 and FlipFlop Sticky 1/2
- TRAILS - Set up your effects Trails/Spill-over
- PARALLEL – Set up parallel or Wet/Dry signal chains
- TAP TEMPO - Using a combination of remote switches and MIDI CC messages to enable Tap Tempo
- HIDDEN PRESET - Each preset in G3/S has a separate fully programable hidden preset
- GLOBAL SETTINGS - setup global options including stereo pairs, Bluetooth, MIDI IN, etc
NAME - NAMING PRESETS
With this highlighted in the menu, press ![]() and you will see the flashing cursor.
and you will see the flashing cursor.
Move the cursor across using ![]() buttons and scroll up and down through the character set using
buttons and scroll up and down through the character set using 
Once you are done, either use  to get back to the main menu or press
  to exit.

MIDI
Enter the MIDI menu.

G3/S's MIDI capability allows you to send up to 20 individual MIDI messages on each preset. These can be PC (Program Change), CC (Control Change), or midi sequencer messages.
G3/S also has a MIDI Clock and a separate MIDI tap tempo feature.
Once on the MIDI menu screen you will be able to scroll down  to each of the 20 available midi messages for this preset.

The different modes of Midi are introduced from software version 512, to add more functionally to what you can do.
Here's an explanation of each symbol:
PC+: Adds a Program Change message to the preset
CC+: Adds a Continuous Control message to the preset
PC~: Sends a PC message when you turn off a StompBox mode preset with a second press
CC~: Sends a CC message when you turn off a StompBox mode preset with a second press
PC–: Sends a PC message when you leave a standard or StompBox flip/flop preset
CC–: Sends a CC message when you leave a standard or StompBox flip/flop preset
PCs: Sends a PC message as part of the MIDI sequencer
CCs: Sends a CC message as part of the MIDI sequencer
NULL: Act's as a 'rest' for the onboard MIDI sequencer

PC* & CC*: This mode is to specifically to link two G3s together and have them control each other

For example, if you want Preset Number 1 on G3/S to activate Preset 7 on a Strymon Timeline, enter the MIDI menu and enter the MIDI Channel that the Timeline is on. Next, enter the 'PC' number that corresponds to the preset on the Strymon that you want to engage (07).
You can repeat this process up to 20 separate times per individual preset.

To Set Up Control Change (Cc) Messages.
Simply scroll right to the MIDI menu, choose the Type 'CC' from the list. Choose the MIDI channel you want to send your message on, then choose the Control Change (CC) value and the number you want to send.
If you are after a specific feature in your MIDI controlled pedal, look up the MIDI table in your pedal's manual.
EXPRESSION PEDAL MIDI

This is the same procedure as the above,
Select Expression Pedal from the MIDI type list and choose the channel number the control number, scroll right and choose the heel down position number and the toe down position number.

It is important to set the heel and toe values. For example, when controlling the mix value on a Strymon Timeline. If you only associated your expression pedal with the mix knob on the Strymon Timeline you would go from completely dry in the heel down position to completely wet in the toe down position with no dry signal at all.
To go from completely dry to adding the delay effect, but leaving the dry signal intact, we want to stop our mix control at the halfway point so the heel down position would be 0 the toe down position would be 64.
If you simply want to go from a light delay to a heavier delay you can increase the value of the heel down position so that when you use your expression pedal, you still have a small bit of delay in the heel down position.
There are two expression pedal inputs in G3/S so you have the choice of which expression pedal you want to use to send out your CC commands.
EXPRESSION PEDAL PRE/POST GAIN

On top of all the MIDI functionality that is available with the expression pedals, you also have the option to set up the expression pedals to control the pre and post gain in G3/S. A really great way to use the expression pedal is as a volume control, using the Pre Gain to control the levels going into your effects or using the post gain as a master volume control.
Select Expression from the main menu, then scroll to select whether you would like to use Pre Gain or Post Gain, select your heel and toe values and your expression pedal will now control pre and post gain levels. Remember you must have your Pre or Post Gain selected on this preset to be able to control the levels with your expression pedal.
Tap Tempo
The Tap Tempo feature on G3/S is designed to be a flexible as possible. If you have a preset that uses Tap Tempo you can the same preset to tap your tempo information. You can also set up your Tap Tempo on its own preset so you have a master Tap Tempo footswitch.

- Navigate to Tap Tempo on the main menu
- Choose the type of Tap Tempo you want to use. You have the choice of CC, RMT1, RMT2, RMT3 or RMT4
If you choose CC, enter the MIDI information of the pedal you want to control. Channel number, Control number and value.
If one of the Remote Switches is selected, it will send a pulse from the Remote Switch as you tap.
G3/S gives you the ability to send up to 3 different Tap Tempo commands per preset. PLEASE NOTE If you choose CC for Tap Tempo this will happen alongside any other MIDI commands sent at the same time from the MIDI menu. The difference here is that you Tap Tempo information is sent every time you press the preset, whereas the MIDI information form the preset is sent only with the first press.
MIDI CLOCK

G3/S's MIDI CLOCK enables you to send a MIDI clock message that can sync all your clock input enabled time-based effects. You can send this message out on individual MIDI channels or you can send this out on Omni which is all MIDI channels simultaneously.
LOOP ORDER

Being able to arrange the order of your effects has a massive impact on the sound. Are you putting your Delay into your Tremolo? Is your Boost going into your OverDrive or your OverDrive going into your Boost?
With G3/S you can move any G3/S effects loop or loops in any order you want, and the process could not be simpler.

Go to loop order on the menu, scroll right and you will see 3 lines of numbers - 1 through to 12 which correspond to your effects loops - Use the EFFECTS LOOPS buttons on the top board off G3/S to enter the numbers in the order that you want to use them. You will see the numbers start changing positions. It is that simple.

Once you've done that and have exited the deep edit menu you will still need to turn on the effects loops on the preset but they will be in the order that you have determined in the loop order function.
STOMPBOX
The standard stomp box mode Is the same on G3/S as it was in G2. If you want to be able to add your delay on top of any other preset in G3/S;
- Select to the preset that you want to use
- Turn on your delay loop using the effects loop buttons (make sure every other function including outputs and other effect loops are turned off.)
- Press the stompbox button and the small yellow stompbox light will come on next to the preset. This indicates that this preset is now set up in stomp box mode.
If you now go to a standard preset and press the stompbox mode preset that you have just set up, you will notice that it adds your delay to the sound of the original preset. You can set up as many stop box mode presets as you like and add them on top of your standard or core tone presets.
There are 3 Stompbox modes in G3/S; Standard, Sticky and Flash.
Standard is the default setting, to select either of the other two modes you will need to enter the DEEP EDIT MENU, scroll down to STOMPBOX, and select the stompbox mode you want BEFORE you create your stompbox mode preset.
Standard – (As detailed above) A normal preset will clear any standard Stompbox mode presets.
Sticky Stomp – Once you turn on a Sticky Stomp preset, it will NOT be cleared by pressing a normal preset the same way a standard STOMPBOX mode preset does. It will stay active until you turn it off by pressing the footswitch. For example, if you have an effect that you like to have on most of the time such as reverb, but like the option to be able to turn it off, set the reverb pedal up on a sticky stomp foot switch and it will stay on until you decide to turn it off.
Flash Stomp - This sets up your stomp box mode in momentary mode so that the stomp box preset will only be on while you have got your foot pressed down on the foot switch. Imagine you have got a delay set on the edge of self-oscillation and you just want to be able to kick it on every now and then, Flash function is perfect for that
Editing a StompBox Mode Preset - All you really need to remember about editing stompbox mode presets is that while the yellow light is on the preset, that preset is locked and cannot be edited. To edit a stompbox mode preset simply select it, then press the stomp box mode button. This will take that preset out of stomp box mode and you can then edit it freely. Once you have edited that preset, you can press the stop box mode button again to put it back into stomp box mode. To edit a flash mode preset just press and hold the preset while you press the stompbox button.
TRAILS

Because of G3/S's new stereo voltage-controlled amplifiers on the output, we are delighted to be able to offer you true Stereo Trails/Spill-over.

- Select the preset you want your reverb and delay trails to spill-over onto.
- Go to trails in the menu scroll right and turn on trails for the preset.
- Select the loop or loops that feature delay and reverb that you would like to spill-over onto on top of my rhythm sound.
Remember you set up trails on the preset you are going to, not the preset that you have come from. For example, I want my delay and reverb from my solo sound spilling over on top of my rhythm sound so I would set trails up on my rhythm sound. Once you have done this, anytime you land on this preset from a preset that has delay and reverb that you've selected within the trails mode loops, you will get delay spill-over.
Tip - if you are using a MIDI controlled pedal for your delay, you need to make sure that either your rhythm sound is not changing the delay preset or you have the ability to turn on trails like you do in the Strymon Timeline. Otherwise, when the presets change on the MIDI control device, it will terminate any trails from that sound. The easiest way to achieve this is to turn off any midi messages being sent to your delay from your rhythm/spill-over sound.
PARALLEL
The parallel features in G3/S is the key to setting up effects in parallel, wet dry, even sending different effects to different amplifiers.
The idea behind parallel is simple, it means that at some point in your signal path you split your signal and you send that signal to different effects then either join that signal path again or continue with the split signal being sent to different outputs.

The one thing that we were adamant we would do, before a proper parallel feature, was the ability to flip the phase on the parallel line. This is crucial as you run a high percentage of risk of the effects in the parallel line being out of phase with the effects on the normal line. If the effect is out of phase you will hear a cancellation a frequency. A great example of this is if you set up a parallel signal path with no effects selected and you flip the phase in G3/S you will hear a complete cancellation of your guitar signal.

SETTING UP PARALLEL

Go to menu, scroll down to parallel and then scroll to the right to turn on a parallel signal path. now we are going to select where we split our signal.
If you want to split the signal at the input simply choose before loop 1, or if you want to split the signal before your Overdrive in loop 3 simply choose before loop 3. We now have two separate signals: our standard signal and our parallel signal.
Then you need to choose if you want to re-join the signal or not. If you want to re-join, select the loop that you want to join after. If not, the standard signal will continue along to output 1 and the parallel signal will continue along to output 2.
Next you need to select the loops you want to add to your parallel signal. Remember that you have made a second signal path, so you need to tell G3/S what affects loops you want to send to your parallel signal path. Please note that you are assigning loops to your parallel signal path here but you will still need to add them to the preset by pressing/selecting the effects loops on the top panel when you exit deep edit mode.
Here are some examples:
EXAMPLE 1 - PUTTING AN OVERDRIVE AND DISTORTION IN PARALLEL

This is a really great way to explore some creative and unique gain tones. It is very different from connecting them in series. Say your OverDrive is in loop 2 and our Distortion is in loop 3. You want to put your Distortion in parallel without Overdrive, so you split before loop 2 and re-join after loop 3. Now try flipping the phase and you will hear in one direction; it will sound full and in the other direction it will sound thin, the 'full' sound means that they are in phase and the frequencies are not cancelling each other out. Generally, this is a more appealing sound.
EXAMPLE 2 - WET / DRY

I've always loved the sound of a wet dry rig where you have all of your gain tones going to both amplifiers but your delays and reverbs only being sent to 1 amplifier, it sounds massive.
To achieve this, we split our signal after our gain tones. For instance, you split the signal before loop 4 and select no re-join. You, therefore, send your signals from here to separate amplifiers. Anything that you select from this point, on the parallel signal path, will go to output 2. Anything else will go to output one so you can have a sound with your OverDrives going to both amplifiers, Delays going to one amplifier and modulation going to another. It really is a fantastic way two explore some unique sounds. If you run into phase problems, use the programmable phase button on the top panel.
EXAMPLE 3 - PARALLEL WITH STEREO

This is basically the same as your Wet/ Dry rig, where you do not have a join after you split the signal. Any stereo effects that you add from this will be added into the signal path, keeping the signal path separate. It's important that the effect be true stereo with LEFT and RIGHT inputs
PARALLEL X 4
PARALLEL X 4 enables you to have up to 4 stereo signal paths in parallel as well as a dry signal path going to either or both outputs

In the PARALLEL > PARALLEL CONTROL > PARALLEL X 4 ENABLE
Select your START point by going to PARALLEL START > LOOP SPLIT BEOFRE. In the above example we split before LOOP 5
In parallel loops Select if the loop is OUT or IN
Select the PATH. There are 4 paths available
Select the output
Select the DRY signal paths. Your options are NO DRY LOOPS, DRY1, DRY2, DRY 1&2

When you select loops for the signal path please be aware that until you select those loops as part of your preset, you won't hear any audio from that path. The idea with Parallel x 4 is that you can have fully wet effects, with no dry signal unless you add the dry signal path option.
Wet/Dry/Wet
The Parallel x 4 feature enables a traditional WET/DRY/WET set up with the addition of a HumDinger in the effects loop before the split to give you your dry signal path
In this example I have a stereo delay and reverb in loops 9/10 and 11/12. In Parallel 4 I'm splitting the signal before loop 9.
Loop 8 includes a HumDinger which is going to split the signal and send it to our DRY amp. So in G3, LOOP 8 has become our CENTRE DRY option.
After loop 8 the signal is split and sent to the inputs on the stereo delays and reverbs, the outputs going to OUT 1 and OUT 2 mixers, then to their respective outputs.
In this scenario the dry signal that is fed to the centre amp is fed the inputs of both the stereo reverb and delay, then the wet signal only is mixed in parallel and sent stereo left and right for a true WET/DRY/WET set up

HIDDEN PRESET

The hidden preset on G3/S enables you to have a secondary preset for every preset in G3/S. All you need to do is turn this feature on under global setup and then turn it on for every preset where you wish to activate a hidden preset. The normal presets on G3/S are numbered 1 to 14, the hidden presets are numbered 15 to 28, giving you up to 28 presets per bank. Once you have turned the hidden preset on, press the preset a second time to go to the hidden preset. This will be indicated by an H in the upper left-hand side of G3/S's screen.
GLOBAL SETUP
GLOBAL SETUP is our utilities menu. The global setup submenu is, as it sounds, a global parameter menu and will be the same for all presets. Here you can edit the following settings:
Number Of Banks – G3/S Has up to 99 banks but if you don't use that many banks and you don't want to be scrolling through that many, you can limit the number of banks you use here.
Bank Ext Switch - This turns on the bank external switch located on the back panel of G3/S allowing you to use any momentary switch plugged into here as your bank select
Bank Preset - G3/S gives you the option of selecting a foot switch to use as your bank select button. You can select any of the footswitches or you can use the external bank select located on the rear panel of G3/S.
Bluetooth - Here you can turn on G3/S's Bluetooth, enabling it to link to your iOS device to use with your G3/S app. If you turn on Bluetooth and it does not receive any information from your iOS device, it will turn off after 2 minutes to ensure no unwanted connectivity.
Update in conjunction with the G3/S iOS app, update enables you to update the latest G3/S software. The current version of your software will be held until the update is finished so that if there are any issues while updating you will still have the current version of software in your G3/S only once the update has performed will it take over.
Hidden Preset - This enables hidden presets to be turned on per preset. It is a master hidden presets button. If you turn off your hidden presets here, all your hidden presets will be disabled. Turn on hidden presets here and that will give the option of turning on hidden presets for individual presets.
Stereo Pairs - G3/S has 12 x mono loops but you can pair these loops to use with your stereo effects, so, whether you use 1x stereo effect or 6, you can simply pair the effects loops that you want to use. If you have 1 x stereo reverb at the end of your chain, you will pair loops 12 and 11 which still provides you with 10 x mono loops. If I have 3 x stereo loops, I will pair 12 & 11, 10 & 9, and 8 & 7, giving me 3 x stereo loops and 6 x mono loops
Global Phase - Global phase sets up the polarity of the phase on output 2. This is specifically so you do not run into problems if you are trying to add an in-phase pedal in STOMPBOX to an out of phase signal.
Backlight - G3/S's back-lit LCD screen has 4 levels of brightness so you can choose the one that you require for your lighting conditions.
Bank Reset - Here you can reset an entire bank back to factory settings it's a great way to start from scratch on a bank without sacrificing all of your other presets on other banks.
Factory Reset – want to clear everything and start from scratch? This will wipe everything in your G3/S back to factory settings if you do this there is no way to recover your old settings unless you have backed up using the G3/S app
Version - here you can see your software version number and your G3/S serial number. This makes it easy to cheque that you have the latest version of software on your G3/S.
THE G3/G3S APP AND BLUETOOTH
G3/S is equipped with BLUETOOTH to enable you to connect it to an iOS device and utilise all the features of the G3/S app. These include BACKUP, RESTORE, SONGLIST, and SOFTWARE UPDATE. There are more details in the G3/S APP manual but let's have a look at how we update our software:


- Download and install the G3/S App on to your iOS device via the APP Store.
- On G3/S, Go into G3/S's GLOBAL SETUP in the Deep Edit Menu and navigate to BLUETOOTH. This will turn on G3/S's BLUETOOTH and now will be searchable by the G3/S APP.
- Under BLUETOOTH, navigate to UPDATE.
- You'll see a QR code and instructions on G3/S's LCD screen. Hold your camera over the QR code and it will launch Safari and ask if you want to download. Hit YES
- When the download is complete, press the DOWNLOAD button on the top right of your iOS screen. This navigates to the file download page.
- Now press the top file which will be the file you have just downloaded. This will launch the G3/S app.
- In G3/S app, press CONNECT
- Choose G3/S from the list of available devices
- When it says CONNECTED, click on the DISMISS button on the bottom right hand side of the screen
- Now we're back in the main menu, press UPDATE, which will take you the UPDATE page on the G3/S app
- Now press TRANSMIT. The file will start to be downloaded to G3/S. You'll see the packet number rise on the G3/S screen as the file is transferred.
- Once finished the G3/S screen will say – FILE COMPLETE, PRESS 4 TO LOAD.
- When the load is complete, cycle power by unplugging and re-plugging the power in the back of G3/S
- DONE!
PLEASE NOTE – If you do not connect to G3/S's BLUETOOTH within 2 minutes the BLUETOOTH in G3/S will automatically turn off. If the screen on your iOS device goes to sleep during the process, simply tap the screen to awake and the download will continue. It's important that you do not remove the power from G3/S until your asked to. To explore the other app features please refer to the app manual
Current Software – 757
WHAT'S NEW
- 4 lines of parallel!
- Expression Calibration tailoring - The Expression pedal settings now allow you to fully calibrate your expression to get the best sweep.
- 6 Midi Messages on Expression
- Midi Clock Tap Tempo - Various Bug Fixes Deep Dive:
Expression Calibration tailoring:
The Expression pedal settings now allow you to fully calibrate your expression to get the best sweep. Now, on the expression pedal settings, you can calibrate the heel and the toe settings of your chosen expression. To do so:
Go Deep Edit > Expression
Click down to EXP 1 (or EXP 2 if you're using EXP 2!) cal heel > Click along > Now press your expression pedal so the heel is all the way back. > Press FootSwitch 4. G3 will display on the screen a percentage from 1 to 100% of how far the expression pedal travels.
Click FootSwitch 3 to go back, and click down to EXP 1 Cal Toe > Click along > Now press your expression pedal so the toe is all the way down. > Press FootSwitch 4. G3 will display on the screen a percentage from 1 to 100% of how far the expression pedal travels.
G3 will have now have calibrated the top and the bottom points of your expression pedal.
As well as this, if you click down lower to EXP 1 (or EXP 2 if you're using EXP 2!) log curve - you can now select tailored curves for your expression sweep. Click through these and try them out to work out what your preferred sweep is for your expression pedal.
Midi Clock Tap Tempo
To use midi clock tap tempo - you start the clock as you'd expect. To set the preset to tap - go settings > tap tempo > Click down to 'Tap Preset' - Select footswitch. That footswitch will now tap the tempo for midi clock.
We recommend you do a full backup to the G3 app before you install this update. For details on how to do this please visit the app/backup section in the G3 manual as well as an in depth video which can be found at our YouTube channel
TECH SPECS G3/G3S
Physical size: 44cm x 13cm x 7.8cm / 17.3" x 5.1" x 3.07"
Screen size: Approximately 5 x 3.8cm / 1.96"x 1.5"
Weight: 2.4 kgs / 5.29 lbs
Power Requirements: 9V DC (2.1mm centre neg) @ 650mA.We recommend the use of The GigRig Generator power supply supplied with The G3/S Switching System. (Strymon Zuma, True Tone 1-Spot and Voodoo Labs Pedal Power 2 have been tested to power G3/S sufficiently).
Input impedance 1M Ohm
Out 1 - Signal path with input and output amps OFF – True Bypass
Out 1 is earthed and must always be connected to ground.
Out 2 - Signal path with input and output amps OFF – Buffered and Isolated
Out 2 is transformer isolated and phase reversible.
Input signal handling Maximum = 16.5V dBV peak to peak in true bypass.
Signal Bandwidth = 4Hz to 150KHz
Pre Gain/Buffer and Post Gain Stereo VCA Output Amplifier/Buffer
Minimum gain -30dBu
Maximum Gain +8dBu
Bandwidth at 1V = 4Hz to 150KHz.
Buffer output impedance 1K Ohms
Noise. 4.7nV per root Hz
This specification is subject to change without notice. Consult our Web site for amendments.
www.thegigrig.com ;
Documents / Resources
References
Download manual
Here you can download full pdf version of manual, it may contain additional safety instructions, warranty information, FCC rules, etc.
Advertisement


Need help?
Do you have a question about the G3 and is the answer not in the manual?
Questions and answers