Advertisement
- 1 Brand Story
- 2 Package List - A50
- 3 Product Diagram
- 4 Download and Install App
- 5 Accounts Registration
- 6 How to Reset the Camera
- 7 Add Camera to App
- 8 Camera Installation
- 9 Solar Panel Installation
- 10 Device Menu
- 11 PIR Motion Detection
- 12 Storage Instructions
- 13 Power Saving Settings
- 14 Multi-Camera Management
- 15 Multi-User Sharing
- 16 How to Find the SN Number?
- 17 FAQ
- 18 Documents / Resources
Brand Story
Leading the Way in Affordable, Advanced Home Security.
From our inception in 2008, Zumimall has been at the forefront of redefining home security. Our philosophy? Combine top-tier specifications with affordability. Our results? Over a million premium, yet affordable smart security products in homes and businesses worldwide.
As one of the global leaders in intelligent security technology, we've always prioritized the consumer's needs. We've crafted a range of products that seamlessly blend into the modern home and business aesthetic while providing unparalleled security.
From suburban areas to urban centers worldwide, our reach spans numerous countries, safeguarding homes and businesses.
But we're not just for homeowners. Businesses, retailers, and diverse industries trust Zumimall to keep their assets and people safe. Our commitment has always been clear: Deliver smart, efficient, and stylish security solutions without breaking the bank.
Choose Zumimall, and be part of the smarter, secure future we're building together.
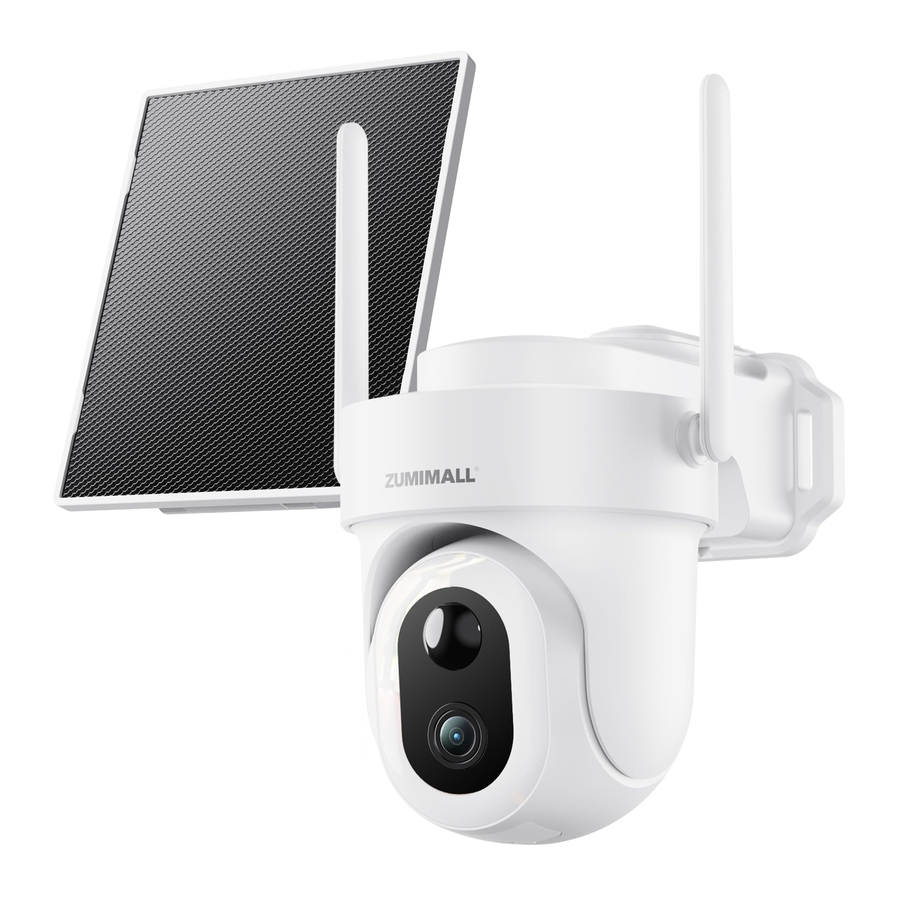
Package List - A50

NOTE: Micro SD card and power adapter are not included.
Product Diagram

| Power Port | DC 5V±10% |
| Power on/off | Press power button for 3-5 seconds to turn on/off the camera |
| Status Light |
|
| |
| SD Card Slot | Support local SD card storage (Max.128GB) |
| Reset | Press and hold on for 5 seconds to reset the camera |
| Charging Indicator |
|
| Battery | Built-in rechargeable batteries |
Download and Install App
Download ZUMIMALL App from Google Play™ or App Store™. Or scan the QR codes below, with your smartphone.

NOTE: Please turn on both of the following permissions.
- Allow ZUMIMALL App to access mobile cellular data and wireless LAN, otherwise it will fail to connect the camera.
![]()
- Allow ZUMIMALL App to receive pushed messages, otherwise, the phone will not receive alarms when motion is detected.
![]()


Accounts Registration
New user needs to sign up ZUMIMALL App with an email address.
Click ' Sign up ' to create a New Account and follow the steps to complete registration.

NOTE:
- Please tick 'Agree' the 'User Agreement and Privacy Policy';
- If the verification code is sent out over time due to network problems, please try again later;
- If registered with mailbox, please check the verification code in the spam mailbox if you didn't receive it.
How to Reset the Camera

- Go to the device homepage, select the camera that needs to be reset, and long press it to remove it from the app.
- Press the camera's reset button for 5-10 seconds until you hear the 'Boogu' sound.
- Reconnect the camera as a new device.
Add Camera to App
Preparations for Connection

- Insert a Micro SD Card: Insert a Micro SD Card into the camera to save video clips, or you can start the 7-day free cloud service. Without a Micro SD Card or cloud service, no video will be saved.
- Check Wi-Fi Compatibility: The camera only works with 2.4GHz Wi-Fi and does not support 5GHz. If your router is dual-band, make sure it is set to 2.4GHz mode to ensure the camera works.
- Ensure Same Network Connection: For successful pairing, ensure that both the phone and camera are connected to the same network.
- Proximity to Router: When connecting to the network, please place the camera close to the router (recommended within 10-15 ft).
Adding Methods
Method 1: Bluetooth Setup(Recommend)
")
- On the homepage, tap 'Add' or the '+' icon in the upper right corner, then tap 'Add Device'.
- If Bluetooth on your phone is not turned on, a pop-up will appear. Please allow it to turn on Bluetooth.
- Once Bluetooth is on, the app will automatically search for available devices. Select the device you want to connect to from the search list.
- Select the 2.4GHz Wi-Fi network you want the camera to connect to and enter the password. When Bluetooth is on, the app will automatically show available 2.4GHz Wi-Fi networks. Note that 5GHz Wi-Fi networks will not be shown. If you can't find your Wi-Fi network, please contact your router provider to check the 2.4GHz Wi-Fi settings.
- The app will then automatically proceed to the Wi-Fi connection page. A sound will be heard, and the camera's indicator light will change to steady blue when the connection is successful. Click 'Next' to edit the camera name and choose a family. Click 'Done' to finish the setup.
- If the connection fails, check the reason and resolution shown in the app. Long press the reset button until you hear a 'Boogu' sound to reset the camera and start again, or try the other methods below.
Method 2: QR App Code Setup

Tap 'Add Device'

Select Camera

Turn on the Camera

Input Wi-Fi Password

Prepare the Scanning

Scan QR Code

Installation Complete at 100%

Name the Camera

View Installation Tips

Perform Network Diagnosis

Using the Camera
Method 3: QR Device Code Setup
- Click '+', and then select 'Scan Code',and then scan the QR code on your device.

- Select the device you want to add. Check if your phone Wi-Fi is 2.4Ghz, then click 'Next'.

- Return to the 'ZUMIMALL' application, select the Wi-Fi network and enter the password, then click 'Next'.
NOTE: All routers, including those with 5G capability, also come with a 2.4G signal. Simply set a 2.4GHz Wi-Fi on router settings and select the 2.4G signal during configuration.

- When connecting, you should make sure your router, mobile, and camera are as close as possible.


Camera Installation
Installation Preparation

- Surface Selection: Choose a clean, smooth, and dry surface for mounting the bracket. Avoid uneven surfaces like wood veneer or plaster walls.
- Bracket Mounting: Use the provided positioning stickers and screws to securely attach the bracket to the wall.
NOTE:
- Avoid Strong Lights: Avoid facing the camera toward strong lights, mirrors, windows, or swimming pools.
- Minimize Interference: Keep the camera away from outlets, air conditioner vents, humidifiers, and heat vents.
- Maintain Distance: Position the camera at least 1 meter away from other wireless devices (e.g., microwaves, Wi-Fi routers) to prevent interference.
Mounting Position and Angle
- Location:
Ensure the camera is unobstructed and within Wi-Fi coverage. - Mounting:
Select an appropriate position on the wall to mount the camera.

- Angle for Motion Detection:
- Aim the camera to cover the lower two-thirds of the field of view, which is the most sensitive to motion.
- For close monitoring (e.g., front door), mount the camera 7-10 feet (2-3 meters) high. This helps to focus on closer objects and reduce false alerts from distant movement.
- For distant monitoring (e.g., yard), mount the camera higher to cover the area within the lower two-thirds of the view.


Best Practices for Motion Detection

- Motion Path: Position the camera so that motion moves side-to-side across its view rather than directly toward or away from it.
- Detection Range: Optimal motion detection occurs within 5 to 20 feet (1.5 to 6 meters) from the camera, though it can detect motion up to 33 feet (10 meters).
Solar Panel Installation
Installation Steps
- Mount the bracket using the mounting template and the screws provided in the package.
![]()
- Loosen the adjusting control on the bracket and adjust the angle of the solar panel to receive direct sunlight.
![]()
- Retighten the adjusting control to secure your setting.
![]()
- Connect the solar panel to the camera with the USB-C cable.
![]()


Installation Location
- Find a location that receives sunlight for most of the day to ensure maximum exposure.
- The solar panel needs a few hours of direct sunlight to convert solar energy into electricity. The conversion efficiency is affected by weather conditions, seasonal changes, geographic locations, etc.
Installation Angle

- Ensure the solar panel is angled to receive direct sunlight.
- Avoid installing the solar panel completely horizontally to prevent the accumulation of dust and debris. It is advised to install the solar panel at an angle for optimal sunlight exposure.
Installation Precautions
- Ensure there is no obstruction blocking the solar panel. The energy harvesting efficiency drops significantly even if a small portion of the solar panel is blocked.
- Wipe the solar panel regularly to remove dust and debris.
Device Menu

- Add Device and Scan Code
- More Functions
- Real Time
- Live View Button
- Camera Name
- Settings
- Device Homepage
- Messages
- Explore
- Personal Homepage
- Quit Live Viewing
- Setting Manual
- View Live
- SD Card History
- Cloud Storage
- Screenshot to Phone
- Two-Way Talk
- Record to Phone
- Motion Detection On/Off
- PTZ
- Light
- Siren
- Audio Warming and Strobe Light
- Full Color Mode
- Album
- Time Bar
- Adjusting the Timeline
- Date of History Record
- Alarm Time Point
- Delete Video Recording
- Download Video
- Delete
PIR Motion Detection
Motion Detection Alarm Setting
Sensitivity Adjustment:
Adjust motion detection sensitivity from 1 to 10. Refer to the image below for settings.

Tap on 'Settings'

Select 'Alarm Management'

Set it up
| Sensitivity | Detecting Distance |
| 1~3 | 3.3~10ft(1~3m) |
| 4~7 | 13~23ft(4~7m) |
| 8~10 | 26~33ft(8~10m) |
NOTE: Higher sensitivity increases the PIR detection range but may lead to faster battery drain.
Alarm Notification
- Recording Type: This camera does not support continuous 24/7 recording. It activates only when motion is detected.
- System Reactions:
- Alarm Notifications: Receive sound alerts via the app.
- Storage: Pictures and videos are automatically saved to the micro SD card or cloud storage.
Record/Playback/Delete

- View Records: On the 'MESSAGES' page, tap 'Alarm Messages' to view all recorded events.
- Playback/Delete: Use the buttons provided to playback or delete recordings.
- Save/Share: Screenshots and manually recorded videos from live, history, or cloud pages are saved in Pictures & Videos. These files can be stored in your phone's album or shared directly.
Storage Instructions

- Manual Storage
- Go to the live video feed and manually record by clicking the 'Record' button to start or stop.
- Recordings will be stored in your app's album.
- Exiting the live view will automatically stop the recording.
- Memory Card
- The camera supports micro SD cards (not included) up to 128GB.
- It will record continuously and overwrite the oldest recordings when the card is full.
- Cloud Storage Plan
- Click the 'Basic cloud storage' button to start recording 6-second videos on a 7-day loop for free.
- No code is necessary to activate the cloud storage, it will automatically activate after payment is processed.
NOTE: If you select the wrong cloud plan, please contact us through the app's Help section for assistance.
Power Saving Settings
Alarm Interval
This function helps avoid repeated alarms for the same event. You can set an alarm interval of different lengths. For example, if the interval is set to 5 minutes, and the camera is triggered at 08:00, you will receive an alarm message, but will not receive another alarm notification within the next 5 minutes, even if motion detection continues.
NOTE: This function is off by default. You can enable it as needed.
Recording Time
You can set different recording lengths. For example, if the recording length is set to 20 seconds, after the camera is triggered, you can view a 20-second alarm video in the history of cloud playback.

Alarm Plan
You can set a weekly or daily alarm schedule as needed. For example, if the camera's working hours are set from 0:00 to 1:00, the camera will only be triggered and record alarm video during this period.
NOTE: Up to 4 time periods can be set for the alarm schedule.
Battery Management
- The camera has a built-in high-capacity battery, which can last for 2-3 months, assuming the camera wakes up 15 times per day and records video for 10 minutes each day.
NOTE: Battery life depends on how frequently the camera is activated. The more it is activated, the faster the battery drains. It is recommended to lower the 'Motion Detection' sensitivity or turn it off occasionally. - When the battery power is less than 20%, the app will send you reminders to charge the camera.
- Charge the camera with a DC 5V 2A charger until it is fully charged, which typically takes 6-8 hours.
Multi-Camera Management

Multi-User Sharing
NOTE:
- One App account (A) cannot be logged in on multiple devices simultaneously.
- One camera cannot be connected to multiple App accounts.
- However, a camera can be shared from account A to account B.
Sharing Steps:
- downloads the ZUMIMALL App on their phone and creates a new account.
- clicks 'Add' in the App on their phone.
- scans B's QR code or inputs B's account ID.
- accepts the share and refreshes the device page.

On the camera's settings page, tap Share

You have two ways to share: QR code and enter your account number

The person being shared clicks on the QR code on the 'My' page

Scan this QR code

Or enter the account number of the person being shared

Customise the permissions of the person being shared

View Shared Records

Accepting sharing requests
How to Find the SN Number?
If you have any other questions, please send us the SN number of your camera and describe the problem you have encountered. We will resolve it as soon as possible.
Email: Support@zumimall.com

Click Settings

Click Device Information

View Virtual ID
FAQ
Connection Issues
Camera is Not Powering On
- Ensure the power switch is turned on.
- Charge the battery using a DC 5V/2A adapter. The blue light indicates charging.
Failed to Connect to Wi-Fi During Initial Setup
- Verify the correct Wi-Fi password and ensure you are using the 2.4GHz network.
- Move the camera closer to your router for a stronger signal.
- Set the Wi-Fi encryption to WPA2-PSK/WPA-PSK.
- Ensure SSID is within 31 characters and password within 64 characters.
- Check that DHCP is enabled on your router.
- Avoid special characters in the network name and password.
- Use the admin password if there are separate admin and guest networks.
- Ensure no excessive devices are connected to avoid IP address conflicts.
- Keep the camera at least 1 meter away from other wireless devices and metal objects to avoid interference.
- Reset the camera if needed by pressing the 'Reset' button until you hear a 'Boogu' sound, then reconnect.
How Can I Differentiate Between 2.4GHz and 5GHz Wi-Fi?
- Check Router Documentation: Consult the router's manual or contact support.
- Use a Dual-Band Router:
- Access your router settings via computer or phone.
- Log in and rename your Wi-Fi networks to clearly indicate 2.4GHz and 5GHz (e.g., 'Network_2.4GHz' and 'Network_5GHz'). Avoid merging the bands to clearly identify them.
- Connect to the 2.4GHz network on your phone, then connect your camera.
Why Does the Camera Still Not Connect to Wi-Fi After Correctly Selecting 2.4GHz and Entering the Password?
- Ensure your camera and phone are on the same network.
- Verify that DHCP is enabled on your router.
- Confirm your network is 2.4GHz and that the Wi-Fi authentication method is set to WPA2-PSK or a similar method.
- Avoid special characters in the network name and password.
- Use the admin password for networks with both admin and guest options.
- Check Wi-Fi signal strength and remove the SD card if connection issues persist.
- Ensure there are no excessive devices causing IP conflicts.
- Keep the camera away from wireless devices and metal objects.
- Reset the camera if changing Wi-Fi networks.
Functionality Issues
Will the Camera Show Red Lights When Night Vision is Activated?
The camera's infrared lamps emit dim red lights during night vision, but the image quality remains clear in low light conditions.
What is the Maximum Length of Recording Time?
The recording time can be set in the app, with options ranging from 10 to 30 seconds.
Why Am I Not Receiving Push Notifications on My Phone?
- Ensure 'Receive Alert Notifications' is enabled in the app.
- Check your phone settings to allow notifications from the app.
- Ensure the app is running in the background (for Android users).
Why Can't I Hear Any Sounds from My Camera?
- Ensure the sound icon is turned on for live audio.
- For two-way audio, enable the two-way talk feature in the camera settings.
Device Setup Issues
Failed to Scan QR Code on the Phone (Battery is Fully Charged)
- Remove the protective film from the camera lens.
- Clean the lens with a dry paper towel.
- Adjust the distance between your camera and phone for better focus.
- Scan the QR code under good lighting.
- If issues persist, contact Support.
How Far Should the Camera be Placed from the Router?
The camera can connect up to 20 meters away in open areas. However, actual range may vary based on Wi-Fi strength and environmental factors. Place the camera closer to the router if the signal is weak.
Does My Phone Need to be Connected to the Same Wi-Fi as the Camera to View It?
No, your phone does not need to be on the same Wi-Fi network. As long as the camera is connected to your home Wi-Fi, you can use WLAN or cellular data to view the camera.
Product Service
Email: Support@zumimall.com
Distributor: Distributor@zumimall.com
More About Us
Web: www.zumimall.com
Facebook: www.facebook.com/zumimalloffice
Amazon Store: www.amazon.com/zumimall
Documents / Resources
References

Download manual
Here you can download full pdf version of manual, it may contain additional safety instructions, warranty information, FCC rules, etc.
Advertisement


Need help?
Do you have a question about the BF-A50 and is the answer not in the manual?
Questions and answers