Minolta DIMAGE SCAN ELITE 5400 Hardware Manual
Hide thumbs
Also See for DIMAGE SCAN ELITE 5400:
- Software manual (76 pages) ,
- Hardware manual (13 pages)
Table of Contents
Advertisement
Advertisement
Table of Contents

Subscribe to Our Youtube Channel
Related Manuals for Minolta DIMAGE SCAN ELITE 5400


Summary of Contents for Minolta DIMAGE SCAN ELITE 5400
- Page 1 HARDWARE MANUAL 9222-2890-11 AV-A304/ME200304...
-
Page 2: For Proper And Safe Use
• Do not disassemble this product. Electric shock may cause injury if a high-voltage circuit inside the product is touched. Take the product to a Minolta Service Facility when repairs are required. • Immediately unplug the unit and discontinue use if the product is dropped or subjected to an impact in which the interior is exposed. - Page 3 Every necessary precaution has been taken to ensure the accuracy of this instruction manual. Minolta is not responsible for any loss or damage caused from the operation of this product. This manual may not be copied in part or whole without prior written permission from Minolta.
-
Page 4: Before You Begin
Before you begin Thank you for purchasing this Minolta product. Please take the time to read through this instruc- tion manual so you can enjoy all the features of your new scanner. Check the packing list before using this product. If any items are missing, immediately contact your dealer. -
Page 5: Table Of Contents
Table of contents This manual contains information specific to this model scanner. This includes hardware setup and use as well as notes about software operation, compatibility, and system requirements. See the supplied DiMAGE Scan Utility software manual for information on the installation and opera- tion of the scanner software. -
Page 6: System Requirements
* To use preinstalled Mac OS 8.6 with a built-in FireWire port, a Firewire 2.2 to 2.3.3 extension must be installed. This software can be downloaded free of charge from the apple web site at http://www.apple.com. Check the Minolta web site for the latest compatibility information: North America: http://www.minoltausa.com Europe: http://www.minoltasupport.com... -
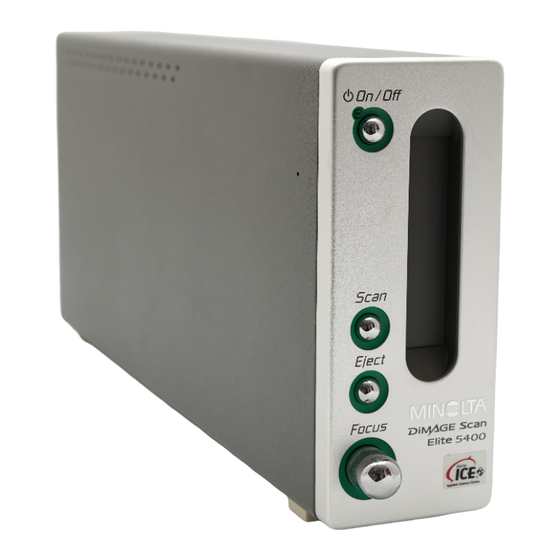
Page 7: Names Of Parts
Names of parts Indicator lamp Power switch USB port Front door Quick Scan button IEEE 1394 port Eject button DC terminal Focus dial Do not use the focus dial until is has been activated in the DiMAGE Scan Utility’s preferences dia- log box. -
Page 8: Before Connecting The Scanner To A Computer
Before connecting the scanner to a computer Before connecting the scanner to a computer, the DiMAGE Scan Utility must first be installed. Read the software instruction manual for the installation procedure. The scanner should be placed on a level surface free from vibrations. It should be located away from direct sunlight and in a clean, dry, well-ventilated area. -
Page 9: Connecting The Ieee 1394 (Firewire) Cable
Connecting the IEEE 1394 (FireWire) cable Securely plug the cable into the scanner’s and computer’s IEEE 1394 port. Either end of the cable can be connected to the IEEE 1394 port on the scanner or com- puter. The scanner should be connected directly to the computer. Attaching the scanner to an IEEE hub may prevent proper operation. -
Page 10: Loading The Film Holders
Loading the film holders Handling film To achieve the best possible reproduction from the scanner, the film and film holder should be free from dust and dirt. Always work with processed film in a clean, dust-free environment. Handle film by the edges or mount to prevent fingerprints and dirt marring the image area. Special lint free gloves are available from photographic equipment retailers for film handling as well as anti- static cloths, brushes, and blowers for removing dust. -
Page 11: Loading Mounted Slides
Loading mounted slides Up to four mounted 35mm or APS slides can be inserted into the slide mount holder. The slide mounts must be between 1 mm and 3.2 mm thick to fit the holder. Glass mounts cannot be used; the glass refracts the light resulting in distorted and unevenly illuminated scans. -
Page 12: Loading A Film Holder Into The Scanner
Loading a film holder into the scanner Before using the scanner, install the DiMAGE Scan Utility; see the software instruction manual. Turn on the scanner and then start the computer. Launch the DiMAGE Scan Utility before insert- ing the film holder. Do not insert the film holder into the scanner while the utility software is launching or the scanner is initializing;... -
Page 13: Scanner Notes
Scanner notes Compatibility with the DiMAGE Scan Utility The DiMAGE Scan software is compatible with many of Minolta’s high-end film scanners. This means only one scanner driver needs to be installed on a computer with multiple scanner models connected. Because of the differences in specifications between scanners, some of the DiMAGE Scan func- tions cannot be used with this scanner model. -
Page 14: The Quick Scan Button And Dimage Scan Launcher
The Quick Scan button and DiMAGE Scan Launcher The Quick Scan button launches the DiMAGE Scan applications. When the button is pressed, the DiMAGE Scan launcher is displayed. Simply click on one of the launch- er buttons to start the appropriate applica- tion. -
Page 15: Pixel Polish System Requirements
The Quick Scan button can be used to launch a single application directly. Simply select the appli- cation from the drop-down menu at the bottom of the launcher; each time the Quick Scan button is pressed, that application will open along with the launcher. If the Batch Scan Utility is selected, the first time the Quick Scan button is pressed the scanner initializes and then the message to insert the holder is displayed. -
Page 16: Manual Focus Dial
Manual focus dial The scanner can be focused manually using the focus dial. The manual focus dial must first be activated in the DiMAGE Scan Utility preferences window, see “Setting scanner preferences” in the advanced scanning section of the software manual. When the manual focus dial is active the scanner’s autofocus system is disabled and the other scanner focusing functions will not work. -
Page 17: Digital Ice System Requirements
Digital ICE system requirements The computer must meet the system requirements below to use Pixel Polish. PC / AT compatible computers Macintosh computers 256 MB of RAM in addition to the require- 256 MB of RAM. ments for the OS and applications. 512 MB 512 MB recommended. -
Page 18: Job File List
Job file list Jobs can be used to make scan settings based on the final use of the image. See making-the- final-scan section in the DiMAGE Scan software manual. The following charts list the parameters of the scanner’s Job files: Scanner notes... -
Page 19: Disconnecting The Scanner
On February 20th, 1962, John Glenn became the first American to orbit the Earth. On board his Friendship 7 spacecraft was a Minolta Hi-matic camera to record that historic event. The 4 hour, 55 minute, and 23 second flight orbited the Earth three times at an average speed of 28,000 kph (17,500 mph). -
Page 20: Troubleshooting
Troubleshooting This section covers minor problems with scanner operation. For major problems or damage, or if a problem continues to reoccur frequently, contact your dealer or a Minolta service facility. SYMPTOM or MESSAGE SOLUTION Confirm the cable is securely connected between the When starting up the utility software, could-not- computer and scanner. -
Page 21: Checking Software Installation - Windows
Windows 98 and Me: click the device-manager tab in the properties window. 3. The driver file should be located in the imaging-device location of the device manager. Click on the location to display the files. MINOLTA DiMAGE Scan Elite5400 should be listed as the imag- ing device. -
Page 22: Closing The Scanner Door
Please contact your dealer for information regarding installation, USB or IEEE 1394 interface rec- ommendations, or application compatibility. If your dealer is unable to help you, contact an author- ized Minolta service facility. Please have the following information ready when calling Minolta tech- nical support: 1. -
Page 23: Technical Specifications
Technical specifications Scan type: Moving film, fixed sensor, single-pass scan Film type: Negative and positive, color and monochrome Film formats: Mounted and unmounted 35mm film. Scanning dimensions: 24.61 x 36.69mm (5232 x 7800 pixels) Optical input resolution: 5400 dpi Image sensor: 3-line primary-color CCD with 5300 pixels/line A/D conversion: 16 bit... - Page 24 We offer support for our digital products 24 hours per day on www.minoltasupport.com. Camera know-how, image composition, digital image editing: discover more about Minolta’s new internet world and visit www.minoltaphotoworld.com © 2003 Minolta Co., Ltd. under the Berne Convention and the Universal Copyright Convention.
Need help?
Do you have a question about the DIMAGE SCAN ELITE 5400 and is the answer not in the manual?
Questions and answers