Table of Contents

Subscribe to Our Youtube Channel
Related Manuals for Mobiclinic ECG300G


Summary of Contents for Mobiclinic ECG300G
- Page 1 ELECTROCARDIÓGRAFO ECG300G Manual de instrucciones Instruction manual Última revisión: 24 de mayo de 2022 Last revision: May 24th 2022 Lea las instrucciones antes de usar el producto.
-
Page 2: Table Of Contents
Capítulo 2. Aviso de seguridad......................................3 Capítulo 3. Normas de Mantenimiento.....................................3 Capítulo 4. Características del Instrumento..................................4 Capítulo 5. Mapa Esbozo de Panel ECG300G.................................5 Capítulo 6. Atención antes de Operar....................................7 Capítulo 7. Trabajo Preparatorio antes de Instrumentación.............................7 Capítulo 8. Precaución durante Operación..................................7 Capítulo 9. -
Page 3: Capítulo 2 Aviso De Seguridad
6) La fusión de arritmia versátil puede resultar en medición indigna de confianza debido a la dificultad en distinguir la onda P en tal situación. 7) ECG300G ha sido diseñado para llevar a cabo la interpretación de huella ECG inmediatamente tras la medición. -
Page 4: Capítulo 4 Características Del Instrumento
Electrocardiógrafo PT NL 3.6 El servicio de mantenimiento gratuito se cancelará si se ha destruido la etiqueta de protecció. 3.7 Para mantenimiento de carga más allá del periodo de garantía, nuestra empresa aconseja continuar usando “Norma de contrato de mantenimiento”. Por favor consulte con nuestro departamento de atención al cliente para situaciones específicas. -
Page 5: Capítulo 5 Mapa Esbozo De Panel Ecg300G
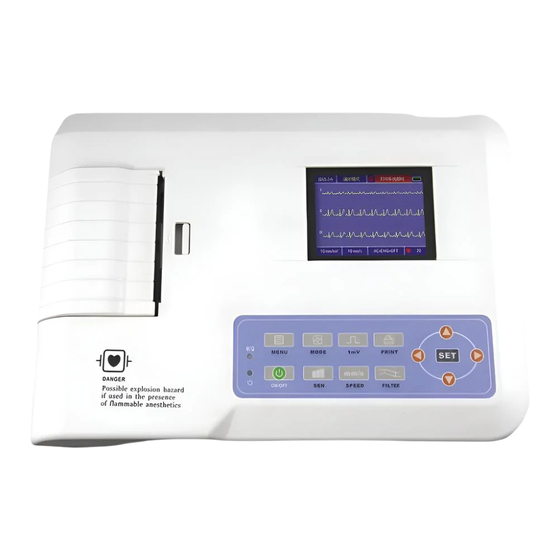
Electrocardiógrafo PT NL Capítulo 5 Mapa Esbozo de Panel ECG300G Botón Pantalla de Visualización 5.1 Mapa esbozo y nombre de componentes Cubierta del Gabinete de Papel Panel de Control Conector del Cable Conector de USB Conector RS232 Conector de Puesta a Tierra Interruptor de Encendido Enchufe de Energía Eléctrica... - Page 6 Electrocardiógrafo PT NL Portafusible 5.2 Definición de la Tecla Tecla de función: encendido/apagado Tecla de función: Ajuste positivo Tecla de función: Ajuste de velocidad de papel Tecla de función: Seleccion de la función de filtrar Tecla de función: Menú Tecla de función: Cambiar modo de impresión Tecla de función: 1mV marcador Tecla de función: Imprimir Tecla de función: Ingresar...
-
Page 7: Capítulo 6 Atención Antes De Operar
Electrocardiógrafo PT NL 5.3 Definición de Indicador El indicador se vuelve verde cuando hay suministro de energía AC, y cuando el indicador se vuelve verde y rojo a la vez se esyá recargando. Indicador para instrumento cuando está encendido. Capítulo 6 Atención antes de Operar 6.1 Se requiere que usted lea con detalle este manual de operación antes de operar a fin de asegurarse de realizar una operación segura y efectiva de este equipo. - Page 8 Electrocardiógrafo PT NL Papel de Impresión Eje de Papel Rodillo de Goma Gabinete de Papel 8.7.1 La dimensión del papel de impresión térmica de alta velocidad en este instrumento es: 80mm(W)×20m(L). 8.7.2 Abra la cubierta del gabinete de papel, saque el eje de papel e instale papel de registro bien hasta que la figura entre en la posición interna correcta.
-
Page 9: Capítulo 9. Colocación Del Electrodo
Electrocardiógrafo PT NL 9.4 Sustancia que puede causar mancha en el papel de registro: Gel, pegamento y papel compuesto húmedo incluyendo su disolvente orgánico. 9.5 Sustancia que puede causar que las ondas se desvanezcan: Carpetas de archivo hechas del material PVC blanda, plástico, etc; borrador y cinta magnética que contienen plastificante. Fluorescencia y tinta de sello. - Page 10 Electrocardiógrafo PT NL 10.3 Lista de Comprobación para conexión de Electrodos y cable ECG Localización de Código de Nº de Electrodo Electrodo Ranura Alarma Derecha RA/R Alarma Izquierda LA/L Pierna Izquierda LL/F Pierna Derecha RL/N Pecho 1 VI/CI Pecho 2 V2/C2 Pecho 3 V3/C3...
-
Page 11: Capítulo 12. Panel De Control E Instrucción Clave
Electrocardiógrafo PT NL Nº Marca Descripción Estatus desconocido, normalmente visualizado cuando acaba de iniciar la sesión del instrumento dentro de 1 minuto. Utilizando una fuente de alimentación de corriente alterna Usando batería, y energía plena Usando batería, volumen: 3/4 Usando batería, volumen:1/2 Usando batería, volumen: 1/4 Usando batería, pero baja energía, se sugiere recargar la batería o usar la fuente de alimentación corriente alterna. - Page 12 Electrocardiógrafo PT NL Estatus de Energía Eléctrica: Por favor refiera a 12.4 Teclado: Entrar en la interfaz de muestreo. Cuando el instrumento está en estado encendido, va a iniciar esta opera- ción automáticamente. Entrar en la interfaz de gestión de Archivo. Preguntar, modificar o borrar información de archivo. Vea el mapa de croquis para obtener información de la colocación de electrodos.
- Page 13 Electrocardiógrafo PT NL Parar Muestreo: Presione la tecla en el teclado para parar el proceso de muestreo y regresar a la interfaz principal. Cambio de Terminal: Puede presionar la tecla para mostrar los otros terminales. Los terminales se usan por impresión manual.
- Page 14 Electrocardiógrafo PT NL En la interfaz, presione el botón en el teclado y el sistema entrará en la interfaz de configuración de atajo. Seleccioine el botón [OK] y el sistema aplicará las nuevas configuraciones y regresará a la interfaz de muestreo. Seleccione [Cancel] ([Cancelar]) y el sistema regresará...
- Page 15 Electrocardiógrafo PT NL 13.3 Introducir Información del Archivo Según los diferentes items de configuración (vea 13.8), usario puede introducir el archivo de paciente antes o después de muestreo y también, puede introducir archivo en blanco. La ventana de introducción es como sigue: Información de archivo Botones de función Seleccione cualquier ventana de introducción.
- Page 16 Electrocardiógrafo PT NL 13.4 Gestión de Archivo Histórico En la interfaz principal, seleccione el botón y podrá entrar en la interfaz de gestión de archivo, como se le muestra: Suma de archivos actuales / Suma de archivos totales Lista de archivo Archivo actualmente seleccionado Borrar el archivo...
- Page 17 Electrocardiógrafo PT NL Seleccione [Query] ([Preguntar]) para iniciar una ventana de diálogo sobre Preguntas de archivo como se muestra a continuación. Introduzca condición de búsqueda y seleccione el botón [Select]([Seleccionar]) y el usuario ya podrá tener resultado deseado. La función de [Clear] ([Borrar]) es borrar la condición de preguntar introducida.
- Page 18 Electrocardiógrafo PT NL Asegúrese de hacer la selección correcta. Seleccione [Review] ([Revisar]) y así se podrá iniciar la siguiente interfaz de revisión, la cual es semejante a la interfaz de muestreo. Fecha de muestreo Duración del tiempo de muestreo Estatus de Energía eléstrica Velocidad Punto de tiempo de revisión Duración de muestreo total...
-
Page 19: Configuraciones Del Sistema
Electrocardiógrafo PT NL Seleccione el botón (OK), el sistema aplicará las nuevas configuraciones y regresará a la interfaz de revisión. Seleccione el botón (Cancel), el sistema regresará a la interfaz de revisión sin aplicar las nuevas configuraciones. Cada una de las funciones de las opciones se muestra como sigue: 13.7 Configuraciones de Fecha y Tiempo En la interfaz principal, seleccione botón para abrir la siguiente ventana de diálogo donde se muestran las configuraciones de Fecha y... - Page 20 Electrocardiógrafo PT NL En esta ventana de diálogo, seleccione el botón (Default ) (Por Defecto), las configuraciones del sistema regresarán con parámetros por defecto. Cada una de las funciones de opciones es como sigue: 13.9 Configuraciones de Muestreo Seleccione el botón en la interfaz y así...
- Page 21 Electrocardiógrafo PT NL Seleccione el botón [Default] ([Por Defecto]) y las configuraciones de muestreo regresarán con las por defecto. Cada una de las funciones de opciones se muestra como sigue: 13.10 Analizar Configuraciones de Parámetro Seleccione el botón en la interfaz principal y así se podrá iniciar la siguiente ventana de diálogo en la cual se analiza la configuración de parámetros.
- Page 22 Electrocardiógrafo PT NL Seleccione el botón [Default] ([Por Defecto]), las configuraciones del sistema regresarán con las por defecto. Refiera a lo que sigue: 13.11 Configuraciones de Impresión Seleccione el botón en la interfaz principal y así, se podrá iniciar la ventana de diálogo de la configuración de impresión, como se muestra: Seleccione el botón [Default] ([Por Defecto]), las configuraciones de impresión regresarán con las por defecto.
- Page 23 Electrocardiógrafo PT NL Nota: Auto acto de desnudarse, Desnudarse de ritmo, QRS en promedio, Autodiagnóstico, Periódico son disponi- bles cuando el modo de impresión “Auto” o “Ritmo” ha sido seleccionado. 13.12 Revisar Colocación de Electrodos Seleccione el botón en la interfaz principal para iniciar la siguiente interfaz de ilustración de colocación de la línea de alimentación. Seleccione cualquier tecla para salir de esta interfaz...
- Page 24 Electrocardiógrafo PT NL 13.13 Quiénes Somos Seleccione el botón en la interfaz principal y ya podrá iniciar la siguiente interfaz de información relacionada con este instrumento. Esta interfaz muestra el nombre del instrumento, la versión, el nombre de la compañía, derecho de copia y detalle de contacto de la compañía.
- Page 25 Electrocardiograph PT NL ELECTROCARDIOGRAPH ECG300G Please read instructions before use...
-
Page 26: Chapter 1. Main Technical Specifications
Chapter 1. Main Technical Specifications..................................1 Chapter 2. Safety Notice........................................2 Chapter 3. Maintenance Standards....................................2 Chapter 4. Instrument Characteristics....................................3 Chapter 5. ECG300G Panel Sketch Map..................................4 Chapter 6. Care Before Operation....................................6 Chapter 7. Preparatory Work Before Instrumentation...............................6 Chapter 8. Caution During Operation....................................6 Chapter 9. Electrode Placement.......................................7 Chapter 10. -
Page 27: Chapter 2. Safety Notice
6) Versatile arrhythmia fusion may result in unreliable measurement due to the difficulty in distinguishing the P wave in such a situation. 7) ECG300G has been designed to perform ECG trace interpretation immediately after measurement. It is precisely this interpretation that does not report all possible heart problems and may sometimes not comply with the physician’s diagnosis. -
Page 28: Chapter 4. Instrument Characteristics
Electrocardiograph PT NL 3.4 The free maintenance period for spare parts is half a year. Power cable, recording paper, operation manual and packing material are excluded. 3.5 Our company is not liable for failures of other connecting instruments caused by failures of this device directly or indirectly. 3.6 The free maintenance service will be cancelled if the protection label has been destroyed. -
Page 29: Chapter 5. Ecg300G Panel Sketch Map
Electrocardiograph PT NL Chapter 5. ECG300G Panel Sketch Map 5.1 Outline map and name of components Button Display screen Paper Cabinet Cover Control Panel Cable Connector USB connector RS232 connector Grounding Connector Grounding Power Switch Electrical Power Socket... -
Page 30: Fuse Holder
Electrocardiograph PT NL Fuse holder 5.2 Definition of the Key Function key: On/Off Function key: Positive adjustment Function key: Paper speed adjustment Function key: Filter function selection Function key: Menu Function key: Change print mode Function key: 1mV marker Function key: Print Function key: Enter Function key: Up Function key: Down... -
Page 31: Chapter 7. Preparatory Work Before Instrumentation
Electrocardiograph PT NL 5.3 Definition of Indicator The indicator turns green when AC power is supplied, and when the indicator turns green and red at the same time it is recharging. Indicator for instrument when switched on. Chapter 6. Care Before You Operate 6.1 You are required to read this operation manual thoroughly before operating to ensure safe and effective operation of this equipment. - Page 32 Electrocardiograph PT NL Printing Paper Paper Shaft Rubber Roller Paper Cabinet 8.7.1 The dimension of the high-speed thermal printing paper in this instrument is: 80mm(W)×20m(L). 8.7.2 Open the paper cabinet cover, pull out the paper shaft, and install the registration paper tightly until the figure enters the correct internal position. 8.7.3 Close the paper cabinet cover.
-
Page 33: Chapter 9. Electrode Placement
Electrocardiograph PT NL Chapter 10. Electrode Placement Note: Set up the chest electrode first and then the limb electrode. 10.1 Chest Electrode (See Figure 4) Attach the chest electrodes to the positions as shown below: V1: Inner fourth costal to the right edge of the sternum. V2: Inner fourth costal to the left edge of the sternum. - Page 34 Electrocardiograph PT NL 10.3 Checklist for Electrode and ECG Cable Connection Location of No. of Electrode Code Electrode Slot RA/R Right Alarm LA/L Left Alarm LL/F Left Leg RL/N Right Leg VI/CI Chest 1 V2/C2 Chest 2 V3/C3 Chest 3 V4/C4 Chest 4 V5/C5...
-
Page 35: Chapter 12. Control Panel And Key Instruction
Electrocardiograph PT NL Mark Description Unknown status, normally displayed when just logged in to the instrument within 1 minute. Using an alternating current power source Using battery, and full power Using battery, volume: 3/4 Using battery, volume:1/2 Using battery, volume: 1/4 Using battery, but low power, it is suggested to recharge the battery or use the AC power supply. -
Page 36: Sampling Interface
Electrocardiograph PT NL Electrical Power Status: Please refer to 12.4 Keyboard: Enter the sampling interface. When the instrument is in the on state, it will start this operation automatically Enter the File management interface. Query, modify or delete file information. See the sketch map for electrode placement information. - Page 37 Electrocardiograph PT NL Stop Sampling: Press the key on the keypad to stop the sampling process and return to the main interface. Change of Terminal:You can press the key to display the other terminals. The terminals are used for manual printing.
- Page 38 Electrocardiograph PT NL Display content Observation Processing... in the printing process Waiting... in the process of finishing printing Lack of paper. The user has to restart the operation after filling No paper in papers The connection between the system and the printing sub- Out of print lead time system is broken.
- Page 39 Electrocardiograph PT NL 13.3 Entering File Information According to the different configuration items (see 13.8), the user can enter the patient file before or after sampling and can also enter a blank file. The input window is as follows: Archival information Function buttons Select any input window.
-
Page 40: Archive Management
Electrocardiograph PT NL 13.4 Archive Management In the main interface, select the button and you can enter the archive management interface, as shown: Sum of current files / Sum of total files List of archives Currently selected file Delete the selected file Exit this menu Page roll buttons selected... -
Page 41: File Review
Electrocardiograph PT NL Select [Query] to launch a File Query dialog box as shown below. Enter search condition and select the [Select] button and the user can have the desired result. The function of [Clear] is to clear the entered query condition. - Page 42 Electrocardiograph PT NL Be sure to make the correct selection. Select [Review] to start the next review interface, which is similar to the sampling interface. Sampling date Duration of sampling time Electric Power Status Speed Review time point Total sampling duration Increase In this interface, the user can adjust the time segment of the waveform by means of the button and also the speed and gain.
-
Page 43: Date And Time Settings
Electrocardiograph PT NL Select (OK) button, the system will apply the new settings and return to the review interface. Select (Cancel) button, the system will return to the review interface without applying the new settings. Each of the option functions is shown as follows: Item Optional Content Optional Content... - Page 44 Electrocardiograph PT NL In this dialog box, select the (Default ) button, the system settings will return to default parameters. Each of the options functions as follows: Item Item Observation None / 30 seconds / 1 minute / 2 The screensaver will be archived after the selected period of Screen Protector minutes / 5 minutes / 10 minutes time.
- Page 45 Electrocardiograph PT NL Select the [Default] button and the sampling settings will return to the default settings. Each of the option functions is shown as follows: Item Optional Content Observation AC Filter On/Off Default setting using AC Filter or not EMG Filter On/Off Default setting using EMG Filter or not...
-
Page 46: Print Settings
Electrocardiograph PT NL Select the [Default] button, the system settings will revert to the default settings. Refer to the following: Item Observation Pace Terminal Set the rhythm terminal to analyse heart rate and print ECGs in rhythm print mode. Premature The system will use the value entered as a standard for considering the premature beat. - Page 47 Electrocardiograph PT NL Item Optional Content Observation Print mode [Auto 3x4+1]/[Auto 3x4]/[Auto The selection will be used as the default print mode. 2x6+1]/[Auto 2x6]/[Auto 4x3]/ [Rythm2]/[Rythm3]/[Rythm4]/ [Manual] Cable magnification The selection will be used as the default Cable Smart/Current Augmentation. “Smart” means that the system will adjust the wire rise automatically to match the paper height during printing.
- Page 48 Electrocardiograph PT NL 13.13 About us Select the button on the main interface and you will be able to start the next interface of information related to this instrument. This interface shows the instrument name, version, company name, copy right and company contact details.
- Page 49 Electrocardiograph PT NL...
Need help?
Do you have a question about the ECG300G and is the answer not in the manual?
Questions and answers