Table of Contents
Advertisement
Available languages
Available languages
Quick Links
Advertisement
Table of Contents
Troubleshooting

Subscribe to Our Youtube Channel
Related Manuals for Mobiclinic ECG600G


Summary of Contents for Mobiclinic ECG600G
- Page 1 MANUAL DE INSTRUCCIONES ELECTROCARDIÓGRAFO ECG600G Manual de instrucciones Instruction manual Última revisión: 13 de junio de 2022 Last revision: June 13th 2022 Lea las instrucciones antes de usar el producto.
-
Page 2: Especificaciones Técnicas
Electrocardiógrafo PT NL AVISO Aviso al usuario y/o paciente: cualquier incidente grave que haya ocurrido en relación con el producto debe comunicarse al fabricante y a la autoridad correspondiente del Estado Miembro en el que esté establecido el usuario y/o paciente. INDICACIONES - En cualquier tipo de pacientes para detectar episodios de hipoxemia difícilmente apreciable por clínica. -
Page 3: Características Principales
El dispositivo está destinado a ser utilizado en todas las poblaciones de pacientes, lo cual es decidido por el médico clínico. El programa de análisis sólo proporciona análisis de ECG para pacientes mayores de 3 años (incluidos). • Nombre del software: Software integrado ECG600G. • Especificación del software: ninguna •... - Page 4 Electrocardiógrafo PT NL funcionar con una fuente de alimentación de CC incorporada. • Los requisitos de seguridad se han tenido plenamente en cuenta en el diseño del producto, pero el operador no puede ignorar la observación del paciente y del aparato. Corte la alimentación o retire el electrodo cuando sea necesario para garantizar la seguridad del paciente.
-
Page 5: Unidad De Control
Electrocardiógrafo PT NL 3. PRINCIPIO DE FUNCIONAMIENTO Y CARACTERÍSTICAS ESTRUCTURALES 3.1 Principio de funcionamiento y su diagrama de bloques 3.1.1 La fuente de alimentación • Principio de la fuente de alimentación Después de que la fuente de alimentación de CA entre en la fuente de alimentación conmutada, se convierte en un voltaje de 12V DC y se suministra a la placa de alimentación DC-DC, también proporciona una carga limitadora de voltaje contante para la batería de litio recargable en el dispositivo a través del circuito DC-DC, y genera un voltaje de +5V y +3,3V a través de la conversión de energía para suministrar energía a los módulos correspondientes. -
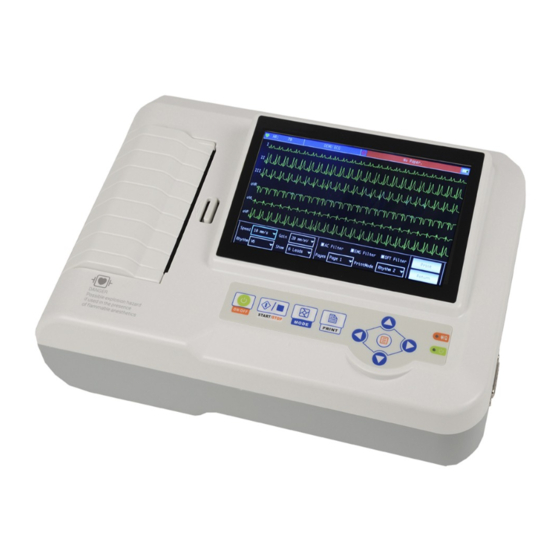
Page 6: Vista Frontal
Electrocardiógrafo PT NL PT NL 3.2 Nombre de las partes y funciones 3.2.1. Vista frontal Figure 4-2 Front view 1. Tapa del compartimento del papel. Mantenga el compartimento del papel cerrado, sujete el papel de impresión. 2. Pantalla de visualización. Muestra el ECG del paciente y la información relacionada. 3. - Page 7 Electrocardiógrafo PT NL PT NL 3.2.3. Botones 1. Indicador de inicio: se ilumina en verde después de encender el dispositivo. 2. Indicador de estado de la alimentación: El color verde indica que se está utilizando la fuente de alimentación de CA. En este momento no hay batería en el dispositivo o la batería está...
-
Page 8: Precauciones De Uso
Electrocardiógrafo PT NL PT NL Limitación de temperatura Limitación de la humedad Así arriba Frágil, manipular con cuidado Mantener alejado de la lluvia Límite de apilamiento por número Este artículo cumple con la Directiva de Dispositivos Médicos 93/42EEC del 14 de junio de 1993, una directiva de la Comunidad Económica Europea Consulte el manual/folleto de instrucciones Número de catálogo... - Page 9 Electrocardiógrafo PT NL PT NL 4.3 Precauciones después del uso - Ajuste los estados de todas las funciones a los estados iniciales. - Corte la corriente, retire con cuidado los electrodos y las pinzas de las extremidades, luego retire los cables conductores, no tire con fuerza.
- Page 10 Electrocardiógrafo PT NL PT NL 5.2.2 Batería El aparato lleva incorporada una batería de litio recargable, que no necesita ser reinstalada por el usuario. Compruebe la potencia y el estado de la batería antes de usarla. Advertencia: Conecte un extremo del cable de compensación de potencial al terminal equipotencial del dispositivo y conecte el otro extremo a la tierra para mejorar la fiabilidad de la conexión a tierra.
- Page 11 Electrocardiógrafo PT NL PT NL 5.4.3. Colores de los cables conductores Estándar europeo Estándar americano Posición de los electrodos Marca Color Marca Color Brazo derecho Rojo Blanco Brazo izquierdo Amarillo Negro Pierna izquierda Verde Rojo Pierna derecha N/RF Negro Verde Pecho 1 Rojo Rojo...
-
Page 12: Interfaz Principal
Electrocardiógrafo PT NL PT NL 6. INSTRUCCIONES DE FUNCIONAMIENTO Y PARAMETRIZACIÓN 6.1 Interfaz principal Estado de la Disco de la Paciente actual carrera utilizada cuenta de archivo energía Función botones A. Hora: La hora del sistema se puede ajustar en para que se pueda anotar el tiempo detallado de la grabación del ECG. - Page 13 Electrocardiógrafo PT NL PT NL Seleccione para configurar el modo de impresión, el estilo de impresión y el contenido de la impresión, etc. Seleccione para ver la información sobre nuestra empresa, la versión del software.. Cambio rápido: utilice los botones del teclado para cambiar entre cada módulo de función, después de seleccionar pulse el botón para entrar en su configuración.
- Page 14 Electrocardiógrafo PT NL PT NL • Campo de visualización La pantalla muestra la forma de onda del ECG de 12 derivaciones, haciendo doble clic en la forma de onda, puede cambiar entre 3 derivaciones, 6 derivaciones y 12 derivaciones. • Campo de operación Controle el modo de visualización de la impresión del dispositivo a través de los ajustes de operación correspondientes.
- Page 15 Electrocardiógrafo PT NL PT NL El teclado puede tener restricciones de entrada según la limitación del contenido. Las teclas restringidas aparecerán en gris y no estarán disponibles, como se muestra a continuación: 6.4 Gestión de casos En la interfaz principal, haga clic para entrar en la interfaz de gestión de casos, como se muestra a continuación: La interfaz anterior muestra todos los registros médicos almacenados en el dispositivo.
- Page 16 Electrocardiógrafo PT NL PT NL 6.4.1 Consulta Haga clic en "Consulta" para acceder a la interfaz de consulta que se muestra a continuación. Introduzca las condiciones de la consulta y haga clic en "Consultar" para obtener los resultados esperados. Después de hacer clic en "Borrar", el sistema borrará todas las condiciones de consulta que se hayan introducido.
-
Page 17: Configuración De La Fecha Y La Hora
Electrocardiógrafo PT NL PT NL En la interfaz de revisión, el usuario puede utilizar el botón para cambiar el modo de impresión y utilizar para imprimir. 6.5 Configuración de la fecha y la hora En la interfaz principal, haga clic en para acceder a la siguiente interfaz para configurar la fecha y la hora. - Page 18 Electrocardiógrafo PT NL PT NL Artículo Opciones Description Luz de fondo [30 segundos]/[1 minuto]/[2 minutos]/[5 Si no hay ninguna operación después de alcanzar el tiempo es- minutos]/[10 minutos]/[Siempre activa- tablecido, la luz de fondo de la pantalla se apagará. Si se ajusta a "Siempre encendida", la luz de fondo permanecerá...
- Page 19 Electrocardiógrafo PT NL PT NL 6.8 Configuración de la impresión En la interfaz principal, haga clic en para acceder a la interfaz de configuración de la impresión, como se muestra a continuación: Después de hacer clic en "Predeterminado", el sistema restablecerá todos los ajustes predeterminados. El contenido opcional de cada elemento de configuración y su descripción se muestran en la siguiente tabla: Artículo Opciones...
- Page 20 Electrocardiógrafo PT NL PT NL 6.9 Colocación de cables En la interfaz principal, haga clic en para ver el diagrama esquemático de la colocación de los cables, la norma europea se muestra a continuación:: La norma americana se muestra a continuación: 6.10 Acerca de En la interfaz principal, haga clic para ver la información relativa al dispositivo, como se muestra a continuación:...
-
Page 21: Solución De Problemas
Electrocardiógrafo PT NL PT NL 7. SOLUCIÓN DE PROBLEMAS 7.1 Apagado automático • The battery is almost running out, which causes overdischarge protection circuit action. • The voltage of AC power supply is too high, whichi causes overvoltage protection circuit action. 7.2 Interfaz de CA •... -
Page 22: Mantenimiento
Electrocardiógrafo PT NL PT NL 7.4 Deriva de la línea de base • ¿Es estable la instalación de los electrodos? • ¿Es fiable la conexión de los cables conductores o de los electrodos? • ¿Están los electrodos y la piel del paciente embadurnados con suficiente pasta conductora? •... - Page 23 Electrocardiógrafo PT NL PT NL Ícono Descripción El estado de la batería es desconocido, generalmente aparece 1 minuto después del encendido. Utilizando la fuente de alimentación de CA y la batería está llena o no hay batería en el dispositivo. Utilizando la batería, la batería está...
- Page 24 Electrocardiógrafo PT NL PT NL 8.3 Mantenimiento después del uso • Pulse el botón para apagar el aparato. • Desenchufe el cable de alimentación y el cableado. Sujete el cabezal del enchufe para desconectar y no tire del cable con excesiva fuerza. •...
- Page 25 Electrocardiógrafo PT NL PT NL 9. LISTA DE EMBALAJE Y ACCESORIOS 9.1 Accesorios de embalaje Cuando el aparato sale de fábrica, el embalaje intacto debe contener el siguiente contenido: Nombre Cantidad Electrocardiógrafo 1 ud. Electrodos de tórax (ventosa/corte de electrodos) 1 juego (6 piezas) Electrodos de extremidades (pinza de extremidades) 1 juego (4 piezas)
- Page 26 Electrocardiógrafo PT NL PT NL 2.2 Elementos de interpretación Elemento Elemento No anormal IM lateral alto precoz Modo sinusal Bradicardia Posible IM lateral alto agudo Modo sinusal Taquicardia IM lateral alto antiguo Hipertrofia de la aurícula izquierda IM inferior precoz Hipertrofia de la aurícula derecha Posible IM inferior agudo Hipertrofia de la aurícula doble...
-
Page 27: Uso Previsto
Electrocardiógrafo PT NL PT NL 2.2 Uso previsto El uso previsto de la función de Medición e Interpretación Automatizada se muestra a continuación: Aplicación y diagnóstico Para detectar anomalías del corazón del cuerpo humano, los elementos de examen se refieren a la descripción anterior Población Adolescentes y adultos, rango de edad: 12-87 Lugar de aplicación... - Page 28 Electrocardiógrafo PT NL PT NL Cuando el valor es menor que el valor umbral, puede ser el final del complejo qrs. Tomando como referencia el valor del umbral de 1/4, se encuentra el final del complejo QRS. Si el complejo qrs encontrado es amplio, este complejo qrs se excluirá. En caso contrario, guarde el complejo qrs encontrado.
- Page 29 Electrocardiógrafo PT NL PT NL Calcule el valor medio de los datos 20 ms antes del punto de inicio de la onda P y utilice este valor medio como línea de base de la onda P. Encuentre el valor máximo entre el punto de inicio y el punto final de la onda P, la diferencia entre el valor máximo y la línea de base sería la amplitud de la onda P.
- Page 30 Electrocardiógrafo PT NL PT NL Nota: (1) RR: intervalo RR (2) Qs: inicio de la onda Q (3) Ps: inicio de la onda P (4) Pe: fin de la onda P (5) Se: fin de la onda S (6) Ts: inicio de la onda T (7) Te: fin de la onda T (8) PI: 3.1415926 3.5 Juicios de interpretación basados en parámetros...
- Page 31 Electrocardiógrafo PT NL PT NL IM anteroseptal precoz Infarto de miocardio temprano cambio de las derivaciones V1, V2, V3 ningún cambio de las derivaciones V4, V5 Posible IM anteroseptal agudo Infarto agudo de miocardio cambio de las derivaciones V1, V2,V3, ningún cambio de las derivaciones V4,V5 IM anteroseptal antiguo Infarto de miocardio antiguo cambio de las derivaciones V1, V2, V3, nin-...
- Page 32 Electrocardiógrafo PT NL PT NL Depresión del ST, isquemia miocárdica Depresión leve del segmento ST en las derivaciones I, aVL y sin cambios lateral alta leve en las derivaciones II, III, aVF, V4, V5, V6 Depresión del ST, isquemia miocárdica Depresión leve del segmento ST en las derivaciones II, III, aVF y sin cam- inferior leve bios en las derivaciones I, aVL...
- Page 33 Electrocardiógrafo PT NL PT NL 4.2 Introducción del CTS El proyecto CTS de pruebas de conformidad de ECG informatizadas fue lanzado en 1989 por la Unión Europea. Este proyecto sentó las bases del servicio de pruebas de conformidad de ECG informatizadas. En la actualidad, se han diseñado unos 20 tipos de forma de onda derivados de las señales de prueba que tienen una longitud infinita, estas señales forman parte de la base de datos de pruebas CTS-ECG y han demostrado su eficacia en una serie de pruebas oficiales.
- Page 34 Electrocardiógrafo PT NL PT NL 4.5. Preprocesamiento de datos 4.5.1 Preprocesamiento de CTS Los 16 casos (CAL05000, CAL10000, CAL15000, CAL20000, CAL20002, CAL20100, CAL20110, CAL20160, CAL20200, CAL20210, CAL20260, CAL20500, CAL30000, ANE20000, ANE20001, ANE20002) del CTS-ECG se procesarán para la conversión de la tensión y la conversión de la frecuencia para el remuestreo según el formato aplicable en el sistema.
- Page 35 Electrocardiógrafo PT NL PT NL • Verificación y proceso para la base de datos de medición de CSE: Importar los archivos de casos convertidos en el dispositivo, añadir los registros de la base de datos apropiados, entonces la forma de onda para todos los archivos de casos puede ser revisada en el dispositivo, por lo tanto los parámetros de medición automatizados pueden ser obtenidos.
- Page 36 Electrocardiógrafo PT NL PT NL 5.1.3 Resultados de la verificación •Exactitud de las mediciones de amplitud Se utilizarán ECG de calibración y analíticos para medir el valor de la amplitud, cuyo resumen es el siguiente Amplitud Diferencia media (uV) Desviación estándar (uV) Onda P -1.70 5.72...
- Page 37 Electrocardiógrafo PT NL PT NL Los ECG biológicos se introducen en el dispositivo en forma de señales digitales, y luego se puede obtener el valor de la medición mediante un cálculo. Condición Tes: a) sin RUIDO b) con 25uV de alta frecuencia c) con 50uV de pico a valle de 50Hz/60Hz de frecuencia de línea sinusoidal NOISE d) con ruido de base sinusoidal de 1mV de pico a valle de 0,3Hz Para cada nivel de ruido anterior, se determinarán las diferencias de las mediciones entre el ECG sin ruido y los ECG con ruido.
- Page 38 Electrocardiógrafo PT NL PT NL • Base de datos personalizada Inicio Datos iniciales del caso Formato de ECG según el sistema requerido Importar al dispositivo Dibujar la forma de onda del ECG Diagnóstico experto Identificar el complejo QRS Superposición del complejo QRS Parámetro de medición automática Concluir los elementos de interpretación automática Comparar...
- Page 39 Electrocardiógrafo PT NL PT NL Integridad Bloqueo de rama derecha 97.00 89.50 95.45 Completo Bloqueo de rama izquierda 97.73 89.65 91.43 No hay integridad Bloqueo de rama derecha 96.86 89.83 82.35 No se completa Bloqueo de rama izquierda 94.68 89.93 89.66 V1 muestra el tipo "RSR".
- Page 40 Electrocardiógrafo PT NL PT NL Depresión del ST, isquemia miocárdica lateral 80.64 99.14 47.39 leve y alta Depresión del ST, isquemia miocárdica inferior 79.73 99.60 55.16 leve Depresión del ST, isquemia miocárdica 80.59 99.26 50.61 inferolateral leve Depresión del ST, isquemia miocárdica 85.41 99.72 44.44...
- Page 41 Electrocardiógrafo PT NL PT NL Caídas de tensión, interrupciones breves <5% UT (< 95% de caída en UT) para 0,5 <5% de UT (< 95% de caída de UT) duran- y variaciones de tensión en las líneas de ciclos te 0,5 ciclos entrada de la fuente de alimentación 40% UT (60% de caída en UT) para 5 40% de UT (60% de caída de UT) durante...
- Page 42 Electrocardiógrafo PT NL PT NL RF radiada 1720 1700-1990 GSM 1800; CDMA Modulación de pulso b) IEC6100 1900; GSM 1900; 217 Hz 1845 0-4-3 DECT; LTE Band 1, 3, (Especifica- 4, 25; UMTS 1970 ciones de 2450 2400-2570 Bluetooth, WLAN, Modulación de pulso b) prueba para la 802.11 b/g/n, RFID...
- Page 43 Electrocardiograph PT NL INSTRUCTION MANUAL ELECTROCARDIOGRAPH ECG600G Please read instructions before use.
- Page 44 Electrocardiograph PT NL NOTICE Notice to the user and/or patient; any serious incident that has ocurred in relation to the product must be informed to the manufacturer and to the local authority of the Member State in which the user and/ or patient is established.
-
Page 45: Main Characteristics
The device is intended for use on all patient populations, which is decided by the clinical doctor. The analysis program only provides ECG analysis for patients above 3 years old (included). • Name of software: ECG600G embedded software. • Software specification: none •... - Page 46 Electrocardiograph PT NL device must be run with built-in DC power supply. • The safety requierements hava been fully considered in product designing, but the operator can't ignore the observation of the patient and device. Cut off the power or take off the electrode when necessary to ensure the patient's safety. •...
-
Page 47: Control Unit
Electrocardiograph PT NL 3. WORKING PRINCIPLE AND STRUCTURAL CHARACTERISTICS 3.1 Working principle and its block diagram 3.1.1 The power supply unit • Principle of power supply After the AC power supply enters the switching power suuply, it is converted to 12V DC voltage and supplied to the DC-DC power board, it also provides constant voltage current limiting charging for the rechargeable lithium battery in the device through the DC- DC circuit and generates +5V and +3.3V voltage through the power conversion to supply power to the corresponding modules. -
Page 48: Side View
Electrocardiograph PT NL 3.2 Name of parts and functions 3.2.1. Front view Figure 4-2 Front view 1. Paper compartment cover. Keeps the paper compartment closed, holds the printing paper. 2. Display screen. Displays patient's ECG and related information. 3. Button area. Controls the operations of the device and enter the information. WARNING: •... - Page 49 Electrocardiograph PT NL 3.2.3. Buttons 1. Startup indicator: lights in green after turning on the device. 2. Power status indicator: Green indicates that the AC power supply is being used. At this time there is no battery in the device or the battery is full.
-
Page 50: Operation Precautions
Electrocardiograph PT NL Temperature limitation Humidity limitation This way up Fragile, handle with care Keep away from rain Stacking limit by number This item is compliant with Medical Device Directive 93/42EEC of June 14, 1993, a directive of the European Economic Community Refer to instruction manual/booklet Catalogue number Authorized representative in the European Community... -
Page 51: Precautions After Use
Electrocardiograph PT NL 4.3 Precautions after use • Set the states of all functions to initial states. • Cut off the power, gently remove the electrodes and limb clips, then remove the lead cables, do not pull with force. • Clean the device and all accessories and store them for the next use. 5. -
Page 52: Electrode Installation
Electrocardiograph PT NL 5.2.2 Battery The device has a built-in rechargeable lithium battery, which does not need to be re-installed by the user. Check the battery's power and status before use. Warning: Connect one end of the potential equalization wire to the equipotential terminal of the device and connect the other end to the ground to enhance the reliability of the grounding. - Page 53 Electrocardiograph PT NL 5.4.3. Colors of lead cables European standard American standard Electrode position Mark Color Mark Color Right arm White Left arm Yellow Black Left leg Green Right leg N/RF Black Green Chest 1 Chest 2 Yellow Yellow Chest 3 Green Green Chest 4...
-
Page 54: Main Interface
Electrocardiograph PT NL 6. OPERATION INSTRUCTIONS AND PARAMETER SETTING 6.1 Main interface Disk stroage Current patient Power status used file account Function buttons A. Time System time can be set in so the detail time of the ECG recording can be noted. B. -
Page 55: Sampling Interface
Electrocardiograph PT NL Select to set the print mode, print style and print content, etc. Select to view the information about our company, software version. Quick switch: use the buttons on the keyboard to switch between each function module, after selecting press button to enter its setting. - Page 56 Electrocardiograph PT NL • Display field The screen displays sampled 12-lead ECG waveform, by double clicking the waveform, you can swtich between 3-lead, 6-lead and 12-lead. • Operation field Control the print display mode of the device through corresponding operation settings. 1.
-
Page 57: Case Management
Electrocardiograph PT NL The keyboard may have input restrictions according to the limitation of content. The restricted keys will be grayed out and unavailable, as shown below: 6.4 Case management In the main interface, click to enter the case management interface, as shown below: The above interface shows all medical records stored in the device. - Page 58 Electrocardiograph PT NL 6.4.1 Query Click "Query" to enter the query interface shown below. Input query conditions and click "Query" to obtain expected results. After clicking "Clear", the system will clear all query conditions that have been entered. "Cond.And" and "Cond.Or" indicate the matching mode of the query conditions. You can choose one of the two. If you select "Cond. And", the displayed query results will satisfy all the input conditions at the same time;...
-
Page 59: Date And Time Setup
Electrocardiograph PT NL In review interface, users can use button to switch print mode and use to print. 6.5 Date and time setup In the main interface, click to enter the following interface to set date and time. In the current itnerface, the user can switch between items using the buttons and adjust the content of the item with the buttons . -
Page 60: Sampling Setup
Electrocardiograph PT NL Item Options Description Back-light [30 seconds]/[1 minute]/[2 minutes]/[5 If there is no operation after reaching the set time, screen minutes]/[10 mintues]/[Always on] backlight will turn off. If it is set to "Always On", the backlight will always stay on. Light-degree [40% degree]/[60% degree]/[80% de- After setting light degree, the screen will display different... -
Page 61: Print Setup
Electrocardiograph PT NL 6.8 Print Setup In the main interface, click to enter the print setup interface, as show below: After clicking "Default", the system will restore all settings to default. The optional content of each setting item and its description are shown in the following table: Item Options Description... -
Page 62: Lead Placement
Electrocardiograph PT NL 6.9 Lead placement In the main interface, click to view the schematic diagram of lead placement, the European Standard is shown as below: The american standard is shown as below: 6.10 About In the main interface, click to view the information regarding the device, as shown below:... -
Page 63: Troubleshooting
Electrocardiograph PT NL 7. TROUBLESHOOTING 7.1 Auto shutdown • The battery is almost running out, which causes overdischarge protection circuit action. • The voltage of AC power supply is too high, which causes overvoltage protection circuit action. 7.2 AC Interface •... -
Page 64: Baseline Drift
Electrocardiograph PT NL 7.4 Baseline drift • Is the electrode installation stable? • Is the connection of lead cables or electrodes reliable? • Are the electrodes and patient's skin daubed with enough conductive paste? • Is it caused by the patient's movement or breathing? •... -
Page 65: Maintenance
Electrocardiograph PT NL 8. MAINTENANCE 8.1 Battery The device is designed with built-in fully sealed and maintenance-free rechargeable lithium battery, also equipped with perfect auto-charging and discharging monitor system. When the device is connected to AC power supply, the battery will be charged automatically. - Page 66 Electrocardiograph PT NL • High temperature, humidity and sunlight may cause the recording paper to change color. Please keep the recording paper in a dry and cool place. • Please do not place the recording paper under fluorescent light for a long time, otherwise it will affect the recording effect. •...
-
Page 67: Packing List And Accessories
Electrocardiograph PT NL 9. PACKING LIST AND ACCESSORIES 9.1 Accopmanying accessories When the device is shipped from the factory, the intact packaging should contain the following contents: Name Quantity Electrocardiograph 1 pc Chest electrodes (suction cup/electrode slice) 1 set (6 pcs) Limb electrodes (limb clip) 1 set (4 pcs) ECG lead cable... - Page 68 Electrocardiograph PT NL 2.2 Interpretation items Item Item No abnormal Early high lateral MI Sinus mode Bradycardia Possible acute high lateral MI Sinus mode Tachycardia Old high lateral MI Left atrium Hypertrophy Early inferior MI Right atrium Hypertrophy Possible acute inferior MI Dual atrium Hypertrophy Old infolateral MI QRS low voltage...
-
Page 69: Intended Use
Electrocardiograph PT NL 2.2 Intended use The intended use of the Automated Measurement and Interpretation function is shown as below: Application and diagnosis To detect abnormalities of the heart of the human body, examination items refer to above description Population Teenagers and adults, age range: 12-87 Application site Hospitals... - Page 70 Electrocardiograph PT NL When the value is less than the threshold value, it may be the end of qrs-complex. Tale the 1/4 threshold value as a reference, find the end of qrs-complex. If the found qrs-complex is wide, this qrs-complex shall be excluded. Otherwise, save the found qrs-complex. D.
- Page 71 Electrocardiograph PT NL • Q/R/S wave Calculate the average calue of the data 10-30 ms before the start point of QRS complex and use this average value as the baseline QRS complex. Search boundary points that exceed the baseline from the start point of Q wave to the end of S wave. Each adjacent two boundary points forms a sub-wave.
- Page 72 Electrocardiograph PT NL Note: (1) RR: RR-interval (2) Qs: beginning of the Q-wave (3) Ps: beginning of the P-wave (4) Pe: end of the P-wave (5) Se: end of the S-wave (6) Ts: beginning of the T-wave (7) Te: end of the T-wave (8) PI: 3.1415926 3.5 Interpretation judgments based on paramteres Item...
- Page 73 Electrocardiograph PT NL Possible acute forepart anteroseptal MI Acute myocardial infaction change of leads V1, V2,V3, no change of leads V4,V5 Old ateroseptal MI Old myocardial infatction change of leads V1, V2, V3, no change of leads V4, V5 Early anterior MI Early myocardial infarction Possible acute anterior MI Acute myocardial infarction change of leads V3, V4, V5 no change of...
-
Page 74: Data Sources
Electrocardiograph PT NL ST depression, mild inferior myocardial Mild ST-segment depression leads of II, III, aVF, and no change of leads ischemia I, aVL ST depression, mild inferolateroal myo- Mild ST-segment depression of leads I, II, III, aVL, aVF cardial ischemia ST depression, anteroseptal myocardial Severe ST-segment depression of leads V1, V2, V3 and no change of ischemia... - Page 75 Electrocardiograph PT NL 4.2 CTS introduction The CTS computerized ECG conformance testing project was launched in 1989 by the European Union. This project laid the foundation for cumputerized ECG conformance testing service. Currently, about 20 types of waveform have been designed derived from the test signals having an infinite length, these signals are part of the CTS-ECG test database and have proven their effectiveness in a series of official tests.
- Page 76 Electrocardiograph PT NL Note: The heart abnormalities such as posterior myocardial ischemia, early posterior MI and olf posterior MI are not included in the database. These abnormalities and other heart disorders not contained in above sheet won't be regarded as the judment object for the verification of automated interpretation accuracy.
- Page 77 Electrocardiograph PT NL • Verification and Process for CSE measurement database: Import the converted case files into the device, add appropiate database records, then waveform for all case files can be reviewed in the device, therefore the automated measurement parameters can be obtained.
- Page 78 Electrocardiograph PT NL 5.1.3 Verification results • Accuracy of amplitude measurements Calibration and analytical ECGs shall be used to measure the amplitude value, the summary as follows: Amplitude Mean difference (uV) Standard deviation (uV) P-wave -1.70 5.72 Q-wave 7.51 18.07 R-wave -18.05 21.70...
- Page 79 Electrocardiograph PT NL The biological ECGs are fed into the device in form of digital signals, then the measurement value can be obtained by calculation. Tes condition: a) without NOISE b) with 25uV high frequency c) with 50uV peak to valley 50Hz/60Hz sinusoidal line frequency NOISE d) with 1mV peak to valley 0.3Hz sinusoidal base-line NOISE For each NOISE level above, the differences of measurements between the NOISE-free ECG and the ECGs with NOISE shall be determined.
- Page 80 Electrocardiograph PT NL • Customized database Start Initial case data ECG format as system required Import to device Draw ECG waveform Expert diagnosis Identify QRS-complex QRS-complex superposition Auto measurement parameter Conclude automated interpretation items Start comparing Summarize the global statistical results of comparison for each case 5.2.2 Verification results Item ECGs number...
- Page 81 Electrocardiograph PT NL Completeness Right Bundle branch 97.00 89.50 95.45 block Completeness Left Bundle branch 97.73 89.65 91.43 block No completeness Right Bundle 96.86 89.83 82.35 branch block No completeness Left Bundle 94.68 89.93 89.66 branch block V1 shows RSR' type 90.32 91.14 65.12...
-
Page 82: Appendix Ii Emc Guidance And Manufacturer Declaration
Electrocardiograph PT NL ST depression, mild apical myocar- 76.97 99.14 43.13 dial ischemia ST depression, mild anterolateral 77.54 99.08 37.64 myocardial ischemia ST depression, mild high lateral 80.64 99.14 47.39 myocardial ischemia ST depression, mild inferior myocar- 79.73 99.60 55.16 dial ischemia ST depression, mild inferolateral 80.59... - Page 83 Electrocardiograph PT NL Surge IEC 61000-4-5 ±1 kV lines to lines ±1 kV lines to lines ±2 kV lines to earth ±2 kV lines to earth Voltage dips, short interruptions and <5% UT (< 95% dip in UT) for 0.5 cycle <5% UT (<...
- Page 84 Electrocardiograph PT NL Radiated RF 1720 1700-1990 GSM 1800; CDMA Pulse modulation IEC6100 1900; GSM 1900; b) 217 Hz 1845 0-4-3 DECT; LTE Band 1, (Test speci- 3, 4, 25; UMTS 1970 fications for 2450 2400-2570 Bluetooth, WLAN, Pulse modulation ENCLOSURE 802.11 b/g/n, RFID b) 217 Hz...
- Page 85 Electrocardiograph PT NL...
Need help?
Do you have a question about the ECG600G and is the answer not in the manual?
Questions and answers