Imperial DABMAN i200 Manual
- Operating manual (45 pages) ,
- Operating manual (116 pages)
Advertisement
- 1 INTRODUCTION
- 2 Main parts
- 3 SAFETY NOTICES
- 4 INSTALLATION
- 5 OPERATION
-
6
TROUBLESHOOTING
- 6.1 No display indication, radio does not respond to operation
- 6.2 No operation via remote control possible
- 6.3 DAB+ reception poor
- 6.4 FM reception poor
- 6.5 AUX function not working
- 6.6 Poor audio quality when playing music
- 6.7 Volume too low
- 6.8 Network connection cannot be established
- 6.9 Wi-fi (W-LAN) connection cannot be established
- 6.10 No Internet radio stations available
- 7 FEATURES AND TECHNICAL DATA
- 8 Documents / Resources
INTRODUCTION
Thank you for purchasing the DABMAN i200. When you use the DABMAN i200 for the first time, please read these instructions carefully, and retain them for reference in future. You will be able to fully enjoy the many functions of the radio only if you follow the instructions.
This operating manual will assist you with the
- correct
- safe
- optimal
use of the IMPERIAL DABMAN i200. We assume the user of the radio has general knowledge related to the operation of consumer electronics products.
Any person
- installing
- connecting
- operating
- cleaning
- disposing of
this radio must first have taken notice of the entire contents of this operating manual. Always keep this operating manual close to the radio.
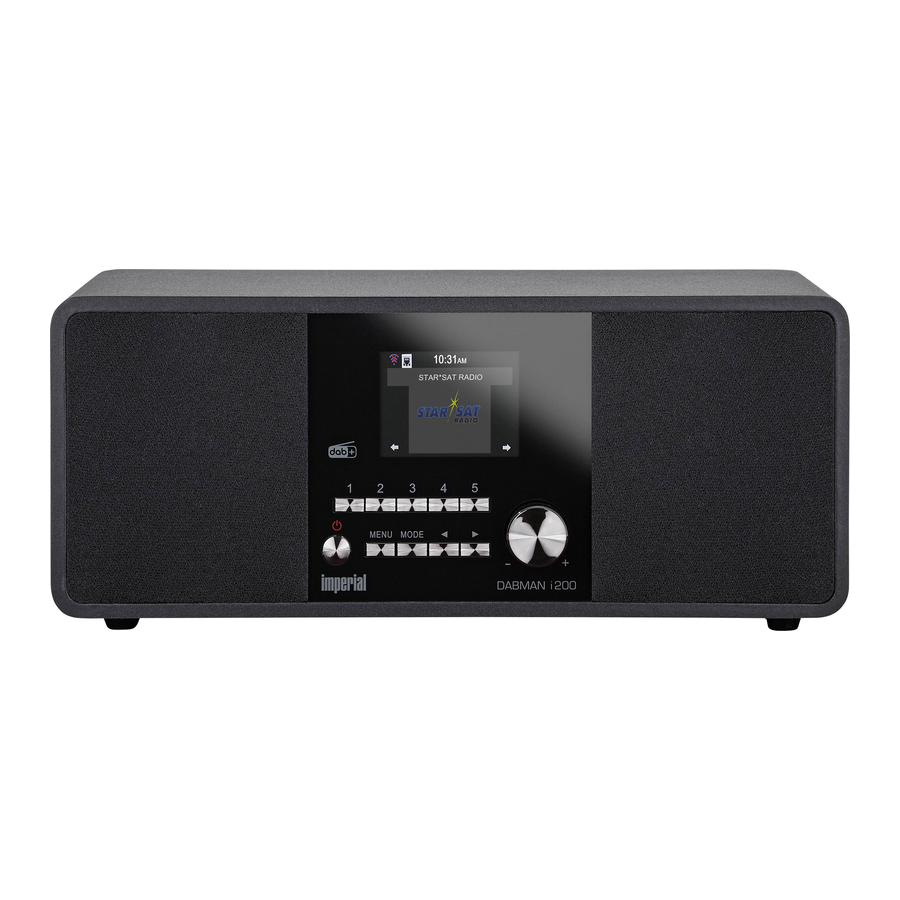
Main parts
(image A)

- Station memory keys 1-5
- Power key on/off
Use this key to switch the radio on or to standby. - Menu key
Calls up the menu of the radio. - Mode
Here you can select the operating mode of the unit, bet ween Internet radio, DAB+, FM, uPnP, AUX and USB. - Navigation/ station selection
Use this key to navigate in the menu, or to select the next station in the station list. - Navigation/ station selection
Use this key to navigate in the menu, or to select the next station in the station list. - Volume control, confirmation key
Use the rotary dial to adjust the volume, or confirm menu entries by pressing the key. - Display
- Power switch
Here you can switch the radio on or off. The radio will be disconnected from the power supply in position 0. - Mains adapter connection
Use this socket to connect the radio with the mains adapter (supplied). - USB connection
Here you can connect the radio with a USB storage device like USB HDD drive or USB Stick in order to reproduce music files from this. - LAN connection
Here you can connect the radio via a network cable with an existing network in order to use the Internet radio function. Alternatively the radio can also be connected via WiFi. - AUX IN
Here you can connect an external audio source such as an MP3 player, smartphone or tablet, using the 3.5 mm AUX cinch cable. - LINE OUT
Here you can connect the radio with a hi-fi amplifier or with active loudspeakers in order to process the music received through the radio via a sound system. - Headphone socket
Here you can connect a headphone, in order to listen to music played on the radio via headphones. When headphones are connected, music reproduction via the radio loudspeakers will be interrupted. - Rear panel
(image B)

- Standby button
Use this button to turn the device on or off. - Sleep
Use this button to turn the sleep timer of the unit on or off. - WPS button
With this button you can establish a W-LAN connection in your home network. - Alarm
Use this button to activate the alarm clock function - Display dimmer
Adjusts the brightness of display - Local radio
- UPnP
Enables the device's UPnP function. - Repeat
Use this button to repeat playback of one or more tracks - Shuffle
This activates random playback - Menu
Use this button to activate the device's menu - Mode
Switches between the various modes, FM Radio, Internet Radio, My Music, DAB Radio - Enter
This button is used to confirm an entry - Navigation up/down - left/right
Use these buttons to navigate through the menu - Select previous track / rewind
Use this button to select the previous track or to rewind. - Select next track / fast forward
Use this button to select the next track or to fast forward. - Play
Starts or pauses playback - Mute
Mutes the device's volume to silent. - Stop
Stops playback - V+ volume
Increases the volume - Numerical keypad
- V- volume
Decreases the volume - EQ equalizer function
You can activate the equalizer function and configure custom sound settings using this button. - Language
You can change the menu language with this button. - Favourites button
Turns on one of the individually stored favourite channels.
Items supplied
| Quantity | Declaration |
| 1 | DABMAN i200 |
| 1 | Remote control |
| 1 | External mains adapter |
| 1 | Operating manual |
| 1 | Guarantee card |
SAFETY NOTICES
Please read the safety notices carefully before operating the radio. Please note all warnings and instructions both on the product and in the operating manual.
Explanation of safety notices
You will find the following categories of safety notices in the operating manual:

Notes marked with the word DANGER will warn you of possible danger of injury to persons.
 Note!
Note!
Instructions with the word NOTE will warn you of possible material or environmental damage. These notes contain special advice related to the economic operation of the receiver.
Basic safety notices
- In case of operating problems, disconnect the radio from the power source.
- To avoid the risk of fire or the danger of an electrical shock, do not expose the radio to rain or to very humid, wet conditions.
- Do not open the housing of the product, otherwise you are at risk of getting an electrical shock.
- Only connect the radio to the mains current via a correctly in stalled 220 – 240 V~, 50 – 60 Hz mains outlet.
- If you will not be using the radio for an extended period, disconnect the external mains adapter from the mains outlet. Only pull out the adapter, do not pull on the cable.
- In case of an electrical storm, disconnect the mains adapter of the radio from the mains outlet.
- Should liquid or foreign objects fall into the radio, immediately dis connect the mains adapter from the mains outlet. Have the product checked by qualified personnel before resuming operation. Otherwise you are in danger of getting an electrical shock.
- Please ensure the electrical outlet (plug) is easily accessible.
- Do not squeeze or sharply bend cable connections.
- If the mains cable is damaged, you must have the radio repaired by an expert before using it again. Otherwise you are in danger of getting an electrical shock.
- Never allow children to use the radio without supervision.
- Always leave maintenance or repair work to qualified personnel. Ignoring this may endanger yourself and others.
- In case of operating problems, disconnect the radio from the power supply.
- Obtain spare parts exclusively from the manufacturer.
- Changes to the product will result in a termination of liability by the manufacturer.
- Remove protective foils/films.
- Use only a dry cloth to clean the equipment
Note!
Note on disconnecting from mains supply. The product draws power even when in standby mode. To completely disconnect the product from the mains supply, the adapter must be disconnected from the mains outlet.
Correct positioning
- Place the radio on a firm, even surface.
- Avoid placing the radio close to sources of heat, e.g. radiators, open fires, e.g. candles, or devices with strong magnetic fields, e.g. loudspeakers.
- Do not place any containers with liquids (e.g. vases) on the radio.
- Avoid places subject to direct sunshine or with a very high level of dust.
- Do not cover the ventilation slots. Ensure adequate circulation of air around the radio.
- Do not place any heavy objects on the radio.
- When moving the radio from a cold to a warm environment, humidity may condense inside the radio. In this case you should wait for an hour before operating the radio again.
- Place the mains cable in such a position that nobody will step on it or trip over it.
Correct handling of batteries
- Batteries may contain poisonous substances. Ensure batteries are not handled by children. Children could place the batteries
- in their mouth and swallow them. If a battery is swallowed, please consult a doctor immediately.
- Leaking batteries may damage the remote control. If the radio is not going to be used for an extended period, remove the batteries.
- Batteries may contain poisonous substances. Batteries must be disposed of in accordance with current legal regulations and with consideration for the environment. Do not dispose of batteries in your domestic waste.
- Do not expose batteries to open flames or extreme heat, as they may explode.
- Always replace batteries by the same type.
INSTALLATION
Please remove the parts carefully from the packaging. Check whether all parts are present.
Note!
The radio can be controlled both by the keys on the radio as well as via the remote control. The operation via the remote control is more convenient and easy method of playing the DABMAN i200. For this reason, this operating manual will focus of setting up and operating the radio via the remote control supplied.
If the radio is connected to a network, it can also be controlled via the application AirMusicControl App. This application is available for Android and IOS operating systems. For more details see Chapter Air music control.
Power supply
First, connect the mains adapter supplied with the corresponding socket on the rear panel A16 of the DABMAN i200. Now connect the mains adapter to a 220 V outlet. Then extend the telescopic antenna on the rear panel A16 of the radio to its full extent, this will ensure the best possible reception, if you wish to receive terrestrially broadcast stations via the antenna.
Network connection
To use the Internet functions of the radio, it must be connected to a network. You can establish the connection via a cable (LAN) or via the integrated W-LAN receiver. If you are using a LAN cable, connect this with the LAN socket A12.
Language selection
Switch on the power switch A9 on the rear panel A16 of the radio.
The radio will be switched on.
Use the Up/down keys B13 of the remote control to select the menu language. Confirm the menu language selected by pressing the ENTER key B12 on the remote control.
Checking the network
If you wish to connect the radio with your home network, confirm the question displayed by pressing Yes. If this setting is selected, the radio will check for available networks each time it is switched on.
Network configuration
To connect your radio with the network, confirm the question displayed by pressing Yes. If you do not wish ot connect the radio with a network, you can bypass this menu item by selecting No.
Network selection
Select the type of connection to be used to connect the radio with a network. If you have connected a LAN cable, select Cable Network, and if you wish to establish a wi-fi connection (W-LAN) select Wireless Network.
When selecting a connection via W-LAN (wireless network) all available networks will be displayed. Select the network with which the connection is to be established
Enter the W-LAN key. Use the arrow keys B13 to select a symbol, continue by pressing the right arrow key. Confirm the entry by pressing ENTER B12.
OPERATION
Press the Menu key A3 on the radio or on the remote control to go to the main menu of the radio. The radio will automatically close the menu after 10 seconds, and will revert to the radio mode previously selected, a display in the bottom right-hand corner will show the seconds, counting backwards.
You can navigate around the menu using the arrow keys B13.
The main menu of the radio consists of the following menu items:
 | Settings |  | FM |
 | Local Station |  | DAB |
 | Internet Radio |  | Information Center |
 | Media Center |  | Audio |
You can select the individual menu items using the arrow keys B13. Confirm your selection by pressing the ENTER key B12.
Configuration
Press the Menu key B10 on the radio or on the remote control, and use the arrow keys B13 to select Settings.
You can make individual settings for the radio under this menu item.
Mode
Select the operating mode of the radio.
If you select the mode Radio Alarm, the radio will switch to a digital clock on the display. Go to the menu item ALARM to configure the radio as a radio alarm.
My MediaU Management
Here you can activate or deactivate the MediaU Management function.
The MediaU Management function allows you to save an individual station list, and to play these stations.
To set up and activate your station list, you will require a login on the following Internet page: http://www.mediayou.net/
If your log-in is successful, you can register your radio. To do this, please enter the MAC address of the radio as a serial number. The MAC address of the radio can be found under the item Information Center.
Whenever you have updated the web page, on which you can manage and update your personal radio stations, please navigate your radio to My MediaU Management to synchronize the changes.
Network
Here you can configure your network settings. Use the arrow keys B13 to select the desired menu item, and confirm by pressing ENTER B12.
The network will be configured as described under Point Checking the network.
Date Time
Here you can set the time and date.
The radio is set to automatic time setting at the factory. When the radio is connected to the Internet via a network, the time and date will be synchronized automatically. In this case it is not necessary to set the time.
Alarm
The radio can be used as a radio alarm.
This menu item allows you to set 2 wake-up times if desired. Also, you can set whether the alarm is to go off at the set time with a note, a melody, an Internet radio station, a DAB+ radio station or an FM station.
When you have entered the alarm time, activate the radio alarm function in the menu.
To stop the alarm, press the Enter key B12 on the remote control, or key 7 A7 on the radio.
To do this, go to Settings and select the menu item Mode, and switch the operating mode to radio alarm here (Chapter Mode).
Timer
The timer allows you to set a time at the end of which the radio will sound an alarm.
To do this, use the arrow keys B13 to enter the time in minutes and seconds. Pressing the key repeatedly will increase or decrease the time in one-second steps, hold the right arrow key or left arrow key down for longer to scan forward or backward through time.
Confirm your entry by pressing Enter B12.
Language
Here you can set the menu language of the radio.
Dimmer
The dimmer function allows you to adjust the brightness of the dislay. The radio is set to the highest level of brightness at the factory. Use this menu item to adjust the brightness individually.
Display
Here you can change the multi-colour display to black and white, if required.
Energy management
Here you can determine whether resp. after what interval the radio should switch automatically from the operating to stand-by mode. You can select from 5, 15 and 30 minutes.
If the radio does not switch off automatically, go to the line Switch Off, and confirm the command with Enter B12.
Weather
If the radio is connected with the Internet, you can also show weather information on the radio display. This menu item allows you to select the place for which weather information is to be shown. You can also specify the temperature units.
Weather information is displayed in stand-by mode. The radio will alternate the display automatically between weather data and the current time.
FM Settings
Here you can switch between stereo and mono reproduction of FM radio reception.
This setting can be useful if you are tuned to an FM station with a weak and distorted signal. In this case, change the setting to Mono to improve the quality.
Setting for local stations
To facilitate the search for stations in your area while in Internet radio mode, you can search specifically for radio stations in your region using the menu.
To do this, you must inform the radio of your location. Here you can enter your location manually, or activate an automatic location search.
Play/reproduction settings
Here you can set the play/reproduction settings applicable when playing audio files via an external USB data medium.
DLNA setting
The radio is capable of communicating with DLNA-enabled equipment. For example, it is possible to reproduce audio files on a DLNA- enabled cell phone via the radio. Here you can change the name of the equipment used to indicate the radio on a DLNA unit.
Equalizer
Here you can select certain pre-selected sound settings. Alternatively, you can also press the EQ key on the remote control while the unit is in operation.
Software Update
It may be necessary to update the operating software in order to improve the functions of the radio.
The USB interface allows you to update the operating system of your radio, provided you have the requisite software, which is available for downloading on www.telestar.de.
The software provided on the Internet page must be unpacked. The unpacked files can then be saved on a suitable storage medium, and connect this with the radio via the USB connection A12.
Factory default settings
In this menu item you can reset the radio to the condition it was in when supplied by the factory. The radio will then commence with a setup as per initial operation.
Local station
Press the Menu key A3 on the radio or on the remote control, and use the arrow keys B13 to select Local Station.
Under this menu item, the most popular Internet radio stations as well as DAB+ radio stations are sorted by geographic region, and can thus be found more easily.
In this menu item, you can use the arrow keys B13 to select the desired program list. Confirm your selection by pressing Enter B12. If you wish to call up radio stations broadcast via DAB+, select DAB. All other radio selection options refer to the reception of Internet radio.
Internet radio
Press the Menu key A3 on the radio or on the remote control, and use the arrow keys B13 to select Internet Radio. In the Internet radio menu you can select and manage all Internet radio stations. As many as 10,000 radio stations may be available, provided your radio is connected to a network that is in turn connected to the Internet.
My Favourites
You can use this menu to select one of the 5 favourite stations you have saved via the station saving keys A1 on the radio. Alternatively, the radio stations can also be called up via the station saving keys A1 on the radio, or by directly entering the number on the remote control.
Radio stations Music
Here you can select between different radio station lists. Use the arrow keys B13 and confirm by pressing Enter B12.
Local Stations
Under this menu item you will find the most popular Internet radio stations and DAB+ stations sorted by geographic region, and can thus be called up more easily. See also Chapter Local station.
Last station selected
This menu item will show you a list of the Internet radio stations you have selected most recently.
Note!
A precondition for the contents of the menu sub-item „last selected" is that you must have used the Internet radio mode previously. When you switch to this mode for the first time, the list will not yet reflect any entries.
Service
This menu item allows you to search specifically for a radio station in the Internet. To do this, you must enter the name of the station. Go to the menu Service and select Scan for station, then confirm by pressing Enter B12.
Use the keys on the remote control to enter the name of the radio station in the search field. Use the right arrow key to move on by one character. Confirm the entry by pressing Enter B12. The radio will now scan for all stations corresponding with this entry. Select a station by using the arrow keys, and confirm by pressing Enter B12. Alternatively you can also add new radio stations if you know their Internet address.
To do this, enter the Internet address of the radio provider.
Media center
Press the Menu key A3 on the remote control or on the radio, and use the arrow keys B13 to select Media Center. If the DABMAN i200 is connected to a wireless network, the radio can also be used as a media player in order to reproduce music data from PCs or smartphones connected to the same home network via UPnP or DLNA, and given that the appropriate media contents have been released for distribution in this network. To select the media player option, proceed as follows: Use the arrow keys B13 to select the area from which you wish to play music.
You have the choice of selecting either USB (USB data source connected to the USB socket of the radio) or UPnP (music data via the UPnP protocol, if these are available in the same network as the radio).
You can also connect a CD USB Drive on USB port, to playback Audio CDs as well as audio files from a Compact Disc.
Select a title you wish to play, and confirm by pressing Enter B12.
Use the fast forward key B15 to go to the next title. Use the rewind key B14 to go back one title.
Use the play key B16 to pause during play, press again to continue playing.
FM
Press the Menu key A3 on the remote control or on the radio, and use the arrow keys B13 to select FM.
In this menu you will find all the relevant settings to receive radio stations via the FM band.
FM station scan
When the DABMAN i200 is switched to the FM mode for the first time, a station scan must be performed. To do this, both an automatic and a manual scan function are available.
Automatic FM scan
When you have switched to FM, press the Enter key B12. The radio will start the automatic station scan and will save all stations found.
The radio can store up to 20 FM radio stations.
FM radio operation
To call up the radio stations saved, press the fast forward key B15 or rewind key B14. Alternatively, you can also call up the first 5 stations saved via the station keys 1-5 A1 on the radio. If you wish to change the allocation of the station saving keys, press the station selection key A5 to perform a scan to the next station that can be received. If necessary, repeat this step until you have found the desired station. Then press the desired station selection key 1- 5 A1 for approx. 2 seconds. The station will now be saved on this key.
DAB
Press the Menu key A3 on the radio or on the remote control, and use the arrow keys B13 to select DAB.
DAB station scan
In addition to FM stations, the radio can also receive DAB+ radio, digital radio broadcast via terrestrial antenna.
When the radio is switched on to DAB mode for the first time, it will start an automatic station scan in order to scan for all stations that can be received at that location.
The station scan will begin, and the display will show a scan progress bar. As soon as the scan has been completed, the radio will begin playing the station most recently selected.
Station selection
Navigate in DAB mode using the arrow keys B13 to scroll through the DAB+ stations that have been found. To change channels, press the ENTER key B12. The radio has a favourites memory, in which you can save your favourite stations.
To save a station go to the desired station as described above. Now hold down the FAV button B24 on the remote control for about 5 seconds. Use the arrow keys B13 to move the station to the desired place in the favourites memory and press the OK button to save the station to this place.
Alternatively, you can choose up to 5 stations using the station-save buttons 1-5 A1 on the device. To do this switch to a desired station and keep one of the station-save buttons A5 pressed for about 5 seconds. The program is then stored at the corresponding position.
DAB Radio Operation
You can open the favourites list using either the FAV button B24 or by pressing the desired number key on the remote control. The first 5 stations of the favourites list can also be selected using the station memory buttons A1 on the device.
Information center
Weather and Finances
Press the Menu key A3 on the remote control or on the radion, and use the arrow keys B13 to select Information Center. In this area you will have access to current weather and financial information.
Under the heading Weather Information select the country and city for which you would like the weather forecast to be displayed. Confirm your selection by pressing Enter B12. Navigate through the menu using the arrow keys B13.
Weather information can also be displayed in stand-by mode. Use the right arrow key to add the weather information selected to the stand- by weather display. The weather display for stand-by mode can be activated as described in Chapter Local station. Similar to the procedure for the weather forecast, you can also have financial services and stock market figures from around the world displayed.
Systeminformation
In this menu you can monitor the details of the network connected. The information includes, among others, the MAC address, which is necessary to register you radio for mymediaU. (See also Chapter My MediaU Management)
AUX
If you connect an external device (e.g. MP3 player) with the DABMAN i200 via cable with the AUX In socket, this can be used as an option to reproduce audio files. To do this, proceed as follows: Use a suitable cable (3.5 mm cinch, obtainable separately, may vary from one device to the next) to connect an external device with the DABMAN i200 (AUX A13) and switch on this device. While in operation, press the Mode key A4 on the remote control, if necessary repeatedly until the display shows „AUX" below the time, or press the Menu key A3, and use the right arrow key to select the menu item AUX.
You can now play music from the external device. The control (title backward/forward, Stop, Play) is effected via the external device connected, the sound volume can be adjusted via the V+/V- keys B19 21 resp. the volume control of the DABMAN i200 or via the external device.
AIR MUSIC CONTROL
The radio can be controlled via an smartphone or a tablet and an appropriate app. The application AIR Music Control can be downloaded for Android and Apple iOS. The app also allows you to reproduce local music files on your smartphone via the radio.
Note!
This description applies to the app, valid as per 09.2015. Functions as well as the appearance may change within the scope of software updates!!
To use the function, download the app from the Google Play Store for Android operating systems, or via I- tunes for IOS operating systems, and install the app on your smartphone.
Ensure that the radio and your mobile tablet are logged into the same network.
Start the application.
When starting the app, this will automatically recognize the DABMAN i200, provided this is logged into the same network. The main menu of the app is structured along the same lines as the menu of the radio.
Main menu
Start the desired function by tapping on the appropriate symbol
Internetradio
In this mode, too, all the familiar functions in Internet radio operation can be selected.
In the lower section you can select the station saving spaces 1-5.
Media Center
In this area you can connect with media servers in your network. In addition, you have the facility to access music files stored on a USB storage device connected with the system.
FM Radio
In this mode you can operate the FM radio.
DAB
In this mode you can operate the DAB+ radio.
TROUBLESHOOTING
| Symptom | Possible cause and solution |
No display indication, radio does not respond to operation | Set up power supply via mains adapter supplied |
No operation via remote control possible | Batteries discharged or incorrectly inserted. Please check whether batteries inserted in correct direction. |
DAB+ reception poor | No stations found, perform a station scan Antenna not fully extended. Change the location of the radio (e.g. closer to window), Repeat station scan |
FM reception poor | Antenna not fully extended, extend the FM antenna to its full length. Change the location of the radio (e.g. closer to window), Repeat station scan |
AUX function not working | DABMAN i200 is set to incorrect mode. Switch to "AUX" mode. Cable may be faulty. Check cable connection between DABMAN i200 and external device |
Poor audio quality when playing music | File with low bit rate. Check the audio file. Tip: For MP3 files, bit rate should be 192Kbit/s or higher |
Volume too low | Check volume setting on i200. Check volume setting of attached device from which music is being played. |
Network connection cannot be established | Check the wi-fi function. Activate the DhCP function of the router on which the radio is to be logged in. A firewall may be active in the network. |
Wi-fi (W-LAN) connection cannot be established | Check the availability of wi-fi networks. Reduce distance between wi-fi router and radio. Ensure you use the correct WEP/WPA password when logging on to a wi-fi router. |
No Internet radio stations available | Check the access points of the network. The radio station may be currently una- vailable. The station link may have been changed, or it is no longer broadcasting. |
FEATURES AND TECHNICAL DATA
| Internetradio | |
| Chip set Audiocodecs Wi-Fi | Magic M6 internet radio solution ca. 10.000 Internetradiostationen available MP3 (Bitrate bis 320 Kbits/s, sample rate bis zu 48 KHz) AAC/AAC+ (Bitrate bis 320 Kbits/s, sample rate bis zu 48 KHz) WMA (Bitrate bis 320 Kbits/s, sample rate bis zu 48 KHz) UPnP/ DLNA komatibel IEEE 802.11b/g WPA/WPA2/WEP (64/128 bit key) |
| DAB/DAB+/FM | |
| DAB DAB+ FM Decoding Reception range | Sensitivity to -100dBm Sensitivity to -101dBm Sensitivity to -100dBm DAB Band III 174 MHz- 240 MHz FM 74 MHz - 108.1 Mhz |
| Display | |
| TFT Color Display | 2.8 inch LCD 240 x 320 pixels |
| SOUND Index | |
| STMicroelectronics BRIDGE AMPLIFIER | (15W+15W Output Music Power) 3" loudspeaker max. 4Ω15W Supports multi sound effect EQ to set IC. NORMAL,FLAT,POP,JAZZ,ROCK CLASSIC) |
| Connection | |
| Line Out Headphone AUX IN LAN Power supply Mains adapter | 3,5 mm Stereo 3,5 mm Stereo 3,5 mm Stereo 10/100 Mbps (RJ45) 12 Volt DC 3 A 10-240 V AC 5060 Hz |
| Battery Remote Control | |
| Typ | CR 2025 3 V |
Documents / Resources
References
Download manual
Here you can download full pdf version of manual, it may contain additional safety instructions, warranty information, FCC rules, etc.
Advertisement


Need help?
Do you have a question about the DABMAN i200 and is the answer not in the manual?
Questions and answers