insta360 Ace Pro 2 Manual
- User manual (250 pages) ,
- Quick start manual (8 pages) ,
- User and safety manuallines (3 pages)
Advertisement
Product Introduction
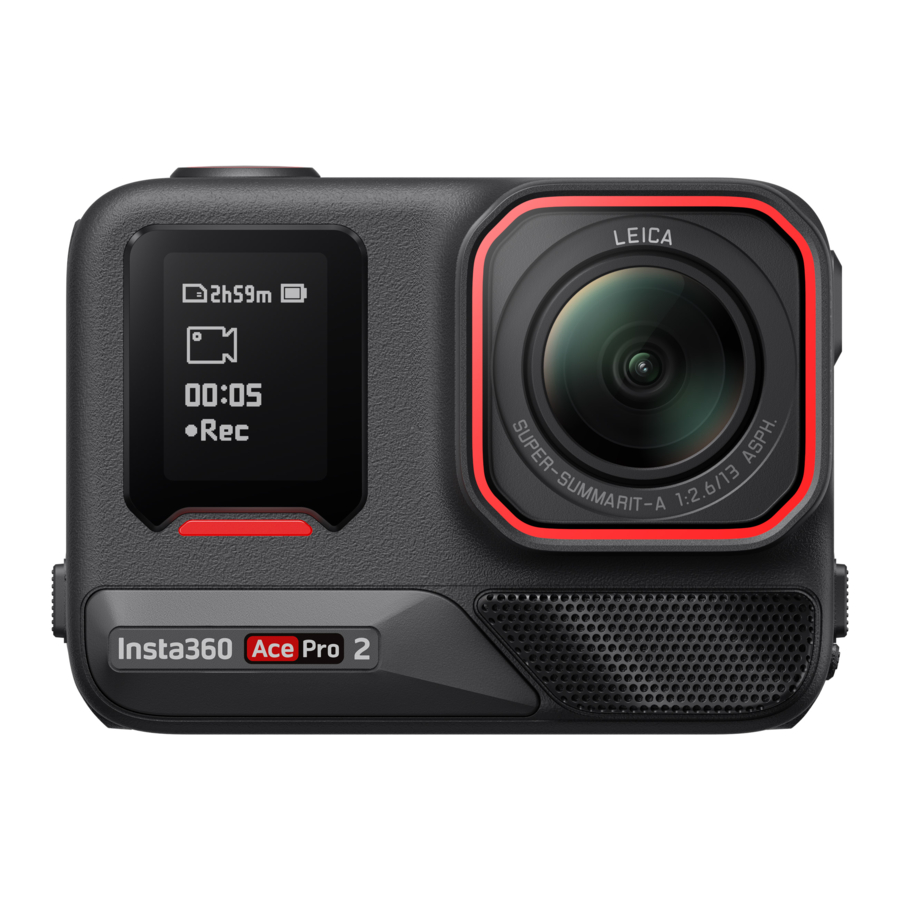
Insta360 Ace Pro 2 Introduction

- Indicator Light
- Front Screen
- Shutter Button
- Microphone
- Lens Guard
- Power Button
- USB Port Cover
- USB-C Port
- MicroSD Card Slot
- Mic Cap/Wind Guard
- Battery Cover
- Battery
- Release Switch
- Indicator Light
- Flip Touchscreen
- Vent Hole
- Mounting Latch
- Speaker
Standard Accessories
Insta360 Ace Pro 2 includes three in-the-box accessories for flexible shooting wherever you go.
| Accessories | Description | Figure |
| Standard Mount: Secure your camera to any accessory for ultrastable shots with the universal 2-prong mount. Magnetic design for quick assembly and disassembly.  | How to Use:
|  |
| Wind Guard Get crystal-clear audio in any situation with the innovative Wind Guard. Professional acoustic foam combined with a metal mesh design reduces wind noise and enhances clarity, ready to snap on and off as needed. It is recommended for high-speed activities such as motorcycling and mountain biking.  | How to Use: Installation:
Removal:
Notes:
|  |
| Mic Cap The removable Mic Cap can replace the Wind Guard for underwater shooting or water sports. Ideal for water sports and diving.  | Installation:
Removal:
Notes:
|  |
First Use
Insert the Battery
- Press and hold the latch of the Battery Cover and slide it downwards.

- Open the cover outward.

- Insert the battery in the direction indicated on the battery.
![]()
- Close the cover and ensure the yellow indication mark is completely covered to ensure waterproofing is not affected.
![]()


Insert the MicroSD Card

- Press and hold the latch of the USB Port Cover and slide it downwards.
- Insert the microSD Card in the direction indicated on the card.
- Close the cover firmly to ensure waterproofing is not affected.
Note:
Please use exFAT format microSD/TF cards of speed classes UHS-I and V30 or above to ensure normal recording.
The maximum supported storage space is 1TB.
Charging
Open the camera's USB Port Cover. Use the USB-C charging cable included in the box to connect Insta360 Ace Pro 2 to a USB-C charger.
The Indicator Lights will be solid red when charging and will turn off once the battery is fully charged.

Rapid PD Fast Charging gets your camera to 80% battery in just 18 minutes and fully charges in 47 minutes.
Insta360 Ace Pro 2 Charging Time:
- PD Fast Charging: 47 minutes - 100%
Tested in a lab environment at 77ºF/25°C with a 30W USB-C charger, camera turned off. Charging time may vary under different conditions. - Normal Charging: 75 minutes - 100%
Tested in a lab environment at 77ºF/25°C with a 15W USB-C charger, camera turned off. Charging time may vary under different conditions.
External Devices
- You can remove the USB Port Cover to attach external devices. Press and hold the latch of the USB Port Cover and slide it downwards.
- Open the cover outward and pull it off.
- After removing the USB Port Cover, you can insert the Quick Reader and external accessories such as microphones.
- To reinstall the cover, align the hook with the metal bar above the slot compartment, clip it on and close it.
Find Your Serial Number
The serial number is a unique code that can be used to quickly identify your camera. You can find the serial number in the following ways:
- Product Box
The serial number is on the back of the original product box.
![]()
- Camera Settings
- Power on your camera.
- Swipe down on the touchscreen to access the Shortcut Menu, then go to Settings > Camera Info to view the serial number.
- Insta360 App

- Connect your camera to the Insta360 app.
- Enter Settings > Device Information to view the serial number.
- Insta360 Studio

- Launch Insta360 Studio on your computer and import any file recorded by the camera.
- Select the footage, click the info icon on the right side of your screen, select File Properties, and view the serial number.


Activation
You need to activate Insta360 Ace Pro 2 in the Insta360 App before using it for the first time.
Steps:
- Download the Insta360 App. Alternatively, search "Insta360" in any major app store or scan the QR code on the box.
- Press the Power Button to turn on Insta360 Ace Pro 2.
- Enable Wi-Fi and Bluetooth on your smartphone.
- Open the Insta360 App and click the camera at the bottom of the page. Select the device you want to connect to in the pop-up window, then follow the on-screen instructions to complete the connection. The name of your camera is "Insta360 Ace Pro 2 ******" by default, where ****** is the last six digits of the serial number on the box your Insta360 Ace Pro 2 came in. The first time you connect to Insta360 Ace Pro 2, you will need to confirm the connection on the touchscreen.
- After successfully connecting the camera, follow the on-screen instructions to activate your camera. The app will prompt you to update the firmware if a new version is available. Please follow the on-screen prompts to update the firmware of Insta360 Ace Pro 2.
Basic Use
Button Instructions

Power Button
| Camera Status | Operation | Description |
| Powered off | Press once |
|
| Powered on | Press once |
|
| Long press |
|

Shutter Button
| Camera Status | Operation | Description |
| Powered off | Press once |
|
| Powered on | Press once |
|
| Long press |
|
Release Switch
| Operation | Description |
| Press the buttons on each side of the flip screen at the same time. |
|
Using the Screen
Front Screen
Once the camera is turned on, the front screen will display the following information:

| Camera Status | Description |
| Previewing | Battery, storage capacity, shooting specifications, current shooting mode. |
| Shooting | Shooting status, i.e., paused, pre-recording, countdown, etc. |
| Other | Saving footage, connecting to app, firmware update, etc. |
Flip Touchscreen
The touchscreen's main display shows the current camera shooting mode. The menu bar shows battery level, storage capacity, and current shooting parameters. By swiping or tapping the screen, you can achieve the following:
Tap the screen
Hide/show information on the touchscreen.

Swipe down from the top
Enter the shortcut menu.

Swipe left and right in the center
Switch shooting mode.

Swipe from the left
Enter the album page.

Swipe from the right
Enter the shooting parameter settings.

Swipe up from the bottom
More shooting parameter settings.

Shooting Interface

- Storage: Shows the remaining number of photos or the length of video footage that can be stored on the microSD card.
- Battery Status: Current battery level of Insta360 Ace Pro 2.
- Shooting Mode: Click the icon and swipe to select a different shooting mode.
- Shooting Specifications: See the current shooting mode settings.
- Clarity Zoom: Click the icon or double-tap the screen to zoom in or out 1x or 2x without compromising image quality.
- Field of View: Change the Field of View.
Shooting Mode
Click the icon and swipe or swipe left and right in the center of the screen to select a different shooting mode.
| Shooting Mode | Description |
| Video | Record a video with FlowState Stabilization automatically applied. Active HDR is available up to 4K60fps. |
| PureVideo | PureVideo improves image quality in low light environments. |
| FreeFrame Video | Apply FlowState Stabilization and Horizon Lock with adjustable aspect ratio in post via the app or Studio. Active HDR is available up to 4K60fps. |
| TimeShift | TimeShift video can be used while moving to create a hyperlapse effect. |
| Timelapse | Suitable for shooting static timelapse videos. |
| Dashcam | Record continuously and save footage up to a specified amount of storage. Active HDR is available up to 4K30fps. |
| Loop Recording | Record continuously and save only the last fixed-length segment. Active HDR is available up to 4K60fps. |
| Slow Motion | Shoot Slow Motion video with a high frame rate. |
| Starlapse | Shoot and store multiple photos and automatically combine Starlapse effects. |
| Burst Photo | Take multiple photos in a short space of time. |
| Interval | The camera automatically takes continuous photos at a specific time interval. |
| Photo | Take a single photo. |
Shortcut Menu
Swipe down on the touchscreen to view the camera settings.

- QuickCapture: Turn on/off. Once enabled, press the Shutter Button when the camera is powered off to turn it on and start recording.
- Rotation Lock: Turn on/off.
- Gesture Control: Turn on/off.
- AI Highlights Assistant: Turn on/off. The camera finds the best moments from a single video and shows you the highlights to review. Merge them into one video or save each of them as new files. View them on the Album page.
- Pre-Recording: Turn on/off. Save up to 120 seconds of footage before you press the Shutter Button.
- Endurance Mode: Turn on/off. Acts as a low-power mode to prolong battery life. Some features and specifications are not available in Endurance Mode, such as Gesture and Voice Control.
- Underwater Mode: Turn on/off. Optimizes stabilization and corrects distortion underwater, delivering more realistic and natural footage.
- Lock Screen: Tap to lock the screen. Swipe up on the touchscreen to unlock.
- Grid: Turn on/off.
- Voice Control: Turn on/off.
- Audio Modes: Choose between three audio modes: Wind Reduction, Voice Enhancement and Stereo. You can select the most suitable audio mode according to the scenario.
- Adjust Brightness: Slide the bar to adjust the screen brightness.
- Timed Capture: Use the Timed Capture function.
- Bluetooth Remote: Search for and connect a Bluetooth remote.
- Bluetooth Headphones: Search for and connect Bluetooth headphones and headsets.
- Settings: See camera settings, such as speaker volume, turn the Indicator Light on/off, customize the Power Button, etc.
Shooting Specification Settings
Swipe up from the bottom of the touchscreen to view shooting specification settings.

| Shooting Mode | Parameters |
| Video | Active HDR, Stabilization, Ratio, Duration, Resolution, Frame Rate |
| PureVideo | Stabilization, Ratio, Duration, Resolution, Frame Rate |
| FreeFrame Video | Active HDR, Ratio, Duration, Resolution, Frame Rate |
| TimeShift | Stabilization, Ratio, Duration |
| Timelapse | Resolution, Frame Rate, Stabilization, Ratio, Interval, Shoot length |
| Dashcam | Active HDR, Loop Space, Time Watermark, Stabilization, Ratio, Resolution, Frame Rate |
| Loop Recording | Active HDR, Stabilization, Ratio, Loop Duration, Resolution, Frame Rate |
| Slow Motion | Stabilization, Ratio, Duration, Resolution, Frame Rate |
| Starlapse | Type, Format, Ratio, Duration, Resolution, Timer |
| Burst Photo | Burst, Cache, Format, Ratio, Resolution, Timer |
| Interval | Interval, Format, Ratio, Duration, Resolution, Timer |
| Photo | Format, Ratio, Resolution, Timer |
Shooting Parameter Settings
Swipe left from the right edge of the touchscreen to see the shooting parameter settings.

| Parameters | Description | |
| Shutter Speed | Controls the time it takes for light to enter the camera. The faster the shutter speed, the clearer the image. Make this higher for dynamic shots and lower for low light conditions. | |
| Sensitivity (ISO) | Reflects how sensitive the sensor is to light. A higher sensitivity means the camera can capture more light for a brighter image. | |
| Exposure Value (EV) | In Auto Mode, you can adjust the EV to help with overexposure or underexposure. | |
| White Balance (WB) | Removes unrealistic colors and tones so colors are accurately captured in the image. A higher white balance produces warmer tones and lower results in cooler tones. | |
| Exposure Preset | It is recommended to use Anti-Flicker for daily scenes for the best image brightness. For action scenes, Jitter Blur Reduction can improve stability, but the image may be darker. | |
| Filter | Add different color tones and effects. | |
| Metering Mode | Face Priority prioritizes the face for brightness. Matrix ensures accurate exposure of the whole image. | |
| I-Log | A professional color profile that captures more detail for more flexible color grading in post-production. | |
| Sharpness | Enhance the contrast at the edges of the image to make blurry videos appear sharper. | |
| Shooting Mode | Parameters | |
| Auto | Manual | |
| Video | Filters, EV, Metering Mode, Sharpness, I-Log, Exposure Preset, WB | Filters, Shutter, ISO, EV, Sharpness, I-Log, WB |
| PureVideo | Filters, EV, Exposure Preset, WB, Metering Mode | |
| FreeFrame Video | Filters, EV, Metering Mode, Exposure Preset, Sharpness, I-Log, WB | Filters, Shutter, Sharpness, I-Log, ISO, EV, WB |
| TimeShift | Filters, EV, WB, Sharpness | Filters, Shutter, ISO, EV, WB, Sharpness |
| Timelapse | Filters, EV, WB, Sharpness | Filters, Shutter, ISO, EV, WB, Sharpness |
| Dashcam | Filters, EV, Metering Mode, Exposure Preset, Sharpness, I-Log, WB | Filters, Shutter, ISO, EV, WB, Sharpness, I-Log |
| Loop Recording | Filters, EV, Metering Mode, Exposure Preset, WB, Sharpness, I-Log | Filters, Shutter, ISO, EV, WB, Sharpness, I-Log |
| Slow Motion | Filters, EV, WB, Sharpness | Filters, Shutter, ISO, EV, WB, Sharpness |
| Starlapse | WB, EV | Shutter, ISO, EV, WB |
| Burst Photo | Filters, EV, WB | Filters, Shutter, ISO, EV, WB |
| Interval | Filters, EV, WB | Filters, Shutter, ISO, EV, WB |
| Photo | Filters, EV, Metering Mode, WB | Filters, Shutter, ISO, EV, WB |
Album Page
Swipe right from the left of the touchscreen to enter the Album page.

Indicator Lights
Insta360 Ace Pro 2 has two LED Indicator Lights, one on the front of the camera and one on the back. Both display the same information. You can turn the Indicator Lights on/off in Settings > General.
| Camera Status | Indicator Light Status |
| Powered on | Solid blue during startup, then solid cyan |
| Start shooting with QuickCapture | Flashes cyan three times |
| Standby/standby (charging)/standby (fully charged) | Solid cyan |
| Power off | Flashes cyan five times |
| Charging (powered off) | Solid red (turns off when fully charged) |
| Pre-Recording | Solid cyan |
| Countdown >1s | Flashes cyan |
| Countdown≤1s | Flashes cyan five times |
| U-Disk Mode/Webcam Mode | Solid cyan |
| Downloading to app | Flashes green |
| Insufficient storage/backup interrupted/formatting failed | Flashes yellow three times then stops |
| Quick Reader has no SD card | Solid yellow |
| Updating firmware | Slowly flashes blue |
| Low battery | Flashes yellow three times every 5 seconds |
| Temperature too high | Flashes yellow three times |
| Insufficient storage/file error/USB error/no SD card | Solid yellow |
File Storage
Please use exFAT format microSD/TF cards of speed classes UHS-I and V30 or above. Slow speed may affect recording. The maximum supported storage space is 1TB. Compatibility issues may cause recording to stop.
We recommend using the official microSD cards available on the Insta360 Official Store. If you wish to use another microSD card, the following have also been tested to be compatible with Insta360 Ace Pro 2:
| MicroSD Cards | Model Number | Capacity | Speed Class |
| Sandisk Extreme V30 A1 | SDSQXVF-032GGN6MA | 32GB | V30 |
| Sandisk Extreme Pro V30 A1 | SDSQXCG-032GGN6MA | 32GB | V30 |
| Sandisk Extreme Pro V30 A1 | SDSQXCG-064GGN6MA | 64GB | V30 |
| Sandisk Extreme V30 A1 | SDSQXAF-128GGN6MA | 128GB | V30 |
| Sandisk Extreme V30 A2 | SDSQXAF-128GGN6MA | 64GB | V30 |
| Sandisk Extreme V30 A2 | SDSQXA1-256GZN6MA | 256GB | V30 |
| Sandisk Extreme Pro V30 A2 | SDSQXCZ-1T00ZN6MA | 1TB | V30 |
| Lexar 1066x microSD UHS-I SILVER Series | LMS1066064G-BN | 64GB | V30 |
| Lexar 1066x microSD UHS-I SILVER Series | LMS1066128G-BN | 128GB | V30 |
| Lexar 1066x microSD UHS-I SILVER Series | LMS1066256G-BN | 256GB | V30 |
Format MicroSD Card
It is recommended to regularly transfer camera files to a phone or computer for backup and format the microSD card via the camera or Insta360 app to avoid any storage issues.
- Format via Insta360 Ace Pro 2:
- Insert the microSD card into Insta360 Ace Pro 2.
- Power on Insta360 Ace Pro 2.
- Swipe down on the touchscreen to enter the Shortcut Menu, tap Settings > SD Card > Format.
- Format via Insta360 app:
- Connect Insta360 Ace Pro 2 to your phone via the Insta360 app.
- Enter app Settings > Other Settings > Camera Storage > Format Storage.
Note: When formatting the card by computer, it needs to be in exFAT format, and the allocation unit size should be left as the default setting.
Insta360 App
Connect to the Insta360 app
- Press the Power Button to turn on the camera.
- Enable Wi-Fi and Bluetooth on your smartphone.
- Open the Insta360 app and tap the camera icon at the bottom of the page. Follow the on-screen instructions to activate your camera.
- If you connect to the Insta360 app for the first time, you need to authorize the connection on the touchscreen or press the Shutter Button.
If you are unable to connect to the app, go to your smartphone's Wi-Fi settings, find your camera, enter the password and return to the app. You can change the camera's Wi-Fi password on the app settings page.
Still can't connect to the Insta360 app?
- Check if the Insta360 app has permission for the following: network permission, Bluetooth permission, or local network permission.
- Check if Wi-Fi is enabled on your camera.
- Make sure the camera is close enough to the phone.
File Transfer
You can download camera files to your phone or computer, then edit and export them using the Insta360 app or Insta360 Studio.
File transfer from camera to phone
Wireless Connection (iOS/Android)
- Connect the camera to the Insta360 app.
- Open the app's album page.
- Tap the top right icon to select the files you want to transfer.
- Tap the export icon to save it to your phone's album. Do not exit the app or lock your phone while exporting.
- Tap the download icon to download the footage to the app's gallery.
If your camera can't connect to the Insta360 app, try the following:
- Update the camera and app to the latest version.
- Check your phone's Wi-Fi settings to see if it's connected. If not, enter the Wi-Fi password and restart your camera and phone before trying again. If it's still not connecting, forget the camera's Wi- Fi network in your phone settings and attempt to reconnect.
- Make sure the Insta360 app has GPS and Bluetooth permissions enabled. On Android devices, disable WLAN+ or auto-switch Wi-Fi (if available). On iOS devices, go to system settings, select Insta360, and turn on "Local Network."
File transfer from camera to computer
(Mac/Windows)
- Use the official USB-C cable to connect the camera to your computer.
- Power on the camera and select 'U-Disk Mode'. Wait for the computer to recognize the camera drive.
- Open DCIM > Camera01 folder and copy photos/videos from this folder to your computer.
If your camera can't connect, try the following:
- Ensure the camera's firmware is up to date.
- Use the official USB-C cable for transfer, as non-official cables may have compatibility issues.
- Make sure the camera is powered on.
File transfer from Insta360 app to Mac
iPhone
- Connect your iPhone to your Mac.
- In the Finder window on your Mac, select your iPhone.
- At the top of the Finder window, click Files, then do one of the following:
- Transfer from Mac to iPhone: Create a new folder and name it IMPORT on your desktop. Drag your files to the IMPORT folder and then into the Insta360 app folder on your device.
- Transfer from iPhone to Mac: Click the small triangle beside the Insta360 app to see the DCIM folder, then drag the desired files to a folder on your Mac.
Notes:
- The folder must be named IMPORT with capital letters.
- You may not be able to see the transfer progress. Please wait for it to finish.
- After transferring, restart the Insta360 app on your phone to see the files.
Android
- Install Android File Transfer on your Mac.
- Connect your phone to the Mac and open Android File Transfer.
- Find "data > com.arashivision.insta360akiko > files > Insta360OneR > galleryOriginal".
- Browse the files and folders on your Android device, then copy and paste or drag them to a folder on your Mac.
File transfer from Insta360 app to Windows PC
iPhone
- Install iTunes on your Windows PC. Connect your iPhone to your PC, open iTunes, then complete the authorization process according to the instructions.
- After successful authorization, click the iPhone icon in the top left corner, and the iPhone's files will appear.
- Click "File Sharing" and choose "Insta360" from the list. Then do one of the following:
- Transfer from iPhone to Windows PC: Find the DCIM folder, then click Save. Choose your desired path and click Save.
- Transfer from Windows PC to iPhone: Create a new folder and name it IMPORT, then copy the photos/videos to the IMPORT folder. Replace the IMPORT folder in the Insta360 app.
Notes:
- The folder must be named IMPORT with capital letters.
- After transferring, restart the Insta360 app on your phone to see the files.
Android
- Connect your Android phone to your PC. Choose "Manage Files" under "USB Connected" on the phone if required.
- Click "My Computer/This Computer", find your phone model, and click "Internal Storage".
- Find "data > com.arashivision.insta360akiko > files > Insta360OneR > galleryOriginal", then do one of the following:
- Transfer from Android to Windows PC: Copy the folder or files to your PC.
- Transfer from Windows PC to Android: Copy files to this folder from your PC.
Editing
You can view and edit your footage in the Insta360 app or Insta360 Studio.
- Insta360 app
Edit Page- Connect your camera to the Insta360 app.
- Head to the Edit page. You can open and edit your material in "Create a Video", or use AI to automatically edit your clips with "Auto Edit". Try out the AI templates, themes and effects with FlashCut and Shot Lab for viral videos in seconds.
Album Page
- Connect the camera to the Insta360 app.
- Enter the Album page to view all your clips.
- Open footage and edit it in the player.
- Insta360 Studio
- Download and open Insta360 Studio on your computer from the Insta360 website.
- Connect your camera or SD card to your PC and import your media.
- Edit with Studio's extensive tools and library, or use its Abobe Premiere plugin for even more options.
Exclusive Features
Gesture Control
You can control the camera with gestures, perfect for group selfies or noisy environments. Enable Gesture Control on your camera, then give the sign to start/stop recording or take a photo. Swipe down on the touchscreen and turn on Gesture Control.
Keep both your head and hand clearly in frame to activate the feature. Gesture Control can be used while wearing a helmet or gloves.
| Gesture | Trigger Control |
 Peace Sign | Take photo with countdown timer. |
 Palm | Start/stop video recording. |
Clarity Zoom
During recording and preview, double-tap the screen or tap the zoom button at the bottom right of the screen to zoom in or out 1x or 2x without compromising image quality. Clarity Zoom is supported in the following modes and specifications:
| Shooting Mode | Specifications |
| Photo/Interval/Burst Photo | 12.5MP 9MP |
| Video | 4K (16:9/4:3/2.35:1) @60fps and below 2.7K (16:9/4:3) @60fps and below 1080p (16:9/4:3) @60fps and below |
| Loop Recording/Dashcam/PureVideo | 4K (16:9/4:3) @60fps and below 2.7K (16:9/4:3) @60fps and below 1080p (16:9/4:3) @60fps and below |
Pre-Recording
Pre-Recording lets you capture up to 120 seconds of footage before you've even hit the Shutter Button, so you won't miss a second of action.
The following shooting modes and specifications support Pre-Recording:

Select the shooting mode, swipe down on the screen to enter the Shortcut Menu, tap the "PRE" icon and select a duration. Once enabled, the camera will continuously record, but will only save the set duration to the microSD card once you hit the Shutter Button. For example, if you set Pre-Recording to 15 seconds, but there have been 30 seconds of action before you press the Shutter Button, the final pre-recorded footage will be the last 15 seconds.
You can cancel Pre-Recording at any time. The video will not be saved.
If you press the Shutter Button during Pre-Recording, the camera will start recording normally, and the final video will contain the pre-recorded video and the regular video

Timecode
The camera has a built-in timecode for a smoother workflow when filming with multiple cameras. After recording, you can synchronize multiple video tracks in the edit.
There are three ways to synchronize the timecode:
- Timecode generator: Connect the camera to a timecode generator to synchronize the timecode.
- Insta360 app: Connect the camera to the Insta360 app to automatically calibrate the camera's system time and use it as the timecode.
- Manual synchronization: Manually set the start time on multiple cameras to align the time. Make sure it is the same, then click "Start timecode".
I-Log
Turn on I-Log in the camera's shooting parameters page before recording. After recording, connect the camera to the Insta360 app, go to the Album page, select the file and tap the LUT icon to adjust the color.
Endurance Mode
When using the camera for a long period of time, turn on Endurance Mode in the camera's Shortcut Menu for a longer battery life of up to 3 hours*. When turned on, some features, such as Gesture and Voice Control, are unavailable.
*Tested in 77°F (25°C) lab environment, 1080p24fps video with Active HDR off in Endurance Mode. Battery life may vary under different conditions.
GPS Activity Stats
Use GPS Activity Stats in the Insta360 app to overlay real-time data from your smartphone without any third-party sports equipment.
How to connect:
- If it's the first time using GPS Activity Stats, connect the camera to the Insta360 app to sync the time from your smartphone.
- Go to the app's settings page, tap "GPS Activity Stats", and authorize the Insta360 app to access your phone's GPS data.
- Tap the record button at the bottom of the screen to start recording your GPS data. Keep the app on the GPS Activity Stats page, and the camera can continue recording data without being connected to the app.
- Swipe the button to the right to stop recording. Tap the top-right corner to view your data.
- After recording, you can view the footage in the app's Album. Tap the footage to preview it, select the Stats Dashboard icon and the GPS Activity Stats data will be displayed by default.
Notes:
- You don't need to maintain a Wi-Fi connection once GPS Activity Stats is enabled. The app will continue to record your data as long as the GPS Activity Stats interface is open on the Insta360 app, even if you switch to other apps. Recording will be interrupted if you leave the GPS Activity Stats interface within the Insta360 app.
- Real-time GPS location is not currently supported.
- 360º videos are not currently supported.
- Strong signals in the surrounding environment could interfere with the GPS data and prevent it from being recorded. We recommend shooting in an open outdoor area.
- GPS Activity Stats does not support the following shooting modes: Timelapse, Starlapse, Dynamic Timelapse, Slow Motion, and Bullet Time.
Stats Dashboard
(Garmin/Apple/COROS/IGPSPORT/FIT & GPX Files)
You can also add real-time stats such as speed, elevation, cumulative distance, incline, and motion trajectory to your video from third-party apps and devices when you export. You can overlay data from your Garmin, COROS and IGPSPORT device or Apple Watch and import FIT and GPX files.
Currently, only data from Garmin, Apple, COROS, and IGPSPORT devices are supported, as well as FIT and GPX files. More brands may be added in the future.
Notes:
- 360º videos are not currently supported.
- Strong signals in the surrounding environment could interfere with the GPS data and prevent it from being recorded. We recommend shooting in an open outdoor area.
- Stats Dashboard does not support the following shooting modes: Timelapse, Starlapse, Dynamic Timelapse, Slow Motion, and Bullet Time.
- Garmin/COROS/IGPSPORT Device
How to connect:- Connect the camera to the Insta360 app, open a video on the app's album page, pause the playback, and click "Stats" in the lower menu.
- Select your device as the data source.
- If you have not yet registered or logged into the Insta360 app, you will need to register or log in.
- Log in to your Garmin/COROS/IGPSPORT account and authorize the Insta360 app.
- The data will automatically synchronize to the Insta360 app.
Notes:
- For accurate timecodes between the GPS data and the video, it is recommended to connect the camera to the Insta360 app before recording to obtain the timecode from your phone.
- You must upload data from your device to the corresponding app before data can be synchronized to the Insta360 app.
- You can switch between data sources by tapping the icon on the dashboard page.
- Data can be synchronized to multiple devices that are logged into the Insta360 app.
- Garmin Devices: Insta360 Insta360 Ace Pro 2 supports any Garmin device that shares data with Garmin Connect, including cycling odometers and smartwatches.
- Apple Watch
How to connect:- Connect the camera to the Insta360 app, open a video on the app's album page, pause the playback, and click "Stats" in the lower menu.
- Select "Apple Health" as the data source.
- If you have not yet registered or logged into the Insta360 app, you will need to register or log in.
- Authorize the Insta360 app.
- Apple Health data will automatically synchronize to the Insta360 app.
Notes:
- The Insta360 app does not support Apple Health on Android devices.
- For accurate timecodes between the GPS data and the video, it is recommended to connect the camera to the Insta360 app before shooting to obtain the timecode from your phone.
- Before recording, you need to start a workout on your Apple Watch and save it to record your exercise data and GPS information. You can also manually add a workout in the Apple Health app to synchronize your data.
- You can switch between data sources by tapping the icon on the dashboard page.
- FIT & GPX Files
You can import FIT or GPX files from third-party apps into the Insta360 app in the following two ways:
Share FIT or GPX Files from a Third-Party App to the Insta360 App
If the third-party app supports sharing FIT and GPX files, you can share these files with the Insta360 app. The app will automatically match the data to your videos.
Stay on the Insta360 app's homepage before sharing FIT or GPX files to speed up matching the data.
Save FIT or GPX Files to Your Phone
If saving FIT and GPX files to your phone is supported by the third-party app, you can open the saved files in the Insta360 app via the system's file manager. Alternatively, go to the Stats Dashboard > Data Source > Local Files and choose the file to import. Data will automatically sync to your footage.
Notes:- Some apps or devices may produce GPX files without timestamps and are therefore incompatible with the Stats Dashboard.
- Due to inconsistent timezone settings across different manufacturers, imported files may show inconsistencies.
- Stay on the Insta360 app's homepage before sharing FIT or GPX files to speed up matching the data.
Maintenance
Firmware Update
Firmware updates will be regularly available for Insta360 Ace Pro 2 to ensure it runs efficiently. Please update to the latest version for optimal results.
Before updating the firmware, ensure Insta360 Ace Pro 2 has at least 20% battery remaining.
- Update via Insta360 app:
Connect Insta360 Ace Pro 2 to the Insta360 app. The app will notify you if a new firmware update is available. Follow the on-screen instructions to update the firmware.
If the camera firmware update fails, check the following and try the update again:- Ensure the camera is close to your phone.
- Keep the Insta360 app running, and do not exit or minimize it.
- Ensure your phone has a strong and stable network connection.
Once the above conditions are confirmed, restart the camera and try the firmware update again. If it still fails, try to update the firmware via a computer.
- Update via Computer
- Make sure Insta360 Ace Pro 2 is powered on.
- Connect the camera to the computer using the USB-C cable and select U-Disk Mode.
- Download the latest firmware version from the official Insta360 website on your computer.
- Once the computer has recognized Insta360 Ace Pro 2, copy the "Insta360AcePro2FW.bin" file to Insta360 Ace Pro 2's root directory. Do not change the file name.
- Disconnect Insta360 Ace Pro 2 from the computer. Insta360 Ace Pro 2 will automatically power off. The Indicator Lights will slowly flash blue.
- Insta360 Ace Pro 2 will automatically restart once the update is complete.
Waterproofing
- Insta360 Insta360 Ace Pro 2 camera is waterproof up to 39ft (12m) without a Dive Case. For extended underwater use, use the Dive Case. The Dive Case is waterproof to 197ft (60m).
- Check that the battery compartment is free from dirt or foreign objects. Once the battery is inserted, close the Battery Cover and ensure the yellow indication mark is completely covered to ensure waterproofing is not affected.
- Ensure the USB Port Cover is free from dirt or foreign objects. Ensure it is completely closed before using the camera underwater.
- After every use in seawater, soak the camera in fresh water for 15 minutes, gently rinse it with the flip screen open, and then dry it thoroughly with a soft cloth. Wait until it is completely dry before using it again.
- Insta360 Ace Pro 2 comes with a pre-installed Wind Guard. Removing or installing the Wind Guard and Mic Cap does not affect the camera's waterproofing. Dampness may impact sound quality and noise reduction. Before using the camera on rainy days or for water sports, remove the Wind Guard or replace it with the Mic Cap.
To maintain the waterproofing of Insta360 Ace Pro 2:
- Do not use a hair dryer to dry the camera, as it may affect the microphone and speaker and damage the internal waterproofing ability.
- Avoid operating the camera for extended periods (>1 hour) outside the recommended temperature range (-4°F to 113°F/-20℃ to 45℃) or in humid environments.
- Do not store the camera in high-temperature or high-humidity environments.
- Do not disassemble the camera.
- Avoid entering water at high speeds. Excessive water impact may damage the device.
- Ensure the camera's Battery Cover, USB Port Cover and Lens Cover are installed and securely closed, or the camera will not be waterproof.
Cleaning
- If there are foreign objects, such as dirt or hair, on the Lens Cover, clean it with clean water or use a lens pen, air blower or cloth.
- If there are foreign objects, such as dirt or hair, on the lens, use a lens pen, air blower or cloth to clean it.
- Ensure the Battery and Battery Cover is free of dirt and foreign objects like sand or hair. Clean it with a soft, dry cloth or paper if necessary.
- Ensure the MicroSD Card Slot is free of dust, dirt and sand to ensure the camera works properly.
Battery Precautions
- Only use batteries provided by Insta360 designed for Insta360 Ace Pro 2. Insta360 is not responsible for any accidents or failures that occur by using unofficial batteries. If you need to replace the battery, please purchase it from the Insta360 official store.
- Do not charge the battery immediately after using the camera, as the battery temperature may be too high. It is advised to wait until the battery cools to room temperature before charging. Charging the battery in environments above 104ºF (40°C) or below 32°F (0°C) may lead to battery expansion, leakage, overheating, or battery damage.
- If the battery is not used for a long time, its performance will be affected.
- Recharge and discharge the battery every three months to maintain optimal working conditions.
Arashi Vision Inc.
ADD: 11th Floor, Building 2, Jinlitong Financial Center, Bao'an District, Shenzhen, Guangdong, China
WEB: www.insta360.com
TEL: 400-833-4360 +1 800 6920 360
EMAIL: service@insta360.com
Documents / Resources
References
Download manual
Here you can download full pdf version of manual, it may contain additional safety instructions, warranty information, FCC rules, etc.
Advertisement


Need help?
Do you have a question about the Ace Pro 2 and is the answer not in the manual?
Questions and answers