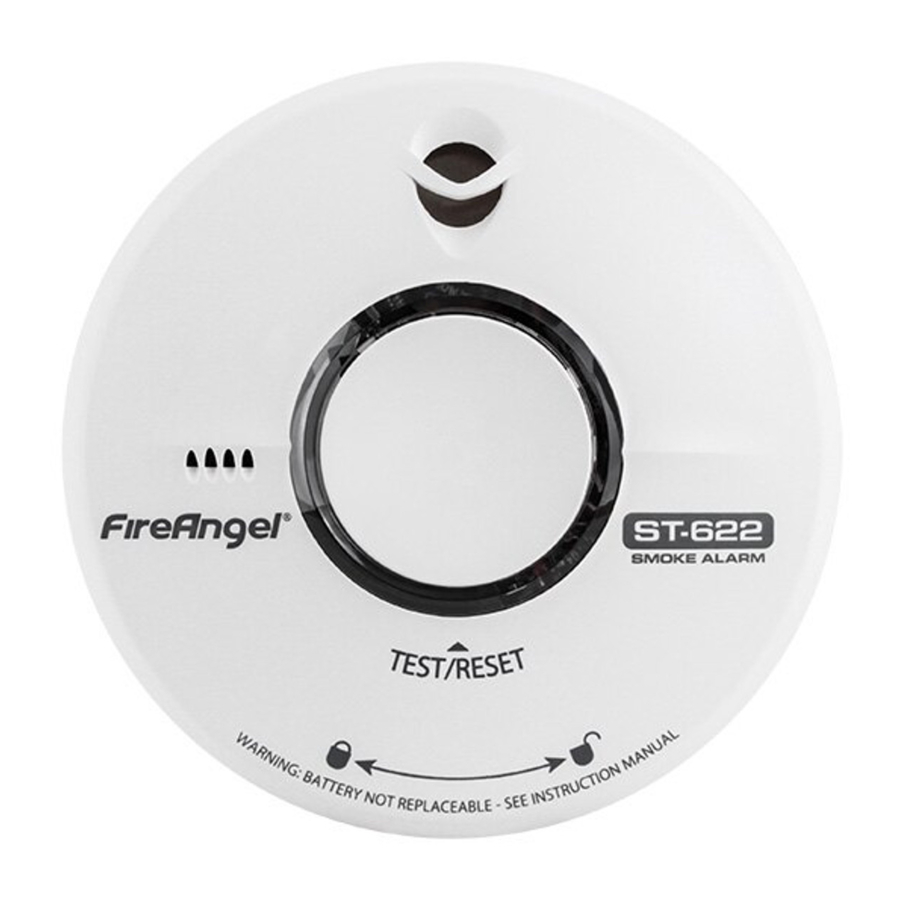
FireAngel THERMOPTEK ST-622 / ST-622T Manual
- User manual (60 pages) ,
- Manual (24 pages) ,
- User manual (16 pages)
Advertisement
INTRODUCTION
The ST-622 multi-criteria high performance detector is the ultimate alternative to traditional alarms. Groundbreaking Thermoptek technology combines the very latest in optical sensing with thermal enhancement, providing faster response to both fire types eliminating the need for ionisation sources which can be harmful to the environment. In addition, this smoke alarm allows the low battery warning chirp to be silenced until it is convenient to replace the alarm (recommended within no more than 7 days).

This user manual contains important information regarding the operation of your smoke alarm. Ensure you read this user manual fully before installing and operating the alarm. If you are installing this smoke alarm for use by others, you must leave this manual with the end user.
AUTOMATIC POWER ENGAGE
Your 10 year life smoke alarm is powered by an internal lithium battery. To avoid unnecessary use of the battery prior to installation, and to ease disposal when the alarm reaches the end of its life, the alarm is supplied with the battery in a deactivated state. The battery on this alarm is automatically enabled when the alarm is fully locked on to the base plate.
Your alarm will not work until it is correctly fitted to the base plate.
THERMOPTEK TECHNOLOGY
Thermoptek alarms are "toast-proof" meaning they can be positioned in area close to kitchens that may be affected by cooking fumes. Heat alarms should be used in kitchens where required.
This combines an optical sensing chamber with thermal enhancement. The alarm is effective at detecting slow burning fires, and constant monitoring of temperature changes enables the sensitivity of the alarm to be instantly increased thereby quickening the typical response time to fast flaming fires significantly.
POSITIONING

Your smoke alarm can be installed into a new build property as additional protection to an existing smoke detection system only. It cannot be used as a substitute for a hard wired system as required in new build properties. In this type of property the building regulations require alarms to be interlinked. You can obtain further information from your local fire service or building control department at your local council offices. These sources generally provide advice on new builds or projects that require planning permission. Your smoke alarm typically meets the minimum requirements for family living units in existing buildings, as long as at least one unit is installed on each floor/ level of your property.
In order to achieve the earliest fire warning, we recommend that a smoke alarm is fitted in all rooms where the temperature is normally between 4°C (40°F) and 38°C (100°F). Check the section on 'Positioning' to ensure that the smoke alarm is to be correctly positioned for the particular dwelling into which it is intended to be installed.
The alarm positions shown are based on typical homes. Construction and layout of individual dwellings will vary, so this should be regarded only as a guide. Check with your local fire station for further guidance.
EXISTING HOMES

 MINIMUM RECOMMENDATIONS
 RECOMMENDED FOR ADDITIONAL PROTECTION
NOTE: Kitchens should be covered by a self contained heat detector.
Smoke alarms should be sited at least 300mm from light fittings and walls. Ideally as central as possible in the room.
If positioning your smoke alarm on the wall, the top of the detection element must be between 150mm and 300mm below the ceiling, and at least 300mm from a wall.
Smoke alarms should be positioned at no more than 600mm vertically below the highest point in the room.

Multi-family or mixed occupant residence (Tenancy building, student accommodation)
Your smoke alarm can also be used in individual flats and bedsits, providing the same conditions are met as for a singlefamily residence. However, there must already be a primary fire detection system that meets regulatory requirements for common areas such as lobbies and hallways.
Institutions and Hotels
This includes motels, hospitals, day care facilities, long-term health care facilities, boarding houses and dormitories. Your smoke alarm can be used in individual sleeping/resident rooms, providing the same conditions are met as for a single-family residence. However, there must already be a primary fire detection system that meets regulatory requirements for common areas such as lobbies and hallways. Use of this smoke alarm in common areas may not provide sufficient fire warning to residents or meet regulatory requirements. This smoke alarm is designed to operate as a standalone smoke alarm.
This smoke alarm will not communicate with other smoke alarms or fire alarm systems. It is not intended as a substitute for a complete alarm system.
Mobile Homes and Caravans
This smoke alarm is suitable for use in mobile homes and caravans.
Commercial and Industrial Premises
This smoke alarm is not intended for any non-residential, commercial or industrial application, nor for any other purpose than described above.
For further installation guidance consult British Standard BS 5839-6.
HOW TO INSTALL YOUR SMOKE ALARM
Make sure you have read and understood this manual before installing your smoke alarm.
- Preparation
The base plate should be attached to the ceiling or wall.
Break out the tabs from the base plate. Use the fixing slots on the base plate as a guide when marking the position of the drill holes. With an appropriately sized drill, drill the holes and insert the plastic fixing anchors supplied (if needed).

- Install Base Plate
Fit the base plate to the ceiling or wall using the screws provided.

- Fit Your FireAngel Smoke Alarm
The alarm has a mechanism on the back that activates the alarm when it is correctly connected to the base plate. There are three lugs (hooks) on the back of the alarm that slide in to three slots on the base plate.

When used with the base plate, the alarm can be attached in any orientation, simply line up the lugs (hooks) with the holes at the end of the slots then twist the alarm clockwise until the alarm stops, make sure the alarm is twisted on fully.

Once the smoke alarm has been fitted onto the base plate correctly, the internal battery will activate. The red LED on the front of the alarm should now flash once every 40 seconds to show that it is active. - Test Your Smoke Alarm
After fitting the alarm to the base plate, wait for 5 seconds for the alarm to settle then test the alarm. See 'Alarm Test'.


OPERATION
Normal Condition
The red LED on the front should flash every 40 seconds to show that the alarm is active.
Low Battery Condition
Your smoke alarm requires the battery to have sufficient capacity of power to operate correctly.
Should your smoke alarm enter a low battery condition, the unit will emit an audible 'chirp' once every 40 seconds. When this occurs, we recommend you replace the alarm immediately. Your smoke alarm will continue to warn of this low battery condition for at least 7 days, however, failure to change the alarm after this time would mean your smoke alarm may have insufficient power to alert you in a real fire situation. When the alarm is removed from the base plate the battery will automatically deactivate and the low power warning chirp should stop, allowing you to dispose of the alarm.
Low Battery Warning Silence
This feature can temporarily silence the low battery chirp for 8 hours which is particularly useful if the warning begins during the night. This feature may be repeated up to 10 times, but is not a substitute for replacing the smoke alarm.
ALARM TEST
The alarm must be properly attached to the base plate before it can be tested.
- Press the test button in the centre and release.

- The unit will give an audible alarm consisting of 2 cycles of 3 loud beeps, then stop automatically.
![]()
- The red LED on your alarm will flash rapidly during the audible signal.


NOTE: The test button accurately tests the alarm's smoke sensing circuit, there is no need to test your alarm with smoke. If your smoke alarm fails to give an audible test signal, please refer immediately to the trouble shooting guide at the end of this manual.
You should test your smoke alarm every week.
ALARM SMART SILENCE™

If your smoke alarm emits the full alarm signal and you are not testing the unit, the smoke alarm is warning you of a potentially dangerous situation that requires your immediate attention. Only use the alarm silence function after making sure that there is no ongoing fire emergency situation. Do not block the vents on the alarm or disable the smoke alarm in any way, as this will remove your protection. Smoke alarms can sometimes react to cooking fumes or other non emergency situations. Your smoke alarm features "Smart Silence" technology. In the event of a known false alarm your smoke alarm can be temporarily silenced by pressing the central test button. Your alarm will automatically return to full sensitivity within 10 minutes.
NOTE: If the level of smoke reaching the alarm is very high the alarm silence will be overridden and the alarm will continue to sound.
- Press and release the silence button, the alarm sound will shortly stop.
![]()
- Your alarm will silence and enter into a reduced sensitivity reset cycle for approximately 10 minutes.
![]()
- During the reduced sensitivity reset cycle, the red LED on your alarm will continue to flash more rapidly than normal, approximately once every second.
![]()
- Your alarm will automatically return to full sensitivity on completion of the reset cycle and the red LED will revert to flashing once every 40 seconds.
![]()


Never ignore any alarm. Ignoring the alarm may result in injury or death. If your smoke alarm activates and alarms and you are not absolutely certain of the source of the smoke, get everyone out of the house immediately.
LOW BATTERY WARNING SILENCE
Low battery warnings often start at night or when it maybe inconvenient to replace your alarm. You can silence the audible chirp for a period of 8 hours by pressing the test button. Your smoke alarm will still detect smoke during this time of low battery warning silence. However it is recommended that you replace your alarm immediately, and certainly within 7 days, as your alarm may then have insufficient power to warn you of a real fire situation after this time.
Your smoke alarm cannot be silenced if the chirp is indicating a fault. In this instance, the unit should be replaced immediately to ensure protection in the event of a fire.
MAINTENANCE
Your smoke alarm has been designed to be as maintenance-free as possible, however there are several things you must do to keep it working properly.

Your smoke alarm is a sealed electrical device and no attempt should be made to open the case. Attempting to open the case will invalidate your Warranty.
Testing
Test your smoke alarm once every week see 'Alarm Test'. Any test failures should be reported to the Technical Support Team.
Cleaning
As a minimum your smoke alarm should be cleaned once every 3 months using your vacuum cleaner fitted with the soft brush attachment.

Your smoke alarm may false alarm when it is being cleaned using a vacuum cleaner.
Do not use solvents or cleaners on your smoke alarm, as they may cause damage to the sensor or circuitry. The unit can be wiped with a slightly damp cloth.
Do not paint the smoke alarm as this may block the openings and prevent smoke from entering the sensor.
TROUBLESHOOTING
| Problem | Solution |
| Your smoke alarm does not sound during testing |
|
| Your smoke alarm chirps intermittently |
|
| Your smoke alarm activates when no smoke is visible |
|
| The low battery warning silence chirp does not silence when the test button is pressed |
|
| You experience frequent unwanted alarms |
|
If you have any questions, please contact the Technical Support Team between 9am - 5pm Monday – Friday. Telephone: 0330 094 5830 or e-mail: technicalsupport@fireangeltech.com. You can also visit the support section of our website www.fireangeltech.com
(UK) technicalsupport@fireangeltech.com
(DE) technik@fireangeltech.com
(FR) supporttechnique@fireangeltech.com
(NL) klantenservice@fireangeltech.com
(INT) Internationalsupport@fireangeltech.com
FireAngel Safety Technology Limited
Vanguard Centre, Coventry CV4 7EZ UK
Technical Support: 0330 094 5830/EIRE dial 1-800 523171
Email: technicalsupport@fireangeltech.com
Web: www.fireangeltech.com
Documents / Resources
References
Download manual
Here you can download full pdf version of manual, it may contain additional safety instructions, warranty information, FCC rules, etc.
Advertisement


Need help?
Do you have a question about the THERMOPTEK ST-622 and is the answer not in the manual?
Questions and answers