
Related Manuals for Simpli Home Murphy AXCLDYMUR28-AB


Summary of Contents for Simpli Home Murphy AXCLDYMUR28-AB
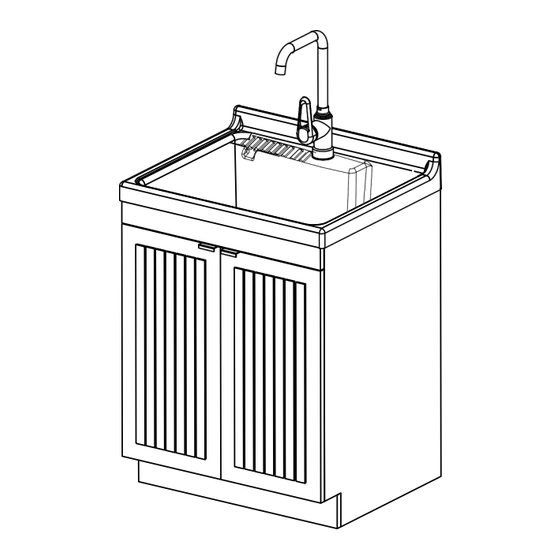
- Page 1 Murphy / Bishop / Guilford inch Laundry Cabinet with Faucet and ABS Sink Model # AXCLDYMUR28-AB...
- Page 2 Great quality is a right. Thank you for shopping with Simpli Home, America's top brand for high-value furniture. It's time to register your product warranty. It's quick and easy. And you'll be happy you did. ✓ Activate your 1-year warranty.
- Page 3 Review your product and collect rewards! Thank you for your purchase! We hope you enjoy it. We’d love your feedback. Please share a review and get instant rewards! simpli-home.com/product-review Share photos and get your cash back! Send us images or share them on social and qualify for instant rewards.
- Page 4 For fastest customer service: Open your phone’s camera. Point your phone’s camera at the QR code to scan. Click on the pop up. You’ll be taken to our customer service page. Fill the form with your order information and issue. Submit form.
-
Page 5: Safety Information
IMPORTANT: Please read this manual carefully before beginning assembly of this product. Keep this manual for future reference. Safety Information This furniture is designed for indoor use. Identify all the parts and hardware. Do not discard of the packaging until you have checked that you have all the parts and hardware required. -
Page 6: Pre-Assembly Information
Pre-Assembly Information Model # AXCLDYMUR28-AB Cabinet Parts BOTTOM PANEL BACK BOTTOM PANEL RIGHT SIDE PANEL QTY 1 QTY 1 QTY 1 BACK TOP PANEL BACK MIDDLE PANEL LEFT SIDE PANEL QTY 1 QTY 1 QTY 1 FRONT BOTTOM PANEL FRONT TOP PANEL LEFT DOOR QTY 1 QTY 1... - Page 7 Pre-Assembly Information Model # AXCLDYMUR28-AB Drain Parts DRAIN BOWL ASSEMBLY DRAIN PLUG ASSEMBLY DRAIN WASHER BLACK QTY 1 QTY 1 QTY 1 THREAD WASHER COUPLING BLACK PIPE WASHER QTY 1 QTY 1 QTY 1 COUPLING BLACK PIPE WASHER WHITE STRAIGHT DRAIN PIPE BLACK QTY 2 QTY 1 QTY 1...
- Page 8 Pre-Assembly Information Model # AXCLDYMUR28-AB Pre-Assembly Information Model # AXCLDYMUR28-AB Model # AXCLDYMUR28-AB Faucet Parts FAUCET BODY FAUCET WASHER RUBBER FAUCET WASHER STEEL QTY 1 QTY 2 QTY 1 BRASS NUT ASSEMBLY QTY 1 Hardware Parts Ⅰ Ⅱ Ⅲ CAM LOCK CAM PIN WOOD DOWEL QTY 25...
- Page 9 Components - Key Diagram Model # AXCLDYMUR28-AB Ⅵ...
- Page 10 Assembly Model # AXCLDYMUR28-AB Step 1 Ⅱ Ⅱ 1. Screw Cam Pins into the pre-drilled small holes on Left Side Panel and Right Side Ⅱ Panel...
- Page 11 Assembly Model # AXCLDYMUR28-AB Step 2 NOTE: THE SCREWDRIVER IS NOT INCLUDED IN THE HARDWARE PACK. Ⅲ Ⅰ Ⅲ 1. Insert Wood Dowels into the pre-drilled hole of Bottom Panel , Back Bottom Panel Ⅲ , Back Top Panel , Back Middle Panel and Front Top Panel 2.
- Page 12 Assembly Model # AXCLDYMUR28-AB Step 3 NOTE: THE SCREWDRIVER IS NOT INCLUDED IN THE HARDWARE PACK. Ⅱ Ⅰ Ⅰ 1. Attach the Left Side Panel with Cam Pins and Dowels into the pre-drilled holes. Ⅱ 2. Insert Cam Locks into the pre-drilled hole of Bottom Panel , Back Bottom Panel Ⅰ...
- Page 13 Assembly Model # AXCLDYMUR28-AB Step 4 Ⅱ Ⅰ 1. Screw Cam Pins into the pre-drilled small holes on Front Bottom Panel Ⅱ 2. Insert Front Bottom Panel with Cam Pins into the pre-drilled holes on both Side Ⅱ Panels 3. Insert Cam Locks into pre-drilled holes on both Side Panels Ⅰ...
- Page 14 Assembly Model # AXCLDYMUR28-AB Step 5 Ⅳ 1. Use the Screwdriver to attach the Front Panel to Front Top Panel with Self-Tapping Screws M4 x 25. Ⅳ...
- Page 15 Assembly Model # AXCLDYMUR28-AB Step 6 Ⅳ M4X14 1. Use the Screwdriver to attach the right door hinges to Right Side Panel with Self-Tapping Screws M4 x 14. Ⅳ 2. Use the Screwdriver to attach the left door hinges to Left Side Panel with Self-Tapping Screws M4 x 14.
- Page 16 Assembly Model # AXCLDYMUR28-AB Step 7 Ⅴ Ⅵ Door 1. Use the Screwdriver to attach the Handle with Philips Screws M4 x 23. Ⅴ Ⅵ...
- Page 17 Assembly Model # AXCLDYMUR28-AB Step 8 Ⅶ Wall Anchors Ⅶ Screw 1. Pierce holes in the wall and insert Wall Anchors into the holes. Ⅶ 2. Insert the Screw through Panel and then insert into the Wall Anchor to lock in place. Ⅶ...
- Page 18 Assembly Model # AXCLDYMUR28-AB Step 9 1. Place a Rubber Washer onto the end of the Faucet and insert the faucet through the top of the Sink 2. From underneath the Sink , secure the Faucet to the Sink using a Rubber Washer , Steel Washer and Brass Nut Assembly...
- Page 19 Assembly Model # AXCLDYMUR28-AB Step 10 1. Place the Sink with the attached Faucet Body on top of the cabinet.
- Page 20 Assembly Model # AXCLDYMUR28-AB Step 11 1. Put the Drain Washer on the top of the drain opening in the Sink 2. Put the Drain Bowl Assembly on the Drain Washer through the drain opening. 3. From underneath the sink fasten the Threaded Washer onto the Drain Bowl Assembly and tighten.
- Page 21 Assembly Model # AXCLDYMUR28-AB Step 12 1. Fasten the nuts of the hoses (not included in package) to the nut ends of the faucet body. 2. Fasten the nuts of the hoses (not included in package) to the water outlet: •...
- Page 22 Assembly Model # AXCLDYMUR28-AB Step 13 1. Put a Pipe Washer onto the Straight Drain Pipe . Connect the Straight Drain Pipe to the drain and fasten the Coupling 2. Put the Coupling into the Straight Drain Pipe and put a Pipe Washer into the Straight Drain Pipe 3.
- Page 23 Assembly Model # AXCLDYMUR28-AB Step 14 1.Use the Screwdriver to re-align or adjust the hinges that attach the doors to the cabinet.
Need help?
Do you have a question about the Murphy AXCLDYMUR28-AB and is the answer not in the manual?
Questions and answers