Table of Contents
Advertisement
Quick Links
ww w.c a ire in c.c om
CAIRE Inc.
2200 Airport Industrial Dr., Ste. 500
Ball Ground, GA 30107
CAIRE and CAIRE Inc. are registered trademarks of CAIRE Inc.
Please visit our website below for a full listing of trademarks.
Trademarks: www.caireinc.com/corporate/trademarks/.
Copyright © 2024 CAIRE Inc.
discontinue its products, or change the prices, materials, equipment,
quality, descriptions, specifications and/or, processes to its products
at any time without prior notice and with no further obligation or
consequence. All rights not expressly stated herein are reserved by
us, as applicable.
U.S.A.
CAIRE Inc. reserves the right to
16 August 2024 YY-OXG8510D-03(B/0)
Advertisement
Table of Contents

Related Manuals for CAIRE IntenOxy 5


Summary of Contents for CAIRE IntenOxy 5
- Page 1 CAIRE Inc. 2200 Airport Industrial Dr., Ste. 500 Ball Ground, GA 30107 U.S.A. CAIRE and CAIRE Inc. are registered trademarks of CAIRE Inc. Please visit our website below for a full listing of trademarks. Trademarks: www.caireinc.com/corporate/trademarks/. Copyright © 2024 CAIRE Inc.
- Page 2 IntenOxy 5 Oxygen Concentrator Technical Manual Do not operate this unit without first reading and understanding this manual...
-
Page 3: Table Of Contents
SAFETY NOTES TABLE OF CONTENTS SAFETY NOTES ------------------------------------------------------- 01-08 FEATURES -------------------------------------------------------------- 09-12 HANDLING -------------------------------------------------------------- 13-13 OPERATING & INSTALLATION ---------------------------------- 14-25 MAINTENANCE -------------------------------------------------------- 26-30 TROUBLESHOOTING ----------------------------------------------- 31-33 DISASSEMBLY --------------------------------------------------------- 34-40 OTHER ATTENTION ITEMS --------------------------------------- 41-42 EMC INFORMATION ------------------------------------------------- 43-46... -
Page 4: Safety Notes
SAFETY NOTES INTENDED USE INDICATIONS: This oxygen concentrator is intended for using as an oxygen supplement device in the professional healthcare facility and home healthcare environment. It provides high concentration of oxygen to persons requiring oxygen therapy. This device is to be used as an oxygen supplement and is NOT considered life-supporting or life-sustaining. -
Page 5: Before Installation
SAFETY NOTES 2. BEFORE INSTALLATION ▶ The oxygen concentrator should always be kept upright to prevent damage while being transported. ▶ If the electrical outlet power voltage is unstable beyond normal voltage range, please do not use outlet. ▶ Do not use with unstable power source. ▶... - Page 6 4. USING WARNING: To ensure receiving the therapeutic amount of oxygen delivery according to your medical condition CAIRE oxygen concentrator must: -- be used with settings that have been individually determined or prescribed for you at your activity levels with your accessories;...
-
Page 7: Radio Frequency Interference
SAFETY NOTES ▶ It takes 15 minutes from switching on the oxygen concentrator until it can be relied upon to deliver the set flowrate and concentration of oxygen. ▶ For optimum performance, do not open or turn off the oxygen concentrator frequently, reset after 3-5 minutes. -
Page 8: To Reduce The Risk Of Burns, Electrocution, Fire Or Injury To Persons
SAFETY NOTES ● Reposition, relocate, or increase the separation between the equipment. ● Connect the equipment into an outlet on a circuit different from that to which the other device(s) is connected. ● Consult the manufacturer or service personnel for help. 7. - Page 9 SAFETY NOTES WARNING: Open flames during oxygen therapy are dangerous and are likely to result in fire or death. Do not allow open flames within 2 m of the oxygen concentrator or any oxygen-carrying accessories. ▶ The use of oxygen therapy requires that special care be taken to reduce the risk of fire.
- Page 10 SAFETY NOTES ▶ Do not come in contact with the oxygen concentrator while wet. ▶ Do not place or store oxygen concentrator where it can drop into water or other liquid. ▶ Do not reach for oxygen concentrator that has fallen into water. Cut off the power immediately.
- Page 11 SAFETY NOTES b) periodically as these attributes change. User and responsible organization should contact the manufacturer or the manufacturer's representative: -- for assistance, if needed, in setting up, using or maintaining the equipment; -- to report unexpected operation or events. ▶...
-
Page 12: Features
FEATURES 1. SUMMARY ▶ This user’s manual will tell you about your concentrator and will serve as a reference as you use your concentrator. ▶ USE SPECIFICATION Intended medical indication: This oxygen concentrator is intended for using as an oxygen supplement device in the professional healthcare facility and home healthcare environment. -
Page 13: Specifications
FEATURES 3. SPECIFICATIONS 1. Power Supply: 120V ~, 60Hz 2. Input Power: 350VA 3. Maximum Recommend Flow Rate: 5 L/min 4. Oxygen Concentration at Nominal Output Pressure of 0kPa (Measured after warm up 15 minutes): 5 L/min: 87% ~ 96% 5. - Page 14 FEATURES 11. Work system: work continuously 12. Minimum Operating Time: 15 minutes 13. Electric classification: class II equipment, type BF applied part, Ip21 Applied part: Nasal Cannula 14. Electric classification: over voltage category: II pollution degree: 2 altitude: ≤2000m 15. Safety System: ●...
- Page 15 FEATURES When operating condition over the rated ranges of ambient temperature, humidity and atmosphere pressure, the performance of the oxygen may decrease. 17. Oxygen Output Temperature: ≤ 46˚C (114.8˚F) Applied part Temperature (Nasal Cannula): ≤ 41˚C (105.8˚F) 18. Cannula length SHOULD NOT exceed more than 15.2m (49.88 feet) and DO NOT twist.
-
Page 16: Handling
HANDLING 1. UNPACKING CAUTION: If not using immediately, store in original packaging material. 1. Check for any obvious damage to the carton or other packaging. If damage is evident, please notify the carrier or local dealer. 2. Remove all loose packaging from the carton. 3. -
Page 17: Operating & Installation
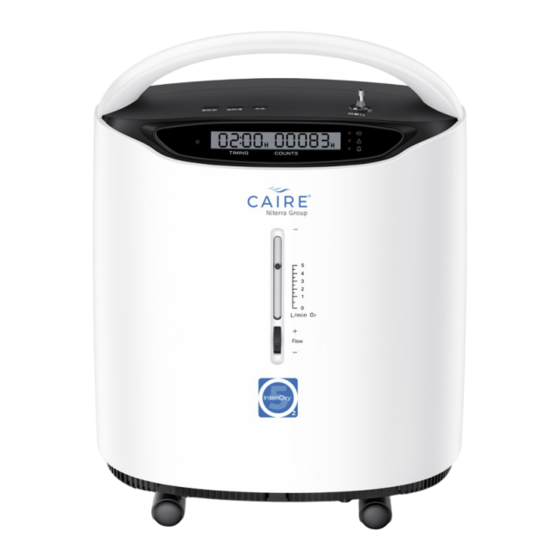
OPERATING & INSTALLATION 1.FEATURE VIEW... - Page 18 OPERATING & INSTALLATION 2. PREPARE WORK NOTE: Inspect the power cord/plug and the exterior of the oxygen concentrator for nicks, dents, scratches or other damages before usage. If it is necessary, call qualified service personnel for examination and repair. 1. Connect the power supply. 2.
- Page 19 OPERATING & INSTALLATION CAUTION: 1) The power supply cord of the oxygen concentrator is not removable. If the power supply cord is damaged, contact the service personnel to replace it. 2) Keep the power supply cord away from heated surfaces. 3) Do not move or relocate the oxygen concentrator by pulling on the power supply cord.
- Page 20 OPERATING & INSTALLATION CAUTION: For the oxygen inhalation time and the oxygen flow adjustment, please follow the doctor’s advices. NOTE: If the flowrate on the flowmeter ever falls below 1 L/min, check for tubings or accessories that are clogged or kinked.
-
Page 21: Alarm Signal
OPERATING & INSTALLATION NOTE: Connect the nasal cannula to the gas outlet connector of the oxygen concentrator. With the oxygen concentrator turned on adjust the flowmeter knob to the desired flowrate. Gas should be flowing freely to the nasal cannula. You should be able to hear or feel the flow of gas to the prongs of the nasal cannula. - Page 22 OPERATING & INSTALLATION Indicator Symbol Status Alarm lights Ready for use or system is in good condition: Green — oxygen concentration ≥ 82% 1) Oxygen concentration < minimum rated concentration (start-up period) Yellow Alarm 2) 70% ≤ Oxygen concentration < 82% System failure (Oxygen concentration <...
- Page 23 OPERATING & INSTALLATION 4. Oxygen concentration is less than 70%. Yellow light illuminates, alarm sounds, panel shows word “LO”. Please remove the power immediately, use the reserve oxygen, and contact supplier immediately. - The maximum and mean delay of “LO” alarm system is less than 60 s. 5.
- Page 24 OPERATING & INSTALLATION When the oxygen concentrator alarms, press the “Audio alarm paused” button, the alarm sounds will be turned off, and the blue light will be on. Press the “Audio alarm paused” button again or 2 minutes later, the alarm will sound again, and the blue light will be off.
- Page 25 OPERATING & INSTALLATION 5. SETTING TIMING UP This oxygen concentrator has timing function, users can set in the range of 0 ~ 2 hours. When it start working, the display shows “TIMING ----H”, which means that the timing function is closed. It will continue to work until the power is cut off. Press the “...
-
Page 26: Turning Off
OPERATING & INSTALLATION Symbol Description Symbol Description Atmospheric pressure Date of manufacture limitation Audio alarm paused Alarm Standby Time setting Serial number Batch code U.S. Federal law restricts this device to sale by or on the order of a physician. MR Unsafe: An item which poses unacceptable risks to the patient, medical staff or other persons within the MR environment. -
Page 27: Remote Control
OPERATING & INSTALLATION 8. REMOTE CONTROL Use infrared remote control to operate the device. (Figure 8) Replace the battery of the remote control as shown in Figure 9. NOTE: During remote control operating, the remote control must be toward the receiver which is located in the control panel. - Page 28 OPERATING & INSTALLATION WARNING: Use only water-based lotions or salves that are oxygen-compatible prior to and during oxygen therapy. Never use petroleum-based or oil-based lotions or salves to avoid the risk of fire and burns. ▶ Firesafe valve CAUTION: The firesafe valve is a thermal fuse designed to extinguish an oxygen delivery tube fire and stop the flow of oxygen if the tube is accidentally ignited.
-
Page 29: Maintenance
MAINTENANCE CAUTION: Before maintaining the oxygen concentrator, Remove the power first to avoid electrical shock. CAUTION: During both normal condition and single fault condition, the housing and nasal cannula can become contaminated with body fluids or expired gases. To reduce the infection risk, please perform the maintenance routinely. NOTE: In places with high dust or soot levels, maintenance may need to be performed more often. - Page 30 MAINTENANCE Wipe the exterior case with a cloth or sponge dipped in 70% ~ 80% medical alcohol. 2. CLEAN OR REPLACE FILTER Please clean or replace the filters in time, it’s very important to protect compressor and to extend the oxygen concentrator life. ▶...
- Page 31 MAINTENANCE 3. CLEAN FIRESAFE VALVE ▶ Clean the firesafe valve weekly as follows: 1) Clean the firesafe valve with a mild detergent or warm soapy water and then rinse thoroughly with clean water. 2) Air dry thoroughly. CAUTION: Before delivery to a new patient, after cleaning and before drying, it should also be disinfected as follows: Put the firesafe valve into 70% ~ 80% medical alcohol, cover and soak for 30 minutes for disinfection.
- Page 32 MAINTENANCE ALARM CHECK METHOD Turn on the power, after 5 minutes, pass the standard gas with oxygen concentration <70% into the oxygen sensor. About 1 LO alarm minute later, the yellow light is on, alarm sounds, panel shows word “LO”. Unplug the pressure sensor pipeline and start the oxygen Pressure concentrator.
- Page 33 MAINTENANCE 5. INSTRUCTIONS FOR PROCESSING AND REPROCESSING ▶ In order to prevent injury caused by infection or damage to the oxygen concentrator, only qualified personnel can clean and disinfect the oxygen concentrator and its accessories for multiple patients. ▶ Follow the instructions below to eliminate possible pathogen infection between patients caused by component or accessory contamination.
-
Page 34: Troubleshooting
TROUBLESHOOTING Use the table below to take actions when the oxygen concentrator indicates an abnormal condition. Symptom Probable cause Solution 1) Poor contact between 1) Insert the power cord plug power cord plug and firmly into the socket. socket. 2) The socket has no 2) Move to a socket with power The oxygen power output. - Page 35 TROUBLESHOOTING Symptom Probable cause Solution 1) Oxygen concentration The oxygen 1) Clean or replace the filter. < 70% concentrator is working, the 2) Oxygen flowrate over yellow light 2) Adjust the flowrate only the maximum recommend illuminates, under the advice of the doctor. flowrate: 5 L/min.
- Page 36 TROUBLESHOOTING Symptom Probable cause Solution The oxygen concentrator is not working, the 1) The temperature inside 2) Stop using the device, yellow light the oxygen concentrator is please contact the supplier illuminates, alarm too high. immediately. sounds, panel shows word "E5". The oxygen 1) Change power source concentrator is...
-
Page 37: Disassembly
DISASSEMBLY (Cut off the power supply first) ♦ IntenOxy 5 DISASSEMBLY PROCEDURES CUT OFF THE POWER SUPPLY FIRST ▶ Put the power switch on ‘○’, and pull out the plug from the socket. REMOVE REAR COVER ▶ Lie down the unit, unscrew the screws in the base. (Figure 11) - Page 38 DISASSEMBLY (Cut off the power supply first) ▶ Open the cover, pull out the air inlet tubing, disconnect the large and small 2-pin connectors then remove the rear cover. ( Figure 13) REMOVE FRONT COVER ▶ Pull out Pressure Regulator Tubing from pressure regulator, disconnect 4-pin connector &...
- Page 39 DISASSEMBLY (Cut off the power supply first) REMOVE MAIN BOARD ▶ Unscrew the screws in the main board. (Figure 16) ▶ Pull out silicone tubing and all connectors in the board then remove the main board. (Figure 16)
- Page 40 DISASSEMBLY (Cut off the power supply first) REMOVE COMPRESSOR CAPACITOR AND INLET MUFFLER ▶ Cut the capacitor fixing tie and remove the capacitor. (Figure 17) ▶ Pull up the inlet muffler and pull out the compressor inlet tubing. (Figure 18)
- Page 41 DISASSEMBLY (Cut off the power supply first) REMOVE HEAT EXCHANGER AND FAN ▶ Unscrew the screws. (Figure 19) ▶ Cut off the fixing ties and pull out the tubing. (Figure 19) ▶ Remove the heat exchanger, take off the fan. (Figure 20)
- Page 42 DISASSEMBLY (Cut off the power supply first) REMOVE PRODUCT TANK, OXYGEN MODULE AND EXHAUST MUFFLER ▶ Pull out the exhaust tubing, rotate and remove the exhaust muffler1 and exhaust muffler2. (Figure 21) ▶ Pull up and remove the product tank, then pull out the connecting tubing. (Figure 21) ▶...
- Page 43 DISASSEMBLY (Cut off the power supply first) ▶ Unscrew the fixing screws in the base, lift and remove the inner case. (Figure 22) ▶ Remove the compressor. (Figure 23)
-
Page 44: Other Attention Items
OTHER ATTENTION ITEMS 1. GAS PASS OPERATION SKETCH MAP 2. ELECTRICAL RATIONALE... -
Page 45: Packing List
OTHER ATTENTION ITEMS 3. PACKING LIST 1. Oxygen Concentrator 1 unit 2. User & Technical Manual 1 piece 3. Firesafe Valve 1 piece 4. Remote Controller 1 piece 5. Cannula 1 piece 4. DEVICE DISPOSAL The responsible organization must contact its local authorities to determine the proper method of disposal of the oxygen concentrator and accessories. -
Page 46: Emc Information
EMC INFORMATION WARNING: Far away from HF SURGICAL EQUIPMENT and the RF shielded room of an ME SYSTEM for magnetic resonance imaging in hospitals, where the intensity of EM DISTURBANCES is high. WARNING: Use of this equipment adjacent to or stacked with other equipment should be avoided because it could result in improper operation. - Page 47 EMC INFORMATION Basic EMC Phenomenon standard or test Immunity test levels method ELECTROSTATIC ±8 kV contact IEC 61000-4-2 ±2 kV, ±4 kV, ±8 kV, ±15 kV air DISCHARGE 10 V/m Radiated RF EM IEC 61000-4-3 80 MHz - 2.7 GHz fields 80% AM at 1 kHz RATED power...
- Page 48 EMC INFORMATION Test IMMUNITY Band frequency Service Modulation TEST LEVEL (MHZ) (MHZ) (V/m) Pulse modulation 380 to 390 TETRA 400 18 Hz GMRS 460, FRS 430 to 470 ±5 kHz deviation 1 kHz sine LTE Band Pulse modulation 704 to 787 13,17 217 Hz GSM 800/900,...
- Page 49 EMC INFORMATION Table 3: Guidance and declaration of manufacturer - electromagnetic emission Phenomenon Compliance Conducted and radiated RF EMISSIONS Group 1, Class B CISPR 11 Harmonic distortion Class A IEC 61000-3-2 Voltage fluctuations and flicker Complies IEC 61000-3-3...
Need help?
Do you have a question about the IntenOxy 5 and is the answer not in the manual?
Questions and answers
What is the purpose for the timming setting
The timing setting on the CAIRE IntenOxy 5 allows the user to set the duration for which the oxygen concentrator operates.
This answer is automatically generated
Where can I purchase a remote control for the caire intenoxy