CAIRE FreeStyle Comfort Manual
- User manual (546 pages) ,
- Technical manual (33 pages) ,
- Quick start manual (2 pages)
Advertisement
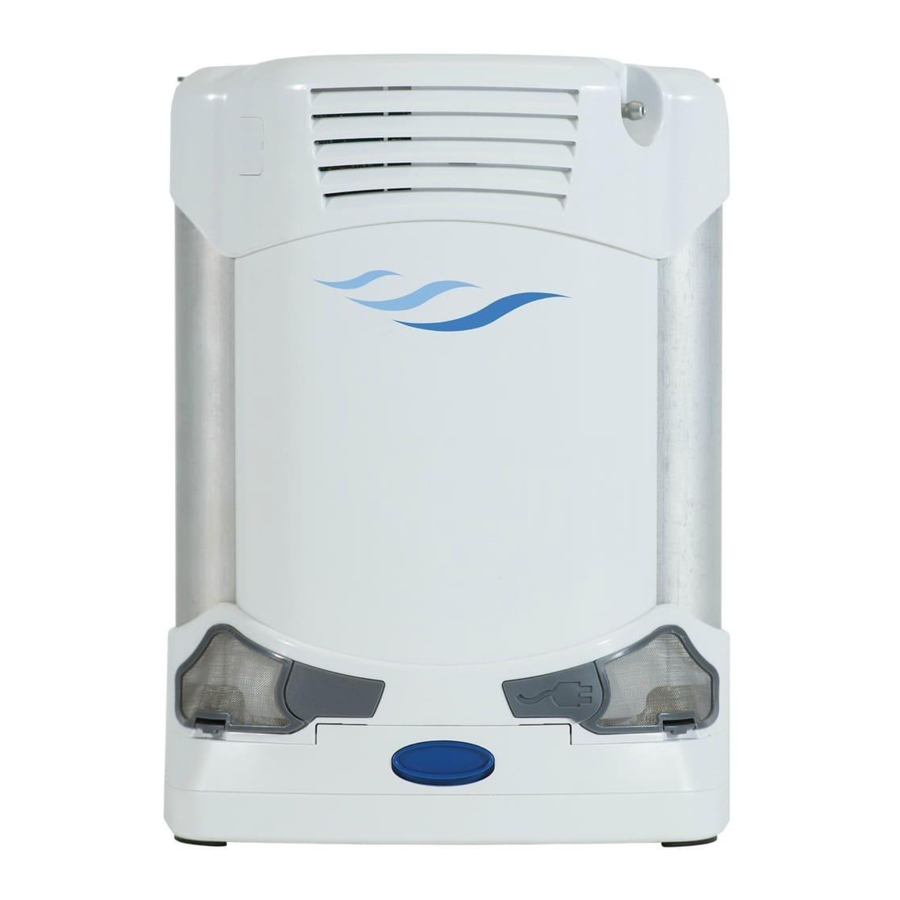
FreeStyle Comfort Overview


Display Screen on Battery

Note: Bolus Delivery Indicator is only available on Software Version 2.7 or higher.
Description of Operation
The air we breathe contains approximately 21% oxygen, 78% nitrogen, and 1% other gasses. In the FreeStyle Comfort, room air is drawn into the machine through the air intakes. It then passes through an adsorbent material called molecular sieve. This material separates the oxygen from the nitrogen and allows only the oxygen to pass through. The result is a flow of high-concentration oxygen delivered to the user.
The FreeStyle Comfort combines advanced oxygen concentrator and oxygen conserving technologies to create a portable device that allows for maximum portability and ambulation. The advanced pulse flow delivery quickly senses when the user breathes in and delivers a pulse of oxygen at the beginning of each inhalation. Pulse flow delivery is ideal for activities and time away from home. It conserves oxygen and extends battery life as opposed to continuous flow. The FreeStyle Comfort is lightweight enough to be carried via the handle, shoulder strap, or backpack. It can be operated on AC, DC (vehicle), or battery power.
Test Procedures
VERIFY GENERAL OPERATION
- Locate and position the FreeStyle Comfort in a proper location for use.
- The concentrator should be well-ventilated so that the air intake filters and air outlet are not obstructed.
- The concentrator should be positioned so that all audible and visual indicators and alarms can be easily seen and heard.
- Be sure the air intake filters are in place before operating the unit. If the unit is missing a filter, contact your equipment provider.
- Install a Battery Pack in the concentrator.
- Align the battery with the bottom housing from the center of the FreeStyle Comfort.
![]()
- Slide the battery inward until you hear a click to confirm that it has locked in place.
![]()
- Align the battery with the bottom housing from the center of the FreeStyle Comfort.
- Insert the AC or DC power supply into the power port receptacle on the front, bottom right side of the unit.
![]()
- Connect a nasal cannula to the oxygen outlet barb. Ensure the connection is secure before the operation.
NOTE: Any Cannula(s) used other than the recommended may affect performance.
![]()
- Turn on the FreeStyle Comfort by pressing the power button and select your prescribed flow setting utilizing the increase (+) or decrease (-) flow buttons.
A brief audible alarm will sound to indicate the device has powered on. A start-up screen will appear showing the current firmware revision in the bottom right corner.
![]()
![]()
Note: When the Freestyle Comfort is initially turned on the default flow setting is 2. If the setting is changed, the unit will power on to the previous flow setting.
Next, the warm-up screen will display while the oxygen concentration is increased until it exceeds low concentration threshold or up to 15 minutes whichever is sooner. Also, the FreeStyle Comfort will start by auto-dosing until a breath is detected or warmup ends, whichever is sooner.
![]()


- Position the nasal cannula on your face per the manufacturer's instructions provided with the cannula and breathe normally. You should feel a puff of oxygen delivered through the nasal cannula each time you inhale.
- To change the flow setting, press the increase (+) or decrease (-) flow buttons to the desired flow rate. It is normal to hear a difference in sound as you change the flow settings.
- Turn the FreeStyle Comfort off by pressing the power button.
NOTE: The display screen will enter standby mode and dim after 20 seconds. Press any button to wake the screen out of standby mode
![]()

| Pulse Volume (mL) * Setting | |||||
| Breath Rate | 1 | 2 | 3 | 4 | 5 |
| 15 | 14.0 | 28.0 | 42.0 | 56.0 | 70.0 |
| 20 | 10.5 | 21.0 | 31.5 | 42.0 | 52.5 |
| 25 | 8.4 | 16.8 | 25.2 | 33.6 | 42.0 |
| 30 | 7.0 | 14.0 | 21.0 | 28.0 | 35.0 |
| 35 | 6.0 | 12.0 | 18.0 | 24.0 | 30.0 |
| 40 | 5.3 | 10.5 | 15.8 | 21.0 | 26.3 |
Tolerance is +/- 15%
Note: To Equipment Provider: The following oxygen administration accessory is recommended for use with the FreeStyle Comfort:
- Nasal Cannula with 7 feet (2.1 m) of tubing (Maximum LPM: 6 LPM): CAIRE Part Number 5408-SEQ
- For any additional recommended accessories, please see the Accessories Catalog (PN MLCONC0149) available on www.caireinc.com.
Test Mode Operation and O2 Concentration Check
Entering Test Mode
With the unit turned on, press the following sequence of buttons "+ + - - + - + -". For the unit to recognize the following sequence, it has to be entered within a 5 second period. If the sequence of buttons is entered correctly, the unit will alarm and the screen will change, having a red border around the screen, indicating the unit is now in test mode. The unit will begin auto-pulsing, enabling O2 concentration testing.
To exit test mode, turn off the unit or re-enter the test mode sequence. Be sure to exit test mode before returning the unit to patient use.
Hour Meter
The hour meter will be useful for tracking the usage of the unit and plan the provider maintenance:
- To view the total operating hours, turn the unit on and enter Test Mode per the instruction from the previous section.
- Within the Test Mode, the five-digit number shown at the bottom of the screen (next to the hourglass symbol) is the operating hours of the unit.
Alarm Code in Test Mode
Reviewing the Alarm Code may be useful during the troubleshooting. The unit will enter an auto-pulse mode for testing such as oxygen level:
- To check the Alarm Code, turn the unit on and enter the Test Mode per instruction from the previous section.
- On the top of the screen, the four-digit number indicates the operating status of the unit. Any combination beside 0000 will indicate the specific issue of the unit. Refer to TROUBLESHOOTING IN TEST MODE for details.
Note: Battery Charge/Discharge cycles is only available on software version 2.7 or higher.
![]()

O2 CONCENTRATION TEST
Before reviewing the Troubleshooting Chart, the following steps may be useful to identify any malfunctions:
- Make sure all filters are clean.
- Enter the Test Mode per instruction from the previous section. After ten minutes of running in test mode, measure the oxygen concentration. The acceptable O2 range is 90% oxygen +5.5/-3%.
Note: The pulse setting can be increased or decreased as normal operation while in test mode. - To exit test mode, turn off the unit or re-enter the test mode sequence. Be sure to exit test mode before returning the unit to patient use.
VERIFY AC AND DC OPERATION
The FreeStyle Comfort comes with an AC and DC power supply to keep your concentrator powered wherever you go. The AC power supply includes the following:
- AC Power brick that operates between 100- 240 volts, 50-60Hz.
- AC Power cord to connect to the power brick and corresponding AC outlet.
![]()

The DC power supply consists of a cord that plugs directly into the unit and the DC outlet.

VERIFY AC POWER OPERATION
AC power is for use at home or wherever standard AC outlet power is available. The FreeStyle Comfort is fully functional on AC power. The FreeStyle Comfort will also recharge the battery pack if needed any time AC power is available (except in an airplane). The battery pack will recharge whether the FreeStyle Comfort is powered on or off.

DO NOT CONNECT EXTERNAL POWER WITHOUT A BATTERY PACK INSTALLED IN THE OXYGEN CONCENTRATOR.
To connect the FreeStyle Comfort to AC Power:
- Connect the AC power brick to the power connector inlet on the front, right bottom of the FreeStyle Comfort. Be sure to push inward, so the connection is secure.
![]()
- Connect the AC power cord to the AC power brick.
![]()
- Connect the opposite end of the AC power cord to the wall or another appropriate electrical outlet.
![]()
- Turn on the FreeStyle Comfort by pressing the power button and increase (+) or decrease (-) the pulse setting.
![]()
- Verify unit operates properly in all settings.
Note: If the battery pack needs to be recharged, the battery icon on the display will have a single orange bar.


VERIFY DC POWER
DC power is for use in the accessory outlets of automobiles, boat, or other motor vehicles. The FreeStyle Comfort is fully functional for use on DC power. The FreeStyle Comfort will also recharge the battery pack if needed any time DC power is available. The battery pack will recharge both if the unit is off, or on and in use.

DO NOT CONNECT EXTERNAL POWER WITHOUT A BATTERY PACK INSTALLED IN THE OXYGEN CONCENTRATOR.
- Turn on your motor vehicle.
Note: Never operate the unit without the vehicle running. - Connect the DC power supply to the power port receptacle front, bottom right side of the FreeStyle Comfort. Be sure to push inward so that the connection is secure.
![]()

- Connect the opposite end of the DC power cord to the automobile or other DC accessory outlet.
![]()
- Turn on the FreeStyle Comfort by pressing the power button and select your prescribed flow setting utilizing the increase (+) or decrease (-) flow buttons.
- Verify that unit operates properly in all settings.
Note: If the battery pack needs to be recharged, the battery icon on the display will have a single orange bar.

VERIFY AIRPLANE MODE
The FreeStyle Comfort can be used on an aircraft per normal operating procedures using battery power ONLY, with no external power source is connected. If an electrical outlet is available, operable, and its location is appropriate for use as a power source, it may serve as a back up to the FreeStyle Comfort's Batteries. In this case, the following recommended procedure regarding the transition from battery to aircraft electrical power must be followed:
- Turn the FreeStyle Comfort On using battery power ONLY, with no external power source connected.
![]()
- Enable airplane mode by press and hold both Up and Down buttons for 5 seconds until you hear a long beep and see the airplane symbol appear as indicated below.
![]()
- When the airplane symbol is displayed, you can plug in the Freestyle Comfort. Note: Due to aircraft limitations, the batteries do not charge in Airplane Mode.
![]()


Patient Cleaning, Care & Routine Maintenance
ROUTINE MAINTENANCE
Servicing of internal components inside of the cabinet of the FreeStyle Comfort must be performed by the oxygen provider.
The operator of the unit is responsible for the following maintenance procedures.
- Weekly – Clean the Air Intake Filters
![]()
DO NOT ATTEMPT TO OPEN OR REMOVE THE PLASTIC COVERS OF THE OXYGEN CONCENTRATOR. THE UNIT SHOULD ONLY BE OPENED BY A QUALIFIED SERVICE TECHNICIAN.
AIR INTAKE FILTERS
Air enters the FreeStyle Comfort through air intake filters located on the front, bottom of the oxygen concentrator. These filters prevent dust and other large particles in the air from entering the unit. At least once per week, the air intake filters should be cleaned. Your oxygen provider may advise you to clean them more frequently, depending upon the operating conditions. Follow these steps to clean the air intake filters properly.
- Remove the filters from the front of the FreeStyle Comfort by pushing up on the corresponding tab and pulling outward.
![]()
- Wash the filters in a warm solution of soap and water.
- Rinse the filters thoroughly and remove excess water with a soft, lint-free cloth. Ensure the filters are completely dry before reattaching.
- Re-install the clean, dry filters.

DO NOT OPERATE THE OXYGEN CONCENTRATOR WITHOUT THE AIR INTAKE FILTER IN PLACE.
BATTERY PACK CARE
Do not allow the battery pack to be exposed to liquids.
Do not attempt to disassemble or open the battery pack.
Do not expose the battery to open flames.
Do not drop the battery pack.
Keep the battery pack away from children.
If your battery pack appears damaged, contact your oxygen provide before use.
Do not place the battery in or near a microwave or other cooking appliances.
BATTERY PACK DURATION
| Setting | Single (8-cell) Battery Duration | Double (16-cell) Battery Duration |
| 1 | Up to 8 hours | hours |
| 2 | Up to 4 hours | hours |
| 3 | Up to 3 hours | hours |
| 4 | Up to 2.25 hours | 4.5 hours |
| 5 | Up to 2 hours | hours |
BATTERY SERVICE LIFE
The FreeStyle Comfort batteries are designed to last 300 charge/discharge cycles.
BATTERY PACK STORAGE
The oxygen concentrator battery does not need to be fully discharged before recharging. It is recommended to charge the oxygen concentrator battery after each use.
Do not leave the battery in a location exposed to excessive heat, such as in direct sunlight or a car.
Doing so could cause the battery's performance and life to deteriorate. It may also cause the battery to generate heat, smoke, catch fire, or explode. The battery pack should be stored in a stable environment characterized by low-humidity (less than 70% RH) and free of corrosive gasses. To prevent rust, avoid conditions that can create condensation such as rapid fluctuations in the ambient temperature.
For storage of a month or more, a discharged or partial charged state of charge between 50% and 75% (two to three LEDs) is recommended. Once charged, remove the battery from the oxygen concentrator.
Cleaning
Turn OFF the unit and disconnect from AC or DC power before any cleaning or disinfection. DO NOT spray the outer case directly. Use a damp (not wet) cloth or sponge. Spray the cloth or sponge with a mild disinfectant solution to clean the cabinet and power supplies. Proceed as directed by the cleaner manufacturer.
TURN OFF THE UNIT AND DISCONNECT THE POWER CORD FROM THE ELECTRICAL OUTLET BEFORE YOU CLEAN THE UNIT TO PREVENT ACCIDENTAL ELECTRICAL SHOCK AND BURN HAZARD. ONLY YOUR EQUIPMENT PROVIDER OR A QUALIFIED SERVICE TECHNICIAN SHOULD REMOVE THE COVERS OR SERVICE THE UNIT.
CARE SHOULD BE TAKEN TO PREVENT THE OXYGEN CONCENTRATOR AND THE BATTERY PACK FROM GETTING WET OR AL- LOWING FLUIDS TO ENTER THE UNIT. THIS CAN CAUSE A MALFUNCTION OR SHUT DOWN, AND CAUSE AN INCREASED RISK FOR ELECTRICAL SHOCK OR BURNS.
DO NOT USE LIQUID DIRECTLY ON THE UNIT. A LIST OF UNDESIRABLE CHEMICAL AGENTS INCLUDES BUT IS NOT LIMITED TO THE FOLLOWING: ALCOHOL AND ALCOHOL-BASED PRODUCTS, CONCENTRATED CHLORINE-BASED PRODUCTS (ETHYLENE CHLORIDE), AND OIL- BASED PRODUCTS. THESE ARE NOT TO BE USED TO CLEAN THE PLASTIC HOUSING ON THE CON- CENTRATOR, AS THEY CAN DAMAGE THE UNIT.
CLEAN THE CABINET, CONTROL PANEL, AND POWER CORD ONLY WITH A MILD HOUSEHOLD CLEANER APPLIED WITH A DAMP (NOT WET) CLOTH OR SPONGE, AND THEN WIPE ALL SURFACES DRY. DO NOT ALLOW ANY LIQUID TO GET INSIDE THE CONCENTRATOR. PAY SPECIAL ATTENTION TO THE OXYGEN OUTLET FOR THE CANNULA CONNECTION TO MAKE SURE IT REMAINS FREE OF DUST, WATER, AND PARTICLES.
USE A DAMP (NOT WET) CLOTH OR SPONGE TO CLEAN THE BATTERY PACK. FIRST SPRAY THE CLOTH OR SPONGE WITH A MILD HOUSEHOLD CLEANER AND CLEAN THE BAT- TERY PACK HOUSING.
DO NOT DISINFECT/CLEAN WITH AUTOMATED WASHING SYSTEM.
CANNULA REPLACEMENT
Always follow the cannula manufacturer's instructions for proper use. Replace the nasal cannula or oxygen tubing every 3 to 6 months (if used daily, 3 months) per manufacturer's or oxygen provider's recommendation. Your physician or oxygen provider will provide you with cleaning and replacement instructions.
Additional supplies for replacement are available through your oxygen provider.
Equipment Provider Maintenance
REQUIRED TOOLS
- T6 torx driver
- T8 torx driver
- ½" hex driver
- Cannula barb tool (CAIRE P/N 21168706)
AIR INTAKE FILTER
The external air intake filter is located on the front, bottom of the oxygen concentrator. You can easily remove it by hand. Instruct the patient to clean this filter weekly. (Reference Air Intake filters in the cleaning, care and Routine maintenance section of this manual)
TURN OFF THE UNIT AND DISCONNECT THE POWER CORD FROM THE ELECTRICAL OUTLET BEFORE YOU CLEAN THE UNIT TO PREVENT ACCIDENTAL ELECTRICAL SHOCK AND BURN HAZARD. REMOVE THE BATTERY FROM THE UNIT BEFORE PERFORMING ANY MAINTENANCE TO PREVENT ACCIDENTAL ELECTRICAL SHOCK AND BURN HAZARD. THE FREESTYLE COMFORT MUST BE OFF AND DISCONNECTED FROM EXTERNAL POWER BEOFRE REMOVING THE BATTERY PACK.
PRODUCT FILTER REPLACEMENT
The product filter is designed to last the life of the unit when used under normal operating conditions. If it is determined the product filter needs to be replaced, follow the instructions below:
- Turn the unit off, disconnect the power cord and remove the power supply.
- While using the oxygen outlet Spanner and a ½" nut driver, unscrew oxygen outlet on the front top right of the unit.
![]()
- Once the oxygen outlet is removed, the product filter can be taken out by simply tipping the FreeStyle Comfort to its side, and the filter will disengage from its position.
- Insert the new product filter.
- Screw the oxygen outlet back until it feels snug.
![]()


COMPRESSOR INTAKE FILTER
The Compressor Intake Filter is designed to last the life of the unit when the unit is used under normal operating conditions. The filter is located underneath the unit. If the filter needs to be replaced, remove the screws using a T6 torx driver. Replace with a new compressor intake filter.

CLEANING AND PREPARING FOR NEW PATIENT USE
When you remove the FreeStyle Comfort from a patient's home, always detach and dispose of the used nasal cannula. Clean the exterior of the unit with a mild household cleaner applied with a damp cloth or sponge. Pay special attention to the oxygen outlet for the cannula connection to make sure it remains free of dust, water, and particles. Be careful not to get any liquid into the interior of the unit.
Next, clean the exterior with a common chemical disinfectant before any other patient uses the unit. Do not use liquid directly on the unit to clean it.
TURN OFF THE UNIT, DISCONNECT THE POWER CORD FROM THE ELECTRICAL OUTLET BEFORE YOU CLEAN THE UNIT TO PREVENT ACCIDENTAL ELECTRICAL SHOCK AND BURN HAZARD. REMOVE THE BATTERY FROM THE UNIT BEFORE PERFORMING ANY MAINTENANCE TO PREVENT ACCIDENTAL ELECTRICAL SHOCK AND BURN HAZARD. THE FREESTYLE COMFORT MUST BE OFF AND DISCONNECTED FROM EXTERNAL POWER BEOFRE REMOVING THE BATTERY PACK.
Replace the air intake filter or clean with warm soapy water between each patient use. The patients should be instructed to clean this filter at least once per week, depending on the environment, during normal operation. Allow the unit to air dry. Then re-test oxygen concentration, test the duration of the battery pack, and ensure the AC and DC power supplies are in good working condition before you return the unit to your inventory.

DO NOT USE LIQUID DIRECTLY ON THE UNIT. A LIST OF UNDESIRABLE CHEMICAL AGENTS INCLUDES BUT IS NOT LIMITED TO THE FOLLOWING, ACCORDING TO THE PLASTICS MANUFACTURER: ALCOHOL AND ALCOHOL-BASED PRODUCTS, CHLORINE-BASED PRODUCTS (ETHYLENE CHLORIDE), AND OIL- BASED PRODUCTS (PINE-SOL, LESTOIL). THESE ARE NOT TO BE USED TO CLEAN THE PLASTIC HOUSING ON THE FREESTYLE COMFORT, THEY CAN DAMAGE THE UNIT'S PLASTIC.
Note: Make the bleach solution a 1:100 dilution of 5.25% sodium hypochlorite. Mix one part household bleach (e.g., Clorox with 99 parts cold tap water). To measure the solution easily, take ¼ cup of household bleach, and mix it with a gallon of cold tap water. Allow the mixture to sit on potentially contaminated surfaces for ten minutes.
Note: CAIRE does not recommend the sterilization of this equipment.
RECORDING MAINTENANCE
Whenever maintenance or service is performed on a unit, an entry should be made in the service log for that concentrator or recorded in accordance with your company's standard procedure.
| FreeStyle Comfort Serial Number | ||||||
| DATE | HOUR METER READING | INITIALS | SERVICE PERFORMED | SYSTEM CHECKOUT | COMMENTS | |
| PURITY | ALARM | |||||
Service Procedures
SIEVE BED REPLACEMENT
TURN OFF THE UNIT, DISCONNECT THE POWER CORD FROM THE ELECTRICAL OUTLET BEFORE YOU CLEAN THE UNIT TO PREVENT ACCIDENTAL ELECTRICAL SHOCK AND BURN HAZARD. REMOVE THE BATTERY FROM THE UNIT BEFORE PERFORMING ANY MAINTENANCE TO PREVENT ACCIDENTAL ELECTRICAL SHOCK AND BURN HAZARD. THE FREESTYLE COMFORT MUST BE OFF AND DISCONNECTED FROM EXTERNAL POWER BEOFRE REMOVING THE BATTERY PACK.
- Disconnect the unit from the AC or DC outlet.
- Remove the battery and flip the unit upside down.
- Remove the four screws using a T8 torx bit screwdriver and remove bottom cover from unit.
![]()
- Pull the manifold outward and flex the sieve bed out slightly from the unit so the manifold can clear the support bolts. Then simply lift the manifold up and off of the sieve bed.
![]()


- Flip the unit in the upright position and pull down on the sieve beds to remove from the manifold.
![]()
- Perform the steps in reverse to replace the old sieve beds with new sieve beds.
![]()


FEED/WASTE VALVE REPLACEMENT
Feed/Waste valves are designed to last the life of the unit.
Signs of Feed/Waste valve failure.
Low O2.
High or Low System Pressure.
REPLACEMENT INSTRUCTIONS
- Disconnect the unit from the AC or DC outlet.
- Remove the battery and flip the unit upside down.
- Remove the 4 fasteners using a T8 torx driver.
- Remove the bottom case plastic.
- Remove zip tie from the manifold to valve pressure connection.
- Remove silicone tubing from feed/waste valve.
- Disconnect valve from the circuit board.
- Remove feed/waste valves from sieve beds.
- Cap sieve bed inlet to prevent moisture ingress while valve is removed.
- Connect new valve to the silicone tubing.
- Replace zip tie from the manifold to valve pressure connection.
- Place valve on sieve bed inlet.
- Connect valve to the circuit board.
- Reassemble bottom case plastic using the T8 fasteners (QTY 4).
![]()

Troubleshooting
Before reviewing the Troubleshooting Chart, the following steps may be useful to isolate any malfunctions:
- Make sure all filters are clean.
- To test the oxygen concentration, the unit must be turned on. With the unit turned on, press the following sequence of buttons "+ + - - + - + -". In order for the unit to recognize the following sequence, it has to be entered within a 5 second time period. If the sequence of buttons is entered correctly, the unit will alarm and the screen will change, having a red border around the screen, indicating the unit is now in test mode.
- After ten minutes of running in test mode, measure the oxygen concentration. The acceptable O2 range is 90% oxygen +5.5/-3%
- Make sure the unit is leak-free by testing all tubing connections and fittings with a leak-testing solution. Protect the circuit board from the solution, and start the leak test at the compressor, following the air flow of the unit to the oxygen outlet. Repair all leaks by tightening connections and fittings.
- To exit test mode, turn off the unit. Be sure to exit test mode before returning the unit to patient use.
Note: The Pulse setting can be increased or decreased as normal operation while in test mode.
The alarm code can stack, e.g., 0x0003 indicates both battery high temperature and case high temperature. (0x0001 and 0x0002)
The table below is for a single alarm instance at a time. Active Alarm codes are combined through a bit-wise AND function, so that if multiple alarms are present simultaneously, each alarm can be discerned separately. For example, Alarm Code 0x00C0 would indicate Alarms 0x0040 and 0x0080 simultaneously.
| Decimal | Hexadecimal |
| 1 | 1 |
| 2 | 2 |
| 3 | 3 |
| 4 | 4 |
| 5 | 5 |
| 6 | 6 |
| 7 | 7 |
| 8 | 8 |
| 9 | 9 |
| 10 | A |
| 11 | B |
| 12 | C |
| 13 | D |
| 14 | E |
| 15 | F |
Troubleshooting Table
Review the Troubleshooting Chart that follows to isolate and repair a malfunction:
| Alarm Code (Hex) | Run Mode Display | Alarm Description | Probable Cause | Suggested Action | More Details |
| 0x0000 |  | None | Normal Operation | None | |
| 0x0001 |  | Battery High Temperature | Hot Battery Defective Battery | Test unit with a battery at room temperature. Test unit with another battery. | 1 Beep Every 20 sec Unit is reaching battery safety shutdown threshold. Unit will shut down if threshold is reached. |
| 0x0002 |  | Case High Temperature | Case Temperature Greater Than 60°C Vent Blockage Other | Allow unit to cool down. Ensure there are no blockages on any vents of the unit. Contact Caire for repair. | 1 Beep Every 20 sec Unit is reaching shutdown threshold. Unit will shut down if it reaches an internal temperature of 65°C. |
| 0x0004 |  | High Pressure | Sieve Bed Failure Feed / Waste Valve Failure Other | Replace sieve beds. Replace feed / waste valves. Contact Caire for repair. | 1 Beep Every 20 sec |
| 0x0008 |  | No Breath Detected | Outlet Filter Other | Ensure the cannula is leakfree. Replace outlet filter. Contact Caire for repair. | 1 Beep Every 30 sec No breath detected for 15 seconds. Activated after first breath or warm up screen is off, whichever comes sooner. During No Breath Detected alarm, the unit will auto-dose at 20 BPM until a breath is detected and the alarm is disabled. (This feature is only available for Firmware Rev 1.2 or higher) |
| 0x0010 |  | Low Battery Shutdown | Battery Level Below 5% Defective Battery | Test unit with a charged battery. Test unit with another battery. | 1 Beep Every 30 sec Alarms until battery runs out of power and unit shuts down. |
| 0x0020 |  | O 2 Warmup | Unit is Warming Up | Allow the unit to warm up for 15 minutes. | Unit will start by auto-dosing until a breath is detected or Warm Up ends, whichever is sooner. |
| 0x0040 |  | Low O 2 | Intake Filter Clogged Sieve Bed Failure Low / High Pressure Other | Clean or replace intake filters. Replace sieve beds. See Low / High Pressure Contact Caire for repair. | 1 Beep Every 30 sec, for up to 5 min |
| 0x0080 |  | OCD Failure | Kink in Cannula Outlet / Product Filter Clogged Other | Ensure there are no kinks in the cannula. Replace outlet / product filter. Contact Caire for repair. | 1 Beep Every 20 sec |
| 0x0100 |  | Low Battery Warning | Battery Level 10% or Below Defective Battery | Test unit with a charged battery. Test unit with another battery. | 1 Beep, No Repeat |
| 0x0200 |  | Breath Rate Exceeded | Patient Breathing More Than 40 BPM Other | Run unit in normal operation for 15 minutes without breathing off the unit. Ensure alarm does not occur during this period. Contact Caire for repair. | 1 Beep Every 60 sec |
| 0x0400 | | Fan Failure | Other | Contact Caire for repair. | |
| 0x0800 | | Low Pressure | Intake Filter Clogged / Pinched Clogged Inlet Tubing Feed / Waste Valve Failure Sieve Bed Failure Other | Clean or replace intake filters. Verify that compressor inlet tubing is not pinched or clogged. Replace feed / waste valves. Check for leaks on bottom sieve bed caps. Replace sieve beds. Contact Caire for repair. | |
| 0x1000 |  | Low Temperature | Case Temperature Less Than 0°C | Allow unit to warm up to room temperature. | |
| 0x2000 | | Compressor Failure | Other | Contact Caire for repair. | |
| 0x4000 | | O2 Out of Range | Other | Contact Caire for repair. |
Accessories and Parts List
For proper performance and safety, use only these listed accessories supplied by CAIRE through your oxygen provider. Use of accessories not listed below could adversely affect the performance and/ or safety of the concentrator.
| FreeStyle Comfort Standard Accessories | |
| Battery, 8-Cell | BT034-1S |
| Battery 16-Cell | BT035-1S |
| Carrying Bag | MI396-1 |
| Backpack | MI459-1 |
| Shoulder Strap | MI397-1 |
| Power Supply, 120W 15V | PW036-1S |
| Oxygen Outlet Spanner | 21168706 |
| DC Cord | CD041-1 |
| Optional Accessories Available | |
| Desktop Battery Pack Charger | BT036-1 |
| Spare Parts List | |
| Sieve Beds | BE566-1S |
Note: Additional options may be available for country-specific power cords where noted above. Contact CAIRE or your oxygen provider if alternate options are needed for order.
User Controls & System Status Indicator

Safety Instructions
Safety instructions are defined as follows:
IMPORTANT SAFETY INFORMATION FOR HAZARDS THAT MIGHT CAUSE SERIOUS INJURY.
Important information for preventing damage to the FreeStyle Comfort.
Note: Information needing special attention.
Indications for Use
IT IS VERY IMPORTANT TO SELECT ONLY THE PRESCRIBED LEVEL OF OXYGEN. DO NOT CHANGE THE FLOW SELECTION UNLESS YOU HAVE BEEN DIRECTED TO DO SO BY A LICENSED CLINICIAN.
FEDERAL (USA) LAW RESTRICTS THIS DEVICE TO SALE OR RENTAL BY ORDER OF A PHYSICIAN OR OTHER LICENSED HEALTH CARE PROVIDER.
THIS UNIT IS NOT TO BE USED FOR LIFE SUPPORT. GERIATRIC, PEDIATRIC, OR ANY OTHER USER UNABLE TO COMMUNICATE DISCOMFORT WHILE USING THIS DEVICE MAY REQUIRE ADDITIONAL MONITORING. USERS WITH HEARING AND/OR SIGHT IMPAIRMENT(S) MAY NEED ASSISTANCE WITH MONITORING ALARMS.
PULSE DOSE MODE SETTINGS MUST BE DETERMINED FOR EACH USER INDIVIDUALLY FOR THEIR NEEDS AT REST, DURING EXERCISE, AND WHEN TRAVELING.
SOME RESPIRATORY EFFORTS OF THE PATIENT MIGHT NOT TRIGGER THE CONSERVING FUNCTION
THE FREESTYLE COMFORT IS NOT INTENDED FOR USE WITH A TRACHEOTOMISED PATIENT.
PREGNANT OR NURSING WOMEN SHOULD NOT USE ACCESSORIES RECOMMENDED IN THIS MANUAL, THEY MAY CONTAIN PHTHALATES.
Contraindications for Use
IN CERTAIN CIRCUM- STANCES, THE USE OF NON-PRESCRIBED OXYGEN CAN BE HAZARD- OUS. THIS DEVICE SHOULD ONLY BE USED WHEN PRESCRIBED BY A PHYSICIAN.
NOT FOR USE IN THE PRESENCE OF FLAMMABLE ANESTHETICS.
AS WITH ANY ELECTRICALLY POWERED DEVICE, THE USER MAY EXPERIENCE PERIODS OF NON-OPERATION AS A RESULT OF ELECTRICAL POWER INTERRUPTION, OR THE NEED TO HAVE THE OXYGEN CONCENTRATOR SERVICED BY A QUALIFIED TECHNICIAN. THE OXYGEN CONCENTRATOR IS NOT APPROPRIATE FOR ANY USER WHO WOULD EXPERIENCE ADVERSE HEALTH CONSEQUENCES AS THE RESULT OF SUCH TEMPORARY INTERRUPTION.
Safety Guidelines
NO MODIFICATION OF THIS EQUIPMENT IS PERMITTED
THIS DEVICE SUPPLIES HIGH-CON- CENTRATION OXYGEN THAT PROMOTES RAPID BURNING. DO NOT ALLOW SMOKING OR OPEN FLAMES WITHIN THE SAME ROOM OF (1) THIS DEVICE, OR (2) ANY OXYGEN-CARRYING ACCES- SORY. FAILURE TO OBSERVE THIS WARNING CAN RESULT IN SEVERE FIRE, PROPERTY DAMAGE, AND/OR CAUSE PHYSICAL INJURY OR DEATH.
DO NOT OPERATE UNIT IN A RESTRICTED OR CONFINED SPACE (I.E., A SMALL CASE OR HANDBAG) WHERE VENTILATION CAN BE LIMITED. THIS CAN CAUSE THE OXYGEN CONCENTRATOR TO OVERHEAT AND IMPAIR PERFORMANCE.
THE CONCENTRATOR SHOULD BE LOCATED AS TO AVOID SMOKE, POLLUTANTS OR FUMES.
IN THE EVENT THERE IS A SERIOUS INCIDENT OCCURRING WITH THIS DEVICE, THE USER SHOULD IMMEDIATELY REPORT THE INCIDENT TO THE PROVIDER AND/OR THE MANUFACTURER. A SERIOUS INCIDENT IS DEFINED AS AN INJURY, DEATH, OR POTENTIAL TO CAUSE INJURY/DEATH SHOULD THERE BE A REOCCURRENCE OF THE INCIDENT. THE USER CAN ALSO REPORT THE INCIDENT TO THE COMPETENT AUTHORITY IN THE COUNTRY WHERE THE INCIDENT OCCURRED.
THE USE OF SOME OXY- GEN ADMINISTRATING ACCESSORIES NOT SPECIFIED FOR THIS OXYGEN CONCENTRATOR MAY IMPAIR ITS PERFORMANCE. RECOMMENDED ACCESSORIES ARE REFERENCED WITHIN THIS MANUAL.
IF THE OXYGEN CONCENTRATOR HAS BEEN DROPPED, DAMAGED OR EXPOSED TO WATER, PLEASE CONTACT YOUR HOME CARE PROVIDER FOR INSPECTION OR POSSIBLE REPAIR OF THE DEVICE. DO NOT USE THE OXYGEN CONCENTRATOR IF IT HAS A DAMAGED POWER CORD OR PLUG.
PROPERLY SECURE, BELT OR OTHERWISE RESTRAIN THE OXYGEN CONCENTRATOR WHEN IN A VEHICLE DURING TRANSPORT TO PREVENT DAMAGE OR INJURY.
THE US DEPARTMENT OF TRANS- PORTATION (DOT) AND UNITED NATIONS (UN) REGULATIONS REQUIRE THE REMOVAL OF THE BATTERY FROM THE DEVICE FOR ALL INTERNATIONAL AIRLINE TRAVEL WHEN THE OXYGEN CONCENTRATOR IS CHECKED AS LUGGAGE. WHEN SHIPPING THE OXYGEN CONCENTRATOR, THE BATTERY MUST ALSO BE REMOVED FROM THE DEVICE AND PACKAGED PROPERLY.
DO NOT OPERATE THIS EQUIPMENT WITHOUT FIRST READING AND UNDERSTAND- ING THIS MANUAL. IF YOU ARE UNABLE TO UNDERSTAND THE WARNINGS AND INSTRUC- TIONS, CONTACT YOUR EQUIPMENT PROVIDER BEFORE ATTEMPTING TO USE THIS EQUIPMENT; OTHERWISE, INJURY OR DAMAGE MAY RESULT.
IF YOU FEEL DISCOMFORT OR ARE EXPERIENCING A MEDICAL EMERGENCY, SEEK MEDICAL ASSISTANCE IMMEDIATELY.
OPERATING THE OXYGEN CON- CENTRATOR OUTSIDE OF THE OPERATIONAL TEMPERATURE SPECIFICATIONS CAN LIMIT THE CONCENTRATOR'S ABILITY TO MEET OXYGEN CONCENTRATION SPECIFICATION. REFER TO THE SPECIFICATION SECTION OF THIS MANUAL FOR TEMPERATURE LIMITS.
USE NO OIL, GREASE, OR PETRO- LEUM-BASED OR OTHER FLAMMABLE PROD- UCTS WITH THE OXYGEN-CARRYING ACCESSORIES OR THE OXYGEN CONCENTRATOR. ONLY WATER BASED, OXYGEN COMPATIBLE LOTIONS OR SALVES SHOULD BE USED. OXYGEN ACCELERATES THE COMBUSTION OF FLAMMABLE SUBSTANCES.
DO NOT ALLOW EITHER THE AIR INTAKE OR THE AIR OUTLET EXHAUST TO BECOME BLOCKED. DO NOT DROP OR INSERT ANY OBJECTS INTO ANY OPENINGS ON THE DEVICE. THIS CAN CAUSE THE OXYGEN CONCENTRATOR TO OVERHEAT AND IMPAIR PERFORMANCE.
THE INCORRECT USE OF THE BATTERY CAN CAUSE THE BATTERY TO GET HOT, IGNITE, AND MAY CAUSE SERIOUS INJURY. BE SURE NOT TO PIERCE, STRIKE, STEP ON, DROP THE BATTERY, OR OTHERWISE SUBJECT THE BATTERY TO STRONG IMPACTS OR SHOCKS. THE USE OF A DAMAGED BATTERY MAY CAUSE PERSONAL INJURY.
DO NOT SHORT-CIRCUIT THE BATTERY'S METAL CONTACTS WITH METALLIC OBJECTS, SUCH AS KEYS OR COINS. THIS MAY CAUSE SPARKS OR EXCESSIVE HEAT TO BE GENERATED.
WHILE USING THE PORTABLE OXYGEN CONCENTRATOR OUTDOORS WITH THE AC POWER SUPPLY, CONNECT THE POWER SUPPLY INTO A GROUND FAULT INTERRUPTED (GFI) OUTLET ONLY.
THE OXYGEN CONCENTRATOR SHOULD NOT BE USED ADJACENT TO OR STACKED WITH OTHER EQUIPMENT. IF ADJACENT OR STACKED USE IS UNAVOIDABLE, THE DEVICE SHOULD BE OBSERVED TO VERIFY NORMAL OPERATION.
USE OF CABLES AND ADAPTERS OTHER THAN THOSE SPECIFIED, WITH THE EXCEPTION OF CABLES AND ADAPTERS SOLD BY THE MANUFACTURER OF THE MEDICAL ELECTRICAL EQUIPMENT AS REPLACEMENT PARTS FOR INTERNAL COMPONENTS, MAY RESULT IN INCREASED EMISSIONS OF DECREASED IMMUNITY OF THE OXYGEN CONCENTRATOR.
USE ONLY ELECTRICAL VOLTAGE SPECIFIED ON THE SPECIFICATION LABEL AFFIXED TO THE DEVICE.
DO NOT USE EXTENSION CORDS WITH THIS UNIT OR CONNECT TOO MANY PLUGS INTO THE SAME ELECTRICAL OUTLET. THE USE OF EXTENSION CORDS COULD ADVERSELY AFFECT THE PERFORMANCE OF THE DEVICE. TOO MANY PLUGS INTO ONE OUTLET CAN RESULT IN AN OVERLOAD TO THE ELECTRICAL PANEL CAUSING THE BREAKER/FUSE TO ACTIVATE OR FIRE IF THE BREAKER OR FUSE FAILS TO OPERATE.
In the event of an alarm or you observe the Oxygen Concentrator is not working properly; consult the Troubleshooting section in this manual. If you cannot resolve the problem, consult your Equipment Provider.
To prevent a void warranty, follow all manufacturer's instructions.
DO NOT ATTEMPT ANY MAINTENANCE OTHER THAN THE POSSIBLE SOLUTIONS LISTED WITHIN THIS MANUAL. DO NOT REMOVE COVERS, ONLY YOUR EQUIPMENT PROVIDER OR A QUALIFIED SERVICE TECHNICIAN SHOULD REMOVE THE COVERS OR SERVICE THIS DEVICE.
USE ONLY ACCESSORIES RECOMMENDED BY THE MANUFACTURER. USE OF ANY OTHER MAY BE HAZARDOUS, CAUSE SERIOUS DAMAGE TO YOUR OXYGEN CONCENTRATOR AND WILL VOID THE WARRANTY.
THE MANUFACTURER RECOMMENDS AN ALTERNATE SOURCE OF SUPPLEMENTAL OXYGEN IN THE EVENT OF A POWER OUTAGE, ALARM CONDITION, OR MECHANICAL FAILURE. CONSULT YOUR PHYSICIAN OR EQUIPMENT PROVIDER FOR THE TYPE OF RESERVE SYSTEM REQUIRED.
SMOKING WHILE USING OXYGEN IS THE NUMBER ONE CAUSE OF FIRE INJURIES AND RELATED DEATHS. YOU MUST FOLLOW THESE SAFETY WARNINGS:
DO NOT ALLOW SMOKING, CAN- DLES, OR OPEN FLAMES IN THE SAME ROOM WITH THE DEVICE OR THE OXYGEN-CARRYING ACCESSORIES.
SMOKING WHILE WEARING AN OXYGEN CANNULA MAY CAUSE FACIAL BURNS AND POSSIBLY DEATH.
IF YOU SMOKE, THESE 3 STEPS MAY SAVE YOUR LIFE: TURN OFF THE OXYGEN CONCENTRATOR, TAKE OFF THE CANNULA, AND LEAVE THE ROOM WHERE THIS DEVICE IS LOCATED.
"NO SMOKING – OXYGEN IN USE" SIGNS MUST BE PROMINENTLY DISPLAYED IN THE HOME, OR WHERE OXYGEN IS IN USE. USERS AND THEIR CAREGIVERS MUST BE INFORMED ABOUT THE DANGERS OF SMOKING IN THE PRESENCE OF, OR WHILE USING, MEDICAL OXYGEN.
DO NOT USE YOUR OXYGEN CON- CENTRATOR IN THE PRESENCE OF FLAMMABLE GASES. THIS CAN RESULT IN RAPID BURNING CAUSING PROPERTY DAMAGE, BODILY INJURIES, OR DEATH.
REMOVING THE CANNULA AND PUTTING IT ON CLOTHING, BEDDING, SOFAS, OR OTHER CUSHION MATERIAL WILL CAUSE A FLASH FIRE WHEN EXPOSED TO A CIGARETTE, HEAT SOURCE, OR FLAME.
DO NOT LEAVE A NASAL CANNULA ON OR UNDER CLOTHING, BED COVERINGS, OR CHAIR CUSHIONS. IF THE UNIT IS TURNED ON, BUT NOT IN USE, THE OXYGEN WILL MAKE THE MATERIAL FLAMMABLE. ENSURE THE POWER IS OFF WHEN THE OXYGEN CONCENTRATOR IS NOT IN USE.
THE OXYGEN CONCENTRATOR MUST BE OFF AND DISCONNECTED FROM EXTERNAL POWER BEFORE REMOVING THE BATTERY PACK.

Always disconnect AC power supply from the wall before disconnecting the AC power supply from the Oxygen Concentrator.
Do not position the Oxygen Concentrator so that it is difficult to access the power cord.
Always place oxygen supply tubing and power cords in a manner that prevents trip hazard or possible accidental strangulation.
SMALL PARTS MAY PRESENT A POTENTIAL CHOKING HAZARD.
AVOID CONTACT WITH EXHAUST AIR VENT FOR LONGER THAN 10 SECONDS AS IT MAY BE WARM.
WIND OR STRONG DRAUGHTS CAN ADVERSELY AFFECT ACCURATE DELIVERY OF OXYGEN THERAPY.
When using the Oxygen Concentrator in an automobile, boat, or on other DC sources with the DC power supply, make sure that the vehicle is started and running before connecting the Oxygen Concentrator. If the DC power supply does not illuminate and requires resetting, disconnect the DC power supply from the DC outlet, restart your vehicle, and then reconnect your DC power supply into the DC outlet. Failure to follow these instructions can result in the power supply not supplying power to the Oxygen Concentrator.
When the automobile in which you are using the Oxygen Concentrator unit is turned off, disconnect and remove the device from the automobile. Do not store the Oxygen Concentrator in a very hot or cold automobile or in other similar, high- or low-temperature environments.
Note: Portable and mobile RF communications equipment can affect medical electrical equipment.
DO NOT leave the Oxygen Concentrator or the Power Supply plugged into the vehicle if the ignition is in the OFF position. Doing so may drain the vehicle's battery.
For Oxygen Concentrators equipped with batteries: Store in a cool and dry location to help ensure the longevity of your battery. Storing your Oxygen Concentrator for extended periods of time at high temperatures or with a fully charged or completely discharged battery can degrade its overall battery life.
Do not attempt to open the battery; there are no serviceable parts inside the battery. Keep batteries away from children.
ONLY USE the Manufacturer's provided batteries. For proper battery disposal, contact your Equipment Provider or your local government agency for disposal requirements.
Operating or storing the Oxygen Concentrator Outside of its normal operating temperature range, and ambient pressure range (altitude) can affect performance, decrease battery run time, and/or increase battery charge time.
Refer to the Specifications section in this manual for storage and operating temperature limits.
Note: Ensure the cannula is fully inserted and secure. This ensures that the Oxygen Concentrator can properly detect inspiration for oxygen delivery. During inhalation, you should hear or feel oxygen flow to the prongs of the nasal cannula.
Note: Lithium batteries may permanently lose capacity when exposed to extremely hot temperatures with the batteries fully charged or completely depleted. For extended storage, it is recommended that batteries be charged 25 to 50% and remain within a temperature range of -4°F– 68°F (-20°C – 20°C)
Note: The use of some oxygen administration accessories not specified for use with this oxygen concentrator may impair its performance. Recommended accessories are referenced within this manual.
Note: Do not operate the Oxygen Concentrator without the air intake filter in place. If a second filter is provided, insert the replacement filter before you clean the dirty filter. Clean the dirty filter in a warm soap and water solution, then dry thoroughly prior to use.
Note: The Manufacturer does not recommend the sterilization of this equipment.
Note: There is never a danger of depleting the oxygen in a room when you use your oxygen concentrator unit.
THE OXYGEN CONCEN- TRATOR SHOULD NOT BE OPERATED OR PLUGGED IN TO EXTERNAL (AC/ DC) POWER WITHOUT A BATTERY INSTALLED. DO NOT ATTEMPT TO POWER ON THE UNIT OR CONNECT IT TO EXTERNAL POWER WHEN THE BATTERY PACK IS REMOVED.
UNIT IS POWERED OFF AND UNPLUGGED FROM THE POWER SUPPLY. DO NOT ATTEMPT TO REMOVE THE BATTERY PACK WHILE THE UNIT IS STILL ON OR PLUGGED INTO THE POWER SUPPLY.
Note: If the oxygen concentrator has been stored for an extended period of time outside of its normal environmental operating conditions shown in the table below, it should be allowed to return to normal operating temperature before being powered on.
Specifications
| FreeStyle Comfort | |
| Dimensions (with Single Battery) | 10.0 x 7.3 x 3.1 in (25.4 x 18.5 x 7.9 cm) |
| Dimensions (with Double Battery) | 11.0 x 7.3 x 3.1 in (27.9 x 18.5 x 7.9 cm) |
| Weight (with Single Battery Pack) | 5 lbs. (2.3kg) |
| Weight (with Double Battery Pack) | 6 lbs. (2.7kg) |
| Nominal Sound Level | 39,93 dB(A) ± 0,42 dB(A) @ 2 |
| Flow Settings | Pulse Setting 1, 2, 3, 4, 5 |
| O2 Output Setting | Setting 1 - 210 mL/min Setting 2 - 420 mL/min Setting 3 - 630 mL/min Setting 4 - 840 mL/min Setting 5 - 1050 mL/min |
| Oxygen Concentration* | 90% (+5.5% / -3%) |
| Oxygen Monitor | Yes |
| Maximum Outlet Pressure | < 30PSI |
| Dosing Sensitivity | > -0.5 cmH2O |
| Length of Cannula | 7 ft. (2.1 m) |
| AC Power | 100-240VAC, 50-60Hz |
| DC Power | 11-18 VDC (10 max amp) |
| Battery Type | Lithium Ion |
| Battery Capacity | Single cell: 6700 mAh Double cell: 13400 mAh |
| Battery Re-Charge Time | Single Battery: 3.5 hours Double Battery: 6.0 hours |
| Battery Pack Durations | Single Battery Duration: Setting 2 - up to 4 hours Double Battery Duration: Setting 2 - up to 8 hours |
| Operating Temperature** | 41°F to 104°F (5°C to 40°C) |
| Transportation and Storage Temp. (Unit) | -13°F to +158°F (-25°C to +70°C) up to 10,000 ft. (3048m) |
| Transportation and Storage Temp. (Battery) | -4°F to +68°F (-20°C to +20°C) up to 10,000 ft. (3048m) |
| Operating Altitude** | -1250 to 10,000 ft. (-381 to 3048 m) (tested to 700-1060 hPa) |
| Operating Humidity | 15-95% relative humidity (non-condensing) |
| Storage Humidity | 0-90% relative humidity (non-condensing) |
| Limited Warranty | 3 years unit 1 year battery & power supplies |
* Based on an atmospheric pressure of 14.7 psi (101 kPa) at 70°F (21°C)
** Operating outside of these operational specifications can limit the concentrator's ability to meet Oxygen Concentration specification at higher liter flow rates. The warm-up screen may continue to display until the concentrator has reached target concentration or up to 15 minutes. Continue to use the unit during this time.
The expected service life is a minimum of five years. The expected shelf life of the sieve beds is approximately one year if concentrator is unused during the entire period.
Documents / Resources
References
Download manual
Here you can download full pdf version of manual, it may contain additional safety instructions, warranty information, FCC rules, etc.
Advertisement


Need help?
Do you have a question about the FreeStyle Comfort and is the answer not in the manual?
Questions and answers