
Subscribe to Our Youtube Channel
Related Manuals for Opera Motion Divan Kit


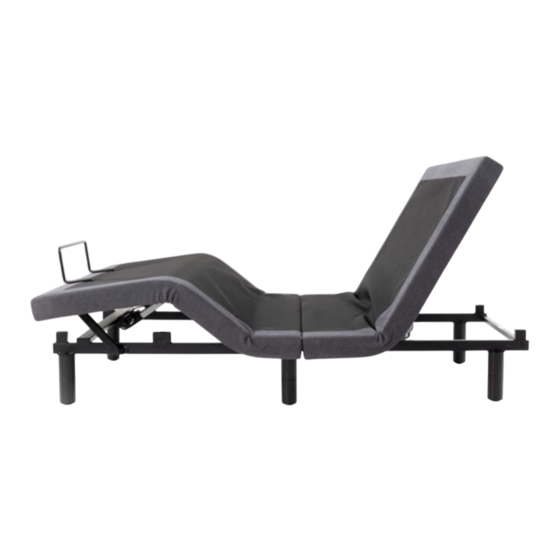
Summary of Contents for Opera Motion Divan Kit
- Page 1 I N S T A L L A T I O N G U I D E A N D T E C H N I C A L S P E C I F I C A T I O N S Opera Motion Divan Kit ® operabeds.com | 0333 222 8584 | 1...
- Page 2 G Side Surround Bolts x16 H Extension Feet x6 I Head End Position Brackets Before you begin, you will also need: • M6 Allen Key • Posidrive Screwdriver 2 | Opera Motion Divan Bed Installation Guide and Technical Specification | Version 2...
- Page 3 1 | Remove Divan Surround from Outer Packaging Remove the divan head end, foot end, side skirts and brackets from the packaging. You should have: 1 x Head End Surround 1 x Foot End Surround 2 x Side Surround 4 x Brackets 16 x Bolts 6 x Extension Feet 4 x Corner Feet...
- Page 4 Mounting Clips Loosen the prefitted screw in the Foot End panel (B) and attach the Mounting Clips (F) securely. Two clips are required per Smart Base. 4 | Opera Motion Divan Bed Installation Guide and Technical Specification | Version 2...
- Page 5 7 | Screw the Side Surround to the Head End Connect the Side Surrounds (C/D) to the brackets on the Head End (A) using the pre-fitted plates. 8 | Position the Surround Under the Bed Once the Side Surrounds are attached on both sides, push the surround under the bed until it reaches the Head End Position...
- Page 6 12 | Place the Underbed Drawers into the Surround (Only for Underbed Drawer Options) Place the underbed drawers under the divan surround. Installation of your divan bed is now complete! 6 | Opera Motion Divan Bed Installation Guide and Technical Specification | Version 2...
- Page 7 Optional Motion Divan Headboard If you purchased your smart base with a divan headboard, please follow the following steps carefully to assemble. Before you begin, you will also need: • M6 Allen Key • Spanner Contents J Headboard Bracket x 2 K Headboard x 1 L Bolt x 4 M Washers x 8...
- Page 8 (N). Repeat this for all four holes. When the holes have been made, align the headboard with the head end of the bed. 8 | Opera Motion Divan Bed Installation Guide and Technical Specification | Version 2...
- Page 9 3 | Tighten the Headboard Thumb Screw Place the thumb screws (N) into the headboard and the bracket holes. Place the washers (M) and nuts (L) onto the thumb screw inside the bed frame. Tighten the nut using a spanner. Ensure the nut has been tight- ened enough to prevent any unwanted movement with the headboard.
- Page 10 S Elevation Kit Headboard T Elevation Kit Foot End- U M8 Cap Head Bolt Bracket (Pair) Bracket (Pair) (optional) X Mains Power Lead V M6 Connecting Screw W Transformer 10 | Opera Motion Divan Bed Installation Guide and Technical Specification | Version 2...
- Page 11 1 | Fit legs to the Elevation Kit Screw together the leg extensions (H) and Elevation Kit feet (Q) to be able to raise the lifting platform to the correct height. Screw the ex- tended legs into the 6x positions on the underside of the lifting platform (P).
- Page 12 For beds using the elevation kit without headboard, use the elevation kit headboard brackets (S). Fasten to the elevation kit using M6 con- necting bolts and fit the headboard in the usual way. 12 | Opera Motion Divan Bed Installation Guide and Technical Specification | Version 2...
- Page 13 Se- cure in place using the M8 bolts supplied with the Elevation Kit. The Opera Motion Divan with Elevation Kit is now complete. operabeds.com | 0333 222 8584 | 13...
- Page 14 Notes 14 | Opera Motion Divan Bed Installation Guide and Technical Specification | Version 2...
- Page 15 Notes operabeds.com | 0333 222 8584 | 15...
- Page 16 Opera Beds Azure House, Connaught Road, Kingswood, Hull. HU7 3AP 0333 222 8584 support@operabeds.com operabeds.com 16 | Opera Motion Divan Bed Installation Guide and Technical Specification | Version 2...
Need help?
Do you have a question about the Motion Divan Kit and is the answer not in the manual?
Questions and answers