Opera Classic Installation Manual And Technical Specifications
Hide thumbs
Also See for Classic:
- Installation manual and technical specifications (54 pages) ,
- Installation and user manual (8 pages) ,
- Manual (2 pages)

Related Manuals for Opera Classic


Summary of Contents for Opera Classic
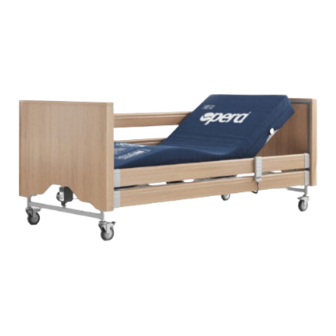
- Page 1 Enhancing Lives, Delivering Comfort O P E R A ® C L A S S I C & C L A S S I C L O W P R O F I L I N G B E D Installation Guide and Technical Specifications V I S I T O P E R A B E D S .
-
Page 2: Table Of Contents
General Information Servicing Technical Specification Service Life and Disposal Guarantee Opera Warrant y Terms and Conditions 1 | Opera Beds | Opera Classic & Classic Low Bed Insta llat ion Guid e a nd Technica l Specificat ion | Version 4... -
Page 3: Explanations Of Symbols
1. Explanations of Symbols Read information wit h t his symbol carefully and urgent ly follow inst ructions. This information is safet y- relevant . This symbol indicates hazards due to elect rical voltage. There is mortal danger! This symbol indicates general hazards. There is danger to life and healt h. -
Page 4: Installation And Commissioning
Plea se not e t hat st yles ma y va ry d ep end ing up on p urcha se. 3 | Opera Beds | Opera Classic & Classic Low Bed Insta llat ion Guid e a nd Technica l Specificat ion | Version 4... - Page 5 (D) Mattress Backrest Platform x 1 (E) Mattress Legrest Platform x 1 N.B. Ea sily id ent ifia b le b eca use it ha s b ot h N.B. Ea sily id ent ifia b le b eca use it only ha s a n a ct uat or a nd t he b la ck cont rol b ox.
- Page 6 Detach t he following accessories and place to one side. (H) Side Rail End Caps x 8 5 | Opera Beds | Opera Classic & Classic Low Bed Insta llat ion Guid e a nd Technica l Specificat ion | Version 4...
- Page 7 3. Remove the Mattress Platforms Wit h t wo people, carefully hold t he backrest mat t ress plat form (D) at bot h ends and pull it up and out of t he t ransport bracket . Carefully place to one side wit h t he act uator on top (1 ).
- Page 8 (as per t he photos below). The securing bolt s are on t he inside frame of t he head/ foot boards, wit h one at each side. 7 | Opera Beds | Opera Classic & Classic Low Bed Insta llat ion Guid e a nd Technica l Specificat ion | Version 4...
- Page 9 6. Detach the Head and Footboards Wit h t wo hands at eit her side of t he board (t he one t hat is not against t he wall) carefully lift it up and out of t he t ransport bracket . Place t his to one side, t his will become t he foot board of t he bed.
- Page 10 2 | Pin removed and holes aligned. 3 | Pin inserted. 4 | Pin inserted wit h guard in place. 9 | Opera Beds | Opera Classic & Classic Low Bed Insta llat ion Guid e a nd Technica l Specificat ion | Version 4...
- Page 11 8. Attach the Headboard to the Backrest Place t he mat t ress backrest plat form (D) down in front of t hat headrest (A). Slide t he metal prongs (wit h t he t wo holes in) on t he mat t ress plat form side channels of t he mat t ress backrest plat form (D) into t he metal plates on t he headboard (as per t he photos below).
- Page 12 4 | Loose t humb screws on t he mat t ress legrest plat form. 11 | Opera Beds | Opera Classic & Classic Low Bed Insta llat ion Guid e a nd Technica l Specificat ion | Version 4...
- Page 13 10. Attach the Footboard Follow step 7 to at tach t he foot board to t he end of t he mat t ress legrest plat form. 11. Remove the Cable Ties Using a pair of scissors, carefully remove t he cable ties from t he act uator motors, handset and t he mat t ress plat form.
- Page 14 4 | Cont rol box wit h act uators 3 | Cont rol box wit h cover at tached. plugged in. 13 | Opera Beds | Opera Classic & Classic Low Bed Insta llat ion Guid e a nd Technica l Specificat ion | Version 4...
- Page 15 13. Fit the Side Rail End Caps Unpack t he side rails (B) from t heir box. Lay all four side rails on t he floor. Fit t he plastic end caps (H) to bot h ends of t he individual side rails. To do t his use t he bot tom of t he side rail as a leading edge and push on t he cap (see photo below).
- Page 16 2 | Side rail runners inserted into rail. side rail. 3 | Side rail at tached to headboard. 15 | Opera Beds | Opera Classic & Classic Low Bed Insta llat ion Guid e a nd Technica l Specificat ion | Version 4...
- Page 17 15. Fit the Side Rails to the Footboard Release t he black securing bolt s t hat secure t he foot board to t he mat t ress legrest plat form and pull t he foot board slight ly away (as per t he photos below).
- Page 18 After replacing t he side rails, secure t he side rails wit h t he side rail channel fixing bolt s. Side rail channel fixing bolt s circled 17 | Opera Beds | Opera Classic & Classic Low Bed Insta llat ion Guid e a nd Technica l Specificat ion | Version 4...
- Page 19 17. Clip on the Mattress Retainers Clip in place t he mat t ress retainers (J), 2 slat s down from t he top of t he backrest, and 2 slat s up from t he bot tom of t he leg rest . Repeat for t he ot her side of t he bed.
- Page 20 The mat t ress must meet t he requirement s out lined in t he technical specifications. 19 | Opera Beds | Opera Classic & Classic Low Bed Insta llat ion Guid e a nd Technica l Specificat ion | Version 4...
-
Page 21: Bed Operation And Maintenance
3. Bed Operation and Maintenance 3.1 Overview Headboard wit h integrated height adjust ment Foot board wit h integrated height adjust ment operab eds.com | 0333 222 8584 | 20... - Page 22 Mat t ress plat form adjust ment up/ down Tilt Function Nurse key Locking device 21 | Opera Beds | Opera Classic & Classic Low Bed Insta llat ion Guid e a nd Technica l Specificat ion | Version 4...
- Page 23 3.4 Locking Function Locking device Unlocked Handset Locked Handset All elect ric adjust ment functions can be locked by using t he nurses’ key (t he blue key). To lock t he adjusting functions, insert t he nurses’ key into t he locking device and t urn t he key so t hat t he locked padlock set ting is selected (see photos above).
- Page 24 Replace t he bat tery wit h a 9V t ype 6LR61 alkaline bat tery. 23 | Opera Beds | Opera Classic & Classic Low Bed Insta llat ion Guid e a nd Technica l Specificat ion | Version 4...
- Page 25 3.8 9V Battery Change To replace, check or remove t he 9V bat tery, open t he bat tery compart ment on t he power supply unit, t his is at tached to t he ELECTRICAL headrest motor. Follow t he below inst ructions to carry out a bat tery change: •...
-
Page 26: Troubleshooting
25 | Opera Beds | Opera Classic & Classic Low Bed Insta llat ion Guid e a nd Technica l Specificat ion | Version 4... -
Page 27: Safety Instructions
Prior to t he first use, t he Inst ruction Manual must be read conscientiously and in detail by t he user / care personnel. Any incident s or issues must be reported to Opera at, support@ operabeds.com. - Page 28 • Exercise caution when using t he side rails wit h a disabled 27 | Opera Beds | Opera Classic & Classic Low Bed Insta llat ion Guid e a nd Technica l Specificat ion | Version 4...
- Page 29 If t he mains cable or t he mains plug are damaged, t he relevant part must be replaced. This work should only be carried out by t he manufact urer or aut horiesed professionals. When connecting t he mains plug, do not use multiple socket s since liquids may penet rate into t he socket s causing a fire hazard and a possible elect ric shock.
- Page 30 Section 5.1. Adjust ment s of t he bed must only be carried out by suitably 29 | Opera Beds | Opera Classic & Classic Low Bed Insta llat ion Guid e a nd Technica l Specificat ion | Version 4...
- Page 31 5.4 Cleaning and Disinfection Before cleaning and disinfection, t he mains plug must be disconnected and hung up safely. Plugs for t he handset and t he ELECTRICAL motors t hat are plugged into t he cont rol box must remain in t heir socket s.
- Page 32 220mm minimum. If t he dimension is less t han 220mm, an extension side rail kit should be fit ted. 5.7 Electromagnetic Compatibility 31 | Opera Beds | Opera Classic & Classic Low Bed Insta llat ion Guid e a nd Technica l Specificat ion | Version 4...
-
Page 33: General Information
6. General Information 6.1 Definitions of Users Operator An operator is any nat ural or legal person who uses t he care bed or on whose inst ruction it is used (e.g. nursing homes, specialised retailers, healt h insurance companies and medical product suppliers). Users Users are persons who as a result of t heir vocational t raining, experience or briefing are aut horised to operate t he care bed, carry out work on it, or... - Page 34 Under certain conditions t he care beds may be used wit h ot her medical devices, such as antidecubit us/ pressure relieving mat t resses, aerators and 33 | Opera Beds | Opera Classic & Classic Low Bed Insta llat ion Guid e a nd Technica l Specificat ion | Version 4...
- Page 35 • Use of t he care bed for children. • At tempting to move t he care bed when in it s braked position. • Using t he care bed for t ransporting occupant s. • Use of t he care bed on a non- horizontal surface (max incline of 5°). •...
-
Page 36: Servicing
Contact Opera when t here is any uncertaint y. 35 | Opera Beds | Opera Classic & Classic Low Bed Insta llat ion Guid e a nd Technica l Specificat ion | Version 4... - Page 37 7.1 Technical Safety Checks According to EN 62353 Care Bed: ..........................Serial No.: ..........................Location: ..........................Person Responsible: ......................Inspected by: ......................... operab eds.com | 0333 222 8584 | 36...
- Page 38 Height of side guards above the mat tress at least 220mm? 1 9. Have castors including locking brake 37 | Opera Beds | Opera Classic & Classic Low Bed Insta llat ion Guid e a nd Technica l Specificat ion | Version 4...
-
Page 39: Technical Specification
7.2 Checking the Initial Fault Safety To check t he safet y equipment, proceed as follows: The switching positions I and II are testing set tings only used to check t he safet y during t he annual inspection, after repair work, or each time a bed is put back into service after being out of service. - Page 40 Height Adjustment of 400 - 800mm/ 1 6” - 31 ” Mat tress Base (range) from 39 | Opera Beds | Opera Classic & Classic Low Bed Insta llat ion Guid e a nd Technica l Specificat ion | Version 4...
- Page 41 Specification Classic Classic Low Safe Working Load - Max. Weight of Patient: 185kg/ 29st 1 lb SWL (Max Weight of Advisory Weight of Mat tress: 20kg/ 3st 1 lb Patient + Mat tress + Accessories) Advisory Weight of Accessories: 1 5kg/ 2st 4lb...
- Page 42 Max. switching cycles/ mins max. 5 switch cycles/ minutes Safety inspections Annually 8.4 Technical Data (Environmental) 41 | Opera Beds | Opera Classic & Classic Low Bed Insta llat ion Guid e a nd Technica l Specificat ion | Version 4...
- Page 43 8.6 Information about Electromagnetic Emissions Guidance and Manufacturer’s Declaration - Electromagnetic Emissions The care bed is intended for use in the electromagnetic environment specified below. The customer or user of the care bed should ensure that it is used in such an environment.
- Page 44 Interference IEC 60601 Test Compliance Electromagnetic Environment Immunity Level Level - Guidelines Certification 43 | Opera Beds | Opera Classic & Classic Low Bed Insta llat ion Guid e a nd Technica l Specificat ion | Version 4...
- Page 45 <5% UT for 1 / 2 The qualit y of the supply cycle, 1 0ms voltage should be equivalent < 5% UT for 1 / 2 (>95% dip) to that of a t ypical business cycle (>95% dip) Voltage or hospital environment. 40% UT for 5 dips, short 40% UT for 5...
- Page 46 If abnormal performance is observed, it may be necessary to take additional measures, such as reorienting or 45 | Opera Beds | Opera Classic & Classic Low Bed Insta llat ion Guid e a nd Technica l Specificat ion | Version 4...
-
Page 47: Service Life And Disposal
For transmitters not rated in the list above, the working clearance can be determined using the equation, which belongs to the transmitter, where P is the nominal output of the transmitter in Watts (W) according to specifications of the transmitter manufacturer. Note 1 : An additional factor of 1 0/ 3 is applied when calculating the recommended working clearance between transmitters in the 80 MHz to 2.5 GHz frequency range in order to reduce the probability that a mobile/ portable communications device... -
Page 48: Opera Warranty Terms And Conditions
1 1 .2.2 Opera requires any customer requesting service under the warrant y to comply with directions from Opera sta in relation to troubleshooting any issue 47 | Opera Beds | Opera Classic & Classic Low Bed Insta llat ion Guid e a nd Technica l Specificat ion | Version 4... - Page 49 1 1 .2.5 If Opera is unable to repair or replace the product, the customer will be provided with credit for Opera products or may be refunded the price of the product (at Operas election).
- Page 50 (b) Opera’s aggregate liabilit y in respect of all claim7 (, o)- 05 ( )] T J ET EMC.9 (a)- 7 m3- 9 49 | Opera Beds | Opera Classic & Classic Low Bed Insta llat ion Guid e a nd Technica l Specificat ion | Version 4...
- Page 51 Notes operab eds.com | 0333 222 8584 | 50...
- Page 52 Azure House, Connaught Road, Kingswood, Hull, HU7 3AP 0333 222 8584 | support@ operabeds.com | operabeds.com 51 | Opera Beds | Opera Classic & Classic Low Bed Insta llat ion Guid e a nd Technica l Specificat ion | Version 4...
Need help?
Do you have a question about the Classic and is the answer not in the manual?
Questions and answers