Advertisement
®
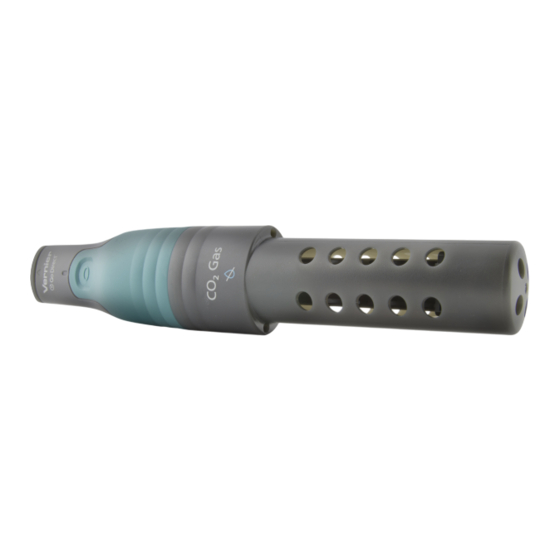
Go Direct
CO
Gas
2
(Order Code GDX-CO2)
Go Direct CO
Gas measures carbon dioxide concentration, temperature, and
2
relative humidity. This sensor includes built-in temperature compensation and
humidity protection. A 250 mL Nalgene bottle is included for running controlled
experiments with small plants and animals.
Go Direct CO
Gas is ideal for the following experiments:
2
Measure the change in CO
gas concentration during cellular respiration.
l
2
Measure the change in CO
gas concentration during photosynthesis.
l
2
Study the effect of temperature on cell respiration or metabolism of organisms.
l
Study how yeast metabolize different sugars.
l
Investigate artificial selection by comparing respiration rates of different yeast
l
strains.
Note: Vernier products are designed for educational use. Our products are not
designed nor are they recommended for any industrial, medical, or commercial
process such as life support, patient diagnosis, control of a manufacturing
process, or industrial testing of any kind.
What's Included
Go Direct CO
Gas
l
2
Micro USB Cable
l
250 mL Nalgene Bottle w/Lid
l
Compatible Software
See
www.vernier.com/manuals/gdx-co2
Go Direct CO
Gas.
2
Quick Start: Vernier Graphical Analysis
1. Charge your sensor for at least 2 hours before first use.
2. Turn on your sensor. The LED will blink red.
3. Launch Graphical Analysis, then click
4. Select your sensor from the list. The sensor ID is located on the sensor label
near the bar code. Note: If you don't see a list of available sensors, click
. After selecting your sensor, click
WIRELESS
5. This is a multi-channel sensor. Click
channel(s) you want to use.
6. Click
. You are now ready to collect data.
DONE
Using other Vernier data-collection apps or want to connect via
USB?
Visit
www.vernier.com/start-go-direct
for a list of software compatible with
®
®
and Bluetooth
.
Sensor Data Collection
.
Pair
and select the
SENSOR CHANNELS
Note: This sensor also works with LabQuest 2 and LabQuest 3; it does not work
with the original LabQuest.
Charging the Sensor
Connect Go Direct CO
Gas to the included Micro USB Cable and any USB
2
device for two hours.
You can also charge up to eight Go Direct CO
Charge Station, sold separately (order code: GDX-CRG). An LED on each Go
Direct CO
Gas indicates charging status.
2
Charging
Fully charged
Powering the Sensor
Turning on the sensor
Putting the sensor in sleep
mode
Connecting the Sensor
See the following link for up-to-date connection information:
www.vernier.com/start/gdx-co2
Connected and charging
Connected, fully charged
Charging via USB,
connected via Bluetooth
Identifying the Sensor
When two or more sensors are connected, the sensors can be identified by tapping
or clicking Identify in Sensor Information.
1
Gas Sensors using our Go Direct
2
Blue LED on steady while sensor is connected to
the Micro USB Cable or Charge Station.
Blue LED is off when charging is complete.
Press button once. Red LED indicator flashes
when unit is on.
Press and hold button for more than three seconds
to put into sleep mode. Red LED indicator stops
flashing when sleeping.
Blue and Green LED solid when sensor is con-
nected to Graphical Analysis via USB and unit is
charging. (Green LED is obscured by the blue
one.)
Green LED solid when sensor is connected to
Graphical Analysis via USB and the unit is fully
charged.
Blue LED is solid and green LED is flashing, but
the green flashing LED looks white because it is
overwhelmed by the blue.
Advertisement
Table of Contents

Subscribe to Our Youtube Channel
Related Manuals for Vernier Go Direct GDX-CO2


Summary of Contents for Vernier Go Direct GDX-CO2
- Page 1 Turning on the sensor Press button once. Red LED indicator flashes Note: Vernier products are designed for educational use. Our products are not when unit is on. designed nor are they recommended for any industrial, medical, or commercial process such as life support, patient diagnosis, control of a manufacturing...
-
Page 2: Using The Product
(ppm) to parts per thousand (ppt), percent (%), or Type NDIR mg/m . See for more information. The readings are www.vernier.com/til/3845 Range 0–100,000 ppm temperature compensated regardless of whether the temperature channel is activated. This is the default channel that is active when the sensor is connected. Accuracy 0 to 1,000 ppm ±100 ppm... -
Page 3: How The Sensor Works
Although the varies with relative humidity. battery is warranted for one year, the expected battery life should be several years. Replacement batteries are available from Vernier (order code: GDX-BAT-650). Troubleshooting Storage and Maintenance Very important: Do not place the sensor into any liquid. -
Page 4: Repair Information
Rev. 6/4/2024 Reorient or relocate the receiving antenna. Go Direct, Vernier Graphical Analysis, LabQuest, and other marks shown are our trademarks or registered trademarks Increase the separation between the equipment and receiver. in the United States. All other marks not owned by us that appear herein are the property of their respective owners, Connect the equipment into an outlet on a circuit different from that to which the receiver is connected. - Page 5 ® The Bluetooth word mark and logos are registered trademarks owned by the Bluetooth SIG, Inc. and any use of such marks by Vernier Science Education is under license. Other trademarks and trade names are those of their respective owners.
Need help?
Do you have a question about the Go Direct GDX-CO2 and is the answer not in the manual?
Questions and answers