Lennox iComfort M30 Manual
- Installation and setup manual (52 pages) ,
- User manual (36 pages) ,
- Installation and setup manual (40 pages)
Advertisement
Thermostat
The iComfort® M30 smart thermostat is an electronic, color display touchscreen with a 7-day programmable interface. After on-line registration is completed, the system may then be accessed by the homeowner from anywhere via computer or mobile device (Internet connection required).
Comfort Features include:
- Three languages supported (English, Français and Español)
- Wi-Fi Connected
- Smart Away® - Uses the thermostat to control the home temperature while unoccupied (geo-fencing)
- FEELS LIKE® - Controls the system using outdoor / indoor temperatures and indoor humidity to create the optimal comfortable conditions in the home
- Schedule IQ feature, you only need to program the thermostat once. Whenever there's a change in your routine, the thermostat adapts heating and cooling to match
- Easy to read 4.3 inch color screen (measured diagonally).
- LCD display with back light shows the current and set temperature, time, inside relative humidity, system status (operating mode and schedules) and outside temperature (optional outdoor sensor required).
- Humidification measurement and control
- Dew point adjustment control
- Equipment maintenance reminders
- Heat/Cool mode -- Permits control of heating, cooling, humidification, and dehumidification without user involvement
- Performance reports are available through the homeowner web portal
- Provides temperature control for gas, oil, electric and heat pumps for up to 4 heat / 2 cool multistage systems (includes dual-fuel operation)
- Compliant with California Title 24 Open ADR 2.0
This thermostat works with:
- Amazon® Alexa
- Google Assistant
- IFTTT
- PureAir™ Air Purification Systems - Indoor air quality with time or sensor based notification of consumables including media filters, UVC bulbs, humidifier pads, and PureAir® system catalyst service / replacement
- Humiditrol® Enhanced Dehumidification Accessory (EDA)
- Ventilation Control for ERV, HRV and Fresh Air Damper
Home Automation
The iComfort® M30 smart thermostat is an Amazon® Alexa-enabled, smart-home-compatible thermostat. It works with Amazon Echo devices allowing the homeowner to ask Alexa to adjust the temperature.
Energy Efficient Settings
Factory preset program settings conform to EPA Energy Star® recommended set points.
Applications
Fully programmable thermostat provides universal system compatibility, precise comfort control and easy programmability.
Provides temperature control for gas, oil, electric and heat pumps for up to 4 heat / 2 cool multi-stage systems (includes dual-fuel operation).
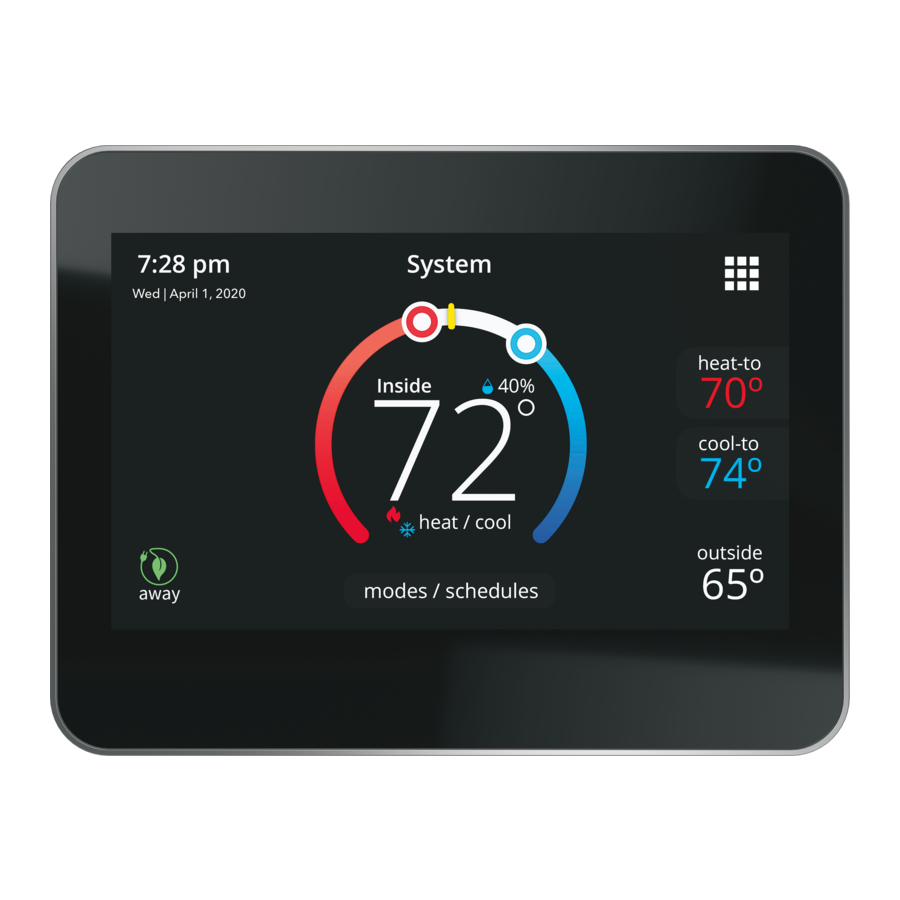
Home Screen
 | If screen is dark (screen saver on), touch screen to turn on the back light. |

Temperature Settings
- Large display of current inside temperature (°F or °C)
- Heating and Cooling set point indicators on the round animated temperature band
- Current cooling set point temperature (cool-to)
- Current heating set point temperature (heat-to)
 | Touching the heat or cool set point indicators on the round temperature band, or touching the heat-to or cool-to option displays the heat or cool menu screens. |
| | Both heating and cooling set point indicators on the round temperature band and the heat-to and cool-to options are displayed if System is set to Heat/Cool mode. |
Cool Only Temperature Adjustment Screen

| | On the Home Screen, touching the cool set point indicators on the round temperature band, or touching the cool-to option displays the cool menu screen. |
- Cooling set point display
- Cooling set point indicator on the round temperature band
- Plus (+) and Minus (–) option
- Home (return to Home Screen)
| | Touch the blue cool set point indicator on the round temperature band, or touch the plus or minus to change the cooling set point in one degree increments. |
| | During a scheduled time period, touching either the set point indicator on the temperature band or the cool-to will initiate a schedule hold |
Heat Only Temperature Adjustment Screen

| | On the Home Screen, touching the heat set point indicators on the round temperature band, or touching the heat-to displays the heat menu screen. |
- Heating set point display
- Heating set point indicator on the round temperature band
- Plus (+) and Minus (–) options
- Home (return to Home Screen)
| | Touch the red heat set point indicator on the round temperature band, or touch the plus or minus to change the heating set point in one degree increments. |
| | During a scheduled time period, touching either the set point indicator on the temperature band or the heat-to will initiate a schedule hold. |
Current Outside Temperature
Displays current outside temperature in °F or °C (optional Remote Outdoor Temperature Sensor required). If no sensor is used, then once connected to the Internet and login to your account through the thermostat, the option to get your outside temperature can obtained using the Internet option. Go to menu > settings > display and set outdoor temperature display to Internet.
Time and Date Display
Displays current time and date (supports daylight savings time changes). When connected to the Internet, time and date are automatically set.
Humidity Display
Displays current inside relative humidity above current indoor temperature.
The icon next to the indoor humidity percentage also represents the humidity level in the home.
Modes / Schedules
Displays current system operating mode below current indoor temperature (heat/cool, heat only, cool only, active schedule or off)
 | Touch to access Modes/Schedules screen. |

| | Touch modes/schedules on home screen under current operating mode to access screen. |
Select to operate a specific mode or schedule.
- Off
- Cool Only
- Heat Only
- Heat/Cool
- Emergency Heat (heat pump systems only)
- Schedule IQ, summer, winter, spring/fall and save energy
- On
- Auto
- Circulate
| | A check mark indicates which mode is active. |
| | Scroll down to see all modes available on the screen. |
Away
| | Touch to display away screen. |

Set heating or cooling set points during unoccupied periods.
- System status indicators which are located along the left side of the home screen. See "Table 1. System and Event Icons" for details for each icon.
- Heating and Cooling set point indicators on the round temperature band. Yellow line indicates current room temperature.
- Current cooling set point temperature (cool-to). Cooling is always represented by the color blue.
- Current heating set point temperature (heat-to). Heating is always represented by the color red.
- Cancel Away Mode
| | Touch cancel away to end away mode and return to current system operation. |
Home Screen and System Event Icons
The following icons are located on home screen and will appear during applicable operations or tasks.
 NOTE: The system status icons located along the left-side of the screen will display a text description when touching the icon.
Table 1. System and Event Icons
| Icon | Function | Screen Text | Purpose |
 | Navigation | Menu | Selecting this icon will bring up user and installer menus. A red circle with a number inside of it indicates a notification is active. |
 | Function | Away | When the away icon is touched, the system will automatically use energy saving settings - heat-to 62 (16.5) and cool-to 85 (29.5). Temperatures can be adjusted by pressing on the available temperature setting (i.e., heat-to or cool-to). To exit away, press the cancel icon. In a zoning system, all zones are set to a single heat-to and cool-too setting. Note that when manually selecting Away from the home screen, the Smart Away feature (if enabled under settings) will be temporally disabled until Away is canceled. |
 | System Status | Heating | System is heating the home. |
 | System Status | Cooling | System is cooling the home. |
 | System Status | Humidifying | If humidification equipment is installed and configured, the system will display this message when adding humidity to the air in the home. |
 | System Status | Dehumidifying | The system can be used in cooling mode to help remove excessive humidity as determined by the user setting. Go to menu > settings > humidity > and turn on dehumidify. Then adjust the acceptable low and high humidity levels in the home with the dehumidification set-point slider. |
 | System Status | Defrosting | The system is defrosting the outdoor unit coil (only when required). Heat pump only. |
 | System Status | Emerg. Heat | All heat pumps operating in northern climates below 35°F (1.6°C) normally need a supplemental heating source. Usually it is in the form of electric heating provided by the indoor unit. Other sources could be gas, oil, or hot-water back-up systems as well. The supplemental heat is also referred to as "second-stage" or "back-up" heating, with "first-stage" being the heat pump only. Emergency heat is when you use your supplemental heat (2nd stage) by itself, without the use of your heat pump (1st stage heat). Not available for non-heat pump systems. |
| | System Status | Aux. Heat | Is only available with heat pump system. If outdoor temperature is above the high balance point, only the heat pump will operate - default 50°F (10°C) high. If outdoor temperature is below the low balance point, only auxiliary heating will operate - default 25°F (-4.0°C) low. If outdoor temperature is in-between the high and low balance point, both the heat pump and auxiliary heat sources can operate. |
 | System Status | Will start soon | A five minute safety delay prevents the compressor from operating too soon after shut-down to allow internal pressures to equalize. This delay icon will also appear when immediately changing demand. For example immediately changing from cooling to heating (gas, electric or heat pump heating). |
 | System Status | Ambient lockout | This indicates that either the outdoor temperature is above or below the balance point temperature settings. The low balance point setting prevents heat pump heating below the set point and back up heat will be used. Typically the default is 25°F (-4.0°C), but that setting can be adjusted by your dealer. At 25°F (-4.0°C) or below for example, only auxiliary heating (electric or gas) is used. If the high balance point is set to 50°F (10°C ) for example, which is also adjustable by your dealer, then auxiliary heat will not be allowed. Only heat pump heating will be used. Anytime the outdoor temperature is below or above the balance point temperature settings, the ambient lockout notice will appear on the home screen. |
 | Function | Transitioning to next schedule | The system is following an active schedule and is transitioning to the next temperature setting based on a time indicator. |
| Fan is running | Displayed whenever the system is heating or cooling. | ||
 | Function | Fan is running | Fan set to ON. Blower fan is always running. Can enable or disable by going to modes/schedules from the home screen. |
 | Fan set to Auto. Blower fan following demand operation. Only comes on for mode operation (cooling or heating). Auto can be set by going to modes/schedules from the home screen. | ||
 | Fan set to circulate. Can enable or disable by going to modes/schedules from the home screen. Fan duration can be set by going to menu > settings > fan. Use the adjustment bar tool to set duration. | ||
 | Function | System Under Test | Typically occurs when the system has had a power interruption. The thermostat starts to look for the indoor and outdoor controls. Sometimes the outdoor control takes longer to boot up and therefore does not respond to inquiry by the thermostat. Recycle power to system may resolve issue. |
 | Function | Load shedding, wait time 45 min | Load shedding is where the utility company turns off you outdoor unit in peak times for a specified period of time to help spread the electrical system load for the area. Your system will resume operation in 45 minutes. |
 | Function | Changing set point range | Temperature is being adjusted. These two symbols together also indicate the mode of operation. As displayed here would indicate heat/cool mode (auto-changeover). |
 | Function | Turning feels like on | Indicating the system is transitioning to "feels like" mode. |
 | Notification | This notification icon indicates there are more than two events active in the system. | |
 | Function | Schedule hold until next period | The schedule hold screen is displayed after changing the temperatures on the heating or cooling screens while a schedule is running. Preset 1, 2, 4, 8, 24 hours or custom setting (using the Time Tool) sets and hold the temperature for a preset or custom time period until the next time period setting. Cancel schedule hold on Home Screen cancels the held setting. |
 | Function | Energy savings 1:00 pm - 5:00 pm | For California residents enrolled in a utility company energy savings program, this indicates a energy savings event is scheduled for a specific time range. |
 | Function | Indoor humidity level | This symbol indicates the humidity level in the home. The indicator can display humidity levels from 10 to 100%. |
 | Function | Smart Away is Canceled for Now | If you are enrolled in Energy Savings with your utili ty company (California only), this will appear if your utility company (California only), this will appear if your system is in Smart Away mode and a energy savings event is started. |
 | Away | Away | When the away icon is touched, the system will automatically use energy saving settings - heat-to 62 (16.5) and cool-to 85 (29.5). Temperatures can be adjusted by pressing on the available temperature setting (i.e., heat-to or cool-to). To exit away, press the cancel icon. In a zoning system, all zones are set to a single heat-to and cool-too setting. Note that when manually selecting Away from the home screen, the Smart Away feature (if enabled under settings) will be temporally disabled until Away is canceled. |
 | Ventilating | Ventilating | Indicates the system is actively ventilating. |
 | Function | Service Urgent | Service Urgent means that a service call is needed to get the system running. |
NOTE: Smart away will be canceled when the system is enrolled in energy savings with a utility provider and a energy saving event is active.
Menu
Menu
| | Touch to display menu screen |

| | Touch each item to display the selected screen |
Notifications
Displays system operating and service reminder messages.

Displays faults, errors and service information.
| | If any faults, errors, or service information appears, options are displayed underneath the notification, remind, clear, service, or reset. Touch to select the desired action. |
Performance Report

Displays the number of hours each month the system has been operating in heating mode (red) or cooling mode (blue) in an easy-to-read graph.
Graph Colors
- Orange indicates heat pump heating
- Red indicates either air handler (electric) or furnace heating
- Blue indicates cooling
- Pale green indicates fan runtime.
Edit Schedules

Set schedules for specifi c times of the year or edit to create custom schedules.
 | Touch the Menu icon on the Home Screen and select Edit Schedules to access the schedules screen. |
- Schedule IQ™
- Summer
- Winter
- Spring/Fall
- Save Energy
| | Schedule IQ™ schedule determines when to operate the system based on individual "home day", "home night", "away" times and temperature settings. Schedule is controlled by the Smart Away™ (geo-fencing) (when enabled) in the thermostat and the iComfort® M30 mobile App. Multiple Apps on multiple devices can control one system. |
| | Touch a schedule name to edit individual schedule. |
- Select Days
- Individual Days (Monday, Tuesday, etc.)
- Week/Weekend (Monday-Friday and Saturday-Sunday)
- All Days
- Select Mode
- Heat/Cool
- Heat Only
- Cool Only
| | Touch days selected to adjust individual times and temperatures. |
| | Touch each time period and select delete period if you want to remove a time period. You can remove all time periods except one if desired. |
| | Using all days follows the same schedule for each day. |
- Set Time (4 time periods per day)
- Individual Sliders to adjust cooling (blue) and heating (red) temperatures for each time period(Adjustable 60 to 90°F)
- Fan Icon
- On
- Auto
- Circulate
- Rename
| | Rename a schedule with the keyboard tool (maximum 16 characters). |
- Restore Defaults resets schedules to factory settings
Settings
Displays various user settings (fan, heat/cool, humidity, reminders, general, display). Factory default settings are highlighted in bold.
 | Touch left side of screen to return to the Home Screen. |

Access to all user settings
- Wi-Fi
- Name
- Away
- Feels Like™
- Fan
- Heat/Cool
- Ventilation
- Humidity
- Notifi cations
- Energy Savings
- Advanced Settings (Installer Settings)
- General
- Display
- Home Info
- Account
 | Touch a parameter on the left side of the screen to display that particular screen. |
Wi-Fi

A graphical representation of the home network showing the connection status from the High Defi nition Display to the Smart Hub to the Internet to the Lennox server.
- Wi-Fi (on/off )
- Wi-Fi Network
| | Touch wi-fi network to see a list of available networks or to add a network connection not shown (other). Also displays network status (secured/unsecured), strength. |
| | Do not use a guest account. Do not use a unsecured connection. Do not use your neighbor's Wi-Fi. Satellite provider network may cause issues as well. |
| | Touch the i for additional information about a particular network (name, SSID, security, RSSI, etc.). |
 | Touch a particular network ID to connect to that network. Enter password to connect. |
| | A red "X" means that there is an issue with a connection point that must be resolved. |
Name
Enter system name (Home 1, Home 2, etc) using the keyboard tool.
Away
NOTE: Most of the procedures listed in this section can be accomplished at the thermostat or using the Lennox iComfort Thermostat App or consumer web portal.
Manual Away
The user can manually put the system into away mode by pressing the "away" icon. When the system is in away mode, the horseshoe is grayed-out and shows the "away" status text. In order to exit away mode, the user can press the "cancel" icon. In away mode, the away set points are used to control the system. The user can modify the away set points from the default values in menu > settings > away.
Smart Away

Smart Away is a feature that can be enabled once you have created and registered your account. Both Home Info and Account options must be completed before this option can be enabled.
Smart Away is a feature that can be enabled once you have created and registered your account. Both Home Info and Account options must be completed before this option can be enabled.
The Smart Away feature depends on the iComfort Thermostat App running on your mobile device (smart phone or tablet) and being logged in to your account. It is also required for Wi-Fi and location settings to be enabled on your mobile device. Android devices must also have the location mode set to "high accuracy." Consult your mobile device user guide for instructions.
Smart Away can also be enabled from your mobile device once you have installed the Lennox iComfort Thermostat App and logged in. Go to the menu > settings > away and turn ON Smart Away. To allow the mobile device you are on to use this feature, turn ON participate. The away fence option will appear and by default, the setting is two miles (3 km). The range for this setting is 2 to 6 miles (3.00 to 9.50 km).
Inner and Outer Away Fences
The inner away fence is set by the user anywhere between 2 to 6 miles (3.00 to 9.50 km) on the mobile app. This setting can be different for each participating mobile device. When any of the participating mobile devices are located inside of its inner away fence, the system will not be in Smart Away; the system will use the temperature set points defined by the schedule or what was manually set.
Once the inner away fence is set, the outer fence for each participating mobile device will be automatically calculated by the Smart Away algorithm.
Transition Set Points
When the closest participating mobile device is between the inner and outer away fences, the thermostat will show the Smart Away indicator. The system will use transition set points to heat or cool the home. The transition temperature set points are automatically calculated by the Smart Away algorithm using a combination of the home and away set points.
Away Set Points
Once all participating mobile devices have moved outside the transition range, the thermostat will continue to show the Smart Away indicator, and the user-set away set points will be used to control the system.
Example: Away set points are 65ºF (18.5ºC) for heating and 85ºF (29.5ºC) for cooling. When the away fence is set to two miles for all participating mobile devices, and the closest participating mobile device is within the 0-2 mile (0 to 3.22 km) range of the home, the system is considered home; the system will use the set points from the schedule or what was manually set. If the closest participating mobile device moves into the 2.1 to 8 miles (3.40 to 13.04 km) range, the system is considered in transition, and the system will start to either increase or reduce the heating or cooling set point. Once all participating mobile devices have moved beyond the 8.1 mile (9.50 km) range from the house, the system sets the set points to the away set points (65ºF for heating and 85ºF for cooling).
Multiple Devices
It is possible to have more than one mobile device participating in Smart Away for this system. The away fence can be set to the same value or diff erent values for each mobile device. The thermostat will not show the Smart Away indication until all devices have moved past their inner away fence, and the system will not reach the user-set away set points until all devices have moved past their outer fence.
NOTE: Starting with Android version 10, when allowing the mobile app access to device location, you must select "Allow all the time" for the Smart Away feature to work correctly.
Feels Like
Accurately controls temperature in the home by determining the "feels like" temperature based on outdoor temperature, indoor temperature plus indoor relative humidity. On/Off:

Fan

Set how long to circulate the air each hour.
- Circulate (9 to 27 minutes, default is 21 minutes)
Heat / Cool

Adjustments for heating and cooling set points, auxiliary heat, safety protection and other settings.
| | Depending on system mode setting, heat/ cool, heat only or cool only is displayed under Settings (user). |
Wider Set Point Range
Controls heating and cooling temperatures with a wider set point range
- On/Off - Changes temperature range from 6090°F (15.5 to 32°C) to 40-99°F (4.5 to 37°C).
Select Heating Mode (Heat Pump Systems Only)
The following options are not available if the outdoor unit is not a heat pump.
- Normal (heats home to desired temperature).
- Comfort (2-stage heating or cooling, second stage is locked in until demand is satisfied)
Auxiliary Heat (Heat Pump Systems Only)
- On/Off.
- Allows auxiliary heat operation if temperature drops below set balance point -20 to 75°F (-29 to 24°C), adjustable).
| | Selecting Auxiliary Heat displays a slider to adjust balance point levels. The optional outdoor temperature sensor is required for balance point operation. |
Safety Protection and Notifications
- Safety Protection - 30 to 100°F (-1 to 38°C), adjustable). Default when enable is 40 to 90°F (4.5 to 32°C). If a situation arises when either the low or high set points are exceeded, either Alarm 29 or 30 will be raised.
| | Safety Protection alerts the homeowner if the house is too cold or hot. |
Humidity Screen
Options on the following screen are dependent on whether humidity control has been enabled and both humidification and dehumidification has been enabled.
Humidity control can be set during initial commissioning of the system or changed later by a technician. Options available on the below screen depends on system configuration settings.

- Off
- Humidify
- Set point - 45% adjustable RH (15 to 45%)
- Dehumidify
- Set point - 50% adjustable RH (35 to 60%)
- Humidify + Dehumidify
![]()

 | Selecting humidify or dehumidify displays a slider to adjust the desired levels. Selecting humidify + dehumidify displays a slider to adjust both levels (humidifi cation-left, dehumidifi cation-right). |
 | Dew point setting is only available with optional remote Outdoor Temperature Sensor (-15 to 15%, adjustable, 0%). |
 | Humidification Control Center Max setting is recommended for drier climates. Operates the humidifi er when there is a call for humidifi cation only. Overcooling range is 0 to 4° degrees. For dehumidification, the max setting will overcool the space based on overcool slider adjustment tool setting. |
 |
Ventilation
This option will only appear if a fresh air damper, ERV or HRV is installed and confi gured by your installer.
Menu Selection
When selecting this menu option, selections will be either:
- Timed or ASHRAE (either Timed or ASHRAE is set by your installer during setup of your thermostat).
- On (always)
- Off (always).
Factory default is ASHRAE. Your installer will need to change it to Timed if that mode is desired.
You can also select "ventilate now" to start a ventilation function immediately. Those menu options are 10, 20, 30, 40 and 50 minutes, 1 hour, 1-1/2 hours, 2 hours, 2-1/2 hours, 3 hours, 3-1/2 hours and 4 hours and custom. Custom will allow to set a specific time to run too.
| NOTE: | On two-speed ventilators, when ventilate now is selected, the ventilator will come on at high speed. |
| NOTE: | Once ventilation is started, a notification appears on the right-side of the home screen indicating a time when that specific cycle will end and the option to cancel the demand. |
What is ASHRAE?
ASHRAE 62.2 is a national standard that provides methods for achieving acceptable indoor air quality in typical residences. It was developed and is maintained by the American Society of Heating and Air-Conditioning Engineers (ASHRAE). One of the standard three main components is Whole House Ventilation which is exhausting stale indoor air and replacing it with fresh outdoor air.
The exhaust fan dilutes the air in the main living spaces with outside air to remove unavoidable contaminants from people, pets, cleaning, off gassing, etc. The whole house fan flow rate is determined based on the floor space and the number of bedrooms. The whole house fan provides multiple air exchanges within the home each day. The operation can be continuous or intermittent (much higher airflow cycled by a timer) if 1 zone or less.
For more information about ASHRAE, go to https://www.ashrae.org.
Notification
- Replace Filter 1
- Replace Filter 2
- Replace UV Bulb
- Replace Humidifier Pad
- PureAir™ Maintenance
- Maintenance Reminder Settings
- Pending utility company peak load event
- Settings for all Reminders:
- Disabled
- 3, 6, 12, 24 Months or Custom date
- Set for Calendar Time or Runtime
| | Touch custom to access the Set Date Tool screen to input custom date settings. |
Energy Savings
NOTE: This feature require XX.XX.xxx or higher. Go to menu > settings > general > about to verify your thermostat firmware version.
Energy Savings feature is currently a feature requirement for the State of California. Enrolling into the energy saving program will allow your utility company to control your thermostat during peak energy events. An icon on the home page will indicate when the system is in an active energy savings event. Enrollment is a two-step process for consumers. The first step requires the consumer to register with their utility provider before the thermostat settings can be enabled to take advantage of the Energy Savings feature.
Enable Energy Savings
Go to Menu > Settings > Energy Settings and turn on enable energy savings. This will automatically get the required certification for your thermostat.
If enabling energy savings is successful or not successful a pop-up screen will appear indicating either.
NOTE: The thermostat will continue to try and retrieve the certificate, if a failure is error is given, we recommend you wait and try again after 5-10 minutes.
Enroll in Energy Savings
The next screen will allow you to enroll in energy savings. Follow the on-screen prompts to continue. Detail on-screen instructions are provided.
Energy Savings Settings
This screen will allow you to use your energy provider's default temperature or pricing set points. You can also customize these settings by selecting
- Peak load event active set-points with the following options:
- Default
- Offset.
- Custom set-points
- Peak Price event Threshold
- Peak Price Event Active Set-points with the following options:
- Default
- Offset.
- Custom set-points
- Energy Savings Events Filter
- Energy Savings Settings Factory Reset
Canceling Energy Savings Event
The option to cancel will appear along the right side of the home screen. When in an active energy savings event and you attempt to update any of the following settings, a pop-up window will appear confi rming you wish to exit the active energy savings event which could result in higher energy consumption during the event period:
- Adjusting the temperature set point manually,
- Selecting a schedule
- Changing the mode of operations
- Manually canceling the event from the home screen indicator.
Canceling Energy Savings Enrollment
The option to cancel enrollment in Energy Savings can be found by going to Menu > Settings > Energy Savings > Energy Savings Settings > Factory Reset Energy Savings Settings
Advanced Settings

See included installation instructions for details. Changes made under Advanced Settings should be made by your HVAC installer or technician.
General

- About
- Thermostat model number
- Control model number
- Control serial number
- Control hardware revision
- Control software revision
- Software revision
- Last updated
- Software Update
- Automatic Updates (on/off)
- Check for Updates Now
- Dealer Info
- Dealer ID
- Name
- Country/Region
- Address 1
- Address 2
- City
- State
- Zip/Postal Code
- Phone
- Website
| | Input dealer information using the keyboard tool. Dealer can also input information during installer setup. |
- Dealer Access
- Remote View (on/off)
- Alerts and Notifications (on/off)
| | Homeowner can allow/disallow dealer access to system information, alerts and notifications for troubleshooting. |
- Screen Lock (Prevents tampering with thermostat settings).
- Unlocked (no security).
- Partially Locked (prevents tampering with the menu settings, set points can be adjusted).
- Locked (prevents tampering with the thermostat).
| | Lock icon on Home Screen indicates a locked or partially locked screen. To unlock, touch and hold the lock icon for 5-6 seconds. |
- Date & Time
- 12 or 24 Hour setting
| | Date and time is automatically set if there is a wi-fi connection to the thermostat. |
- Language
- English
- Français
- Español
Display

- Outdoor Temperature Display
- Off
- Internet (requires Internet connection)
- Sensor (requires that an outdoor air temperature sensor is installed and enabled under Advanced Settings > Outdoor Sensor).
- Indoor Humidity
- On
- Off
- Screen Saver
- On
- Off
| | Default screen saver blanks the screen display (if enabled). Touch the screen to display. |
- Screen Brightness
| | Slide control allows screen brightness adjustment (0 to 100%). |
- Temperature Unit
- °F
- °C
- Clean Screen
| | Thirty (30) Second Countdown timer without affecting settings to allow cleaning of the display. |
Home Info
| | This section can only be completed once a secure Wi-Fi connection is established and the thermostat is connected to the Lennox server. |
Once connected to the Lennox Server, you may enter the following information for your thermostat.
- Home
- Country / region
- Address 1
- Address 2
- City
- Zip / postal code
Account
| | This section can only be completed once a Wi-Fi connection is established and the thermostat is connected to the Lennox server. |
Once connected to the Lennox Server, you may enter the following information for your thermostat.
Your options are:
- Sign in
- Create New Account
- Generate Pin
Sign In
Use this option if you have already created an user account and your thermostat is already associated with that account.
| | If your have forgotten your password, there is an option on the Account Info screen to have the Lennox server email your password to you. |
Create New Account
If you do not have an account with Lennox, you can create an account now. Fields to complete are:
- First name
- Last Name
- Phone
- Login Name
- Set Password
- Receive Alerts and Reminders via Email
- Allow dealer to receive set alerts and remotely fix your system,
- Agree to the Lennox End User License Agreement (EULA).
Once you have received confirmation that your account has been created, then you will need to associate your system with your account.
Generate Pin
Select the generate pin option. A five digit pin will be displayed. Make note of the pin.
NOTE: Pin number is only active for 15 minutes if time expires you have to generate another pin number.
Go to https://www.lennoxicomfort.com:
- Click on yourlogin name in the upper righthand corner.
- Click onadd icomfort.
- Enter the five digit pin you recorded earlier and selectadd.
Wi-Fi Connection and Troubleshooting
Wireless networks supported by this system are:
- 802.11b is 2.4Ghz band (max 11 Mbit/s)
- 802.11g is 2.4Ghz band (max 54 Mbit/s)
- 802.11n is 2.4Ghz band (max 130 Mbit/s)
This is for connecting the thermostat to a secure home wireless network.
| | If having problems with your router connection make sure your router is set up for 802.11 b, g, or n. Some newer router have this connection turned off. |
| | A router with Bonjour capabilities is required for this function. Check the router functions if the thermostat does not connect. Apple Bonjour® is an implementation of zero-configuration networking (Zeroconf), a group of technologies that includes service discovery, address assignment, and host name resolution. |
| | Never use a home guest account. Never use an open router connection (non-secure). Always use a secure connection physically located in the home where the thermostat is located. |
Touch the Menu icon in the upper left-hand corner of the display.
- Touch the settings option on the menu.
- If Wi-Fi is set to disabled, touch the > icon to enabled. The Wi-Fi screen will appear where you can toggle it to ON.
Visible Home Wi-Fi Access Point
- Touch wi-fi network. This will display a list of visible Wi-Fi networks within range of the thermostat.
- Select the homeowner network and type in the password. Touch join to continue.
NOTE: The thermostat can connect to a home wireless router that uses up to 32 characters in the access point name (visible or hidden).
NOTE: If you wish to see the characters you are typing, check show password. The thermostat will support up to a 63 character password. The password cannot contain the % or # symbols.
- If joining the network was successful, the access point name will appear next to wi-fi networks.
Hidden Home Wi-Fi Access Point
- Touch wi-fi network. Scroll down to others.
- Enter new network information. You will need the name of the access point and the type of security being used. Select Security. Options are: none, WEP, WPA and WPA2. If your home Wi-Fi connection is unsecured, then Wi-FI security must be enabled using WEP, WPA or WPA2 via the router before proceeding. Consult your router documentation on how to enable WiFi security.
- Enter the password.
NOTE: If you wish to see the characters you are typing, check show password. The thermostat will support up to a 63 character password.
- Touch join to complete.
- If joining the hidden network was successful, the access point name will appear next to wi-fi networks.
Whether connecting to a visible or hidden network, if successful, a check mark will appear above both the router and Internet icons.
Wireless Terminology
The following terminology is used:
- Received Signal Strength Indication (RSSI). This indicates the signal strength of the Wi-Fi router being received by the scanning device (i.e., smart phone). So the higher the RSSI number (or less negative in some devices), the stronger the signal.
- Internet Protocol Address (IP address). This is an address assigned by your home router for each network device (e.g., computer, printer, thermostat).
| | Connection to Lennox server from your Internet provider may take up to 4-5 minutes depending on your Wi-Fi speed connection speed and how busy the server may be. |
Troubleshooting Tips
Locate the thermostat and router away from other devices that could possibility interfere with wireless communications. Some examples of other devices that could interfere are:
- Microwave ovens
- Wireless cameras
- Portable phones and bases
- Baby monitors
- Wireless speakers
- Bluetooth devices
- Garage door openers
- Neighbor's wireless devices
To eliminate a possible source of interference, temporally disable any devices and see if Wi-Fi performance has improved.
Determining Wireless Connection Signal Strength
The ideal signal strength range for the thermostat is -1 to -69 Received Signal Strength Indication (RSSI). The signal strength can be viewed from the thermostat interface.
- PressNETWORK SETTINGS; This screen shows a graphical view of options representing OPEN and SECURE wireless networks, along with options for adding a network.
- Select the access point that has already been established and connected.
- When selecting the info icon, a screen will appear which will display an option to forget the network and IP address assigned to the thermostat by your router, sub-net mask, router, DNS and RSSI.
- Scroll down to the last entry on this screen. There the Wi-Fi signal strength will be displayed (RSSI). If the RSSI signal strength is anywhere between -9 to -69, then the signal strength is suffi cient. If outside the reference range, then either relocate the router closer to the thermostat, add a repeater, or move the thermostat. Adjusting antenna on router may resolve the issue.
![]()

Connecting to Lennox Server using Alternate Method
An additional test method is with your cell phone.
- Enabled the mobile hot spot option on your phone.
![information]() NOTE: Not all data plans allow this function. Check with your service provider for this option.
NOTE: Not all data plans allow this function. Check with your service provider for this option. - Connect the thermostat to your hot spot.
- Allow up to fi ve minutes for the connection to the Lennox Server.
- If you are able to connect then you have verifi ed that the thermostat's Wi-Fi is functional.
iComfort Mobile App (Applications)


The iComfort® Thermostat App (homeowner app) is available for use on iPhone®, iPad® and Android™ devices.
Amazon Alexa Enabled Devices
This section provides basic information on how to connect your Amazon device utilizing Alexa speech-recognition technology for your thermostat. Also provided are the voice commands that controls your thermostat.
Setup
First you must have a Amazon Alexa enabled device installed and connected to your home Wi-Fi network. Use the following procedure to enable the iComfort S30 Ultra Smart Thermostat Skill using the Amazon Alexa mobile app.
- Download and install the Amazon Alexa app on your mobile device.
- Start the Amazon Alexa app.
- Search for "Lennox" in the Skills or Smart Home Skills section of the Amazon Alexa app and 'Enable Skill' for the Lennox iComfort Skill.
- Login with your Lennox iComfort user name and password
- Your Lennox account should now be successfully linked with Amazon Alexa.
- You can now add your iComfort thermostat to Alexa by either of the following options:
- Clicking on "Discover Devices" in the Smart Home section in the Alexa app OR
- Ask Alexa to discover your iComfort Thermostat by saying, "Alexa, discover my devices".
Under "Smart Home" in your Alexa app, you should see a list of discovered devices with your thermostat or zone names. You can see your system or zone names on the thermostat home screen above the indoor temperature display.
Only use the exact name(s) you see on the thermostat screen when speaking your command. For example, "Alexa, change the "Hallway" to 68 degrees" will work, but "Alexa, change the "Hallway thermostat" to 68 degrees" will not.
In a situation when you may have two or more thermostats in your home, each thermostat must have a unique name. In addition, each zone must also have a unique name like bedroom, kitchen, den, etc.
If your thermostat is using the "Feels Like" feature, Alexa supports that mode of operation as well.
NOTE: You can change your system name by going to the thermostat home screen, select menu> settings > name. To change the name of a specific zone, go to the home screen, select menu> settings > iHarmony and select the specific zone you wish to rename.
Alexa Voice Commands for Lennox Skill
- Set your device to a specific temperature:
"Alexa, set (thermostat name) to 75 degrees"
"Alexa, set (thermostat name) temperature to 75"
"Alexa, set (thermostat name) to 75"
"Alexa, change temperature to 75". Alexa will ask you to confirm which device, just say your thermostat's name.
"Alexa, turn temperature to 75". Alexa will ask you to confirm which device, just say your thermostat's name. - Turn UP the temperature a set amount:
"Alexa, increase (thermostat name) by 3 degrees"
"Alexa, increase (thermostat name) temperature by 3 degrees"
"Alexa, raise (thermostat name) by three degrees" - Turn UP the temperature by two degrees:
"Alexa, increase (thermostat name) temperature"
"Alexa, heat up (thermostat name)" - Turn DOWN the temperature a set amount:
"Alexa, decrease (thermostat name) by three degrees"
"Alexa, lower (thermostat name) temperature by three degrees"
"Alexa, decrease (thermostat name) temperature by three degrees" - Turn DOWN the temperature by two degrees:
"Alexa, lower (thermostat name) temperature",
"Alexa, cool down (thermostat name)"
"Alexa, make (thermostat name) colder" - Ask for the current temperature:
"Alexa, what is the temperature of (thermostat name)" Alexa will reply with current temperature. - Ask for thermostat set points:
"Alexa, what is the (thermostat name) set to?" Alexa will reply with the current thermostat set points and the thermostat mode (heat, cool or auto).
If you ask Alexa to raise or lower the temperature without specifying by how much, it will change the temperature by two degrees.
Changing to Celsius
Using your Amazon Alexa mobile app, select the three bar icon in the upper left-hand of the screen.
- SelectSettings.
- Choose your Amazon device
- SelectMeasurement Units from the menu.
- ToggleON Temperature Units - Use metric measurements for temperature units.
NOTE: Even though your Lennox thermostat supports half degree settings in Celsius, Alexa only supports whole degrees. The first temperature adjustment that gets made will set the temperature to a whole degree, if it was not already.
Heat and Cool Mode
Alexa will control your thermostat a bit differently when it's in Heat • Cool mode. In Heat and Cool mode the system can automatically switch between heating and cooling as needed.
For instance, if you ask Alexa to set the hallway temperature to 70 degrees, your thermostat will use this as a midpoint temperature, setting the Heat set point to 69 and Cool set point to 72. Alexa will confirm your request, saying "Hallway is in auto mode, aiming for 70 degrees".
NOTE:
- You cannot change the mode (heat only, cool only, etc.) of your thermostat using Alexa.
- If your thermostat is in 'away' or 'smart away' mode, any Alexa commands to change thermostat temperature will not work in this mode.
- Currently, you can pair only one home that is listed in your Lennox iComfort Account with Alexa. In the situation where you have multiple homes associated with your iComfort account, you will not have a choice to choose the home for Alexa. You can check the homes associated your account by visiting: https://www.lennoxicomfort.com
Google Home and Assistant
Download the Google Home app from Google Play or the App Store™ on a compatible phone or tablet.
Then follow the on-screen steps to finish setup.
Once you have added the thermostat to your Google Home app, then install the Google Assistant app (Android and IOS) to enable voice control.
NOTE: Google Assistant app may be already installed on your Android device.
Schedule Mode Functions
Raising or lowering the temperature is not supported when using a schedule feature.
When attempting to change the temperature when in either reference mode, Google Assistant will respond with "mode not supported".
Heat / Cool Mode (Auto-Changeover)
Although Google Assistant supports heat / cool mode temperature adjustments, it will do so only by maintaining the currently established temperature ranged.
For example, if you set your heat set point to 60ºF and your cooling set point to 80ºF at the thermostat itself, then you have established a temperature range of 20 degrees. Any adjustment using Google Assistant, either through the app or by voice will maintain a 20 degree range differential as well. Let's say you change your heat set point to 65ºF.
Now your thermostat will indicate the heating is at 65ºF and cooling is set at 85ºF. Adjusting the cooling set point will result in the range being maintained as well. In the Google Home app, the thermostat image will only display the approximate center temperature between the current heating and cooling set points. In this example it would display 75ºF.
Additional Help
To learn more, go to either the Lennox consumer help at:
http://www.support.lennoxicomfort.com/help/lennox-google-assistant/lennox-google-assistant.html
or Google's online help at:
http://g.co/home/help.
IFTTT
Download the IFTTT app from Google Play or the Apple App Store™ on a compatible phone or tablet. Then follow the on-screen stops to finish setup.
To learn more, go to the Lennox consumer web portal at:
https://www.lennoxicomfort.com
https://www.support.lennoxicomfort.com/help/index.html
To IFTTT's online help at: https://help.ifttt.com/hc/en-us.
Control4® Smart Home | Operating System
Control4 is a leading control and automation platform which works with thousands of smart devices integrating audio, video, lighting, security, intercom, and climate control into a seamless customer experience
Control4 gives the customer an easy-to-use interface to control the iComfort® thermostat.
Settings include:
- Display all systems in the home and select a system
- Display all zones in the system and select a zone
- Turn system or zones on or off
- Change manual modes (heat, cool, off)
- Change heating/cooling setpoints for each zone/ system
- Change fan mode (on, auto, circulate)
For additional information please visit the iComfort® Support Website for Control4 Integration.
Documents / Resources
References
![www.ashrae.org]() Home | ashrae.org
Home | ashrae.org![www.lennoxicomfort.com]() Lennox iComfort
Lennox iComfort![www.apple.com]() App Store - Apple
App Store - Apple![play.google.com]() Google Play
Google PlayLennox - Google Assistant | Support Center - Lennox iComfort
Choose a topic to get started: - Google Nest Help
![www.support.lennoxicomfort.com]() Home | Support Center - Lennox iComfort
Home | Support Center - Lennox iComfort

Download manual
Here you can download full pdf version of manual, it may contain additional safety instructions, warranty information, FCC rules, etc.
Advertisement


Need help?
Do you have a question about the iComfort M30 and is the answer not in the manual?
Questions and answers