Lennox S40 Manual
- Installation and setup manual (96 pages) ,
- User manual (49 pages) ,
- Quick start manual (4 pages)
Advertisement
- 1 Features
- 2 Connecting to your Home Wi-Fi using the Thermostat
- 3 Create Your Account
- 4 Support Services
- 5 Home Screen
- 6 Menu
- 7 Settings Menu
- 8 Lennox Smart Devices
- 9 Third-Party Integration
- 10 Documents / Resources
Features
This Lennox S40 Smart Thermostat is an electronic communicating, touchscreen color display.
Comfort features include:
- Three languages supported (English, Français and Español).
- Wi-Fi connected with Android and IOS mobile apps that will allow remote access to your thermostat
- Smart Away® mode brings Lennox innovation to energy savings by doing what regular programmable thermostats cannot. Rather than simply following a set schedule, Smart Away lets the Lennox S40 Smart Thermostat adapt to your life, perfectly. Smart Away works with the GPS in your family's smartphones to detect when the house is empty. When it's sure that nobody is home, it sets the temperature back to save energy. Then, when the Lennox S40 Smart Thermostat detects that someone is on the way home, it returns the system to normal operation so everyone always comes home to comfortable air.
- FEELS LIKE® brings Lennox innovation to comfort by optimizing and automating all the factors that affect how air feels. With the Lennox S40 Smart Thermostat, you simply set a single temperature that you want. The thermostat will then take into account all the factors that affect comfort, including heating, cooling and humidity, and create your ideal environment. It's very similar to the way the "feels like" temperature on a weather report works.
- Allergen Defender brings Lennox innovation to cleaner air by monitoring the air quality and pollen levels in your zip code. When high levels of pollutants or allergens are reported, the Lennox S40 Smart Thermostat automatically increases fan speed to create more clean air per hour in your home.
- Climate IQ® - Monitors current climate conditions and automatically removes excess humidity when necessary (requires Lennox communicating outdoor unit).
- Schedule IQ - With this feature you only need to program the thermostat once. Whenever there's a change in your routine, the thermostat adapts heating and cooling to match.
- Perfect Temperature (Single Set Point) - In non-zoning applications this allows a single temperature setting to be used to cool or heat the home.
- Supports air conditioning or heat pump units with up to four stages of heat / two stages of compressor operation (two stages of heat pump heating, two stages of auxiliary back-up heating and two stages of emergency heating).
- Variable - capacity / multiple - stage Heat/Cool, universal compatibility (gas/ electric/heat pump/air conditioner). When the S40 is used with the variable speed equipment homeowners can save up to 30% on their energy costs over single stage equipment and 15% over two stage equipment.
- Dual-fuel capable when using Lennox communicating heat pump unit with two balance points.
- Humidification measurement and dew point adjustment controls.
- Heat/Cool mode -- Permits control of heating, cooling, humidification, and dehumidification without user involvement.
- Equipment maintenance reminders.
- Screen saver picture upload.
- Other popular features include the Weather Screen Saver and Allergen Defender
- Lennox® Smart Room Sensors for better temperature averaging throughout your home
- Lennox® Wireless Extenders which can increase the range for your Lennox® Smart Room Sensors and Lennox® Smart Indoor Air Quality Monitor.
- Lennox® Smart Air Quality Monitor. This device is an air quality monitor that provides alerts, recommendations, and triggers air purification on demand. It detects and tracks particulates, carbon dioxide and volatile organic compounds (TVOCs) inside the home. When poor quality air is detected, it triggers your system to cycle and clean the air, providing peace of mind that your family is breathing the most healthy, perfect air.
Works with:
- Amazon® Alexa, Google Assistant TM, Control4® and Building36®
- PureAir™ Air Purification Systems - Indoor air quality with time based notification of consumables including media filters, UVC bulbs, humidifier pads, and PureAir® system catalyst service / replacement.
- PureAir S Air Purification Systems - Indoor air quality with time or sensor based notification of consumables including media filters, UVC bulbs, humidifier pads, and PureAir® system catalyst service / replacement.
- Lennox® Smart Zoning Control (1 - 4 zones)
- Humiditrol® Enhanced Dehumidification Accessory (EDA).
- ERV, HRV and Fresh Air Dampers are supported when using an Lennox Equipment Interface Module.

Due to Lennox' ongoing commitment to quality, features and options are subject to change without notice and without incurring liability.
Improper installation, adjustment, alteration, service or maintenance can cause property damage or personal injury. Installation and service must be performed by a qualified installer or servicing agency.
Connecting to your Home Wi-Fi using the Thermostat
Never use a home guest account.
Never use an open unsecured router connection.
Always use a secure connection physically located in the home where the thermostat is located.
Home Wi-Fi Access Point is Visible
- From the thermostat's home screen, go to Menu > Settings > Wi-Fi.
- Slide the option to the ON position to enable Wi-Fi.
- Press on Not Connected to display a list of available access points.
- Locate home network and select the network name.
- Enter the home Wi-Fi network password and press join to continue. If successful the Thermostat Connective Status indicator as illustrated below will show checkmarks across all connections.

Figure 1. Thermostat Connectivity Status

 NOTE: Whether connecting to a visible or hidden network, if successful, a check mark will appear above both the router, and Internet icons. For information on connecting to hidden networks, please reference the S40 Homeowner Guide.
Home Wi-Fi Access Point is Hidden
- Slide the option to ON to enable Wi-Fi.
- Wi-Fi network will show not connected. Press on "not connected".
- Scroll down and select other.
- The "enter new network information" screen will appear. Enter the name of the hidden network.
![warning]() NOTE: The thermostat can connect to a home wireless outer that uses up to 32 characters in the access point name (visible or hidden). DO NOT connect to a guest access point.
NOTE: The thermostat can connect to a home wireless outer that uses up to 32 characters in the access point name (visible or hidden). DO NOT connect to a guest access point. - Select Security. Options are: none, WEP, WPA, WPA2 and WPA3. If your home Wi-Fi connection is unsecured, then Wi-FI security must be enabled using WEP, WPA, WPA2 or WPA3 via the router before proceeding. Consult your router documentation on how to enable Wi-Fi security.
- Once security type is selected, a password field will appear. Enter the password to connect to your home Wi-Fi network.
![warning]() NOTE: If you wish to see the characters you are typing, check show password. The thermostat will support up to a 63 character password.
NOTE: If you wish to see the characters you are typing, check show password. The thermostat will support up to a 63 character password. - Press join.
Whether connecting to a visible or hidden network, if successful, a check mark will appear above both the router and Internet icons.
Wi-Fi Terminology
The following terminology is used in this troubleshooting section:
- Received Signal Strength Indication (RSSI). This indicates the signal strength of the Wi-Fi router being received by the scanning device (i.e., smart phone). So the higher the RSSI number (or less negative in some devices), the stronger the signal.
- Wireless networks supported by this thermostat are:
Table 1. Supported Wi-Fi Standards
| Standard | Description |
| 802.11b | Released in September 1999, it's most likely that your first home router was 802.11b, which operates in the 2.4GHz frequency and provides a data rate up to 11 Mbps. |
| 802.11g | Approved in June 2003, 802.11g was the successor to 802.11b, able to achieve up to 54Mbps rates in the 2.4GHz band, matching 802.11a speed but within the lower frequency range. |
| 802.11n (Wi-Fi 4) | Approved in October 2009 and allows for usage in two frequencies - 2.4GHz and 5GHz, with speeds up to 600Mbps. |
| 802.11ac (Wi-Fi 5) | Current home wireless routers are likely 802.1accompliant, and operate in the 5 GHz frequency space with support speeds up to 866.7 Mbps
|
- Internet Protocol Address (IP address). This is an address assigned by your home router for each network device (e.g., computer, printer, thermostat).
Electromagnetic Interference Causing Poor Connectivity: Locate the thermostat and router away from other devices that could possibility interfere with wireless communications. Some examples of other devices that could interfere are:
- Microwave ovens
- Wireless cameras
- Portable phones and bases
- Baby monitors
- Wireless speakers
- Bluetooth devices
- Garage door openers
- Neighbor's wireless devices
To eliminate a possible source of interference, temporally disable any devices and see if Wi-Fi performance has improved.
Received Signal Strength Indication (RSSI)
The ideal signal strength range for the thermostat is -1 to -69 RSSI. The signal strength can be viewed from the thermostat interface.
- Press NETWORK SETTINGS; this screen shows a graphical view of buttons representing OPEN and SECURE wireless networks, along with button for adding a network.
- Select the access point that has already been established and connected.
- When selecting the right arrow (>), a screen will appear which will display an option to forget the network. In addition IP address, subnet mask, router IP, DNS, MAC Address, Speed, wireless type, BISSID and RSSI.
NOTE: If the RSSI signal strength is anywhere between -9 to -69, then the signal strength is sufficient. If outside this range, then either relocate the router closer to the thermostat, add a repeater, or move the thermostat. Adjusting antenna on router or extender/repeater may resolve the issue.
Create Your Account
Using the Thermostat
You have two options here, to either create your account using thermostat or the Lennox Smart Thermostat App.
- Verify that the thermostat is connected to the home Wi-FI and that all indicators are green and check marked as illustrated below. From the home screen, go to Menu > Settings > Wi-Fi.

Figure 2. Thermostat Connectivity Status

- From your thermostat's home screen, go to Menu > User Account.
- Select Create New Account.
- Enter account details such as your first and last name, phone, email address, and password.
- Select whether you want to receive e-mail updates and reminders.
- Select allow your dealer to receive notifications (highly recommended).
- Select agree to EULA.
- Enter your information and select Next. Enter your country/region, address, city, state, and zip code.
- Select Create Account.
- It is import you provide your Lennox Home Comfort System Dealership remote viewing and other important options. Please go to "" for further details.
Using the Lennox Smart Thermostat App
- Download the Lennox Smart Thermostat App from either the Apple App Store
![www.apple.com]()
or on Google Play
![play.google.com]()
to your mobile device. - Verify that the thermostat is connected to the home Wi-FI and that all indicators are green and check marked as illustrated in "Figure 1. Thermostat Connectivity Status".
- Launch the Lennox Smart Thermostat app and select the Sign up option.
- A pop-up will appear asking for to Allow access to photos and media. This is required if you plan to upload a photo for the thermostat's screensaver. Select Allow or Don't Allow to continue.
- The next pop-up is asking to Allow Thermostat to access this device's location. This is required if you intend to use the Smart Away feature to control your thermostat.
- Select While using the app.
- If your device lists an option called Remove permissions if app isn't used, then this setting must be disabled.
- If an option to select either Precise or Approximate location is offered, you must select Precise (see "Figure 3. Selecting Precise Location").

Figure 3. Selecting Precise Location
- If you already have a Lennox Thermostat account, then sign in here and skip to step 9. Select the Sign Up option on the screen and complete the information requested. Enter you first name, last name, phone, email, verify email, password and verify password.
- Lennox highly recommends enabling Email Updates.
- Agree to the Lennox EULA.
- Select the Sign Up button at the bottom of the screen. A pop-up screen will indicate that your account was successfully created. Select OK to continue.
![warning]() NOTE: If sign-up failed, then follow the instructions being displayed on the app to resolve any issues.
NOTE: If sign-up failed, then follow the instructions being displayed on the app to resolve any issues. - Login to your account.
![warning]() NOTE: You may be asked to allow access to your location all this time. This is required for Smart Away. Please enable that option if you intend to use Smart Away.
NOTE: You may be asked to allow access to your location all this time. This is required for Smart Away. Please enable that option if you intend to use Smart Away. - The next screen will provide the option to add your thermostat.
- Return to your thermostat and from the home screen, go to Menu > User Account > Account.
- Select Generate Pin at the bottom of the screen. A five digit unique pin number will appear. You will use that number to add your new thermostat to your user account using the Lennox Smart Thermostat app.
- Return to your mobile device and enter the 5 digit number displayed on the thermostat here. Then select Add.
![]()
Figure 4. Entering Pin Number - The next screen will provide the option to Add New Home. Select that option.
- Enter the home information required on this screen.
- It is highly recommend by Lennox to check the option to allow dealers to receive service alerts and if possible remotely fix any issue that may occur with your thermostat. See "Support Services" for understanding why it is important to allow your Local Lennox Dealer access.
- Select Done.
- A screen will appear asking that you verify your home address. If everything is correct, select Done.


Support Services
If you did not enable this feature during initial account setup, then you still have the opportunity to participate.
You have made an investment in your heating and cooling system and you expect peak performance. With a simple, ON option, this new smart thermostat forever changes HVAC equipment diagnostics, maintenance, and repair. It provides basic maintenance notifications and alerts, performance reports, and the ability for dealers to remotely diagnose and troubleshoot. This proactive and responsive HVAC care is valid for the lifetime of the HVAC system. Promising peace of mind by doing away with unnecessary dealer visits, avoiding potential repair costs, and ensuring nothing short of perfect air. In some instances, the dealer may be able to correct a problem without ever having to come to your home, saving you time and money.
- From your thermostat's home screen or Lennox Smart Thermostat App, go to Menu > Support Services.
- There are two screens under this section, Your Lennox Dealer Info and Service Access. If you wish to allow your service provider direct access to your system for troubleshooting, then select the following:
Remote View
ON - Allows your Lennox Pro to remotely evaluate the status of your system to ensure optimal performance.
Remote Control
- OFF - You will not give authorization to your Lennox Pro to troubleshoot your system and address system performance remotely.
- ON/ALWAYS - You will always give authorization to your Lennox Pro to troubleshoot your system remotely.
Alerts/Notifications
ON - Allow your Lennox Pro to receive updates when your system needs maintenance.
NOTE: All three options must be toggled on for Remote Diagnostics to function.
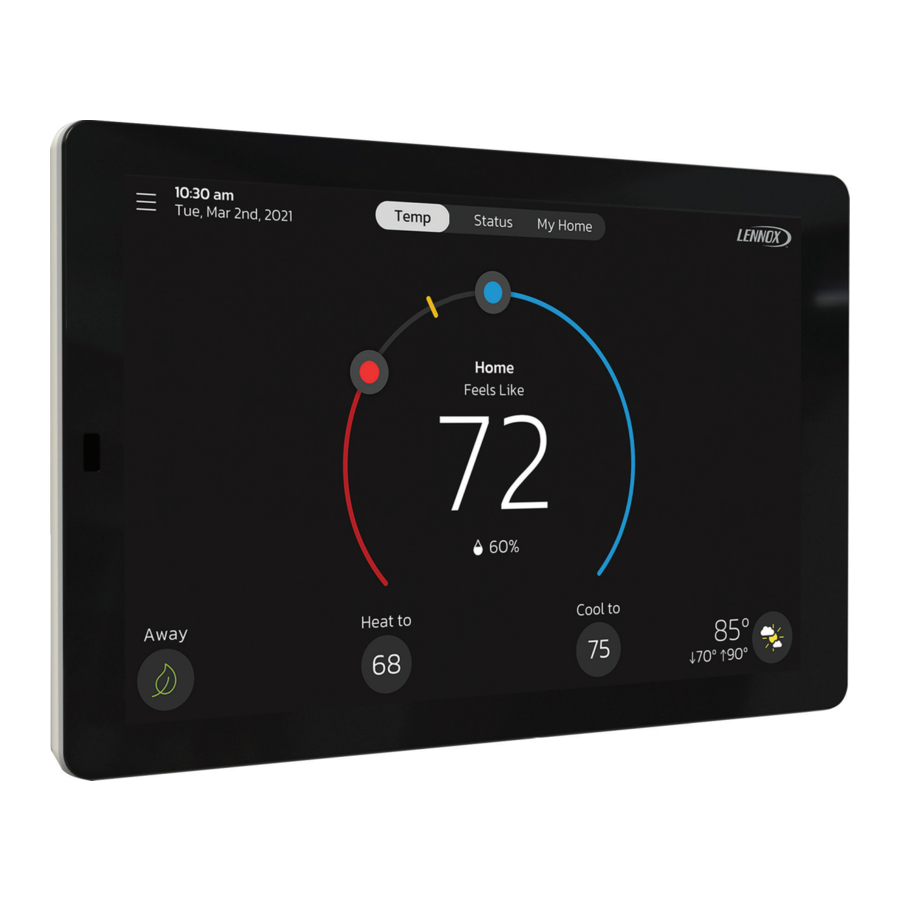
Home Screen

Figure 5. Thermostat Home Screen
Temperature Settings
Large display of current inside temperature (°F or °C)
Heating and Cooling Setpoint Indicators on the round temperature band
Current cooling setpoint temperature Button (Cool-To)
Current heating setpoint temperature Button (Heat-To)
Selecting the heat or cool setpoint indicators on the round temperature band, or selecting the Heat-To or Cool-To buttons displays the heat or cool menu screens Both heating and cooling setpoint indicators on the round temperature band and the Heat-To and Cool-To buttons are displayed if the system is set to Heat/Cool mode or if an active schedule is set to Heat/Cool mode.
Current Outdoor Temperature and Weather Forecast
Displays current outdoor temperature in °F or °C and the current weather forecast
The default outdoor temperature is supplied by the outdoor air temperature sensor or the Wi-Fi data connection (homeowner selectable on the thermostat). The outdoor sensor is furnished as standard with Lennox® Communicating outdoor units, optional for conventional units.
Time and Date Display
Displays current date and time
Humidity Display
Displays current inside relative humidity below current indoor temperature.
Away
The user can manually put the system into away mode by pressing the Away icon located on the bottom left-hand side of the home screen. When the system is in Away a status notification (Away is Active) is displayed on the right-hand side of the home screen.
In order to exit Away, select Cancel located on the bottom left-hand side of the home screen. Selecting the Away is Active status notification will display the current set point range for high and low temperature settings. There is also the option to select Cancel here as well by selecting Yes.
While in Away, the Away Set points are used to control the high and low temperature setting for the thermostat and all zones simultaneously if Smart Zoning is installed. The Away Set points can be changed from the default values by going to Menu > Settings > Away.
Temp
Returns to the thermostat home screen or the home screen for a specific zone if Smart Zoning is installed. Displays current temperature screen for the current system where the thermostat and sensors are located.
Select the Temp button from the Status or My Home screen to return to the thermostat home screen or last zone viewed.
Status
Displays current system operating status for the current system/area where the thermostat and sensors are located. Details such as humidity levels, Feels Like being active, any of the various fan modes and various other system background activities.
My Home
Lennox Smart Home devices and equipment such as Thermostats, Smart Room Sensors, Wireless Extenders, Air Quality Monitor, PureAir and Zoning Control are all optionally purchased items and will appear on this screen if installed.

Figure 6. My Home Screen
This screen will display multiple thermostats in the home. It will also display others devices such as Lennox Smart Zoning (up to four zones per thermostat), Lennox Smart Sensor, Lennox Smart Air Quality Monitor and PureAir S.
- Selecting any item on this screen will display the detail screen for that device.
- A yellow or red dot with an explanation point indicates there is an alert condition for that specific device.
Thermostats and Zones
Selecting the icon will bring up either the thermostat home scree or in a zoning system the home screen for the specific zone selected if zoning is installed.
For further details concerning zoning control, see "Zoning Control".
Lennox Smart Room Sensor
Selecting this options will display the details for the sensor selected. What is displayed is the current temperature for the room that the sensor is located in.
Also listed is:
- If sensor is participating in temperature averaging.
- Humidity level in the room
- If the room is occupied or unoccupied.
- Battery percentage
- Wi-fi connection strength.
- There is an option to select Current Temp. This will display the screen that is located at Menu > Settings > Current Temperature.
- The second option to select is Sensor Settings. This screen will allow you to rename the sensor or selecting About Sensor to view model number, serial number and firmware version.
- See "Lennox Smart Devices" for further details.
Lennox Smart Air Quality Monitor
Selecting this option will display the current conditions for air quality pollutants in the home. Green indicates good, yellow indicates fair and red indicates poor. In addition a Wi-Fi indicator show the current signal strength. There are also three options that can be selected.
Options located on the right-side of the screen are:
- Monitor Name allows the user to rename the sensor using the virtual key board.
- Device Type will always show Monitor.
- About Monitor will list model and serial numbers along with firmware version.
- Level of Indoor Air Cleanliness. Options are High, Medium and Basic (Most Economical)
For further details, see "Lennox Smart Air Quality Monitor".
Lennox Wireless Extender
Selecting this icon will bring up the wireless strength indicator. There is an additional select called Extender Settings. This screen includes:
- Extender Name: This will show the current name of the extender and can also be renamed from this screen.
- Device Type: Extender
- About Extender: This will list model and serial numbers and firmware version.
For further details, see "Lennox Wireless Extender".
Pure Air S
Selecting this option will display the PureAir S filter life. Red indicates 1-10% filter life left, yellow indicates 11-30% filter life left and green indicates 31-100 filter life left. Also available are:
- More Info: Information is listed here on the PureAir S product.
- Reminders: You can set service reminders here for 1 day, 1 week, 1 month, 3 months or custom.
- Service Contracts: This will list your service contact if it has been entered into the thermostat.
For further details, see "PureAir™ S".
Table 2. Home and Status Screens Icon Descriptions
| Icon | Function or Screen Text | Purpose |
 | Menu | Selecting this icon will bring up user and installer menus. |
 | Menu with Notification Icon | If there are one or more notifications this icon will appear over the menu icon. The number in the center indicates how many active notification are present. |
 | Feels Like is Active or Turning Feels Like on | |
 | Smart Away is Active or Away is Active | When the away icon is Selected, the system will automatically use energy saving settings - heat-to 62 (16.5) and cool-to 85 (29.5). Temperatures can be adjusted by pressing on the available temperature setting (i.e., heat-to or cool-to). To exit away, press the cancel icon. In a zoning system, all zones are set to a single heat-to and cool-too setting. Note that when manually selecting Away from the home screen, the Smart Away feature (if enabled under settings) will be temporally disabled until Away is canceled. |
 | Heating | System is heating the home. This animated icon will appear above the system name on the home screen. |
 | Cooling | System is cooling the home. This animated icon will appear above the system name on the home screen. |
 | Humidifying | If humidification equipment is installed and configured, the system will display this message when adding humidity to the air in the home. |
 | Dehumidifying | The system can be used in cooling mode to help remove excessive humidity as determined by the user setting. Go to Menu > Settings > Humidity > and turn on dehumidify. Then adjust the acceptable low and high humidity levels in the home with the dehumidification set-point slider. |
 | Defrosting | The heat pump system is defrosting the outdoor unit coil (only when required). |
| | Emergency Heat | All heat pumps operating in northern climates below 35°F (1.6°C) normally need a supplemental heating source. Usually it is in the form of electric heating provided by the indoor unit. Other sources could be gas, oil, or hot-water back-up systems as well. The supplemental heat is also referred to as "second-stage" or "back-up" heating, with "first-stage" being the heat pump only. Emergency heat is when you use your supplemental heat (2nd stage) by itself, without the use of your heat pump (1st stage heat). Not available for non-heat pump systems. |
| | Auxiliary Heat | Is only available with heat pump system. If outdoor temperature is above the high balance point, only the heat pump will operate - default 50°F (10°C) high. If outdoor temperature is below the low balance point, only auxiliary heating will operate - default 25°F (-4.0°C) low. If outdoor temperature is in-between the high and low balance point, both the heat pump and auxiliary heat sources can operate. |
 | Will start soon | A five minute safety delay prevents the compressor from operating too soon after shut-down to allow internal pressures to equalize. |
 | Ambient lockout | This indicates that either the outdoor temperature is above or below the balance point temperature settings. The low balance point setting prevents heat pump heating below the set point and back up heat will be used. Typically the default is 25°F (-4.0°C), but that setting can be adjusted by your dealer. At 25°F (-4.0°C) or below for example, only auxiliary heating (electric or gas) is used. If the high balance point is set to 50°F (10°C) for example, which is also adjustable by your dealer, then auxiliary heat will not be allowed. Only heat pump heating will be used. Anytime the outdoor temperature is below or above the balance point temperature settings, the ambient lockout notice will appear on the home screen. |
 | Fan is running | Fan set to ON. Fan is NOT following the schedule and runs continuously until it is changed from the selected mode. |
 | Fan in auto mode is active. | Fan set to Auto. Fan will follow the fan setting in the selected schedule. |
 | Fan in circulate mode is active. | Fan set to Circulate. Fan is following schedule and cycles during periods of equipment inactivity. Circulate run time is dependent on user settings. |
 | Fan in Allergen Defender mode is active | Allergen Defender: Go to Menu > Settings > Fan to turn on or off Allergen Defender. Internet weather must be enabled and the pollen count is high for the following pollens (Grass, Ragweed, Mold, Tree and Overall Pollen) the fan will run between heating or cooling demands to help clean the air. Works best with MERV 11 or higher filter. Allergen Defender only runs when no other fan modes (On, Auto or Circulate) are being utilized. |
 | System Under Test | Typically occurs when the system has had a power interruption. The thermostat starts to look for the indoor and outdoor controls. Sometimes the outdoor control takes longer to boot up and therefore does not respond to inquiry by the thermostat. Recycle power to system may resolve issue. |
 | Aux Heat | Auxiliary heating is active. |
 | Load shedding, wait time 45 min | Action to reduce the load on something, especially the interruption of an electricity supply to avoid excessive load on the generating plant. |
 | Service Urgent | Service Urgent means that a service call is needed to get the system running. Selecting the icon will display a pop-up screen. Service Urgent. The system has encountered a problem. Alarm ID: xxxx and a description of the alarm is provided. Select OK to cancel the pop-up screen. |
 | Coasting to Perfect Temp | Coasting allows the current temperature to reach the desired single set-point without the system doing any work. The red arrow indicates the temperature is less than the desired set point. The blue arrow indicates is greater than the desired set point. |
 | Coasting to Perfect Temp | |
 | Ventilating or Ventilating unit (specific Time) | This indicates the system is actively ventilating and the precise time the cycle will end. Selecting cancel will terminate the current ventilation session. Selecting the icon will display a pop-up screen. Ventilating until x: xx pm. Do you wish to cancel. Options are No or Yes. |
 | Peak Monitoring until x: xx pm - x: xx pm | The utility company will automatically set the energy savings time period. You can select cancel to exit this mode. By canceling you will be opting the system out of the current active energy savings events. A pop-up screen will ask you to verify this is what you wish to do. Selecting the icon will display a pop-up screen. Peak Monitoring will be active from x: xx pm to x: xx pm. |
 | Transitioning to next schedule | The system is following an active schedule and is transitioning to the next temperature setting based on a time indicator. |
| Schedule hold until next period | Selecting the icon will display a pop-up screen. Schedule will hold until next schedule setting. There is also the option to select duration of hold or cancel. Options to select are Cancel, Duration and Hold. | |
| Schedule Hold until xxxx | Two pop-up may appear. Schedule will hold. Do you wish to cancel? Options are Yes or No. Schedule will hold until xxxx. Do you wish to cancel? Options are Yes or No. | |
 | Cleaning Air | The Lennox Smart Air Quality monitor has determine that there is poor air quality in the home and is running the indoor unit fan. Select this notification will allow you to view details concerning the air quality or postpone the air cleaning for a specified time period. |
 | Postponing Cleaning Air | |
Menu
Select the Menu button on the home screen to display the Menu screen.
If multiple thermostat control systems are available they will be shown below the General menu settings.
General
Notifications
Filters for displaying notifications are All Notifications (options that can be checked off are All Notification, Service Urgent and Maintenance) The second filter option is All Time Periods and the selection options are All Time Periods, Last 24 hours, Last 30 days and Last 12 months.
User Account
This section is only accessible if the thermostat has an active connection to Wi-Fi. Details on creating a user account and adding a thermostat to the new or existing account.
Display Settings
The available settings are:
- Auto Brightness with an option for either ON or OFF. When set to OFF, there is an adjustment bar to set the brightness level.
- Screen Lock with an option Unlocked, Partially Locked and Locked.
- Proximity Sensor which is ON by default. When set to ON, the display will automatically turn on when you approach it. When set to OFF, you will have to touch the screen for it to turn on.
- Screen Saver which by default is set to OFF. Options are OFF, Weather, Power Save (blank screen) and photo. Photo can be upload to the thermostat by using the Lennox S40 Smart Thermostat app.
- Use the Lennox Thermostat App, select Menu > Display Settings > Screensaver and upload an image from this screen. If the upload is successful a confirmation screen will indicate so.
- Home screen settings are:
- Outdoor Temperature by Source. Options are Accuweather or outdoor temperature sensor. Default setting is Accuweather. To display Accuweather you have to have an good Wi-Fi connection, connected to the Lennox server and logged into your user account.
- Outdoor Weather. This options allows the user to turn on or off outdoor weather on the home screen.
- Indoor Humidity. This options allows the user to turn on or off indoor humidity being displayed on the home screen.
Support Service
Local Lennox Dealer Info: Here you have the options to either just display information already populated on this screen or add or correct the service contact information. This is where you can add details such as Name, Country, Address, phone, email and website information.
Service Access which allows your service provider remote access to your system for viewing.
Remote Control allows to service provider control of your system for troubleshooting purposes. By default this option is set to OFF.
Alerts and Notifications. This will allow your service provider to be notified of your system maintenance needs. By default this is set to OFF.
You have made an investment in your heating and cooling system and you expect peak performance. With a simple, ON option, this new smart thermostat forever changes HVAC equipment diagnostics, maintenance, and repair. It provides basic maintenance notifications and alerts, performance reports, and the ability for dealers to remotely diagnose and troubleshoot. This proactive and responsive HVAC care is valid for the lifetime of the HVAC system. Promising peace of mind by doing away with unnecessary dealer visits, avoiding potential repair costs, and ensuring nothing short of perfect air. In some instances, the dealer may be able to correct a problem without ever having to come to your home, saving you time and money.
System
Mode
This screen will allow the user to set the operating mode of the system. Options are Emerg Heat, Heat Only, Heat / Cool, Cool Only and Off
Schedule
The pre-configured options for scheduling are No Schedule, Schedule IQ, Save Energy, Sprint / Fall, Winter and Summer. All of the schedules can be modified. Unique schedules can be assigned to individual zones when Lennox Smart Zoning Control is installed.

Figure 7. Schedule IQ Setup Screen
No Schedule - System is not following a schedule. All changes are performed manually.
Schedule IQ - This schedule operating in heat / cool mode and answering a few simple questions will allow the system to know how to set the temperature for the home based on time settings. By default there are two times and temperature settings which can be adjusted using the edit schedules option.
- At home day wake-up default time is 7:00am and low temperature setting of 67°F and high temperature setting of 80°F. Start time can be adjusted by press on the current time setting and can be adjusted as exampled in figure 6.
- At home night sleep default time is 11:00PM and low temperature setting of 66°F and high temperature setting of 84°F.
- Away - When away from home, Smart Away when enabled (see "Away") is used to set the temperature while the home is unoccupied.
Default low temperature setting of 62°F and high temperature setting of 85°F. Temperatures for any of the options above can be adjusted by sliding the low and high temperature circle left or right on the sliding scale.

Figure 8. Schedule IQ Setup Screen
Summer – Provides the average Summer indoor cooling set points for home temperatures. Temperatures and time periods can be adjusted to provide your desired set points.
Spring/Fall - Provides the average Spring/Fall indoor cooling set points for home temperatures. Temperatures and time periods can be adjusted to provide your desired set points.
Winter – Provides the average Winter indoor heating set points for home temperatures. Temperatures and time periods can be adjusted to provide your desired set points.
Save Energy – Provides the recommended Energy Star set points recommended by the Environmental Protection Agency energy savings.
Fan (On, Auto and Circulate)
Options are:
- On which means the system will run the fan continuously.
- Auto which indicates it will run during a call or heating or cooling only.
- Circulate will run predetermine number of minutes to hour. The setting for this duration per hour can be found at Menu > Settings > Fan. Options are 9 to 27 minutes per hour.
Settings
See following section.
Settings Menu
The system setting screen will allow the homeowner to connect to their home Wi-Fi router and give their system a name.

Figure 9. User Setting Menu
System Info
Selecting this menu item will allow you to rename your system.
Wi-Fi
See "Figure 1. Thermostat Connectivity Status" for information on how to connect to your home Wi-Fi network.
Away
NOTE: Most of the procedures listed in this section can be accomplished at the thermostat or using the Lennox S40 Thermostat App or consumer web portal.
Manual Away
The user can manually put the system into away mode by pressing the "away" icon. When the system is in away mode, the horseshoe is grayed-out and shows the "away" status text. In order to exit away mode, the user can press the "cancel" icon. In away mode, the away set points are used to control the system. The user can modify the away set points from the default values in Menu > Settings > Away.

Figure 10. Away Settings
Smart Away
Both Home Info and Account options must be completed before this feature can be enabled.
The Smart Away feature depends on:
- Lennox S40 Thermostat App continuously running on your mobile device (smart phone or tablet) and being logged in to your account.
- Requires Wi-Fi and location settings to be enabled on your mobile device. Android devices must also have the location mode set to "high accuracy." Consult your mobile device user guide for instructions.
Smart Away can also be enabled from your mobile device once you have installed the Lennox S40 Thermostat App and logged in. Go to the Menu > Settings > Away and turn ON Smart Away. To allow the mobile device you are on to use this feature, turn ON participate. The away fence option will appear and by default, the setting is two miles (3 km). The range for this setting is 2 to 6 miles (3.00 to 9.50 km).
Inner and Outer Away Fences
The inner away fence is set by the user anywhere between 2 to 6 miles (3.00 to 9.50 km) on the mobile app. This setting can be different for each participating mobile device. When any of the participating mobile devices are located inside of its inner away fence, the system will not be in Smart Away; the system will use the temperature set points defined by the schedule or what was manually set. Once the inner away fence is set, the outer fence for each participating mobile device will be automatically calculated by the Smart Away algorithm.
Transition Set Points
When the closest participating mobile device is between the inner and outer away fences, the thermostat will show the Smart Away indicator. The system will use transition set points to heat or cool the home. The transition temperature set points are automatically calculated by the Smart Away algorithm using a combination of the home and away set points.
Away Set Points
Once all participating mobile devices have moved outside the transition range, the thermostat will continue to show the Smart Away indicator, and the user-set away set points will be used to control the system.
Example: Away set points are 65ºF (18.5ºC) for heating and 85ºF (29.5ºC) for cooling. When the away fence is set to two miles for all participating mobile devices, and the closest participating mobile device is within the 0-2 mile (0 to 3.22 km) range of the home, the system is considered home; the system will use the set points from the schedule or what was manually set. If the closest participating mobile device moves into the 2.1 to 8 miles (3.40 to 13.04 km) range, the system is considered in transition, and the system will start to either increase or reduce the heating or cooling set point. Once all participating mobile devices have moved beyond the 8.1 mile (9.50 km) range from the house, the system sets the set points to the away set points (65ºF for heating and 85ºF for cooling).
Multiple Mobile Devices
It is possible to have more than one mobile device participating in Smart Away for this system. The away fence can be set to the same value or different values for each mobile device. The thermostat will not show the Smart Away indicator until all devices have moved past their inner away fence, and the system will not reach the user-set away set points until all devices have moved past their outer fence.
NOTE: Smart Away will be canceled when the system is enrolled in energy savings with a utility provider and a energy saving event is active.
Mobile Device Location Services Settings for Smart Away
To use Smart Away, you will need to be running Android Version 9, 10, 11 or 12. Location Services Settings are as follows:
- Starting with Android versions 9 and 10, when allowing the Lennox Thermostat app access to device location you must select Allow all the time for the Smart Away feature to work correctly so go to Settings > Apps > Thermostat > Permissions > Locations and Allow all the time setting is enabled.
- Starting with Android version 11, to ensure location services for the Lennox Smart Thermostat's Smart Away feature are not auto disabled by Android operating system, go to Settings > Apps > All Apps > Thermostat > Permissions and locate Remove permission if app isn't used and ensure this setting is disabled.
- Starting with Android version 12, when you start up the Thermostat App, you will be ask to enable permissions for location. Select the two options illustrated here.
To use Smart Away you need to be running IOS 12, 13, 14 or 15 for Location Services Settings.
")
- Location services will need to be enabled for this feature to work. Go to Settings > Privacy > Location Services > Location Services.
- Select Always Allow for Smart Away to control the temperature in your home while you are away
- Select Always Allow with Precise Location Enabled for Smart Away to control the temperature in your home while you are away.
- Select Allow While Using App for Smart Away to control the temperature in your home while you are away..
Current Temperature
Feels Like
This feature is not a temperature setting but the temperature that the space feels like based on current outdoor and indoor temperatures and indoor humidity.
When Feels Like is set to On, the words Feels Like will appear above the indoor temperature display on the home screen.

Figure 11. Feels Like Screen
Using Smart Room Sensors
When Lennox Smart Room Sensors are installed in the home the homeowner has the option to include individual smart room sensors for determining a better Feels Like control of the entire home. Using the temperature detected at each sensor will be factored into the Feels Like result when enabled.

Figure 12. Feels Like Screen with Smart Room Sensors Selected
Fan (Allergen Defender)
Allergen Defender
Go to Menu > Settings > Fan to turn on or off Allergen Defender. Internet weather must be enabled and the pollen count is high for the following pollens (Grass, Ragweed, Mold, Tree and Overall Pollen) the fan will run between heating or cooling demands to help clean the air. Works best with MERV 11 or higher filter.
Circulation Timer Adjustment
Circulate air can be adjusted on this screen. Adjustments between 9 to 27 minute duration per hour. The circulate option runs during any mode selected except when the system is turned off.
Heat / Cool
This screen allows changes to how the system operates. Options are single set-point, heat pump mode (normal or comfort), auxiliary heat and safety protection.
Perfect Temperature
- This option will only be available in non-zoning systems. This option allows the user to control both heating and cooling temperatures with one single temperature setting. Factory default is off (see the following figure for screen example).
![warning]() NOTE: When set to Perfect Temp, the Heat / Cool position indicator changes. The blue color (cooling) indicator is on the left and heating (red) indicator is on the right. This is just the opposite on how it is displayed in normal Heat • Cool mode. Also the Heat / Cool mode indicator will display Auto instead.
NOTE: When set to Perfect Temp, the Heat / Cool position indicator changes. The blue color (cooling) indicator is on the left and heating (red) indicator is on the right. This is just the opposite on how it is displayed in normal Heat • Cool mode. Also the Heat / Cool mode indicator will display Auto instead.
![warning]() NOTE: Perfect Temp is not compatible with Google Assistant. Google Assistant will not be able to adjust your home temperature.
NOTE: Perfect Temp is not compatible with Google Assistant. Google Assistant will not be able to adjust your home temperature. - Select Heat Pump Mode: (only available with system using a heat pump). Options are normal and comfort. Default is normal. Descriptions for what each setting does is displayed on the screen.
Wider Set-Point Range
Changes the default low and high maximum temperature setting from 60-90°F to 40-99°F (15.5 - 32.0°C to 4.5 - 37.0°C).
Auxiliary Heat
When the outdoor temperature is above the high balance point, only the heat pump is allowed to run. When outdoor temperatures are below the low balance point, only the auxiliary heat source is allowed to run. When outdoor temperatures are between the high and low balance points, then both the heat pump and auxiliary heat source are allowed to run.
Auxiliary heat is the use of an additional heat source, when the heat pump BTU capacity is not sufficient to keep up with the home's heating demand; sometimes it is also called supplemental heat. When used in a dual-fuel mode, auxiliary heating is accomplished with a gas or oil fired unit. In this mode of operation, the heat pump must shut down and uses just the auxiliary heating unit for heating.
If the system is an air handler with electric heat, the auxiliary heat will be in conjunction with the heat pump when the home heating requires it. Another use of auxiliary heat with heat pump systems includes a setting called balance point. Balance point puts temperature limits on when the heat pump and electric heat work together or independently.
- When the outdoor temperature is above the default high balance point of 50°F (10°C) (default), only the heat pump will be allowed to run (no auxiliary heat).
- When the outdoor temperature is below the default low balance point of 25°F (-4.0°C) (default), only the auxiliary heat is allowed to run (no mechanical heat pump operation).
- When the outdoor temperature is between the low and high balance point settings both heat sources are allowed to satisfy the heating demand.
Safety Protection
Alerts you if the home gets too cold or hot. This is set under this menu option on the setting for both low and high temperatures. The system will automatically turn on either cooling or heating if the home's interior temperature reaches either the low or high setting. A notification is also sent to the Home screen notification area and Lennox S40 Thermostat App.
Humidity
Some options that are available under this section are dependent on type of equipment (indoor and outdoor units) and humidification accessory is installed.
Adjustment Slider Tools
- Dehumidification Set Point Percentage — The slide bar adjustment tool allows desired humidity level in the home. Selection between 40% to 60% are available. Default is 55% when dehumidify is enabled.
- Humidification Set Point Percentage- This adjustment tool is only visible when dew point is set to OFF. Range is 15% to 45% humidity. Default is 40%.
- Overcooling — This adjustment allows selection between 0°F to 4°F (0°C to -2°C). This adjustment is only available when Max or Climate IQ (Auto) is selected. This selection will limit how much overcooling is allowed when trying to achieve the dehumidification set point. Default is 2°F (1.0°C).
- Dew Point — This adjustment twill help reduce the amount condensation that may build up on windows and other glass surfaces. A dew point slider bar option will appear under the humidity menu. By default the dew point slider is set to OFF. When dew point is set to ON, the slide bar adjustment will appear with a range of -15% to 15%. Default is 0%.
NOTE: Dew Point - Adjustment requires an outdoor temperature sensor and is automatically controlled by the outside temperature.
Humidity Control
The following options are available under humidity control:
- Off
- Humidify only option is available when a humidification accessory is installed.
- Dehumidify onlyoption is available with or without a dehumidification accessory installed.
- Humidify + dehumidify option is only available when a humidification accessory is installed.
Humidification Control Center
When a humidification accessory is installed and humidify is enabled, the options are as follows:
- Normal — Recommended for moderate climates. This runs the humidifier when there is a call for heat and humidification.
- Max — Recommended for drier climates. This runs the humidifier when there is a call for humidification only.
- Dew Point percentage slider adjustment tool is available for both Normal and Max settings.
- Humidification set point percentage slider adjustment tool is only visible when Dew point is set to OFF.
Dehumidification Control Center
The following dehumidification settings are not applicable and ignored on systems employing iHarmony Zoning.
No Dehumidification Accessory Installed
When dehumidify is enabled and no dehumidifier accessory is installed, the dehumidifications options are as follows:
- Basic — Recommended for moderate climates. No dehumidification is active. Dehumidification set point slider adjustment tool only is available.
- Max — Recommended when outdoor air is excessively humid. May over cool your home to achieve the desired dehumidification set point.
- Climate IQ (Auto) — Automatically adjusts system run-time based on a combination of dehumidification set point and local weather conditions obtained from the Internet. May over cool your home to achieve the desired dehumidification set point.
- Both overcooling and dehumidification set point slider adjustment tools are available for both Max and Climate IQ (Auto). The overcooling adjustment slider tool limits overcooling between 0ºF to 4ºF.
Humidify + Dehumidify Settings
When this option is selection, a combination of both humidification and dehumidification settings are available.
When dew point is set to OFF. Then a dual purpose slider adjustment tool will appear. This tool will allow you to adjust the set point percentage for both humidification (left slider) and dehumidification (right slider). Range is 15% to 60% humidity.
Table 3. Humidity Control Modes of Operations
Tab 3a
| Function | Setting Mode | Description |
| Humidification Only | Normal | These thermostat modes allow the homeowner to control the relative humidity (RH) between 15% and 45%. The following conditions must be met for either mode to operate:
Additionally, the NORMAL mode requires that heat demand exists. |
| Max | ||
 | ||
Tab 3b
| Function | Setting Mode | Description |
| Dehumidification Only | Normal | This setting is recommended when the air outside is not too humid and the outdoor unit is either staged or variable capacity. |
| Max |
NOTE: Discharge air temperature sensor (catalog number 88K38) is required. | |
| Dehumidification Only | Climate IQ (Auto) | This feature is applicable only to Lennox communicating thermostat with either Lennox communicating staged or variable capacity outdoor units only. This setting automatically adjusts both indoor fan speed and cooling power based on local climate conditions using Climate IQ® technology. This setting may cool your home below the set temperature. |
| The below adjustment tools are only available with either Max or Climate IQ setting selected. | ||
 | ||
Tab 3c

Dehumidification Accessory Installed
When either an auxiliary dehumidifier or Humiditrol is installed the only setting available is dehumidification set point slider adjustment tool is available. The only adjustment tool will be the Dehumidification Set Point Percentage.
Humiditrol: When Humiditrol accessory is used there are an additional parameter settings that your Lennox technician/installer can adjust.
Zoning Control
NOTE: Lennox Zoning Control only work with Lennox communicating systems.
For user setting options, go to Menu > Settings > Zoning Control. By default Zoning is ON on the Zoning Control screen. If you wish to place the system into central mode then turn this setting OFF. You can also rename each zone from this screen.
Heating / Cooling Changeover
The following is an example of how the zoning system operates during a heating / cooling changeover.
When the system is satisfying a call from zone 1 for heating and receives a call for cooling from zone 2, the following will occur:
- Then system will continue to fulfill the demand from zone 1 until satisfied, or a maximum time of 20 minutes has occurred.
- If after 20 minutes the system is still operating based on satisfying the heating demand from zone 1, the system will terminate that demand.
- The system will then shut system down for five (5) minutes. This will allow for system temperatures and operating pressures to stabilize.
- After a five 5 minute delay the system will begin operations to satisfied the cooling demand from zone 2.
The system will continue to operate in this matter each time it receives a zone call that is opposite of the current mode of operation (heating or cooling).
Cooling Operation
When a zone thermostat makes a demand for cooling, the zone damper opens and the cooling equipment begins operating.
Cooling demand is terminated when:
- All zone demands for cooling are terminated.
- The demand has exceeded the Heat / Cool changeover time limit (20 minutes) while a heat demand exists.
When cooling demand is terminated, a five minute minimum off time delay is initiated.
Second stage cooling is energized when the discharge air temperature is 7°F higher than the set point of the cooling staging temperature settings.
Heating Operation
When a zone thermostat makes a demand for heating, the zone damper opens and heating equipment begins operating. Heating demand is terminated when:
- All zone demands for heating are terminated.
- The demand has exceeded the Heat / Cool changeover time limit (20 minutes) while a cooling demand exists.
When heating demand is terminated, a five minute minimum off-time delay is initiated.
Second-stage heating is energized if the discharge air temperature is lower than the set point of the heating staging temperature set point.
Notifications
This section allows the user to setup reminders for various accessories. By default all listed items are disabled. The reminders can be set for 3, 6, 12 or 24 months and a custom reminder by specific date can be set. Reminders options are:
- Replace Filter 1 or Replace Filter 2
- Replace UV bulb
- Replace humidifier pd
- PureAir maintenance
- Maintenance reminder.
Table 4. Maintenance Alerts
| Number | Reminder |
| 3000 | Filter 1 |
| 3001 | Filter 2 |
| 3002 | Humidifier Pad |
| 3003 | UV Light |
| 3004 | Maintenance |
| 3005 | PureAir Maintenance |
Peak Monitoring
Peak Monitoring is currently a feature requirement for the State of California. Enrolling into the energy saving program will allow your utility company to control your thermostat during peak energy events. An icon on the home page will indicate when the system is in an active energy savings event. Enrollment is a two-step process for consumers. The first step requires the consumer to register with their utility provider before the thermostat settings can be enabled to take advantage of the Peak Monitoring feature.
Enable Peak Monitoring
Go to Menu > Settings > Peak Monitoring and turn on enable energy savings. This will automatically get the required certification for your thermostat.
NOTE: If enabling energy savings is successful or not successful a pop-up screen will appear indicating either. If unsuccessful, try again in a few minutes.
Enroll in Peak Monitoring
The next screen will allow you to enroll in energy savings. Follow the on-screen prompts to continue. Detail on-screen instructions are provided.
- Toggle enable Peak Monitoring to ON. A pop-up message will appear asking wanting you to first verify that your utility provider has a Demand Response Program. If they do, select OK.
- In the next screen, write down the registration code listed and then select OK.
- On this screen, select "enroll Peak Monitoring", and type in the URL provided by your energy provider and then select DONE.
- If enrollment is successful, the next screen will indicate enrollment status as enrolled and connection status as connected.
Peak Monitoring Settings
This screen will allow you to use your energy provider's default temperature or pricing set points. You can also customize these settings by selecting the following.
- Peak load event active set-points with the following options:
- Default
- Offset.
- Custom set-points
- Peak Price event Threshold
- Peak Price Event Active Set-points with the following options:
- Default
- Offset.
- Custom set-points
- Peak Monitoring Events Filter
- Factory Reset Peak Monitoring Settings - selecting this option will reset Peak Monitoring settings to factory state.
Canceling Peak Monitoring Event
The option to cancel will appear along the right side of the home screen. When in an active energy savings event and you attempt to update any of the following settings, a pop-up window will appear confirming you wish to exit the active energy savings event which could result in higher energy consumption during the event period:
- Adjusting the temperature set point manually.
- Selecting a schedule.
- Changing the mode of operations.
- Manually canceling the event from the home screen indicator.
Cancel Enrollment
The option to cancel enrollment in Energy Savings can be found by going to Menu > Settings > Peak Monitoring > Energy Savings Settings > cancel enrollment
PureAir™ S
PureAir S is an air purification system that cleans the air in your home by addressing all three types of indoor air pollutants an:
- Airborne particles (like pollen, dust and pet dander).
- Germs and bacteria.
- Chemical orders and vapors.
PureAir S uses a MERV 16 air filter, UVA light and catalyst to work.
Ventilation
This option will only appear if a fresh air damper, ERV or HRV is installed and configured by your installer. Either ERV or HRV could be configured as single or two-stage if applicable.
Menu Selection
When selecting this menu option, selections will be either:
- Timed or ASHRAE (either Timed or ASHRAE is set by your installer during setup of your thermostat).
- On (always)
- Off (always).
Factory default is ASHRAE. Your installer will need to change it to Timed if that mode is desired.
You can also select "ventilate now" to start a ventilation function immediately. Those menu options are 10, 20, 30, 40 and 50 minutes, 1 hour, 1-1/2 hours, 2 hours, 2-1/2 hours, 3 hours, 3-1/2 hours and 4 hours and custom. Custom will allow to set a specific time to run too.
NOTE: On two-speed ventilators, when ventilate now is selected, the ventilator will come on at high speed.
NOTE: Once ventilation is started, a notification appears on the right-side of the home screen indicating a time when that specific cycle will end and the option to cancel the demand.
What is ASHRAE?
ASHRAE 62.2 is a national standard that provides methods for achieving acceptable indoor air quality in typical residences. It was developed and is maintained by the American Society of Heating and Air-Conditioning Engineers (ASHRAE). One of the standard three main components is Whole House Ventilation which is exhausting stale indoor air and replacing it with fresh outdoor air.
The exhaust fan dilutes the air in the main living spaces with outside air to remove unavoidable contaminants from people, pets, cleaning, off gassing, etc. The whole house fan flow rate is determined based on the floor space and the number of bedrooms. The whole house fan provides multiple air exchanges within the home each day. The operation can be continuous or intermittent (much higher airflow cycled by a timer) if 1 zone or less.
For more information about ASHRAE, go to https://www.ashrae.org.
Devices
Lennox Wireless Extenders and Smart Room Sensors can only be added or removed using the Lennox Thermostat App.
The homeowner can add or remove Lennox Smart Room Sensors and Lennox Wireless Extenders to the thermostat only if at least one device has already been added first by your installer.
NOTE: For more information on setup, placement and pairing of smart room sensors and wireless extenders, see the Smart Sensor Installation and Setup Guide provided with the device.
Advanced Settings
This section is for installers and technicians ONLY to customize system settings and run various diagnostic tests.
View Support Service Control Center
Allows installers and technicians to perform custom configurations tailored for the homeowners unique requirements.
Restart
Options are to restart Smart Hub, thermostat or both.
Unregister System
Unregister System means that your thermostat will no loner be lined to your email account.
Alert Code Priority Types and Notification Options
To expand a specification notification to access a more detail description of the alert code, press the down arrow to expand the description.
Table 5. Alert Code Priority Condition Visibility

* For homeowner to receive email notifications, email updates has to be enabled. From the home screen, go to menu > user account > Email updates and set to ON.
** For dealers to receive service alerts and service alert emails the feature needs to be enabled by the homeowner. From the home screen, go to menu > user account > Dealer Email updates and set to ON.
Lennox Smart Devices
Lennox Smart Room Sensor
The Lennox S40 Smart Thermostat can support up to six Lennox Smart Room Sensors.
Adding and Removing Smart Room Sensor
Please refer to the Smart Room Sensor Installation and Setup Guide for information on the devices, placement and pairing using the Thermostat App.
The first device must be added by the technician in order to create the BLE network. Thereafter the homeowner can add or remove devices using the Lennox Smart Thermostat app.
View and Understanding the Smart Room Sensor Detail Screen
From the thermostat's home screen, select the My Home option. Then select the wireless extender icon. This will display the details for that Smart Room Sensor.

Smart Room Sensor Detail Screen
- Selecting Current Temp button is a short cut to the Current Temperature. There you can select which Room Averaging using Occupancy Detection.
- Selecting Sensor Settings will allow you to include or exclude a specific Smart Room Sensor from temperature averaging. Also listed in this area is device name, type and about device. Selecting device name will allow you to rename the device if needed.
Room Averaging using Occupancy Detection
The following two features can be set using either the thermostat or thermostat app using the system setting screen.
From the home screen, go to Menu > Settings > Current Temperature.

Figure 13. Occupancy Settings for Temperature Averaging
Occupancy Sensor Setting
The occupancy detection feature is built into every sensor. The settings are as follows:
- OFF - When the occupancy feature is turned OFF, the thermostat will always include the sensor in temperature averaging.
- ON - When the occupancy feature is turned ON, the thermostat will only include the sensor in temperature averaging if the room is occupied.
Sensor Temperature Difference Limit
There is feature for temperature averaging that limits how much of a difference in temperature readings there can be by comparing any Smart Room Sensor detected temperature to the S40 thermostat detected temperature. By default, if the smart room sensor temperature reading difference is less or greater than 7ºF, it will be excluded from participating in temperature averaging.
The message "Device is not participating as temperature readings are abnormally high/low" will appear at the bottom of the Smart Room Sensor Detail screen.
Verify that the sensor is not in direct sunlight, discharge vents, unconditioned space or any other type environmental conditions that could affect the smart room sensor temperature reading.
NOTE: If the smart room sensor is in a suitable location and the actual room temperature does not match what the sensor is reporting, then the smart room sensor may need to be replaced.
Lennox Wireless Extender
Adding and Removing the Lennox Wireless Extender
Please refer to the Smart Room Sensor Setup and Installation guide for information on the devices, placement and pairing using the Lennox Thermostat App to the S40 Smart Thermostat. .
View and Understanding the Wireless Extender Detail Screen
From the thermostat's home screen, select the My Home option. Then select the wireless extender icon. This will display the details for that wireless extender.
Wireless Signal strength indicators are illustrated as follows:

Wireless Extender Signal Strength Indicators
The Smart Room Sensor will list the following
- Whether the Smart Room Senor is Participating in temperature averaging.
- Room humidity percentage.
- If the room is currently occupied or unoccupied.
- Battery life percentage
- Signal Strength.
Lennox Smart Air Quality Monitor

Adding and Removing the Smart Air Quality Monitor
This device can only be installed by your professional installer.
The S40 Smart Thermostat can support one Lennox Smart Air Quality Monitor.
How the Smart Air Quality Monitor Works
When the Smart Air Quality Monitor detects poor indoor air quality (IAQ) in the home it will attempt to clean the air. Depending on the IAQ equipment installed in the home, one of the following methods will be used:
- No IAQ equipment – it will run the indoor unit blower to circulate the air.
- Filter cabinet Installed - it will run the blower motor to circulate the air through the filter.
- Pure Air – turns on system to run Pure Air to circulate the air through the Pure Air
- ERV/ HRV – will check out door IAQ and if better than indoor, will bring in fresh air, if not, run blower motor to circulate the air
Side Switch
There is a side switch on the monitor that when in the UP position enables the internal fan of the monitor and transmits air quality data to the thermostat.
When the switch is moved to the DOWN position it will turn off the internal fan of the monitor and stop communicating data to the thermostat. An alert code 70003 will be displayed indicating the switch is OFF. The alert code will automatically clear once the switch has been moved to the ON position.
While the switch is in the DOWN position, the latest reading from the monitor will be displayed on the thermostat. It will not update that information until the switched is moved back to UP position.
Definition of Contaminants
Table 6. Terminology
| Term | Definition |
| PM2.5 | PM stands for particulate matter (also called particle pollution), the term for a mixture of solid particles and liquid droplets found in the air you can breath. The 2.5 is the fine inhalable particles, with the diameters that are generally 2.5 micrometers and smaller. Breathable air particles can include pet dander, bacteria, mode, chemicals form cleaning products, building materials, fuel-burning equipment such as furnaces, upholstered goods, cooking, sweeping, copy machines, skin flakes, clothing fibers, combustion, cooking, smoke, dust, dirt, spores, and pollen. Sources vary seasonally. |
| VOC | Volatile organic compounds (VOC) are a combination of gases and odors released/emitted/off-gassed from a variety of sources. VOC include a variety of chemicals, some of which may have a short- and long-term adverse health effects. Alternate terms are odors, gases, vapors and chemicals. |
| CO2 | CO2 or carbon dioxide is an odorless, colorless, non-flammable gas. Carbon dioxide is a by-product of combustion, as well as a result of the metabolic process in living organisms (for example, you remove it from your body via the lungs in exhaled air). |
| BLE | BLE stands for Bluetooth Low Energy. BLE is a variation of the Bluetooth wireless standard designed for low power consumption. |
Smart Air Quality Details Screen
From the thermostat home screen, select My Home. Select the Smart Air Quality Monitor icon to view the current details concerning your indoor air quality.


When the system is cleaning the air and icon will be displayed on the home screen. There will also be message listed under the Status screen as well.
Indoor Level of Air Cleanliness Setting
On the Smart Air Quality Monitor detail screen, select Monitor Settings and then select Level of Indoor Air Cleanliness. Options are High, Medium and Basic (most economical).
The intend for these options is to allow the installing technician to fine-tune the thresholds telling apart Good and Fair air quality. If the technician selects the High option, this will result in the system triggering cleaning actions at lower levels of pollutants and contaminants.
Only Volatile Organic Compounds (VOC) thresholds will be affected by these settings.
Likewise, Basic mode will trigger air cleaning at higher levels of VOC compared to Medium.
Third-Party Integration
The most current information provided by Lennox is available using the QR codes listed on the QuickStart Guides or product packaging.
For any of these third party applications to work with your thermostat, the thermostat MUST be connected to the Internet and you MUST be logged into your Lennox Thermostat account.
Amazon Alexa
Download the Amazon Alexa app from Google Play

or the App Store™ on a compatible phone or tablet.

Then follow the on-screen stops to finish setup.
Once you have added the thermostat to your Amazon Alexa app, then you can use Siri® to voice control.
Changing to Celsius
Using your Amazon Alexa mobile app, select the three bar icon in the upper left-hand of the screen.
- Select Settings.
- Choose your Amazon device.
- Select Measurement Units from the menu.
- Toggle ON Temperature Units - Use metric measurements for temperature units.
NOTE: Even though your Lennox thermostat supports half degree settings in Celsius, Alexa only supports whole degrees. The first temperature adjustment that gets made will set the temperature to a whole degree, if it was not already.
Heat and Cool (Auto-Changeover)
Alexa will control your thermostat a bit differently when in Heat / Cool mode. In Heat / Cool mode the system can automatically switch between heating and cooling as needed.
For instance, if you ask Alexa to set the hallway temperature to 70 degrees, your thermostat will use this as a midpoint temperature, setting the Heat setpoint to 69 and Cool setpoint to 72. Alexa will confirm your request, saying "Hallway is in auto mode, aiming for 70 degrees".
NOTE:
- You cannot change the mode (heat only, cool only, etc.) of your thermostat using Alexa.
- If your thermostat is in 'away' or 'smart away' mode, any Alexa commands to change thermostat temperature will not work in this mode.
- Currently, you can pair only one home that is listed in your Lennox User Account with Alexa. In the situation where you have multiple homes associated with your Lennox thermostat account, you will not have a choice to choose the home for Alexa. You can check the homes on your account by visiting:
Additional Help
Amazon's online help at https://alexa.amazon.com.
Google Home and Assistant
Download the Google Home app from Google Play
or the App Store™
on a compatible mobile device and then follow the on-screen steps to finish setup.
Once you have added the thermostat to your Google Home app, then install and enable the Google Assistant app (Android and IOS) to enable voice control.
NOTE: Google Assistant app may be already installed on your Android device.
Perfect Temp and Schedule Mode Functions
Raising or lowering the temperature is not supported when using a schedule or Perfect Temp feature. When attempting to change the temperature when in either reference mode, Google Assistant will respond with "mode not supported".
Heat / Cool Mode (Auto-Changeover)
Although Google Assistant supports heat / cool mode temperature adjustments, it will do so only by maintaining the currently established temperature ranged. For example, if you set your heat set point to 60ºF and your cooling set point to 80ºF at the thermostat itself, then you have established a temperature range of 20 degrees. Any adjustment using Google Assistant, either through the app or by voice will maintain a 20 degree range differential as well. Let's say you change your heat set point to 65ºF. Now your thermostat will indicate the heating is at 65ºF and cooling is set at 85ºF. Adjusting the cooling set point will result in the range being maintained as well. In the Google Home app, the thermostat image will only display the approximate center temperature between the current heating and cooling set points. In this example it would display 75ºF.
Additional Help
Google's Online help at https://support.google.com/googlenest/gethelp?hl=en.
Control4® Smart Home | Operating System
Control4 is a leading control and automation platform which works with thousands of smart devices integrating audio, video, lighting, security, intercom, and climate control into a seamless customer experience
Control4 gives the customer an easy-to-use interface to control any Lennox Smart Thermostat.
Settings include:
- Display all systems in the home and select a system
- Display all zones in the system and select a zone
- Turn system or zones on or off
- Change manual modes (heat, cool, off)
- Change heating/cooling setpoints for each zone/system
- Change fan mode (on, auto, circulate)
For additional information please visit https://www.control4.com.
Building36®
BUILDING36 PRACTICAL HOME AUTOMATION
Building36 is a leading control and automation company that delivers nextgeneration smart home solutions which work with thousands of smart devices, integrating control for HVAC, water, video, lighting/appliance and security into one location.
Building36 gives the customer an easy-to-use interface via the Building36 Dashboard or the Building36 Home Mobile App to control the Lennox' S40 thermostat.
Settings include:
- Display all systems in the home and select a system
- Display all zones in the system and select a zone
- Turn system or zones on or off
- Change manual modes (heat, cool, off)
- Change heating/cooling setpoints for each zone/system
- Change fan mode (on, auto, circulate)
For additional information please visit https://building36.com.
Documents / Resources
References
![www.apple.com]() App Store - Apple
App Store - Apple![play.google.com]() Google Play
Google Play![www.ashrae.org]() Home | ashrae.org
Home | ashrae.orgMeet the new Alexa
Contact Us - Google Nest Help
Control4 Smart Homes
![building36.com]() Building36 – Innovative Smart Home Technology & Connected Devices
Building36 – Innovative Smart Home Technology & Connected Devices
Download manual
Here you can download full pdf version of manual, it may contain additional safety instructions, warranty information, FCC rules, etc.
Advertisement


Need help?
Do you have a question about the S40 and is the answer not in the manual?
Questions and answers