Advertisement
Getting Started
To begin with setup, follow the steps below. The UA Connect software guides you through the process step-by-step.
- Download and install UA Connect from www.uaudio.com/volt/start
- Launch the UA Connect application
- Follow the instructions within the app
To learn how to set up Volt with recording software and how to redeem your bundled software, please see UA Connect with Volt Interfaces.
Introduction & Overview
Record Like a Pro, Anywhere
Volt 4 is the perfect USB audio interface for creative collaborators who want to easily record audio projects with professional studio sound. Plug right into your Mac, PC, iPad, or iPhone and Volt just shows up, ready to capture your inspiration with professional sound, courtesy of Universal Audio.
Collaborate with Best-in-Class Audio Quality
From the team that brought you the game‑changing Apollo interface, Volt 4 delivers superior studio sound quality with more character and tone than any USB interface in its class.
Capture Legendary Tones with Vintage Mic Preamp Mode
Few sounds can compare to a vintage Universal Audio 610 tube preamp, the same preamp used to record everyone from Ray Charles to Van Halen. Volt 4 gives you the rich, full sound of this iconic UA preamp, thanks to its built‑in tube emulation circuitry, a UA exclusive.
Easy In, Easy Out
Volt 4 gives you simple audio connections to quickly get started. Just plug your mics and guitars into the front panel preamps, and use the line inputs for synths and drum machines. Then connect your speakers or headphones to monitor your audio with no latency. With Volt, you'll be creating like a pro, fast.
Get a 30-day Free Trial to UAD Spark
Start creating music with the best gear ever made using UAD Spark, an ever‑expanding library of world‑class plug‑ins and instruments for a low monthly price. UAD Spark plug‑ins run natively on Mac and will give your recordings the professional analog tones heard on your favorite albums. Try UAD Spark
Stay Inspired with a Curated Suite of Audio Software
Some audio interfaces give you a smattering of random audio apps. Not Volt. Instead, we put together a bundle of serious music production tools, virtual instruments, and plug‑ins from the industry's best.
iPad & iPhone Ready
Traveling light? Plug Volt 4 into your iPad or iPhone, and you can easily create beats and samples, record your band's rehearsals, and edit songs anywhere (requires external Volt power supply and an Apple Lightning to USB Camera Adapter, except iPads with USB-C).
Key Features
- Desktop 4-in/4-out USB audio interface with class-leading 24-bit/192 kHz audio conversion for Mac, PC, iPad, and iPhone
- Vintage Mic Preamp mode lets you record voice or guitar with the rich, full sound of a classic UA tube preamp
- Essential suite of audio and music software including Ableton, Melodyne, UJAM's Virtual Drummer, Marshall, Ampeg, and more
- Studio-quality headphone amplifier for loud, clear monitoring
- USB bus powered to reduce cable clutter
- 48V phantom power for condenser microphones
- Direct Monitoring for latency-free recording
- Monitoring matrix for advanced audio routing
- Stylish, rugged construction built to withstand years of use
- 1-in/1-out MIDI connections
- USB-C to USB-A cable included
System Requirements
Please visit this article for Volt system requirements.
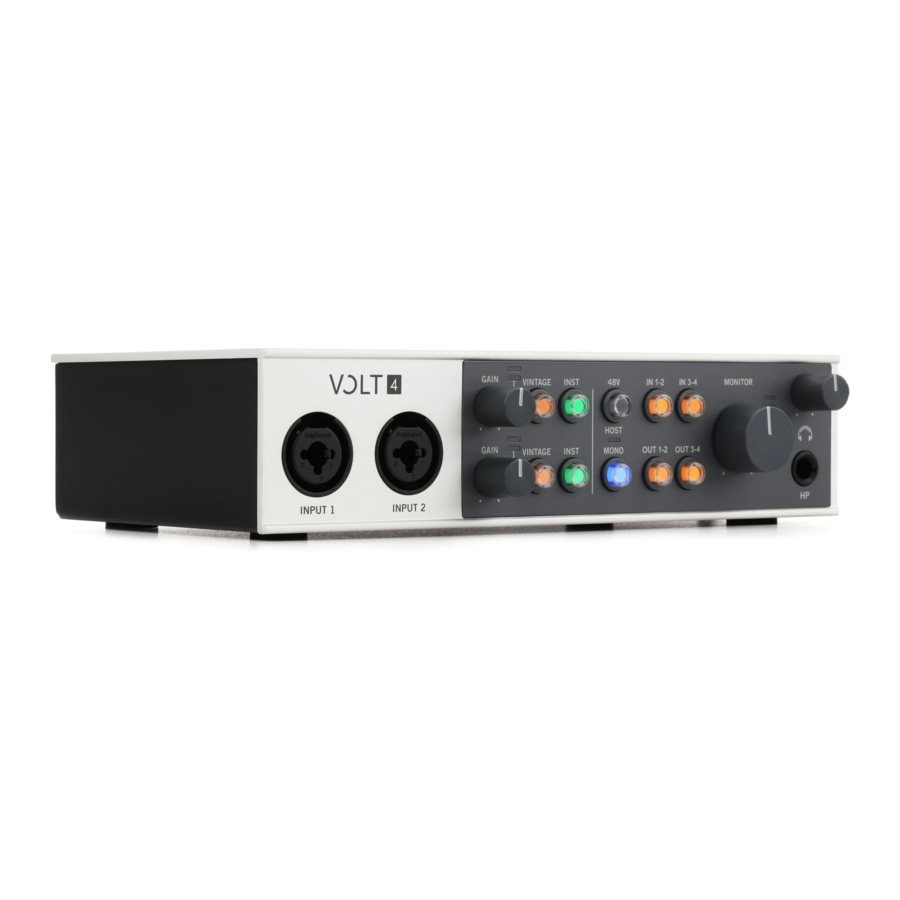
Volt 4 Hardware Descriptions
All hardware controls, connections, and indicators are explained in this section.
Front Panel

(1) XLR/TRS Combo Inputs
Connect your microphones, instruments, or line level sources here. The combo input connectors accept XLR and ¼" (6.35 mm) plugs.
A microphone is typically connected with an XLR connector, and an instrument or line level signal is connected with a ¼" (6.35 mm) TS or TRS plug.
Preamp gain and impedance automatically adjusts for line or mic signals, based on whether the plug is XLR or ¼", along with the state of the INST button.
Press the INST button to toggle the impedance and gain of the line input to accommodate a Hi- Z instrument, such as an electric guitar or bass.
 Tip: The Vintage Preamp can be used on mic, line, and instrument inputs.
Balanced and unbalanced connections
- The line inputs on Volt are balanced when connected with TRS connectors to balanced equipment.
- Use TRS (balanced) audio cables for the best results with balanced audio sources. Balanced equipment uses three conductor wiring (via TRS or XLR connectors) to reduce interference and electrical noise, and to provide better audio quality over longer cable runs. Use TS (unbalanced) cables for instruments that are not balanced, such as an electric guitar or bass, or an unbalanced synth or sound module. TS connections may also be suitable for shorter input cables, where electrical interference noise may not be an issue.

UA Support: Balanced and Unbalanced Connections Explained
(2) Gain Knobs
These knobs adjust the preamp gain for the microphones, instruments, or line level devices attached to the associated inputs. For optimum gain, rotate the gain knob to adjust the input signal level while monitoring the source that is connected, so the input meters (3) show signal but do not light red.
(3) Input Meters
The Input Meters show the signal level of the input, which is controlled by the Gain knob. The red input LED lights when the input signal is near 0 dB (clipping).
Tip: Clipping occurs when the signal is overloaded. When clipping occurs, the top of the waveform is squared off, creating distortion that may be unpleasant. Clipping has creative uses, but is usually avoided. To prevent clipping, adjust the gain so only green and yellow meters light, and the red LED doesn't light.
(4) Vintage Buttons
Press these buttons to toggle the Vintage Preamps. The Vintage Preamps can be used on mic, line, and instrument inputs.
The Vintage Preamp adds a carefully crafted analog tube preamp emulation, inspired by Universal Audio's all-tube 610 console preamplifier, to the sound. When the button is lit orange, the circuit is active.
UA Support: How to Use Vintage Preamp Mode on Volt USB Audio Inter...
(5) Instrument Buttons (INST)
Press these buttons to toggle the impedance and gain of the line inputs to accommodate Hi-Z instruments, such as electric guitar or bass. These buttons are lit green when the Hi-Z inputs are enabled.
Tip: Generally speaking, the INST button should be off when connecting a line-level source such as a keyboard or sound module, unless you need more gain.
(6) 48V Phantom Power Button
Press this button to toggle 48V phantom power at the XLR microphone inputs. The LED blinks red while phantom power is activating or powering off. The LED is lit solid red when phantom power is active. Both XLR inputs receive phantom power when enabled.
Phantom power is required by most condenser microphones, but is usually not required with dynamic microphones or ribbon microphones (phantom power can damage some ribbon microphones).
 Note: Disable phantom power before you connect or disconnect the microphone.
UA Support: When to Use +48V Phantom Power on UA Audio Interfaces
(7) Monitor Source Buttons

Output pair OUT 1-2 and/or OUT 3-4 must be selected to hear audio from your computer.
The Monitor Source buttons select the audio that you'll hear in the monitor and headphone outputs. When a monitor source button is lit, that source is routed to the speakers and headphones.
You can choose to monitor either the mic/line/instrument inputs (direct monitoring), outputs from the computer, or both.
IN (Direct) – The IN 1-2 and IN 3-4 buttons route Volt's hardware inputs directly to the monitor outputs. Direct monitoring allows you to listen to your inputs through the device, without any software latency.
OUT – The OUT 1-2 and OUT 3-4 buttons route audio from the computer to the monitor outputs. Enable these buttons to hear sound from the audio software.
Monitor source notes
- You can monitor multiple sources at the same time. Enable all sources that you want to route to monitor outputs and headphones.
- Press the MONO button so it is lit blue to listen to the inputs panned to the center. By default, inputs are routed in stereo, so input 1 and 3 are routed to the left output, and input 2 and 4 are routed to the right output.
- You can still hear direct audio from the inputs if IN sources are enabled, even if no OUT sources are enabled for monitoring. In this scenario you can monitor your input sources, even if you are not monitoring any output from the audio software, or when Volt is not connected to a computer.
- When any combination of both IN and OUT sources are enabled, the volume from your audio software is slightly reduced so you can clearly hear your input signals.
The monitor source buttons work as described below.
| Monitor Source Button | Enabled | Disabled |
| IN 1-2 | Hardware inputs 1-2 are routed directly to the monitor and headphone outputs, and also to the audio software. | Hardware inputs 1-2 are routed to the audio software, but not directly to the monitor and headphone outputs. |
| IN 3-4 | Hardware inputs 3-4 are routed directly to the monitor and headphone outputs, and also to the audio software. | Hardware inputs 3-4 are routed to the audio software, but not directly to the monitor and headphone outputs. |
| OUT 1-2 | Audio software outputs 1-2 are routed to the monitor and headphone outputs. | Audio software outputs 1-2 are not routed to monitor and headphone outputs. |
| OUT 3-4 | Audio software outputs 3-4 are routed to the monitor and headphone outputs. | Audio software outputs 3-4 are not routed to monitor and headphone outputs. |
UA Support: How to use Direct Monitoring on Volt USB Audio Interfaces
Default setting
From the factory, OUT 1-2 is selected. With this setting, you hear audio from your computer (most audio software will automatically route audio to outputs 1-2), but your inputs are not directly monitored.
Monitor Source Example
How to listen to preamp inputs and audio software
Select IN 1-2 to hear hardware inputs 1 and 2, and select OUT 1-2 to hear audio from your computer.

(8) Mono Button
Press the mono button to route the monitor source direct inputs in mono instead of stereo. The button lights blue when enabled.
The mono button applies to Volt's hardware inputs only.
(9) Host Indicator
The host indicator is lit blue when Volt is recognized by the computer or device.
(10) Monitor Knob
Rotate this knob to adjust the volume of speakers connected to the Monitor outputs. The output signal level meters indicate the output levels.
(11) Headphone Output
Connect stereo headphones to this output. Headphones are connected with a ¼" (6.35 mm) TRS plug. If your headphones have a ⅛" (3.5 mm) plug, use a TRS ⅛" to ¼" adapter.
(12) Headphone Volume Knob
Adjust the headphone volume with this knob. The headphone volume control is independent from the Monitor volume control.
Note: The monitor output and headphone signals are the same.
Rear Panel

(13) Monitor Outputs
Connect your stereo speaker system to the monitor outputs. Connect the left speaker to Monitor 1/L and the right speaker to Monitor 2/R. You can use TS (tip-sleeve) or TRS (tip-ringsleeve) ¼" (6.35mm) cables.
Monitor notes
- The sources that you hear in the monitor and headphone outputs are assigned using the Monitor Source buttons (11). To hear your computer or software in the monitor speakers and headphones, Monitor Source OUT 1-2 must be enabled. These outputs are enabled by default.
- When you enable direct inputs with the Monitor Source IN buttons, you will hear those inputs on the monitor outputs and the headphone outputs, even if no outputs are selected with the Monitor Source buttons.
Balanced and unbalanced connections
- The outputs on Volt are balanced when connected with TRS connectors to balanced equipment.
- Use TRS (balanced) audio cables for the best results with a balanced stereo speaker system. Balanced equipment uses three conductor wiring to reduce interference and electrical noise, and to provide better audio quality over longer cable runs. TS connections may be suitable for shorter output cables, where electrical interference noise may not be an issue.
Note: The monitor outputs are not powered. You will need to connect the cables to either powered speakers or an amp with speakers.
(14) Line Outputs
Use the line outputs for monitoring unattenuated audio directly from the software. Audio can be assigned to these outputs in your software. These are ¼" balanced outputs. See (11) Monitor Source Buttons for related information.
- Line Outputs 1-2 typically carry the main outputs from your software.
- Line Outputs 3-4 must be specifically assigned as outputs from your software. These can be used for various monitoring purposes.
(15) Line 3-4 Inputs
Connect input sources for line inputs 3-4 here. These are ¼" balanced inputs designed for line level sources, such as synths, external sound modules, or other line-level sources.
Note: There are no gain controls on the line 3-4 inputs. Any level controls must be configured in your software.
(16) MIDI I/O
You can connect a MIDI device to Volt with standard 5-pin MIDI DIN cables. Connect the MIDI OUT of your device to the MIDI IN on Volt, and the MIDI IN of the device to the MIDI OUT on Volt.
You may not need to make both connections. For example, a MIDI controller might only be connected to the MIDI IN on Volt, and a MIDI sound module might only be connected to the MIDI OUT from Volt.
(17) USB-C
Connect Volt to a USB 2.0 (or higher) port on your computer with a USB-C to USB-A cable (included), or with another cable.
For example, you can connect with a USB-C to USB-C cable if your computer has a USB-C port.
For iOS or iPad devices, connect the interface with a USB-C cable (iPads with USB-C) or with the Apple Lightning to USB Camera Adapter (other iPadOS and iOS devices).
Note: Volt is bus powered when connected to ports that meet USB 2.0 specifications. However, some USB ports, such as those on low-quality hubs, don't meet USB specs and cannot supply adequate bus power. If Volt doesn't power on, connect Volt to external 5VDC power to compensate for the underpowered USB port.
(18) 5VDC Power
Volt is bus powered when connected to a USB port that supplies adequate power. You can use the 5VDC connector to connect to power when required (for example, if you want to reduce power drain on an iPad or laptop, or if the USB port or hub is not able to provide enough power).
Tip: You can power Volt by connecting the included USB-A to barrel connector power cable to a USB power adapter, then connecting the barrel plug to this power inlet on Volt.
UA Support: When and Why to use External Power with Volt
(19) Power Switch
Apply power to Volt with this switch.
(20) Kensington Security Slot
Use with Kensington-compatible security devices to secure Volt hardware.
Troubleshooting
| Problem | Solution |
| No power |
|
| Host indicator doesn't light |
|
| Crackling audio, dropouts, glitches | Increase the buffer size setting in the software on your computer. When recording, you can use direct monitoring to record without latency at higher buffer sizes. |
| (PC) ASIO driver not available in DAW | Install the Volt hardware driver with the UA Connect app. |
| Other Issues | [links to cs videos and troubleshooting section] |
Volt 4 Specifications
For Volt specifications, please visit this article.
Documents / Resources
References
![www.uaudio.com]() Volt Start
Volt Start![www.uaudio.com]() UAD Spark
UAD Spark![www.youtube.com]() UA Support: Balanced and Unbalanced Connections Explained - YouTube
UA Support: Balanced and Unbalanced Connections Explained - YouTube![www.youtube.com]() UA Support: How to Use Vintage Preamp Mode on Volt USB Audio Interfaces - YouTube
UA Support: How to Use Vintage Preamp Mode on Volt USB Audio Interfaces - YouTube![www.youtube.com]() UA Support: When to Use +48V Phantom Power on UA Audio Interfaces - YouTube
UA Support: When to Use +48V Phantom Power on UA Audio Interfaces - YouTube![www.youtube.com]() UA Support: How to use Volt Without a Computer - YouTube
UA Support: How to use Volt Without a Computer - YouTube![www.youtube.com]() UA Support: How to use Direct Monitoring on Volt USB Audio Interfaces - YouTube
UA Support: How to use Direct Monitoring on Volt USB Audio Interfaces - YouTube![www.youtube.com]() UA Support: When and Why to use External Power with Volt - YouTube
UA Support: When and Why to use External Power with Volt - YouTube
Download manual
Here you can download full pdf version of manual, it may contain additional safety instructions, warranty information, FCC rules, etc.
Advertisement


Need help?
Do you have a question about the Volt 4 and is the answer not in the manual?
Questions and answers