Table of Contents
Advertisement
Quick Links
02.09.2024, 12:58
Browse help topics
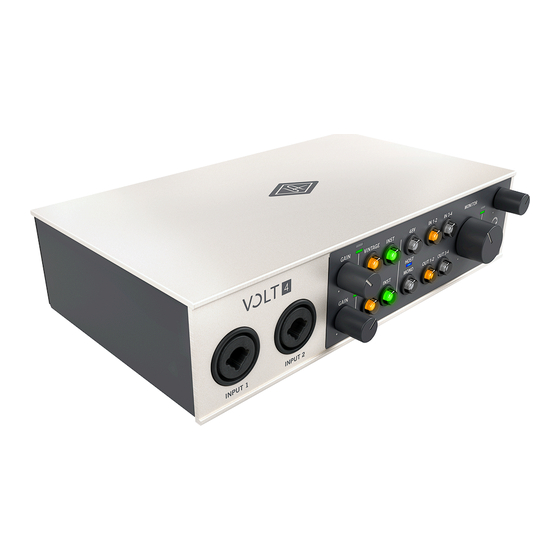
Volt 4 Hardware Manual
Updated 10 months ago
This article contains complete instructions for Volt 4 hardware controls and
connections.
Note: To learn how to set up Volt with audio software and how to redeem
your bundled software, please see UA Connect with Volt Interfaces.
Article Contents
Getting Started
Introduction & Overview
Volt 4 Hardware Descriptions
Troubleshooting
Volt 4 Specifications
https://help.uaudio.com/hc/en-us/articles/8588391492372-Volt-4-Hardware-Manual
Volt 4 Hardware Manual – Universal Audio Support Home
1/17
Advertisement
Table of Contents

Related Manuals for Universal Audio Volt 4


Summary of Contents for Universal Audio Volt 4
- Page 1 Browse help topics Volt 4 Hardware Manual Updated 10 months ago This article contains complete instructions for Volt 4 hardware controls and connections. Note: To learn how to set up Volt with audio software and how to redeem your bundled software, please see UA Connect with Volt Interfaces.
-
Page 2: Getting Started
— and our goal is to make your investment pay off. Universal Audio’s family of audio interfaces represent the best examples of what UA has stood for over its long history; from its original founding in the 1950s by my father, to our current vision of delivering the best of both analog and digital audio technologies. - Page 3 Few sounds can compare to a vintage Universal Audio 610 tube preamp, the same preamp used to record everyone from Ray Charles to Van Halen. Volt 4 gives you the rich, full sound of this iconic UA preamp, thanks to its built‑in tube emulation circuitry, a UA exclusive.
-
Page 4: Key Features
Volt 4 Hardware Manual – Universal Audio Support Home Easy In, Easy Out Volt 4 gives you simple audio connections to quickly get started. Just plug your mics and guitars into the front panel preamps, and use the line inputs for synths and drum machines. Then connect your speakers or headphones to monitor your audio with no latency. -
Page 5: System Requirements
02.09.2024, 12:58 Volt 4 Hardware Manual – Universal Audio Support Home Vintage Mic Preamp mode lets you record voice or guitar with the rich, full sound of a classic UA tube preamp Essential suite of audio and music software including Ableton, Melodyne, UJAM’s Virtual... - Page 6 02.09.2024, 12:58 Volt 4 Hardware Manual – Universal Audio Support Home (1) XLR/TRS Combo Inputs Connect your microphones, instruments, or line level sources here. The combo input connectors accept XLR and ¼” (6.35 mm) plugs. A microphone is typically connected with an XLR connector, and an instrument or line level signal is connected with a ¼”...
- Page 7 02.09.2024, 12:58 Volt 4 Hardware Manual – Universal Audio Support Home UA Support: Balanced and Unbalanced Connections Explained UA Support: Balanced and Unbalanced Connections Explained (2) Gain Knobs These knobs adjust the preamp gain for the microphones, instruments, or line level devices attached to the associated inputs.
- Page 8 Volt 4 Hardware Manual – Universal Audio Support Home The Vintage Preamp adds a carefully crafted analog tube preamp emulation, inspired by Universal Audio’s all-tube 610 console preamplifier, to the sound. When the button is lit orange, the circuit is active. ...
- Page 9 02.09.2024, 12:58 Volt 4 Hardware Manual – Universal Audio Support Home Note: Disable phantom power before you connect or disconnect the microphone. UA Support: When to Use +48V Phantom Power on UA Audio Interfaces UA Support: When to Use +48V Phantom Power on UA Audio Interfaces...
- Page 10 02.09.2024, 12:58 Volt 4 Hardware Manual – Universal Audio Support Home You can monitor multiple sources at the same time. Enable all sources that you want to route to monitor outputs and headphones. Press the MONO button so it is lit blue to listen to the inputs panned to the center. By default, inputs are routed in stereo, so input 1 and 3 are routed to the left output, and input 2 and 4 are routed to the right output. ...
- Page 11 02.09.2024, 12:58 Volt 4 Hardware Manual – Universal Audio Support Home UA Support: How to use Direct Monitoring on Volt USB Audio Interfaces UA Support: How to use Direct Monitoring on Volt USB Audio Interfaces Default setting From the factory, OUT 1-2 is selected. With this setting, you hear audio from your computer (most audio software will automatically route audio to outputs 1-2), but your inputs are not directly monitored.
-
Page 12: Host Indicator
02.09.2024, 12:58 Volt 4 Hardware Manual – Universal Audio Support Home Press the mono button to route the monitor source direct inputs in mono instead of stereo. The button lights blue when enabled. Important: The mono button applies to Volt’s hardware inputs only. -
Page 13: Monitor Outputs
02.09.2024, 12:58 Volt 4 Hardware Manual – Universal Audio Support Home (13) Monitor Outputs Connect your stereo speaker system to the monitor outputs. Connect the left speaker to Monitor 1/L and the right speaker to Monitor 2/R. You can use TS (tip-sleeve) or TRS (tip-ring- sleeve) ¼”... - Page 14 02.09.2024, 12:58 Volt 4 Hardware Manual – Universal Audio Support Home Note: The monitor outputs are not powered. You will need to connect the cables to either powered speakers or an amp with speakers. (14) Line Outputs Use the line outputs for monitoring unattenuated audio directly from the software. Audio can be assigned to these outputs in your software.
- Page 15 02.09.2024, 12:58 Volt 4 Hardware Manual – Universal Audio Support Home For example, you can connect with a USB-C to USB-C cable if your computer has a USB-C port. For iOS or iPad devices, connect the interface with a USB-C cable (iPads with USB-C) or with the Apple Lightning to USB Camera Adapter (other iPadOS and iOS devices).
-
Page 16: Kensington Security Slot
02.09.2024, 12:58 Volt 4 Hardware Manual – Universal Audio Support Home Apply power to Volt with this switch. (20) Kensington Security Slot Use with Kensington-compatible security devices to secure Volt hardware. Troubleshooting Problem Solution No power Make sure Volt is connected to a port that meets USB 2.0 specifications. - Page 17 02.09.2024, 12:58 Volt 4 Hardware Manual – Universal Audio Support Home Volt 4 Specifications For Volt specifications, please visit this article. https://help.uaudio.com/hc/en-us/articles/8588391492372-Volt-4-Hardware-Manual 17/17...
Need help?
Do you have a question about the Volt 4 and is the answer not in the manual?
Questions and answers