
Related Manuals for NAD T775 HD


Summary of Contents for NAD T775 HD
- Page 1 T 775 ® AV Surround Sound Receiver Owner’s Manual Manuel d’Installation Manual del Usuario Manuale delle Istruzioni...
-
Page 2: Important Safety Instructions
IMPORTANT SAFETY INSTRUCTIONS 1. Read instructions - All the safety and operating instructions should be NOTE TO CATV SYSTEM INSTALLER read before the product is operated. This reminder is provided to call the CATV system installer’ s attention to Section 820-40 of 2. - Page 3 NAD is a trademark of NAD Electronics International, a division of Lenbrook Industries Limited Copyright 2009, NAD Electronics International, a division of Lenbrook Industries Limited...
-
Page 4: Table Of Contents
NAD IPD 2 ........ -
Page 5: Introduction
Packed with your T 775 is the NAD HTR 3 remote control, a full-system remote especially designed for easy use and understanding. Be sure to read Dolby Pro Logic IIx Music and DTS Neo: 6 Music modes can also create the section “Using the HTR 3 Remote Control”, to familiarize yourself with... -
Page 6: Getting Started
Suffice it to say that these two questions will influence your system’s ultimate performance every bit as powerfully as your selection of electronics and speakers. Your NAD audio specialist dealer will be happy to advise you and to recommend reference materials. -
Page 7: Dealing With Hum And Noise
INTRODUCTION GETTING STARTED DEALING WITH HUM AND NOISE Hum and noise may sometimes prove a challenge in complex, multi-channel audio systems. Note these considerations to help prevent hum and noise problems: • Power all your system's audio component from AC outlets originating from the same circuit of your house wiring. -
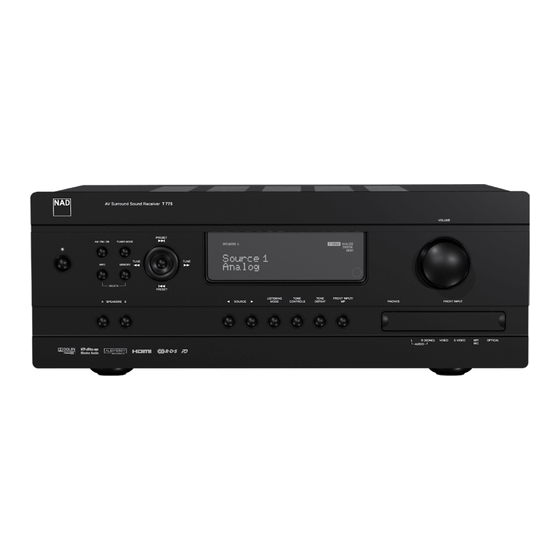
Page 8: Identification Of Controls
IDENTIFICATION OF CONTROLS FRONT PANEL 1 STANDBY BUTTON : Press this button or the HTR 3 remote’s [ON] 4 AM/FM/DB : Toggle this button to select either AM, FM, DAB (230V button to switch ON the T 775. The Standby LED indicator will turn from version only) or XM (120V version only) tuner functions. - Page 9 IDENTIFICATION OF CONTROLS FRONT PANEL 10 VOLUME : Use this control to adjust the volume level of the main 17 PHONES : Accepts stereo headphone using a standard 1/4-inch stereo speakers. The default volume level is -20dB. The VOLUME knob is also phone plug (use a suitable adapter for headphones equipped with a used to increment / decrement other adjustable parameters like Tone smaller plug).
-
Page 10: Rear Panel
4 MP DOCK: The T 775 is equipped with a data port in the rear panel HDTV satellite/cable box. Connect the HDMI Monitor OUT to a HDTV or where an optional NAD IPD (NAD IPD Dock for iPod), NAD IPD 2 and projector with HDMI input. - Page 11 OUT when Source 3 (AUDIO 3 IN/VIDEO 3 IN/S VIDEO 3 IN) is selected. output port into this socket. The T 775 is compatible only with NAD Likewise, there will be no output at AUDIO 4 OUT/ VIDEO 4 OUT/S- DAB Adaptor DB 1 so check with your NAD dealer for this module’s...
- Page 12 T 775 only) or 230V 50 Hz (for 230V version models T 775 only). Always disconnect the AC Mains cable plug from the live wall socket first, before All NAD products with IR IN/IR OUT features are fully compatible with disconnecting the cable from the T 775 Mains input socket.
-
Page 13: Operation
OPERATION USING THE T 775 – MAIN MENU ABOUT THE ON-SCREEN DISPLAY (OSD) LISTENING MODE The T 775 receiver employs a simple, self-explanatory system of on-screen display “menus” that will appear on the connected video monitor/TV. These are required during the setup process (and are useful in day-to-day operation), so be sure to connect the monitor/TV before proceeding with setup. -
Page 14: Adjusting Listening Modes
Panorama (On/Off): Adds a “wraparound” effect by extending some reproduced with proprietary NAD surround processing with signals output to the front left/right, center and discrete left/right surround channels, stereo content into the surround channels. -
Page 15: Dsp Options
Even at lower listening NAD: Ideal “in room” response developed by NAD engineers along with volumes, Dynamic Volume ensures that the richness and dynamics of the Audyssey Engineers. -
Page 16: Tone Controls
OPERATION USING THE T 775 – MAIN MENU TONE CONTROLS ZONE CONTROLS The T 775 has three Tone Control levels – Treble, Bass and Center Dialog. Depending on the settings made at the separate ‘Zone Setup’ menu under Bass and Treble controls only affect the low bass and high treble leaving the the ‘Setup Menu’... -
Page 17: Using The T 775 - Setup Menu
OPERATION USING THE T 775 – SETUP MENU SETUP MENU SOURCE The T 775 is equipped with ten configurable Sources. The settings for each Source are dependent on the configurations set forth in the parameters for that particular Source window. To change or toggle through the Sources, scroll to ‘Source’... - Page 18 OPERATION USING THE T 775 – SETUP MENU ANALOG AUDIO DIGITAL AUDIO The T 775 has nine analog audio inputs including 7.1 input. These analog To take advantage of the T 775’s high performance surround and digital inputs - Audio 1, Audio 2, Audio 3, Audio 4, Audio 5, Audio 6, Audio Front, audio circuitry, it is advisable that its Digital Audio inputs are selected.
- Page 19 OPERATION USING THE T 775 – SETUP MENU VIDEO FORMAT CONVERSION TRIGGER OUT The T 775 is equipped with a Video Format Converter. This allows for a The Trigger Out for a particular Source is dependent on the configurations simplified video connection between the T 775 and your TV Monitor when done in a separate menu on Trigger Setup (See ‘Trigger Setup’...
-
Page 20: Source Setup (Table View)
Enabled : Select ‘Yes’ to enable iPod as a Source or ‘No’ to disable it. Auto Connect : Select ‘Yes’ to automatically enable and connect the iPod player docked in the linked NAD iPod docking station when Source The following measurements are performed: • Detection : Speaker configuration is detected including number of... - Page 21 Audyssey engineers developed what we believe is the ideal of surround sound, and can also distort the tonal balance of the system. ‘in room’ response curve. We include this NAD EQ, along with an Audyssey Professional Acoustical Engineers often add wall treatments and even move developed EQ as the two best choices.
-
Page 22: Speaker Configuration
OPERATION USING THE T 775 – SETUP MENU SPEAKER CONFIGURATION Speaker Configuration can be managed and adjusted by pressing a combination of and then keys. Set ‘Front, ’ ‘Center, ’ and ‘Surround’ to “Large, ” “Small” or “Off” as your subsystem’s speakers require. The ‘Back’... -
Page 23: Speaker Distance
OPERATION USING THE T 775 – SETUP MENU SPEAKER DISTANCE The SPL meter should be placed at the primary listening position, at approximately the height of the seated listener’s head. A tripod is helpful but with a little duct tape almost anything — a pole lamp, music-stand, or ladder-backed chair, for example —... -
Page 24: Adjusting Channel Levels 'On The Fly
This setting is also used for multi-zone installations using subwoofer level. passive ‘impedance matching’ volume controls. See your NAD dealer for specific information about integrating your NAD Receiver into a multi-room Use the HTR 3’s ’SURR, ’ ‘CENT’ and ‘SUB’ keys for direct-access level audio distribution system. -
Page 25: Trigger Setup
OPERATION USING THE T 775 – SETUP MENU TRIGGER SETUP LISTENING MODE SETUP The T 775 features three configurable +12V DC Trigger Output that can be The T 775 has various listening mode options and is mostly configurable. used to activate a component or system it is fed into. A Trigger Input is also These are provided to reproduce a variety of sound effects depending available to turn on the applicable link it is associated to. - Page 26 OPERATION USING THE T 775 – SETUP MENU DOLBY DIGITAL PLUS Dolby Digital Plus is the next-generation audio technology for all high- The Digital Theater System Digital Surround (simply called DTS) is a multi- definition programming and media. It combines the efficiency to meet channel digital signal format that can process higher data rates than with Dolby future broadcast demands with the power and flexibility to realize the full Digital.
-
Page 27: Dolby Setup
OPERATION USING THE T 775 – SETUP MENU DOLBY SETUP DTS SURROUND MODES The following are further descriptions about the DTS surround modes. DTS-HD MASTER AUDIO DTS-HD Master Audio is a technology that delivers master audio sources recorded in a professional studio to listeners without any loss of data, preserving audio quality. -
Page 28: Enhanced Stereo
Color bit rate and the luma and chroma components. For a better for DTS-ES Matrix 6.1 to achieve 6.1-channel surround playback. DTS Neo: 6 understanding of these video details, consult with your NAD Audio surround includes two modes for selecting the optimum decoding of the Specialist or your distributor’s technical department. -
Page 29: A/V Presets
OPERATION USING THE T 775 – SETUP MENU A/V PRESETS The T 775’s simple but powerfully flexible system of ‘Presets’ allows you to customize virtually every aspect of your audio-video playback, and recall them with a single key-press. The parameters ‘Listening Mode, ’ ‘DSP Options’ and ‘Tone Controls’... -
Page 30: Using The T 775 - Am/Fm/Db/Ipod
OPERATION USING THE T 775 – AM/FM/DB/iPod LISTENING TO AM/FM RADIO TUNING STATIONS The T 775’s internal AM/FM tuner offers very high quality sound from radio 1 Press TUNE on the front panel momentarily to step up or down broadcasts. The reception and sound quality will always be dependent to a between AM or FM frequencies. -
Page 31: About User Names
• In XM mode and with DEVICE SELECTOR set to “TUNER”, HTR 3’s [FM NOTE MUTE] button has the same function as that of the front panel’s [TUNER One can store the same channel in two preset locations - one with MODE] button. TUNER MODE On and another with TUNER MODE Off. • Check with your NAD audio specialist for other versions of XM Mini- Tuner compatible with T 775. ABOUT USER NAMES IMPORTANT NOTICE You can assign an eight character “User Name” to each radio preset, which will show in the front-panel readout whenever that preset is recalled. Unless otherwise specifically stated, navigating or accessing XM functions... -
Page 32: Listening To Dab Radio
NAD-specified outboard DAB 3 Upon selecting either “Full Scan” or “Local Scan”, automatic scanning module – the NAD DAB Adaptor DB 1. All the control software for this format is included; just plug-in the module and start enjoying the CD-like will be performed. -
Page 33: Service List
OPERATION USING THE T 775 – AM/FM/DB/iPod 4 The strength of the incoming signal can be shown on the VFD by pressing the [ENTER] button. The more segments visible in the lower The level of compression of stations can be set to eliminate the differences display line, the stronger the signal. -
Page 34: Reset
USING THE T 775 – AM/FM/DB/iPod RESET INFORMATION SETTINGS The “Reset” option allows the connected (and separately sold) NAD DAB While listening to a DAB broadcast, the type of information displayed in the Adaptor DB1 to be reset to its factory default settings. -
Page 35: Listening To Your Ipod Player
SCAN [ ] / PAUSE [ ] / PLAY [ ] 1 With your T 775, iPod player and NAD IPD all at power ON state, select Press PAUSE [ ] during playback to stop playback temporarily. Resume play SOURCE 5 of your T 775. Your iPod player will show in its display the by pressing PAUSE [ ] again or PLAY [ ]. -
Page 36: Nad Ipd 2
TO VIEW VIDEOS OR PHOTOS LOADED IN YOUR iPod The NAD IPD 2 has its own remote control - the DR 1. For you to control the Videos or photos uploaded in your iPod can be viewed directly via the NAD IPD 2 using the DR 1, you have to go to “iPod Setup”... -
Page 37: Using The Htr 3 Remote Control
• Contains pre-programmed library of NAD remote codes. The NAD HTR 3 is ready to operate the T 775 A/V Receiver right out of the box, but it is really eight remotes in one. Each of the 8 Device Selector keys at the top of the handset can call up a new “page”... -
Page 38: Learning Codes From Other Remotes
OPERATION USING THE HTR 3 REMOTE CONTROL LEARNING CODES FROM OTHER REMOTES Begin by positioning the HTR 3 “nose-to-nose” with the source remote so the two devices’ infrared windows are about 2 inches apart. • Enter Learning Mode: On the HTR 3, simultaneously press-and-hold for 3 seconds both a Device Selector key and the [RES] key (just below the DISP key) until the Learn LED at the center of the HTR 3 turns steady green. -
Page 39: Macro Commands
OPERATION USING THE HTR 3 REMOTE CONTROL MACRO COMMANDS A “macro” command is a series of two or more remote codes issued automatically from a single keypress. You might use a macro to automate a simple command sequence, such as, “Turn on the DVD player and then press PLAY”. -
Page 40: Factory Reset
DELETE MODE The HTR 3 can store learned, copied, and “default library” commands on any single key (The default library commands are the pre-programmed NAD codes, such as the native T 775 commands on the [AMP] “page. ” ). You can delete commands by layers back “down” to the default library command on any key, removing learned commands, punched-through functions, and copied keys. -
Page 41: Loading Code-Libraries
LOADING CODE-LIBRARIES The HTR 3 can store a different library of default NAD codes for each of its Device Selector “pages. ” If the original default library does not control your NAD CD player, tape deck, DVD player, or other component, follow the procedure below to change the code-library. -
Page 42: Checking Code-Library Number
OPERATION USING THE HTR 3 REMOTE CONTROL CHECKING CODE-LIBRARY NUMBER You can check the current code-library on any Device Selector key as follows. Enter Library Mode by simultaneously pressing-and-holding for 3 seconds both the desired component’s Device Selector key and the [AVPS] key, until the Learn LED turns green. Press the [DISP] key; the HTR 3 indicates the current code-library by flashing its [CUSTOM], [VCR], and [MACRO] keys. -
Page 43: Reference
REFERENCE TROUBLESHOOTING CONDITION POSSIBLE CAUSES POSSIBLE SOLUTIONS No sound from all channels. • AC power unplugged. • Check AC cable connection and outlet. • Power not switched on. • Outlet has no power. • Speaker A (or Speaker B) is not activated. • Activate Speaker A (or Speaker B) by pressing the corresponding front panel or HTR 3 button. -
Page 44: Specifications
REFERENCE SPECIFICATIONS AMPLIFIER SECTION Power output Stereo Mode 130W (21.1dBW) (8 ohms within rated distortion) IHF dynamic power; 8 ohms 200W (23dBW) IHF dynamic power; 4 ohms 340W (25.3dBW) Power output Surround Mode 7 x 100W (20dBW) Total harmonic distortion at rated power <0.08% IM distortion at rated power <0.08%... - Page 46 All rights reserved. NAD and the NAD logo are trademarks of NAD Electronics International, a division of Lenbrook Industries Limited. No part of this publication may be reproduced, stored or transmitted in any form without the written permission of NAD Electronics International.
Need help?
Do you have a question about the T775 HD and is the answer not in the manual?
Questions and answers