Advertisement
Quick Links
Advertisement

Subscribe to Our Youtube Channel
Related Manuals for IKEA RANSBERG


Summary of Contents for IKEA RANSBERG
- Page 1 INSTALLATION INSTRUCTIONS RANSBERG...
- Page 2 ENGLISH FRANÇAIS ESPAÑOL INSTALLER: Leave Assembly INSTALLATEUR : laissez les INSTALADOR: Deje las Instruction with owner. instructions d’assemblage instrucciones de montaje al au propriétaire. propietario. OWNER: Read your PROPRIÉTAIRE : lisez le PROPIETARIO: Lea el dishwasher User Manual. It contains important safety manuel d’utilisation de votre manual de usuario de su information for operating...
- Page 3 WARNING AVERTISSEMENT ADVERTENCIA Electric Shock Hazard Risque d’électrocution Peligro de descarga eléctrica Disconnect electrical Débranchez l’alimentation power at the fuse box or électrique au niveau du Desconecte la energía circuit breaker box before coffret à fusibles ou du eléctrica en la caja de beginning installation.
- Page 4 ENGLISH FRANÇAIS ESPAÑOL Do not install the appliance N’installez pas l’appareil No instale el aparato solo. alone. seul(e). ENGLISH FRANÇAIS ESPAÑOL Protect the floor during the Protégez le sol lors de Proteja el suelo durante la installation. l’installation. instalación. ENGLISH FRANÇAIS ESPAÑOL Keep children away during...
- Page 5 ENGLISH FRANÇAIS ESPAÑOL Do not use any extention N’utilisez pas de rallonges. No utilice cables de cables. extensión. ENGLISH FRANÇAIS ESPAÑOL If you need help contact the Si vous avez besoin d’aide, Si necesita ayuda, póngase Authorised Service Center. contactez le centre de en contacto con el Servicio service agréé.
- Page 6 ENGLISH FRANÇAIS ESPAÑOL Below components are Les éléments suivants Los siguientes componentes needed during the sont nécessaires à son necesarios durante la installation. l’installation. instalación. Phillips-head (PH2) Tape Level Ruban adhésif Niveau Screwdriver Cinta Nivel Tournevis cruciforme (PH2) Destornillador Phillips (PH2) Flat-bladed Screwdriver Safety Glasses Measuring Tape...
- Page 7 ENGLISH FRANÇAIS ESPAÑOL Below components are Les composants ci-dessous Los siguientes available with dishwasher. sont disponibles avec le componentes vienen con el lave-vaisselle. lavavajillas. Screw Screw Screw Top hook Crochet supérieur Tornillo Tornillo Tornillo Gancho superior Side bracket Lower bracket Rubber side filler Side cover Support latéral...
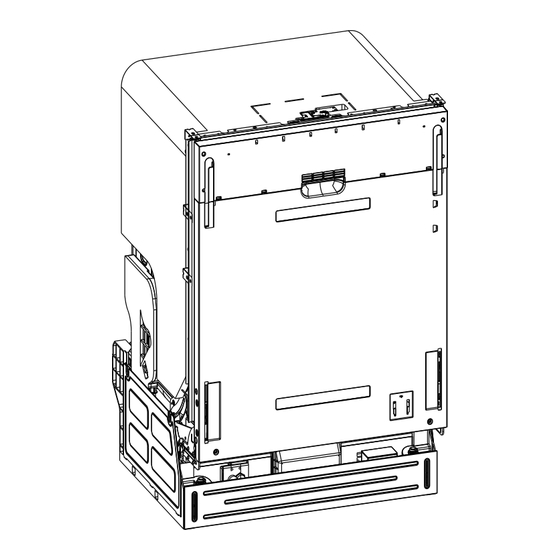
- Page 8 " " ENGLISH FRANÇAIS ESPAÑOL External dimensions of the Dimensions extérieures du Dimensiones exteriores del dishwasher. lave-vaisselle. lavavajillas.
- Page 9 Electrical, water, and drain lines must be confined to shaded area. Les lignes électriques et les 4 1/2" conduites d’eau et d’évacuation 87,6 doivent être confinées à la zone ombragée. Las líneas eléctricas, de agua y de drenaje deben limitarse a las áreas sombreadas.
- Page 10 Câble d’alimentation Power cable Cable de energía Water supply line Conduite d’eau Línea de suministro de agua ENGLISH WARNING The hot water line may pass through the same hole as the electrical and drain hose. FRANÇAIS AVERTISSEMENT La conduite d’eau chaude peut passer par le même trou que les câbles électriques et le tuyau de vidange.
- Page 11 ENGLISH FRANÇAIS ESPAÑOL WARNING AVERTISSEMENT ADVERTENCIA If not installed in the final Si l’appareil n’est pas Si aún no se ha instalado location, we recommend installé à son en la ubicación definitiva, opening the door with two emplacement définitif, il recomendamos abrir la people as shown above.
- Page 12 ENGLISH FRANÇAIS ESPAÑOL WARNING AVERTISSEMENT ADVERTENCIA Electric Shock Hazard Risque d’électrocution Peligro de descarga eléctrica Observe all local codes Respectez tous les codes and ordinances for et règlements locaux Respete todos los códigos electrical and plumbing concernant les y disposiciones locales connections.
- Page 13 ENGLISH Remove the kickplate. Don’t throw the screws and the kickplate to the garbage. FRANÇAIS Retirez la plaque d’appui. Ne jetez pas les vis et la plaque à la poubelle. ESPAÑOL Retire la placa de protección. No arroje los tornillos y la placa de protección a la basura.
- Page 14 ENGLISH FRANÇAIS ESPAÑOL Install the filler piece Installez la garniture Instale la pieza de relleno...
- Page 15 x” (cm) ~ x-1/16” (~ x-0.2cm) ENGLISH FRANÇAIS ESPAÑOL Start measuring the niche Commencez par mesurer la Comience a medir el and level the dishwasher niche et mettez le espacio de instalación y with manual screwdriver for lave-vaisselle à niveau à nivele el lavavajillas con un rear and front legs.
- Page 16 Green to green(ground) Vert à vert (terre) Verde a verde (línea a tierra) White to white(nuetral) Blanc à blanc (neutre) Blanco a blanco (neutro) Black to black(hot) Noir à noir (phase) Negro a negro (energizado) ENGLISH Install to power, make sure that all of the connections are secure. installation must be done by professional.
- Page 17 Water supply line Power cable Conduite d’eau Câble d’alimentation Línea de suministro Cable de energía de agua Tilting machine, fix the cables with back and front hook En inclinant l’appareil, fixez les câbles à l’aide des crochets arrière et avant. Inclinando el aparato, fije los cables a los ganchos trasero y delantero.
- Page 18 ENGLISH FRANÇAIS ESPAÑOL Measure the niche width Mesurez la largeur de la Mida el ancho del espacio and the depth of the top. niche et la profondeur du de instalación y la Cut the steam protection as dessus. Coupez le profundidad de la parte shown above.
- Page 19 ENGLISH FRANÇAIS ESPAÑOL Remove the adhesive strip Retirez la bande adhésive Retire la tira adhesiva de from the steam protection du pare-vapeur et protección de vapor y and apply the steam appliquez le pare-vapeur aplique la protección de protection to niche top sur la surface supérieure vapor en la superficie surface and the cabinet.
- Page 20 Rubber side filler Garniture latérale en caoutchouc Relleno lateral de goma Look from the square hole to find the right installation position Regardez à travers le trou carré pour trouver la bonne position d’installation Mire a través del orificio cuadrado para encontrar la posición de instalación correcta ENGLISH...
- Page 21 side bracket support latéral soporte lateral Cut the brackets Install the brackets Coupez les supports Installez les supports Corte los soportes Instale los soportes ENGLISH FRANÇAIS ESPAÑOL Install the brackets. Installez les supports. Instale los soportes.
- Page 22 ENGLISH For full wooden panel, please use enclosed drilling template (H) and proceed with the following steps. FRANÇAIS Pour un panneau en bois plein, utilisez le gabarit de perçage joint (H) et suivez les étapes suivantes. ESPAÑOL Para paneles completamente de madera, utilice la plantilla de perforación adjunta (H) y continúe con los siguientes pasos.
- Page 23 ENGLISH For divided wooden panels please use VÅGLIG rails and proceed with the following steps. VÅGLIG should be purchased before installation FRANÇAIS Pour les panneaux en bois divisés, utilisez les rails VÅGLIG et suivez les étapes suivantes. Les rails VÅGLIG doivent être achetés avant l’installation ESPAÑOL Para paneles de madera...
- Page 24 Weight Min. (3Kg / 6.6lbs) Max. (8Kg./ 16.6lbs) Poids Min. (3Kg / 6.6lbs) Max. (8Kg./ 16.6lbs) Peso Mín. (3Kg / 6.6lbs) Máx. (8Kg./ 16.6lbs) Can be adjust to below range by after service: Weight Min. (2.5Kg / 5.5lbs) Max. (11.5Kg./ 25.3lbs) (i) check Page 35 Peut être réglé...
- Page 25 ( H ) ( W ) ENGLISH Cut the template and use adhesive fix the paper template and With light pressure. align paper template "TOP" edge with the top surface of the Front. FRANÇAIS Découpez le gabarit et utilisez du ruban adhésif pour fixer le gabarit en papier et, en exerçant une légère pression, alignez le bord marqué...
- Page 26 ENGLISH FRANÇAIS ESPAÑOL Mark the drilling holes. Marquez les trous à Marque los agujeros de percer. perforación.
- Page 27 Ø " Ø 2 mm ENGLISH Remove the template and drill with a Ø 5/64"(2mm) drill to make the pre-holes. Do not drill more than 5 mm. FRANÇAIS Retirez le gabarit et percez les avant-trous à l’aide d’un foret de Ø 2 mm. Ne percez pas plus de 5 mm.
- Page 28 ENGLISH Install the top hooks and lower brackets and stickers, please make sure all brackets are positioned straight, not diagonal. FRANÇAIS Placez les crochets supérieurs et les supports inférieurs ainsi que les autocollants, en veillant à ce que tous les supports soient positionnés en ligne droite et non en diagonale. ESPAÑOL Instale los ganchos superiores, los soportes inferiores y los adhesivos, por favor asegúrese de que todos los soportes están colocados en línea recta, no en diagonal.
- Page 29 M4X6 ENGLISH When using divided panels, follow this page. FRANÇAIS Si vous utilisez des panneaux divisés, suivez cette page. ESPAÑOL Si utiliza paneles divididos, siga el dibujo de esta página.
- Page 30 ENGLISH Rotate the side cover, do not bend the plastic cover. FRANÇAIS Faites pivoter le couvercle latéral, ne pliez pas le couvercle en plastique. ESPAÑOL Gire la cubierta lateral, no doble la cubierta de plástico.
- Page 31 Be careful not to pinch your fingers at the pointed areas. Veillez à ne pas vous pincer les doigts aux endroits pointus. Tenga cuidado de no aprisionarse los dedos en las áreas señaladas. ENGLISH Install the top bracket first, then slide the front to down to match the lower bracket position.
- Page 32 x(height of next door top surface from floor) x (hauteur de la surface supérieure de la porte suivante par rapport au sol) x (altura de la superficie superior de la puerta contigua desde el suelo) x” (cm) ENGLISH Locate the dishwasher near the niche, then adjust the height of the front to match the top surface of next door.
- Page 33 ENGLISH Rotate back the side cover, do not bend it. FRANÇAIS Faites pivoter le couvercle latéral vers l’arrière, sans le plier. ESPAÑOL Gire a su posición la cubierta lateral, sin doblarla.
- Page 34 ENGLISH Insert the drain hose into the hole in the cabinet wall. FRANÇAIS Insérez le tuyau d’évacuation dans le trou de la paroi de l’armoire. ESPAÑOL Inserte la manguera de desagüe en el orificio de la pared del gabinete.
- Page 35 ENGLISH Adjust the door balance according to the weight of the Front. FRANÇAIS Réglez l’équilibre de la porte en fonction du poids de la façade. ESPAÑOL Ajuste el equilibrio de la puerta según el peso del frente.
- Page 36 conductors and connected to the ENGLISH appliance‘s equipment grounding Connect inlet hose and electrical terminal or lead. It is the consumer‘s connection. responsibility to contact a qualied installer to make sure the electrical installation conforms with the National WARNING Electrical Code and local codes and Risk of property damage ordinances.
- Page 37 qualifié à l’aide de matériaux reconnus Tous les raccordements électriques par la norme UL et les codes locaux. doivent être confinés dans le boîtier de raccordement. Ne pas utiliser de rallonge. Cela pourrait entraîner un incendie, une électrocution Cet appareil est équipé de fils ou d’autres blessures corporelles.
- Page 38 ENGLISH FRANÇAIS ESPAÑOL Align the appliance with Alignez l’appareil avec le Alinee el aparato con el the adjacent kitchen meuble de cuisine gabinete de cocina cabinet. adjacent. adyacente.
- Page 39 ENGLISH Mark the position of the machine in the cabinet. FRANÇAIS Marquez la position de l’appareil dans l’armoire. ESPAÑOL Marque la posición del aparato en el gabinete.
- Page 40 Make sure the mark didn't move. Assurez-vous que la marque n’a pas bougé. Asegúrese de que la marca no se haya movido. ENGLISH Fix the machine to kitchen system. FRANÇAIS Fixez l’appareil au système de cuisine. ESPAÑOL Fije el aparato al mueble de la cocina.
- Page 41 Reinstall the kickplate to the dishwasher Réinstallez la plaque d’appui sur le lave-vaisselle Vuelva a instalar la placa protectora en el lavavajillas.
- Page 44 © Inter IKEA Systems B.V. 2024 23328 AA-2448431-2...
Need help?
Do you have a question about the RANSBERG and is the answer not in the manual?
Questions and answers
how to adjust the spring rate on the door
Adjust the door balance according to the weight of the front panel.
This answer is automatically generated