Advertisement
Quick Links
Advertisement

Subscribe to Our Youtube Channel
Related Manuals for Giada IB3-771


Summary of Contents for Giada IB3-771
- Page 1 - 1 -...
- Page 2 The copyright of this manual belongs to Shenzhen JIEHE Technology Development Co., Ltd. (Giada, JIEHE’s global brand) and all rights are reserved. The company reserves the right to change this manual at any time without notification. Specifications here are for reference only, please take the real product as standard.
- Page 3 Table of Contents 1.Product Introduction ..................- 4 - 2. Hardware Specifications ................- 4 - 3. Hardware Usage Instruction ..............- 6 - 3.1 Dimension Chart ................- 6 - 3.2 Interface Definition ................- 6 - 3.2.1 Board Jumper, Header And Interface Diagram ....... - 6 - 3.2.2 Board Jumper And Header Definition ........
- Page 4 1.Product Introduction The ARM-based motherboard IB3-771 is equipped with RK3588 CPU, which integrated a built-in NPU that supports INT4/INT8/INT16/FP16 hybrid operation and its AI performance is up to 6TOPs. This embedded SBC features with onboard 8GB dual-channel LPDDR4x memory, supports eMMC5.1 onboard storage, provides a SATA3.0 connector, supports 8K Display and Android 12, and can be used in a variety of applications, such as digital signage, edge computing, kiosks and other AIoT solutions.
- Page 5 1 × HDMI (Max. 7680 × 4320 @60 Hz) Display Output 1 × HDMI (Max. 3840 × 2160 @60 Hz) 1 x HDMI-IN (Max. 3840 x 2160 @60 Hz) Ethernet Interface 2 x RJ45 Button 1 x Power on, 1 x Recovery USB Pin 6 x USB2.0, signal by 6 x 4pin USB header 1 x 20pin eDP (Max.
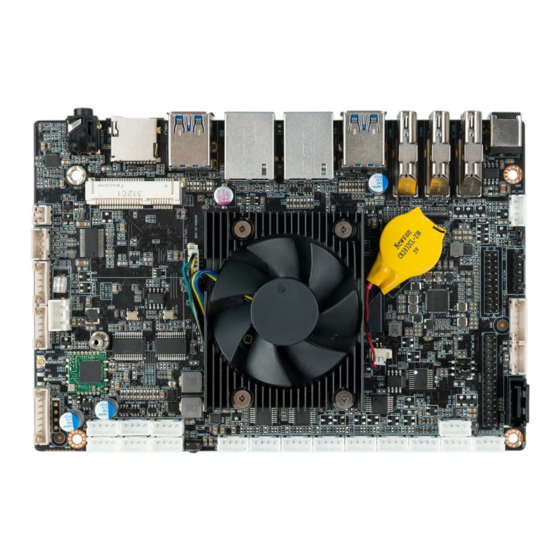
- Page 6 3. Hardware Usage Instruction 3.1 Dimension Chart 3.2 Interface Definition 3.2.1 Board Jumper, Header And Interface Diagram - 6 -...
- Page 7 3.2.2 Board Jumper And Header Definition Jumper Function PIN Definition /Header MIC1 2 pin MIC SPK1 4 pin SPK SPI1 SPI2 - 7 -...
- Page 8 Reserved GPIO interface, IO_KEY1 power switch interface, Recovery interface 7 JUSB1 USB2.0 pin JUSB2 USB2.0 pin JUSB3 USB2.0 pin JUSB4 USB2.0 pin JUSB5 USB2.0 pin - 8 -...
- Page 9 JUSB6 USB2.0 pin UART_F1 RS485 pin UART_F2 RS485 pin UART_F3、 TTL pin UART_F4 - 9 -...
- Page 10 UART_F3、 TTL pin UART_F4 I2C_F1 I2C pin I2C_F2 Debug interface, TTL DEBUG1 Baud rate 1500000 - 10 -...
- Page 11 CAN_F1 CAN interface SATA interface SATA1 (3.5-inch not supported)" SATA1_PW SATA power interface LVDS LVDS1 interface LVDS and EDP_PWR_ EDP power SEL1 selection jumper EDP1 EDP interface - 11 -...
- Page 12 EDP and EDP_LVDS_ LVDS INVT1 backlight interface LT9211 driver MCU_D1 programming interface MASKROM MASKROM mode jumper 4 pin 12V DC_IN2 power pin CPU_FAN1 4 pin Fan pin - 12 -...
- Page 13 BAT_CON1 Button Battery MIPI Devices MIPI_CSI1 3.3 Accessories Installation Steps For safety reasons, please ensure that the board is disconnected with power before installation. 3.3.1 3G/4G Installation 1. Plug the 3G/4G module into the mini PCIE slot. 2. Secure the module to the carrier by tightening up the screw. - 13 -...
- Page 14 3.3.2 SATA Hard Disk Installation 1. Connect SATA disk with cable to the connector on board. The product does not contain SSD disk cable. 3.3.3 SIM Card Installation This product supports standard SIM card with the size of 25mm × 15mm. 1.
- Page 15 4.How to set HDMI IN signal on two screens with HDMI IN APP The HDMI-IN ports on IB3-771 supports clone display with internal HDMI signal. You can use the HDMI-IN function by following setup: Connect IB3-771 HDMI OUT with two HDMI screens and connect IB3-771 with one HDMI_IN signal.
- Page 16 FIG below shows. 5. Firmware Upgrade Guide 5.1 Preparation: IB3-771 player Archive of IB3-771 firmware provided by Giada technical support Host PC with screen and installed the Windows operation system. USB OTG Cable (RP-SMA Male↔RP-SMA Male) ...
- Page 17 After you get the Archive from Giada technical support, copy the Archive to your host PC, you will find below files inside: Android Tool - tool for updating IB3-771 Firmware image. DriverAssitant - tool to install drivers and firmware image file ...
- Page 18 Click “ok” after the installation finish 5.2.2. Connect the IB3-771 with host PC In order to connect the IB3-771 with Host PC and run bootloader mode, you should perform following steps: a. Please ensure that the power of the IB3-771 player is disconnected...
- Page 19 Run RK Android tool V2.93 under the windows of the host PC. c. Connect the IB3-771 player to the host PC via USB OTG port. (please refer to Fig 1for location of the OTG port) d. Firstly, hold the IB3-771 player recovery button (please refer to Fig1 for the location of the button), then connect the power adaptor to the player, you will see “Found a MSC Device”...
- Page 20 (Fig3) (Fig4) c. In the end, you will see a report indicating a successful operation. - 20 -...
- Page 21 The user can set up automatic startup and shutdown, one week as a circle. 6.2 Startup(open) & shutdown(close) time setup System Requirements: Giada player with JAHC APP function. Android OS includes JAHC APP (please refer to Fig1). (Fig1) a.
- Page 22 week as a circle, maximum 3 schedules per day. Select each schedule to set up the Open time and Close time. c. After finishing the setup, click circles to launch the schedule. User can click delete to remove the schedule. (Fig3) (Fig4) - 22 -...
- Page 23 1.Use command ADB version to check if Windows ADB tool is installed. 2. Install Rock chip driver. a. Connect IB3-771 with OTG cable to windows PC host. b. Select ‘Connect to PC’ under android OS->Settings->USB->connect to PC. c. Then you can use ADB shell command to enter ADB.
- Page 24 - 24 -...
Need help?
Do you have a question about the IB3-771 and is the answer not in the manual?
Questions and answers