
Related Manuals for G&D VisionXS-C-DP-HR


Summary of Contents for G&D VisionXS-C-DP-HR
- Page 1 G&D VisionXS-C-DP-HR DE Installation und Bedienung EN Installation and Operation A9100404-1.30...
-
Page 2: Zu Dieser Dokumentation
© Guntermann & Drunck GmbH 2024. Alle Rechte vorbehalten. Version 1.30 – 04.11.2024 Firmware: 1.4.100 Guntermann & Drunck GmbH Obere Leimbach 9 57074 Siegen Germany Telefon +49 (0) 271 23872-0 Telefax +49 (0) 271 23872-120 www.gdsys.com sales@gdsys.com i · G&D VisionXS-C-DP-HR... - Page 3 Erhöhen Sie den Abstand zwischen Gerät und Empfänger. Schließen Sie das Gerät an eine andere Steckdose oder einen anderen Stromkreis als den, mit dem das Empfangsgerät verbunden ist, an. Kontaktieren Sie den Händler oder einen erfahrenen Rundfunk-/Fernsehtechniker. G&D VisionXS-C-DP-HR · ii...
-
Page 4: Table Of Contents
Inhaltsverzeichnis Inhaltsverzeichnis Sicherheitshinweise ..................1 Die VisionXS-C-DP-HR-Serie ................4 Optionaler Anschluss an einen KVM-Matrixswitch ..........4 Lieferumfang ..................... 5 Installation ....................... 6 Vorbereitung ...................... 6 Installation des Rechnermoduls ................7 Installation des Arbeitsplatzmoduls ..............14 Inbetriebnahme ....................22 Startvorgang ....................22 Bedienung ....................... - Page 5 Änderung des Hotkeys ................71 Änderung der OSD-Taste ................72 OSD mit doppeltem Tastendruck starten ............ 73 Kanalumschaltung bei Verwendung eines DH-Rechnermoduls ....74 Automatische Kanal-Umschaltung einrichten ..........75 Informationseinblendung zur automatische Kanal-Umschaltung ....76 Änderung der Exklusivmodus-Aktionstaste ..........77 G&D VisionXS-C-DP-HR · iv...
- Page 6 Weiterführende Informationen ..............101 DDC-Weiterleitung mit Cache-Funktion ............101 Kanal-Umschaltung am Arbeitsplatzmodul ............ 102 Pin-Belegung der RS232-Buchse/Schnittstelle ..........103 Statusanzeigen ....................104 Technische Daten ..................105 Allgemeine Eigenschaften der Serie ..............105 Spezifische Eigenschaften der Geräte ............... 108 v · G&D VisionXS-C-DP-HR...
-
Page 7: Sicherheitshinweise
Ständigen Zugang zu den Netzsteckern der Geräte sicherstellen Achten Sie bei der Installation der Geräte darauf, dass die Netzstecker der Geräte jederzeit zugänglich bleiben. Lüftungsöffnungen nicht verdecken Bei Gerätevarianten mit Lüftungsöffnungen ist eine Verdeckung der Lüftungsöff- nungen unbedingt zu vermeiden. G&D VisionXS-C-DP-HR · 1... - Page 8 Bei unbefugtem Entfernen erlischt die Garantie. Die Nichtbeach- tung dieser Vorsichtsmaßnahme kann zu Verletzungen und Geräteschäden führen! Betreiben Sie das Gerät ausschließlich im vorgesehenen Einsatzbereich Die Geräte sind für eine Verwendung im Innenbereich ausgelegt. Vermeiden Sie extreme Kälte, Hitze oder Feuchtigkeit. 2 · G&D VisionXS-C-DP-HR...
- Page 9 Mettre au rebut les batteries usagées conformêment aux instructions du fabricant et de manière écologique. Les batteries usagées ne doivent pas être jetées dans les ordures ménagères. Respectez les prescriptions valables pour l'élimination des produits électroniques. G&D VisionXS-C-DP-HR · 3...
-
Page 10: Die Visionxs-C-Dp-Hr-Serie
-Module zum Anschluss von Rechnern und die -Module zum Anschluss von Arbeitsplätzen an den Matrixswitch. Die Module der -Serie sind mit folgenden Matrixswitches kompatibel: VisionXS-C-DP-HR ControlCenter-Compact-Serie: Version 1.6.0 oder höher ControlCenter-Digital-Serie: Version 2.5.0 oder höher 4 · G&D VisionXS-C-DP-HR... -
Page 11: Lieferumfang
1 × Sicherheitshinweise-Flyer 1 × Flyer »Korrekte Stromversorgung« Zusätzlicher Lieferumfang erweiterter Varianten Die erweiterten Varianten der Arbeitsplatzmodule der VisionXS-C-DP-HR -Serie werden zusätzlich mit den unten aufgeführten Kabeln ausgeliefert. DT-VARIANTEN 1 × Stromversorgungskabel (PowerCable-2 Standard) G&D VisionXS-C-DP-HR · 5... -
Page 12: Installation
) in der Nähe des entfernten Arbeitsplatzes. HINWEIS: Die maximale Kabellänge zwischen dem Arbeitsplatzmodul und den Geräten des Arbeitsplatzes beträgt zwei Meter. 4. Entnehmen Sie die mitgelieferten Kabel der Verpackung und legen Sie diese für die Installation der Geräte bereit. 6 · G&D VisionXS-C-DP-HR... -
Page 13: Installation Des Rechnermoduls
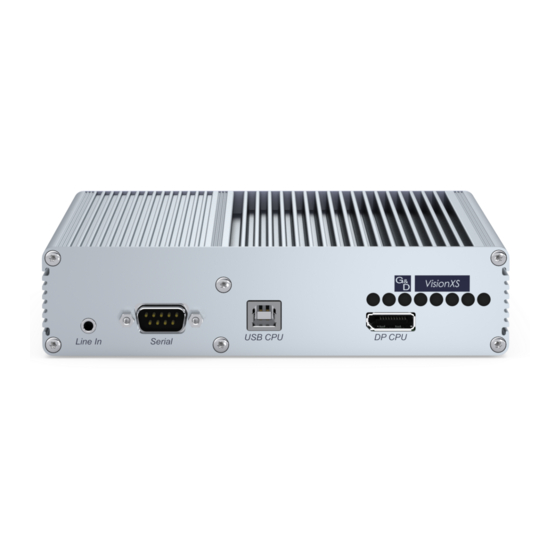
(oder höher) ein. Verbinden Sie das andere Ende des Kabels mit dem lokalen Netzwerk. Tastatur- und Maussignale des Rechners anschließen USB CPU: Verbinden Sie eine USB-Schnittstelle des Rechners mit dieser Schnittstelle. Verwenden Sie hierzu das Kabel USB-AM/BM-2. G&D VisionXS-C-DP-HR · 7... - Page 14 Audio- und RS232-Schnittstellen verbinden (modellabhängig) Line In: Verbinden Sie die Line-Out-Schnittstelle des Rechners mit dieser Schnittstelle. Verwenden Sie hierzu ein Audio-Anschlusskabel Audio-M/M-2. Verbinden Sie eine 9-polige serielle Schnittstelle des Rechners mit dieser Serial: Schnittstelle. Verwenden Sie hierzu das Kabel RS232-M/F-2. 8 · G&D VisionXS-C-DP-HR...
- Page 15 Transmission 2 -Schnittstelle. Verwenden Sie die Transmission 2 -Schnittstelle um eine Verbindung mit einer zwei- ten Gegenstelle herzustellen. WICHTIG: -Varianten ist das Transm. Redundancy -Feature nicht verfügbar, da Transmission 2 -Schnittstelle für die USB 2.0-Übertragung reserviert ist. G&D VisionXS-C-DP-HR · 9...
- Page 16 Installation Separate Übertragungsstrecke bei U2-Varianten herstellen Stecken Sie ein als Zubehör erhältliches Twisted-Pair-Kabel der Transmission 2: Kategorie 6 (oder höher) ein. Das andere Ende des Kabels ist mit der entsprechen- den Schnittstelle des Arbeitsplatzmoduls zu verbinden. 10 · G&D VisionXS-C-DP-HR...
-
Page 17: Stromversorgung Herstellen
Stromaufnahme. Vergewissern Sie sich bitte, dass das zu verwendende Netzteil mindestens die erforderliche Leistung bereitstellt. Unser Support unterstützt Sie gern bei der Sicherstellung der korrekten Stromver- sorgung. Eine Stromversorgung mit unzureichender Leistung kann zu unerwartetem Ver- halten führen und den Betrieb des Geräts dauerhaft beeinträchtigen! G&D VisionXS-C-DP-HR · 11... - Page 18 Schnittstelle kann anschließend im Terminalemulationsprogramm zum Verbindungs- aufbau ausgewählt werden. Der Treiber steht auf der Website im Bereich www.gdsys.com/de Mehr von G&D > zum Download zur Verfügung. Tools & Treiber 1. Starten Sie ein beliebiges Terminalemulationsprogramm (z. B. HyperTerminal oder PuTTY). 12 · G&D VisionXS-C-DP-HR...
- Page 19 4. Im Service-Menü stehen folgende Optionen zur Verfügung: Quit System information Set system defaults: Es wird eine Bestätigung Are you sure? [y]es, [N]o (Standard) angezeigt. Reboot: Es wird eine Bestätigung Are you sure? [y]es, [N]o (Standard) angezeigt. G&D VisionXS-C-DP-HR · 13...
-
Page 20: Installation Des Arbeitsplatzmoduls
Config Panel zuzugreifen und beispielsweise Syslog-Meldungen in diese Netzwerke zu senden. Stecken Sie ein als Zubehör erhältliches Twisted-Pair-Kabel der Kategorie 5 Network: (oder höher) ein. Verbinden Sie das andere Ende des Kabels mit dem lokalen Netzwerk. 14 · G&D VisionXS-C-DP-HR... - Page 21 USB 2.0-Übertragung reserviert. Nur die mittlere Schnittstelle (G) steht hierbei für den -Modus zur Verfügung. Generic-USB WICHTIG: Bei aktiviertem -Modus kann das OSD mit einer Tastatur an Generic-USB -Buchsen nicht bedient werden. USB Devices G&D VisionXS-C-DP-HR · 15...
- Page 22 DP Out 2: Schließen Sie den zweiten Monitor des Arbeitsplatzes an. Audio- und RS232-Schnittstellen verbinden (modellabhängig) Schließen Sie die Lautsprecher oder ein anderes Audioausgabegerät des Line Out: Arbeitsplatzes an. Serial: Verbinden Sie das serielle Endgerät mit dieser Schnittstelle. 16 · G&D VisionXS-C-DP-HR...
- Page 23 Transmission 2 Verwenden Sie die Transmission 2 -Schnittstelle um eine Verbindung mit einer zwei- ten Gegenstelle herzustellen. WICHTIG: -Varianten ist das -Feature verfügbar, da Transm. Redundancy nicht -Schnittstelle für die USB 2.0-Übertragung reserviert ist. Transmission 2 G&D VisionXS-C-DP-HR · 17...
- Page 24 Installation Separate Übertragungsstrecke bei U2-Varianten herstellen Stecken Sie ein als Zubehör erhältliches Twisted-Pair-Kabel der Transmission 2: Kategorie 6 (oder höher) ein. Das andere Ende des Kabels ist mit der entsprechen- den Schnittstelle des Rechnermoduls zu verbinden. 18 · G&D VisionXS-C-DP-HR...
- Page 25 Stromaufnahme. Vergewissern Sie sich bitte, dass das zu verwendende Netzteil mindestens die erforderliche Leistung bereitstellt. Unser Support unterstützt Sie gern bei der Sicherstellung der korrekten Stromver- sorgung. Eine Stromversorgung mit unzureichender Leistung kann zu unerwartetem Ver- halten führen und den Betrieb des Geräts dauerhaft beeinträchtigen! G&D VisionXS-C-DP-HR · 19...
- Page 26 Schnittstelle kann anschließend im Terminalemulationsprogramm zum Verbindungs- aufbau ausgewählt werden. Der Treiber steht auf der Website im Bereich www.gdsys.com/de Mehr von G&D > zum Download zur Verfügung. Tools & Treiber 1. Starten Sie ein beliebiges Terminalemulationsprogramm (z. B. HyperTerminal oder PuTTY). 20 · G&D VisionXS-C-DP-HR...
- Page 27 4. Im Service-Menü stehen folgende Optionen zur Verfügung: Quit System information Set system defaults: Es wird eine Bestätigung Are you sure? [y]es, [N]o (Standard) angezeigt. Reboot: Es wird eine Bestätigung Are you sure? [y]es, [N]o (Standard) angezeigt. G&D VisionXS-C-DP-HR · 21...
-
Page 28: Inbetriebnahme
Start der Module aufgebaut. Die Freischaltung des kostenpflichtig erhältlichen Transm. Redundancy -Features aktiviert die -Schnittstelle. Transmission 2 Verwenden Sie die Transmission 2 -Schnittstelle um eine Verbindung mit einer zwei- ten Gegenstelle herzustellen. 22 · G&D VisionXS-C-DP-HR... -
Page 29: Anmeldung Am Arbeitsplatz
Nutzungsbedingungen aktiviert wurde (siehe Anzeigen von Nutzungsbedin- gungen auf Seite 28). WICHTIG: Das Feld 2-Factor Auth Code (TOTP) erscheint nur bei aktivierter 2-Fak- tor-Authentifizierung. Ausführliche Hinweise hierzu finden Sie im separaten Handbuch der Webapplikation. G&D VisionXS-C-DP-HR · 23... -
Page 30: Konfiguration Der Passwort-Komplexität
4. Wählen Sie die Zeile und betätigen Sie die Min. Großbuchstaben Eingabetaste 5. Geben Sie die gewünschte Mindestanzahl an Großbuchstaben innerhalb eines Passworts ein (Standard: 0) 6. Betätigen Sie die -Taste zur Speicherung der durchgeführten Änderungen. 24 · G&D VisionXS-C-DP-HR... - Page 31 4. Wählen Sie die Zeile Min. Sonderzeichen und betätigen Sie die Eingabetaste 5. Geben Sie die gewünschte Mindestanzahl an Sonderzeichen innerhalb eines Passworts ein (Standard: 0) 6. Betätigen Sie die -Taste zur Speicherung der durchgeführten Änderungen. G&D VisionXS-C-DP-HR · 25...
-
Page 32: Konfiguration Der Anmeldeoptionen
Sie die Max. Fehlversuche Eingabetaste 5. Geben Sie die gewünschte Anzahl an maximalen Fehlversuchen bei der Passworteingabe ein (Standard: 0 = aus/unbegrenzte Anzahl an Fehlversuchen, max. 1.000) 6. Betätigen Sie die -Taste zur Speicherung der durchgeführten Änderungen. 26 · G&D VisionXS-C-DP-HR... - Page 33 5. Geben Sie die gewünschte Sperrzeit in Minuten an, für die ein Nutzer nach dem Überschreiten der Anzahl an maximalen Fehlversuchen bei der Passworteingabe gesperrt wird (Standard: 1 (wenn max. Fehlversuche > 0), max. 1.440 Minuten) 6. Betätigen Sie die -Taste zur Speicherung der durchgeführten Änderungen. G&D VisionXS-C-DP-HR · 27...
-
Page 34: Anzeigen Von Nutzungsbedingungen
Sie die Eingabetaste. Langtext... 10.Erfassen Sie nun die gewünschten Nutzungsbedingungen. Dieses Textfeld ist auf 1.500 Zeichen begrenzt. 11.Betätigen Sie die -Taste zur Speicherung der Texteingabe. 12.Betätigen Sie die -Taste und anschließend die -Taste zur Speicherung der durchgeführten Änderungen. 28 · G&D VisionXS-C-DP-HR... -
Page 35: Konkurrierende Bedienung Des Kvm-Extenders
Alternativ zur konkurrierenden Bedienung des Rechners durch die Arbeitsplätze kann die exklusive Bedienung (s. Seite 30) aktiviert werden. Verwandte Themen: Änderung der Zeitspanne der Eingabesperre auf Seite 78 Änderung der Videobetriebsart der Arbeitsplätze auf Seite 80 G&D VisionXS-C-DP-HR · 29... -
Page 36: Exklusive Bedienung Des Kvm-Extenders
Arbeitsplatzes auszuschalten, während Sie den Extender am anderen Arbeitsplatz bedienen. Verwandte Themen: Berechtigung für exklusiven Zugriff des Arbeitsplatzes auf Seite 79 Änderung der Videobetriebsart der Arbeitsplätze auf Seite 80 Änderung der Exklusivmodus-Aktionstaste auf Seite 77 30 · G&D VisionXS-C-DP-HR... -
Page 37: Abmeldung Am Arbeitsplatz
3. Betätigen Sie die Schnellwahltaste oder markieren Sie die Zeile E - Benutzer abmelden und betätigen Sie die Eingabetaste TIPP: Bereits nach dem Aufruf des On-Screen-Displays können Sie mit der Tastenkombination Strg die Benutzer abmelden-Funktion durchführen. G&D VisionXS-C-DP-HR · 31... -
Page 38: Erstkonfiguration Der Netzwerkeinstellungen
OSD des Arbeitsplatzmoduls und mit dem (Standard: Remote-Hotkey ) das entfernte OSD des Rechnermoduls aufrufen und konfigurieren. Strg Während des Startvorgangs des Arbeitsplatzmoduls werden die Einstellungen bei- der Hotkeys angezeigt (siehe Startvorgang auf Seite 22). 32 · G&D VisionXS-C-DP-HR... -
Page 39: Konfiguration Der Netzwerkschnittstelle
Geben Sie die IP-Adresse der Schnittstelle an. Im Betriebsmodus DHCP ist keine Eingabe möglich. Netzmaske: Geben Sie die Netzmaske des Netzwerkes an. Im Betriebsmodus DHCP ist keine Eingabe möglich. 5. Betätigen Sie die -Taste zur Speicherung der durchgeführten Änderungen. G&D VisionXS-C-DP-HR · 33... -
Page 40: Konfiguration Der Globalen Netzwerkeinstellungen
Geben Sie die IP-Adresse des Gateways an. DNS 1: Geben Sie die IP-Adresse des DNS-Servers an. DNS 2: Geben Sie optional die IP-Adresse eines weiteren DNS-Servers an. 5. Betätigen Sie die -Taste zur Speicherung der durchgeführten Änderungen. 34 · G&D VisionXS-C-DP-HR... -
Page 41: Erreichbarkeit Eines Hosts Im Netzwerk Prüfen (Ping)
Durchschn. mittlere Paketumlaufzeit RTT: Max. RTT: längste Paketumlaufzeit HINWEIS: Falls der eingebene Name des Hosts nicht in eine IP-Adresse aufge- löst werden kann, erscheint eine entsprechende Meldung. 6. Betätigen Sie die -Taste zum Verlassen des Menüs. G&D VisionXS-C-DP-HR · 35... -
Page 42: Status Der Netzwerkschnittstelle Auslesen
Sie die Link-Status Eingabetaste 4. Im Abschnitt Interface A werden Ihnen folgende Daten angezeigt: Link erkannt: Verbindung zum Netzwerk hergestellt ( ) oder unter- brochen ( nein 5. Klicken Sie auf , um die Seite zu verlassen. 36 · G&D VisionXS-C-DP-HR... -
Page 43: On-Screen-Display
OSD des Rechnermodus und mit dem lokalen Hotkey (Standard: ) das lokale OSD des Arbeitsplatzmoduls aufrufen und konfigurieren. Während des Startvorgangs des Arbeitsplatzmoduls werden die Einstellungen bei- der Hotkeys angezeigt (siehe Startvorgang auf Seite 22). G&D VisionXS-C-DP-HR · 37... -
Page 44: Anzeige Des Entfernten Osd
Menüpunkte ohne Untermenü: Die aktuelle Einstellung wird hinter dem Menüeintrag ange- zeigt und kann direkt geändert werden. In der Fußzeile werden die wichtigsten Tasten zur Bedienung des Fußzeile aktuell angezeigten Menüs und ggf. weitere Informationen aufge- führt. 38 · G&D VisionXS-C-DP-HR... -
Page 45: Bedienung Des Osd Per Tastatur Oder Maus
Daten geschlossen und das übergeordnete Menü angezeigt. Betätigen Sie diese Taste, um zwischen den verschiedenen Optionen eines Menüeintrags zu wechseln. Strg+F8: Konfigurationseinstellungen mit vielen verfügbaren Optionen unterstützen diese Tastenkombination zum Aufruf einer über- sichtlichen Liste aller Optionen. G&D VisionXS-C-DP-HR · 39... - Page 46 Diese Maustaste wird zur Bestätigung von Eingaben (z. B. in der Login-Maske) oder zum Aufruf eines Untermenüs verwendet. rechte Maustaste: Diese Maustaste schließt die aktuell angezeigte Menüansicht und zeigt das übergeordnete Menü an. Falls Eingaben geändert, aber nicht gespeichert wurden, erhal- ten Sie diesbezüglich eine Meldung. 40 · G&D VisionXS-C-DP-HR...
-
Page 47: Funktionen Des Osd
-Feldes in der Kopfzeile. 4. Betätigen Sie die -Taste, um das gewünschte Sortierkriterium auszuwählen: Alph+: Die Namen der Listeneinträge werden in alphabetisch aufsteigender Reihenfolge sortiert. Alph-: Die Namen der Listeneinträge werden in alphabetisch absteigender Reihenfolge sortiert. G&D VisionXS-C-DP-HR · 41... -
Page 48: Übersicht Der Menüs Des Entfernten Osd
EDID-Modus und EDID zuweisen Seite 84 Farbtiefe Seite 85 System-Einrichtung Passwort-Komplexität Seite 24 Anmeldeoptionen Seite 26 Nutzungsbedingungen-Konfig. Seite 28 Hotkeys Seite 71 Mehrbenutzer-Eingabesperre Seite 78 Freischaltung Seite 81 Aktiv beim Start Seite 82 Werkseinstellungen Seite 95 wiederherstellen 42 · G&D VisionXS-C-DP-HR... - Page 49 Seite 61 Konfig.-Rechte Seite 62 Bedienrechte Seite 62 Target-Zugriffsrechte Seite 63 Target-USB-Zugriffsrechte Seite 64 Netzwerkeinrichtung Schnittstellen Seite 33 Link-Status Seite 36 Host pingen Seite 35 Netzfilterkonfiguration Seite 96 zurücksetzen Information Hardware-, Firmware-, Hotkey- und Seite 45 Feature-Information G&D VisionXS-C-DP-HR · 43...
-
Page 50: Persönliches Profile-Menü
Seite 100 Bedienung-Menü Das Bedienung-Menü kann nach dem Start des OSD mit der -Taste geöffnet werden. Folgende Funktionen können vom Benutzer ausgeführt werden: Funktion Erläuterung E – Benutzer abmelden Seite 31 T – Temporärer Login Seite 31 44 · G&D VisionXS-C-DP-HR... -
Page 51: Information-Menü
Seriennummer des Geräts und die MAC-Adressen der Netzwerkschnittstellen aufgelistet. Firmware-Information Hier werden die Firmware-Versionen des Arbeitsplatzmoduls und des aufge- schalteten Rechnermoduls angezeigt. Hotkey-Information Hier werden die aktiven Hotkeys ange- zeigt. Feature-Information Hier werden die aktivierten Features angezeigt. G&D VisionXS-C-DP-HR · 45... -
Page 52: Übersicht Der Menüs Des Lokalen Osd
Seite 96 Hardware-, Firmware-, Hotkey- und Information Seite 45 Feature-Information Freischaltung einer erworbenen Zusatz- funktion HINWEIS: Die Freischaltung der Zusatzfunktionen erfolgt über die Webapplika- tion Config Panel Die erforderlichen Schritte sind im Handbuch der Webapplikation beschrieben. 46 · G&D VisionXS-C-DP-HR... -
Page 53: Webapplikation Config Panel
Spracheinstellung angewendet. So ändern Sie die Sprache der Webapplikation: 1. Klicken Sie auf das Sprachkürzel der aktuellen Sprache rechts oben. 2. Schalten Sie die zu verwendende Sprache mit einem Klick auf die gewünschte Sprache um. G&D VisionXS-C-DP-HR · 47... -
Page 54: Webapplikation Beenden
Arbeit mit der Webapplikation. Die Webapplikation wird so gegen unautorisierten Zugriff geschützt. So beenden Sie die Webapplikation: 1. Klicken Sie auf das Benutzersymbol rechts oben. 2. Klicken Sie auf , um die aktive Sitzung zu beenden. Abmelden 48 · G&D VisionXS-C-DP-HR... -
Page 55: Benutzer Und Gruppen
Eigenes Pass- nein nein wort ändern Target-Zugriffs- Ansicht nein voll voll recht Das Effektivrecht der Rechte Target-Konfig und Eigenes Passwort ändern resultieren aus den Rechten der Benutzergruppen. Das Target-Zugriffsrecht wurde hingegen direkt im Benutzerkonto vergeben. G&D VisionXS-C-DP-HR · 49... -
Page 56: Effizienter Einsatz Der Benutzergruppen
In beiden Fällen erhält der Benutzer durch die Gruppen das Effektivrecht für das Recht Target-Konfig. HINWEIS: Möchten Sie einem Benutzer der Gruppe ein erweitertes Recht zuord- nen, kann dies alternativ auch direkt im Benutzerprofil geändert werden. 50 · G&D VisionXS-C-DP-HR... -
Page 57: Verwaltung Von Benutzerkonten
Das neu erstellte Benutzerkonto ist weder mit Konfigurations- noch mit Zugriffsrechten auf Rechnermodule ausgestattet. Fügen Sie das Benutzerkonto vor dessen Verwendung einer bestehenden Benutz- ergruppe hinzu oder erteilen Sie dem Benutzerkonto individuelle Rechte (s. Seite 50). G&D VisionXS-C-DP-HR · 51... -
Page 58: Änderung Des Namens Eines Benutzerkontos
Sie die -Taste. 4. Wählen Sie die Zeile Name und betätigen Sie die Eingabetaste 5. Geben Sie den gewünschten Namen ein und betätigen Sie die Eingabetaste 6. Betätigen Sie die -Taste zur Speicherung der durchgeführten Änderungen. 52 · G&D VisionXS-C-DP-HR... -
Page 59: Änderung Des Passworts Eines Benutzerkontos
Das Feld 2-Factor Auth Code (TOTP) erscheint nur bei aktivierter 2-Faktor-Authentifizierung. Ausführliche Hinweise hierzu finden Sie im separaten Handbuch der Webapplikation. Neu: Geben Sie das neue Passwort ein. Wiederholung: Wiederholen Sie das neue Passwort. 6. Betätigen Sie die -Taste zur Speicherung der durchgeführten Änderungen. G&D VisionXS-C-DP-HR · 53... -
Page 60: Änderung Der Rechte Eines Benutzerkontos
Zugriff auf die Konfiguration des Systems Seite 61 uneingeschränkt möglich Target-Zugriffsrecht Zugriff auf ein Rechnermodul Seite 63 Target-Konfig Konfiguration der Rechnermodule Seite 63 Target-USB-Zugriffs- USB-Zugriffsberechtigung für alle Module Seite 64 recht WebIf-Login Login mit der Webapplikation Config Panel Seite 62 54 · G&D VisionXS-C-DP-HR... -
Page 61: Änderung Der Gruppenzugehörigkeit Eines Benutzerkontos
Benutzergruppen, welchen das Benutzerkonto zugeordnet ist, wer- den mit einer Pfeilmarkierung () angezeigt. 7. Wiederholen Sie ggf. die Schritte 5. und 6., falls Sie die Gruppenzugehörigkeit weiterer Konten bearbeiten möchten. 8. Betätigen Sie die -Taste zur Speicherung der durchgeführten Änderungen. G&D VisionXS-C-DP-HR · 55... -
Page 62: Aktivierung Oder Deaktivierung Eines Benutzerkontos
Strg 2. Wählen Sie die Zeile Benutzereinrichtung und betätigen Sie die Eingabetaste 3. Wählen Sie das zu löschende Benutzerkonto und betätigen Sie die -Taste. 4. Wählen Sie den Eintrag der Sicherheitsabfrage und betätigen Sie die Eingabetaste 56 · G&D VisionXS-C-DP-HR... -
Page 63: Verwaltung Von Benutzergruppen
4. Betätigen Sie die -Taste zur Speicherung Ihrer Eingaben und Erstellung der Benutzergruppe. WICHTIG: Die neu erstellte Benutzergruppe ist weder mit Konfigurations- noch mit Zugriffsrechten auf Rechnermodule ausgestattet (siehe Effizienter Einsatz der Benutzergruppen auf Seite 50). G&D VisionXS-C-DP-HR · 57... -
Page 64: Änderung Des Namens Einer Benutzergruppe
Zugriff auf die Konfiguration des Systems Seite 61 uneingeschränkt möglich Target-Zugriffsrecht Zugriff auf ein Rechnermodul Seite 63 Target-Konfig Konfiguration der Rechnermodule Seite 63 Target-USB-Zugriffs- USB-Zugriffsberechtigung für alle Module Seite 64 recht WebIf-Login Login mit der Webapplikation Config Panel Seite 62 58 · G&D VisionXS-C-DP-HR... -
Page 65: Mitgliederverwaltung Einer Benutzergruppe
Benutzerkonten, die der Benutzergruppe zugeordnet sind, werden mit einer Pfeilmarkierung () angezeigt. 7. Wiederholen Sie ggf. die Schritte 5. und 6., falls Sie die Gruppenzugehörigkeit weiterer Konten bearbeiten möchten. 8. Betätigen Sie die -Taste zur Speicherung der durchgeführten Änderungen. G&D VisionXS-C-DP-HR · 59... -
Page 66: Aktivierung Oder Deaktivierung Einer Benutzergruppe
Strg 2. Wählen Sie die Zeile Benutzergruppeneinrichtung und betätigen Sie die Eingabetaste 3. Wählen Sie die zu löschende Benutzergruppe und betätigen Sie die -Taste. 4. Wählen Sie den Eintrag der Sicherheitsabfrage und betätigen Sie die Eingabetaste 60 · G&D VisionXS-C-DP-HR... -
Page 67: System-Rechte
4. Wählen Sie die Zeile Superuser-Recht und betätigen Sie die -Taste zur Auswahl einer der aufgelisteten Optionen: Uneingeschränkten Zugriff auf das KVM-System nein: Zugriffsberechtigung gemäß Benutzer- Gruppenrechten 5. Betätigen Sie die -Taste zur Speicherung der durchgeführten Änderungen. G&D VisionXS-C-DP-HR · 61... -
Page 68: Berechtigung Zum Ändern Der Einstellungen Des "Persönliches Profil"-Menüs
5. Wählen Sie die Zeile und betätigen Sie die -Taste zur Auswahl einer WebIf-Login der aufgelisteten Optionen: Zugriff auf die Webapplikation erlaubt nein: Zugriff auf die Webapplikation untersagt 6. Betätigen Sie die -Taste zur Speicherung der durchgeführten Änderungen. 62 · G&D VisionXS-C-DP-HR... -
Page 69: Berechtigung Zur Änderung Des Eigenen Passworts
-Taste zur Auswahl einer der aufgelisteten Optionen: voll: Vollzugriff auf den am Rechnermodul angeschlossenen Computer erlaubt nein: Zugriff Rechnermodul angeschlossenen Computer untersagt Ansicht: Ansicht Monitorbildes Rechnermodul angeschlossenen Computers erlaubt 7. Betätigen Sie die -Taste zur Speicherung der durchgeführten Änderungen. G&D VisionXS-C-DP-HR · 63... -
Page 70: Zugriffsrecht Auf Usb-Geräte
5. Wählen Sie das Rechnermodul, für das Sie die Zugriffsrechte ändern möchten. 6. Betätigen Sie die -Taste zur Auswahl einer der aufgelisteten Optionen: Zugriff auf die USB-Geräte erlaubt nein: Zugriff auf die USB-Geräte untersagt 7. Betätigen Sie die -Taste zur Speicherung der durchgeführten Änderungen. 64 · G&D VisionXS-C-DP-HR... -
Page 71: Konfiguration
Bild immer an Arbeitsplatzaktivierung nach permanenter Ausschaltung der Keyboard/Maus Bildanzeige Aktiver Arbeitsplatz nach Start des Extenders keiner Betriebsmodus der RS232-Schnittstelle einstellen RS232 Auswahl des EDID-Modus des KVM-Extenders automatisch Reduzierung der Farbtiefe der zu übertragenden Bilddaten 24 bit G&D VisionXS-C-DP-HR · 65... - Page 72 Automatisches Schließen des OSD nach Inaktivität deaktiviert Position der Informationseinblendung ändern links oben Position des OSD ändern zentriert Die grundlegende Bedienung des OSD wird ab Seite 37 beschrieben. HINWEIS: Weitere Informationen zum Einsatz der Webapplikation finden Sie im separaten Handbuch. 66 · G&D VisionXS-C-DP-HR...
-
Page 73: Konfigurationseinstellungen
Sie die Eingabetaste 3. Wählen Sie in der Zeile durch Betätigung der -Taste zwi- Arbeitsplatztyp schen folgenden Optionen: OpenAccess OpenAccess-Betriebsart (Standard) Standard Standard-Betriebsart 4. Betätigen Sie die -Taste zur Speicherung der durchgeführten Änderungen. G&D VisionXS-C-DP-HR · 67... -
Page 74: Änderung Des Names Des Arbeitsplatzmoduls
Sie die Eingabetaste 3. Wählen Sie die Zeile und betätigen Sie die Name Eingabetaste 4. Geben Sie den gewünschten Namen ein und betätigen Sie die Eingabetaste 5. Betätigen Sie die -Taste zur Speicherung der durchgeführten Änderungen. 68 · G&D VisionXS-C-DP-HR... -
Page 75: Änderung Des Eigenen Passworts
Ein- keine gabe notwendig. Das Feld 2-Factor Auth Code (TOTP) erscheint nur bei aktivierter 2-Faktor- Authentifizierung. Ausführliche Hinweise hierzu finden Sie im separaten Handbuch der Webapplikation. 5. Betätigen Sie die -Taste zur Speicherung der durchgeführten Änderungen. G&D VisionXS-C-DP-HR · 69... -
Page 76: Sprache Auswählen
Persönlichen Profils 3. Wählen Sie in der Zeile Sprache durch Betätigung der -Taste zwischen folgenden Optionen: Verwendung der Systemsprache vom System Verwendung der ausgewählten Sprache [Auswahl] 4. Betätigen Sie die -Taste zur Speicherung der durchgeführten Änderungen. 70 · G&D VisionXS-C-DP-HR... -
Page 77: Änderung Des Hotkeys
Strg-Taste (Standard für das entfernte OSD) Strg Alt-Taste (Standard für das lokale OSD) Alt Gr Alt Gr-Taste Windows-Taste Umschalttaste Shift 5. Betätigen Sie die -Taste zur Speicherung der durchgeführten Änderungen. G&D VisionXS-C-DP-HR · 71... -
Page 78: Änderung Der Osd-Taste
Einfg-Taste Löschen Entf-Taste Pos1 Pos 1-Taste Ende Ende-Taste Bild -Taste Bild hoch Bild -Taste Bild runter Leertaste Leertaste 5. Betätigen Sie die -Taste zur Speicherung der durchgeführten Änderungen. 72 · G&D VisionXS-C-DP-HR... -
Page 79: Osd Mit Doppeltem Tastendruck Starten
OSD-Aufruf mit doppeltem Druck auf die Windows-Taste Shift OSD-Aufruf mit doppeltem Druck auf die Umschalt-Taste OSD-Aufruf mit doppeltem Druck auf die Druck-Taste Drucken 5. Betätigen Sie die -Taste zur Speicherung der durchgeführten Änderungen. G&D VisionXS-C-DP-HR · 73... -
Page 80: Kanalumschaltung Bei Verwendung Eines Dh-Rechnermoduls
4. Wählen Sie in der Zeile Stream-Auswahl die gewünschte Option aus: Pfeil links-Taste und Pfeil rechts-Taste (Standard) Pfeil links, rechts Num+, Num- Num+-Taste und Num--Taste 5. Betätigen Sie die -Taste zur Speicherung der durchgeführten Änderungen. 74 · G&D VisionXS-C-DP-HR... -
Page 81: Automatische Kanal-Umschaltung Einrichten
Kanal umgeschaltet, falls an diesem eine aktive Verbindung besteht. Bei einem Verbindungsabbruch wird automatisch auf den immer anderen Kanal umgeschaltet, unabhängig vom Verbindungs- status des anderen Kanals. 4. Betätigen Sie die -Taste zur Speicherung der durchgeführten Änderungen. G&D VisionXS-C-DP-HR · 75... -
Page 82: Informationseinblendung Zur Automatische Kanal-Umschaltung
Alternativ können Sie eingeben, falls Sie keine Informationseinblen- dung wünschen oder perm (Standard), falls die Information dauerhaft bzw. bis zur nächsten OSD-Nutzung eingeblendet werden soll. 5. Betätigen Sie die -Taste zur Speicherung der durchgeführten Änderungen. 76 · G&D VisionXS-C-DP-HR... -
Page 83: Änderung Der Exklusivmodus-Aktionstaste
Einfg-Taste Löschen Entf-Taste Pos 1-Taste Pos1 Ende Ende-Taste Bild hoch Bild -Taste Bild Bild runter -Taste Leertaste Leertaste 5. Betätigen Sie die -Taste zur Speicherung der durchgeführten Änderungen. G&D VisionXS-C-DP-HR · 77... -
Page 84: Änderung Der Zeitspanne Der Eingabesperre
3. Geben Sie im Feld Mehrbenutzer-Eingabesperre die gewünschte Zeitspanne der Eingabesperre (1 bis 90 Sekunden) ein. 4. Betätigen Sie die -Taste zur Speicherung der durchgeführten Änderungen. Verwandtes Thema: Exklusive Bedienung des KVM-Extenders auf Seite 30 78 · G&D VisionXS-C-DP-HR... -
Page 85: Berechtigung Für Exklusiven Zugriff Des Arbeitsplatzes
Berechtigung für exklusiven Zugriff verweigert 4. Betätigen Sie die -Taste zur Speicherung der durchgeführten Änderungen. Verwandte Themen: Exklusive Bedienung des KVM-Extenders auf Seite 30 Änderung der Videobetriebsart der Arbeitsplätze auf Seite 80 G&D VisionXS-C-DP-HR · 79... -
Page 86: Änderung Der Videobetriebsart Der Arbeitsplätze
Nach Ablauf der Zeitspanne der Eingabesperre wird das Bild automatisch wieder eingeschaltet. 4. Betätigen Sie die -Taste zur Speicherung der durchgeführten Änderungen. Verwandte Themen: Änderung der Zeitspanne der Eingabesperre auf Seite 78 Berechtigung für exklusiven Zugriff des Arbeitsplatzes auf Seite 79 80 · G&D VisionXS-C-DP-HR... -
Page 87: Arbeitsplatzaktivierung Nach Permanenter Ausschaltung Der Bildanzeige
Tastatur nur Maus 4. Betätigen Sie die -Taste zur Speicherung der durchgeführten Änderungen. Verwandte Themen: Änderung der Zeitspanne der Eingabesperre auf Seite 78 Berechtigung für exklusiven Zugriff des Arbeitsplatzes auf Seite 79 G&D VisionXS-C-DP-HR · 81... -
Page 88: Aktiver Arbeitsplatz Nach Start Des Extenders
das Arbeitsplatzmodul an Transmission 2 zeigt nach dem Start sofort ein Bild an 4. Betätigen Sie die -Taste zur Speicherung der durchgeführten Änderungen. Verwandte Themen: Änderung der Zeitspanne der Eingabesperre auf Seite 78 Berechtigung für exklusiven Zugriff des Arbeitsplatzes auf Seite 79 82 · G&D VisionXS-C-DP-HR... -
Page 89: Betriebsmodus Der Rs232-Schnittstelle Einstellen
Der Datenstrom eines RS232-Gerätes wird vom RS232 Rechnermodul zum Arbeitsplatzmodul übertragen (Standard). RS422-Adapter Der Datenstrom eines RS422-Gerätes wird über die separat erhältlichen G&D RS232-422-Adapter Rechnermodul zum Arbeitsplatzmodul übertragen. 4. Betätigen Sie die -Taste zur Speicherung der durchgeführten Änderungen. G&D VisionXS-C-DP-HR · 83... -
Page 90: Auswahl Des Edid-Modus Des Kvm-Extenders
Profil und aktivieren Sie es mit der -Taste. Speichern Sie Ihre Auswahl mit der -Taste. Bei DH-Varianten können Sie die genannten Einstellungen für Video-Kanal 1 Video-Kanal 2 vornehmen. 5. Betätigen Sie die -Taste zur Speicherung der durchgeführten Änderungen. 84 · G&D VisionXS-C-DP-HR... -
Page 91: Reduzierung Der Farbtiefe Der Zu Übertragenden Bilddaten
24 bit (Standard) 18 Bit Reduzierung der Farbtiefe der Bilddaten auf 18 bit Bei DH-Varianten können Sie die genannten Einstellungen für Video-Kanal 1 vornehmen. Video-Kanal 2 4. Betätigen Sie die -Taste zur Speicherung der durchgeführten Änderungen. G&D VisionXS-C-DP-HR · 85... -
Page 92: Verwendung Des Freeze-Modus
Anzeige des farbigen Rahmens ( ) und Einblendung des Rahmen+OSD frame Hinweises Eingefroren ( Bei DH-Varianten können Sie die genannten Einstellungen für Kanal 1 Kanal 2 vornehmen. 5. Betätigen Sie die -Taste zur Speicherung der durchgeführten Änderungen. 86 · G&D VisionXS-C-DP-HR... -
Page 93: Ddc/Ci-Unterstützung (De)Aktivieren
Rechner in Richtung des Monitors. bidirektional Die Übertragung von DDC/CI-Signalen erfolgt bidirektional. Bei DH-Varianten können Sie die genannten Einstellungen für Kanal 1 Kanal 2 vornehmen. 4. Betätigen Sie die -Taste zur Speicherung der durchgeführten Änderungen. G&D VisionXS-C-DP-HR · 87... -
Page 94: Usb-Tastaturmodus Oder "Generic Usb" (De)Aktivieren
Wacom IntuosPro L Wacom Cintiq Pro 24 Pen Wacom CP24 Pen Wacom Cintiq Pro 27 Wacom CP27 Pen/Touch Wacom Cintiq Pro 32 Pen Wacom CP32 Pen Wacom Cintiq Pro 32 Touch Wacom CP32 Touch 88 · G&D VisionXS-C-DP-HR... - Page 95 2. Wählen Sie die Zeile Target-Einrichtung und betätigen Sie die Eingabetaste 3. Wählen Sie die Zeile und betätigen Sie die -Taste zur Aus- USB-HID-Modus wahl einer Option (s. oben). 4. Betätigen Sie die -Taste zur Speicherung der durchgeführten Änderungen. G&D VisionXS-C-DP-HR · 89...
-
Page 96: Usb-Gerät Für Einen Neustart Priorisieren
Änderungen. HINWEIS: Die Priorisierung bleibt auch bestehen, wenn das USB-Gerät vom Arbeitsplatzmodul getrennt wird (erscheint im OSD dann rot) und anschließend wieder verbunden wird (erscheint im OSD dann wieder grün und mit einem Dreieck () markiert). 90 · G&D VisionXS-C-DP-HR... -
Page 97: Änderung Des Scancode-Sets Einer Ps/2-Tastatur
Aktivierung des Scancode-Sets 2 für PS/2-Tastatureingaben Aktivierung des Scancode-Sets 3 für PS/2-Tastatureingaben 4. Betätigen Sie die -Taste zur Speicherung der durchgeführten Änderungen. Die Tastatur wird nach dem erneuten Einschalten initialisiert und das ausgewählte Scancode-Set angewendet. G&D VisionXS-C-DP-HR · 91... -
Page 98: Reinitialisierung Von Usb-Eingabegeräten
Kommunikation zu einem USB-Gerät gestört ist, werden alle angeschlossenen USB-Geräte reinitialisiert. Der Status der USB-Geräte wird nicht überwacht. Falls die Kommunikation zu einem USB-Gerät gestört ist, findet Reinitialisierung statt. keine 4. Betätigen Sie die -Taste zur Speicherung der durchgeführten Änderungen. 92 · G&D VisionXS-C-DP-HR... -
Page 99: Wartezeit Des Bildschirmschoners Einstellen
Sie die Eingabetaste 3. Geben Sie in der Zeile Bildschirmschoner (min) die Wartezeit (1 bis 999 Minuten) des Bildschirmschoners ein. Der Wert 0 deaktiviert den Bildschirmschoner. 4. Betätigen Sie die -Taste zur Speicherung der durchgeführten Änderungen. G&D VisionXS-C-DP-HR · 93... -
Page 100: Tastaturlayout Für Eingaben Innerhalb Des Osds Auswählen
-Taste OSD-Tastatur-Layout zwischen folgenden Optionen: Deutsch (Standard) US-Englisch UK-Englisch Französisch Spanisch Lat.-amerik. Portugiesisch Schwedisch Schweiz-Französich Dänisch 4. Betätigen Sie die -Taste zur Speicherung der durchgeführten Änderungen. 94 · G&D VisionXS-C-DP-HR... -
Page 101: Wiederherstellung Der Standardeinstellungen
2. Wählen Sie die Zeile System-Einrichtung (entferntes OSD) bzw. Arbeitsplatz-Utility (lokales OSD) und betätigen Sie die Eingabetaste 3. Wählen Sie die Zeile und betätigen Sie Werkseinstellungen wiederherstellen Eingabetaste 4. Bestätigen Sie die Sicherheitsabfrage oder brechen Sie den Vorgang ab. G&D VisionXS-C-DP-HR · 95... -
Page 102: Reset Der Netzfilterregeln
2. Wählen Sie die Zeile und betätigen Sie die Netzwerkeinrichtung Eingabetaste 3. Wählen Sie die Zeile Netzfilterkonfiguration zurücksetzen und betätigen Sie Eingabetaste 4. Bestätigen Sie die Sicherheitsabfrage oder brechen Sie den Vorgang ab. 96 · G&D VisionXS-C-DP-HR... -
Page 103: Farbe Der Informationseinblendung Ändern
(Standard). Strg+Num 2. Betätigen Sie die -Taste zum Aufruf des Persönlichen Profils 3. Wählen Sie in der Zeile OSD-Farbe durch Betätigung der -Taste die gewünschte Farbe. 4. Betätigen Sie die -Taste zur Speicherung der durchgeführten Änderungen. G&D VisionXS-C-DP-HR · 97... -
Page 104: Anzeige Der Informationseinblendung
Optionen: hohes Durchscheinen des Bildschirminhalts hoch mittleres Durchscheinen des Bildschirminhalts (Standard) mittel niedrig leichtes Durchscheinen des Bildschirminhalts überdeckende Darstellung des OSD 4. Betätigen Sie die -Taste zur Speicherung der durchgeführten Änderungen. 98 · G&D VisionXS-C-DP-HR... -
Page 105: Automatisches Schließen Des Osd Nach Inaktivität
Pfeiltasten das Menü an die gewünschte Position zu verschieben oder betätigen Sie die Tastenkombination Strg+D zur Wiederherstellung der Standardposition. 5. Betätigen Sie die -Taste zur Speicherung der durchgeführten Änderungen oder die -Taste zum Abbruch der Aktion. G&D VisionXS-C-DP-HR · 99... -
Page 106: Position Des Osd Ändern
Maus, um das OSD an die gewünschte Position zu verschieben oder betätigen Sie die Tastenkombination Strg+D zur Wiederherstellung der Standardposition. 5. Betätigen Sie die -Taste zur Speicherung der durchgeführten Änderungen oder die -Taste zum Abbruch der Aktion. 100 · G&D VisionXS-C-DP-HR... -
Page 107: Weiterführende Informationen
Üblicherweise werden die DDC-Informationen des Monitors unverändert an den Rechner weitergeleitet. Stellt der KVM-Extender aber fest, dass sich die Informatio- nen des Monitors nicht vollständig auslesen lassen oder diese unzulässige Einträge enthalten, werden die Informationen (wenn möglich) vervollständigt oder korri- giert. G&D VisionXS-C-DP-HR · 101... -
Page 108: Kanal-Umschaltung Am Arbeitsplatzmodul
Im Auslieferungszustand sind Select-Keys (Kanal 1) und (Kanal 2) Alt+1 Alt+2 voreingestellt. HINWEIS: Das lokale OSD des Arbeitsplatzmoduls öffnen Sie mit der Tastenkom- bination (Standard). Alt+Num Im lokalen OSD können Sie beispielsweise den Hotkey-Modifizierer und den Select- Key ändern. 102 · G&D VisionXS-C-DP-HR... -
Page 109: Pin-Belegung Der Rs232-Buchse/Schnittstelle
RxD (Receive Data) Eingang Ausgang TxD (Transmit Data) Ausgang Eingang nicht belegt GND (Ground) Ground Ground nicht belegt RTS (Request to Send) Ausgang Eingang CTS (Clear to Send) Eingang Ausgang Power Power G&D VisionXS-C-DP-HR · 103... -
Page 110: Statusanzeigen
Es konnte keine Verbindung hergestellt werden. grün Der KVM-Extender wird mit Spannung versorgt und die Gerätesoftware wurde erfolgreich gestartet. gelb Der KVM-Extender wird mit Spannung versorgt. blau Die Identification-Funktion wurde über die Webapplikation aktiviert. Der KVM-Extender wird nicht mit Spannung versorgt. 104 · G&D VisionXS-C-DP-HR... -
Page 111: Technische Daten
Übertragungsart: transparent Varianten [A] und [AR] Auflösung: 24 bit digital, Stereo Abtastrate 96 kHz Bandbreite: 22 kHz RS232 Übertragungsart: transparent Varianten [AR] Übertragungsrate: max. 115.200 bit/s Übertragene Signale: RxD, TxD, GND, RTS, CTS, 5V G&D VisionXS-C-DP-HR · 105... - Page 112 3840 × 2160 @ 30Hz Weitere nach VESA und CTA standardi- sierte Auflösungen sind im Rahmen der unterstützten Videobandbreite/Pixelrate und Horizontal-/Vertikalfrequenz möglich. Vertikalfrequenz: 24 Hz bis 120 Hz Horizontalfrequenz: 25 kHz bis 185 kHz 106 · G&D VisionXS-C-DP-HR...
- Page 113 DeviceCarrier Luftfeuchte: 20 % bis 80 %, nicht kondensierend Lagerumgebung Temperatur: -20 °C bis +60 °C Luftfeuchte: 15 % bis 85 %, nicht kondensierend Konformität CE, UKCA, FCC Klasse B, TAA, EAC, RoHS, WEEE, REACH G&D VisionXS-C-DP-HR · 107...
-
Page 114: Spezifische Eigenschaften Der Geräte
KVM, Audio und RS232: 1 [+1 optional] × RJ45-Buchse Gegenstelle (1 Gbit/s) Stromaufnahme Hauptstromversorgung: 12 VDC/1,0 A Gehäuse Material: Aluminium eloxiert Dimensionen (B × H × T): 109 × 31 × 184 mm IP-Schutzklasse: IP20 Gewicht: ca. 0,7 kg 108 · G&D VisionXS-C-DP-HR... - Page 115 1 × RJ45-Buchse (1 Gbit/s) Gegenstelle USB 2.0 1 × RJ45-Buchse Stromaufnahme Hauptstromversorgung: 12 VDC/1,0 A Gehäuse Material: Aluminium eloxiert Dimensionen (B × H × T): 109 × 31 × 184 mm IP-Schutzklasse: IP20 Gewicht: ca. 0,7 kg G&D VisionXS-C-DP-HR · 109...
- Page 116 1 × RJ45-Buchse (1 Gbit/s) Gegenstelle USB 2.0 1 × RJ45-Buchse Stromaufnahme Hauptstromversorgung: 12 VDC/1,0 A Gehäuse Material: Aluminium eloxiert Dimensionen (B × H × T): 109 × 31 × 184 mm IP-Schutzklasse: IP20 Gewicht: ca. 0,7 kg 110 · G&D VisionXS-C-DP-HR...
- Page 117 KVM, Audio und RS232: 1 [+1 optional] × RJ45-Buchse Gegenstelle (1 Gbit/s) Stromaufnahme Hauptstromversorgung: 12 VDC/1,9 A Gehäuse Material: Aluminium eloxiert Dimensionen (B × H × T): 109 × 31 × 184 mm IP-Schutzklasse: IP20 Gewicht: ca. 0,7 kg G&D VisionXS-C-DP-HR · 111...
- Page 118 1 [+1 optional] × RJ45-Buchse Gegenstelle Signale der USB 2.0- (1 Gbit/s) Geräte: Stromaufnahme Hauptstromversorgung: 12 VDC/1,9 A Gehäuse Material: Aluminium eloxiert Dimensionen (B × H × T): 109 × 31 × 184 mm IP-Schutzklasse: IP20 Gewicht: ca. 0,7 kg 112 · G&D VisionXS-C-DP-HR...
- Page 119 1 × RJ45-Buchse (1 Gbit/s) Gegenstelle USB 2.0 1 × RJ45-Buchse Stromaufnahme Hauptstromversorgung: 12 VDC/1,9 A Gehäuse Material: Aluminium eloxiert Dimensionen (B × H × T): 109 × 31 × 184 mm IP-Schutzklasse: IP20 Gewicht: ca. 0,7 kg G&D VisionXS-C-DP-HR · 113...
- Page 120 1 [+1 optional] × RJ45-Buchse Gegenstelle (1 Gbit/s) Stromaufnahme Hauptstromversorgung: 12 VDC/1,0 A redundante 100-240 VAC/60-50Hz/0,4-0,2 A Stromversorgung: Gehäuse Material: Aluminium eloxiert Dimensionen (B × H × T): 170 × 40 × 184 mm IP-Schutzklasse: IP20 Gewicht: ca. 1,2 kg 114 · G&D VisionXS-C-DP-HR...
- Page 121 Signale der USB 2.0- (1 Gbit/s) Geräte: Stromaufnahme Hauptstromversorgung: 12 VDC/1,1 A redundante 100-240 VAC/60-50Hz/0,4-0,3 A Stromversorgung: Gehäuse Material: Aluminium eloxiert Dimensionen (B × H × T): 170 × 40 × 184 mm IP-Schutzklasse: IP20 Gewicht: ca. 1,3 kg G&D VisionXS-C-DP-HR · 115...
- Page 122 USB 2.0 1 × RJ45-Buchse Stromaufnahme Hauptstromversorgung: 12 VDC/1,0 A redundante 100-240 VAC/60-50Hz/0,4-0,3 A Stromversorgung: Gehäuse Material: Aluminium eloxiert Dimensionen (B × H × T): 170 × 40 × 184 mm IP-Schutzklasse: IP20 Gewicht: ca. 1,3 kg 116 · G&D VisionXS-C-DP-HR...
- Page 123 1 [+1 optional] × RJ45-Buchse Gegenstelle (1 Gbit/s) Stromaufnahme Hauptstromversorgung: 12 VDC/1,9 A redundante 100-240 VAC/60-50Hz/0,5-0,4 A Stromversorgung: Gehäuse Material: Aluminium eloxiert Dimensionen (B × H × T): 170 × 40 × 184 mm IP-Schutzklasse: IP20 Gewicht: ca. 1,2 kg G&D VisionXS-C-DP-HR · 117...
- Page 124 Signale der USB 2.0- (1 Gbit/s) Geräte: Stromaufnahme Hauptstromversorgung: 12 VDC/1,9 A redundante 100-240 VAC/60-50Hz/0,5-0,3 A Stromversorgung: Gehäuse Material: Aluminium eloxiert Dimensionen (B × H × T): 170 × 40 × 184 mm IP-Schutzklasse: IP20 Gewicht: ca. 1,3 kg 118 · G&D VisionXS-C-DP-HR...
- Page 125 USB 2.0 1 × RJ45-Buchse Stromaufnahme Hauptstromversorgung: 12 VDC/1,9 A redundante 100-240 VAC/60-50Hz/0,5-0,3 A Stromversorgung: Gehäuse Material: Aluminium eloxiert Dimensionen (B × H × T): 170 × 40 × 184 mm IP-Schutzklasse: IP20 Gewicht: ca. 1,3 kg G&D VisionXS-C-DP-HR · 119...
- Page 126 1 [+1 optional] × RJ45-Buchse Gegenstelle (1 Gbit/s) Stromaufnahme Hauptstromversorgung: 12 VDC/1,0 A redundante 100-240 VAC/60-50Hz/0,4-0,2 A Stromversorgung: Gehäuse Material: Aluminium eloxiert Dimensionen (B × H × T): 170 × 40 × 184 mm IP-Schutzklasse: IP20 Gewicht: ca. 1,3 kg 120 · G&D VisionXS-C-DP-HR...
- Page 127 Signale der USB 2.0- (1 Gbit/s) Geräte: Stromaufnahme Hauptstromversorgung: 12 VDC/1,1 A redundante 100-240 VAC/60-50Hz/0,4-0,3 A Stromversorgung: Gehäuse Material: Aluminium eloxiert Dimensionen (B × H × T): 170 × 40 × 184 mm IP-Schutzklasse: IP20 Gewicht: ca. 1,3 kg G&D VisionXS-C-DP-HR · 121...
- Page 128 USB 2.0 1 × RJ45-Buchse Stromaufnahme Hauptstromversorgung: 12 VDC/1,0 A redundante 100-240 VAC/60-50Hz/0,4-0,3 A Stromversorgung: Gehäuse Material: Aluminium eloxiert Dimensionen (B × H × T): 170 × 40 × 184 mm IP-Schutzklasse: IP20 Gewicht: ca. 1,3 kg 122 · G&D VisionXS-C-DP-HR...
- Page 129 1 [+1 optional] × RJ45-Buchse Gegenstelle (1 Gbit/s) Stromaufnahme Hauptstromversorgung: 12 VDC/1,9 A redundante 100-240 VAC/60-50Hz/0,6-0,4 A Stromversorgung: Gehäuse Material: Aluminium eloxiert Dimensionen (B × H × T): 170 × 40 × 184 mm IP-Schutzklasse: IP20 Gewicht: ca. 1,2 kg G&D VisionXS-C-DP-HR · 123...
- Page 130 1 [+1 optional] × RJ45-Buchse Gegenstelle (1 Gbit/s) Stromaufnahme Hauptstromversorgung: 12 VDC/1,9 A redundante 100-240 VAC/60-50Hz/0,5-0,4 A Stromversorgung: Gehäuse Material: Aluminium eloxiert Dimensionen (B × H × T): 170 × 40 × 184 mm IP-Schutzklasse: IP20 Gewicht: ca. 1,2 kg 124 · G&D VisionXS-C-DP-HR...
- Page 131 Signale der USB 2.0- (1 Gbit/s) Geräte: Stromaufnahme Hauptstromversorgung: 12 VDC/1,9 A redundante 100-240 VAC/60-50Hz/0,5-0,3 A Stromversorgung: Gehäuse Material: Aluminium eloxiert Dimensionen (B × H × T): 170 × 40 × 184 mm IP-Schutzklasse: IP20 Gewicht: ca. 1,3 kg G&D VisionXS-C-DP-HR · 125...
- Page 132 USB 2.0 1 × RJ45-Buchse Stromaufnahme Hauptstromversorgung: 12 VDC/1,9 A redundante 100-240 VAC/60-50Hz/0,5-0,3 A Stromversorgung: Gehäuse Material: Aluminium eloxiert Dimensionen (B × H × T): 170 × 40 × 184 mm IP-Schutzklasse: IP20 Gewicht: ca. 1,3 kg 126 · G&D VisionXS-C-DP-HR...
- Page 133 KVM, Audio und RS232: 1 [+1 optional] × RJ45-Buchse Gegenstelle (1 Gbit/s) Stromaufnahme Hauptstromversorgung: 12 VDC/1,0 A Gehäuse Material: Aluminium eloxiert Dimensionen (B × H × T): 109 × 31 × 184 mm IP-Schutzklasse: IP20 Gewicht: ca. 0,7 kg G&D VisionXS-C-DP-HR · 127...
- Page 134 1 [+1 optional] × RJ45-Buchse Gegenstelle Signale der USB 2.0- (1 Gbit/s) Geräte: Stromaufnahme Hauptstromversorgung: 12 VDC/1,1 A Gehäuse Material: Aluminium eloxiert Dimensionen (B × H × T): 109 × 31 × 184 mm IP-Schutzklasse: IP20 Gewicht: ca. 0,7 kg 128 · G&D VisionXS-C-DP-HR...
- Page 135 1 × RJ45-Buchse (1 Gbit/s) Gegenstelle USB 2.0 1 × RJ45-Buchse Stromaufnahme Hauptstromversorgung: 12 VDC/1,0 A Gehäuse Material: Aluminium eloxiert Dimensionen (B × H × T): 109 × 31 × 184 mm IP-Schutzklasse: IP20 Gewicht: ca. 0,7 kg G&D VisionXS-C-DP-HR · 129...
-
Page 138: About This Manual
© Guntermann & Drunck GmbH 2024. All rights reserved. Version 1.30 – 04/11/2024 Firmware: 1.4.100 Guntermann & Drunck GmbH Obere Leimbach 9 57074 Siegen Germany Phone +49 271 23872-0 +49 271 23872-120 www.gdsys.com sales@gdsys.com i · G&D VisionXS-C-DP-HR... -
Page 139: Fcc Statement
Increase the separation between the equipment and receiver. Connect the equipment into an outlet on a circuit different from that to which the receiver is connected. Consult the dealer or an experienced radio/TV technician for help. G&D VisionXS-C-DP-HR · ii... - Page 140 Table of contents Table of contents Safety instructions .................... 1 The VisionXS-C-DP-HR series ................. 4 Optional connection to a KVM matrix switch ............. 4 Package contents ....................5 Installation ....................... 6 Preparation ......................6 Installing the computer module ................7 Installing console modules ................
- Page 141 Channel switching when using a DH computer module ......74 Configuration of channel auto-switching ............ 75 Displaying information of channel auto-switching ........76 Changing the exclusive mode aktionkey ............. 77 Changing the time span of the input lock ............ 78 G&D VisionXS-C-DP-HR · iv...
- Page 142 Channel switching at the console module ............102 Pin assignment of the RS232 socket/interface ..........103 Status LEDs ....................104 Technical data ....................105 General features of the series ................105 Specific features of devices ................108 v · G&D VisionXS-C-DP-HR...
-
Page 143: Safety Instructions
When installing the devices, ensure that the devices’ mains plugs remain accessible at all time. Do not cover the ventilation openings For device variants with ventilation openings, it must always be ensured that the ventilation openings are not covered. G&D VisionXS-C-DP-HR · 1... - Page 144 Failure to observe this precautionary measure can result in injuries and damage to the device. Operate the device exclusively in the intended field of application The devices are designed for indoor use. Avoid extreme cold, heat or humidity. 2 · G&D VisionXS-C-DP-HR...
- Page 145 VORSICHT: Es besteht Explosionsgefahr, wenn die Batterie durch einen falschen Batterie-Typ ersetzt wird. Entsorgen Sie gebrauchte Batterien umweltgerecht. Gebrauchte Batterien dürfen nicht in den Hausmüll geworfen werden. Beachten Sie die gültigen Vorschriften zur Entsorgung elektronischer Produkte. G&D VisionXS-C-DP-HR · 3...
-
Page 146: The Visionxs-C-Dp-Hr Series
The above-mentioned variants are compatible with the following matrix switches: Version 1.6.0 or later ControlCenter-Compact-Serie: ControlCenter-Digital-Serie: Version 2.5.0 or later 4 · G&D VisionXS-C-DP-HR... -
Page 147: Package Contents
1 × »Correct power supply« flyer Additional package contents of expanded variants The package contents of expanded variants of console modules of the VisionXS-C-DP-HR series additionally contain the cables listed below. DT VARIANTS 1 × power cable (PowerCable-2 Standard) G&D VisionXS-C-DP-HR · 5... -
Page 148: Installation
NOTE: Please mind the maximum cable length of two meters between the console module and the devices of the user console. 4. Take the supplied cables and have them ready for the installation of the devices. 6 · G&D VisionXS-C-DP-HR... -
Page 149: Installing The Computer Module
Connect the other end of the cable to the local network. Connecting the computers´s keyboard and mouse signals USB CPU: Use the USB-AM/BM-2 cable to connect one of the computer’s USB inter- faces to this interface. G&D VisionXS-C-DP-HR · 7... - Page 150 Line In: Use an Audio-M/M-2 audio connection cable to connect the omputer’s Line- Out interface to this interface Use the RS232-M/F-2 cable to connect one of the computer’s 9-pin serial inter- Serial: faces to this interface. 8 · G&D VisionXS-C-DP-HR...
- Page 151 Transmission 2 inter- face. Use the Transmission 2 interface to establish a connection with a second counter- part. IMPORTANT: With variants, the Transm. Redundancy feature is available, as interface is reserved for USB 2.0 transmission. Transmission 2 G&D VisionXS-C-DP-HR · 9...
- Page 152 Establishing a separate transmission line with U2 variants Plug a category 6 (or better) twisted pair cable, which is available as Transmission 2: accessory, into this interface. Connect the other end of the cable to the respective interface of the console module. 10 · G&D VisionXS-C-DP-HR...
-
Page 153: Establishing The Power Supply
Our support will gladly assist you in ensuring that your device is supplied with power correctly. If the device is not supplied with adequate power, it may not operate as expected and its function may be permanently impaired! G&D VisionXS-C-DP-HR · 11... -
Page 154: Service Interface
The driver is provided as download on the website under www.gdsys.com/en More from G&D > Tools & drivers 1. Start any terminal emulator (e.g. HyperTerminal or PuTTY). 12 · G&D VisionXS-C-DP-HR... - Page 155 4. In the service menu, you have the following options: Quit System information Set system defaults: A confirmation Are you sure? [y]es, [N]o (default) is displayed. Reboot: A confirmation Are you sure? [y]es, [N]o (default) is displayed. G&D VisionXS-C-DP-HR · 13...
-
Page 156: Installing Console Modules
Config Panel log messages to this network. Insert a category 5 twisted pair cable (or better), which is available as acces- Network: sory. Connect the other end of the cable to the local network. 14 · G&D VisionXS-C-DP-HR... - Page 157 USB 2.0 transfer. Only the middle interface (G) is available for generic mode. IMPORTANT: If the generic USB mode is active, the OSD cannot be operated by a keyboard connected to the USB Devices sockets. G&D VisionXS-C-DP-HR · 15...
-
Page 158: Connecting The Console Monitor
DP Out 1: DP Out 2: Connect the second console monitor. Connecting audio and RS232 interfaces (depending on model) Line Out: Connect the speakers or another audio output device. Serial: Connect the serial end device to this interface. 16 · G&D VisionXS-C-DP-HR... - Page 159 Transmission 2 face. Use the Transmission 2 interface to establish a connection with a second counter- part. IMPORTANT: With variants, the feature is available, as Transm. Redundancy Transmission 2 interface is reserved for USB 2.0 transmission. G&D VisionXS-C-DP-HR · 17...
- Page 160 Establishing a separate transmission line with U2 variants Plug a category 6 (or better) twisted pair cable, which is available as Transmission 2: accessory, into this interface. Connect the other end of the cable to the respective interface of the computer module. 18 · G&D VisionXS-C-DP-HR...
- Page 161 Our support will gladly assist you in ensuring that your device is supplied with power correctly. If the device is not supplied with adequate power, it may not operate as expected and its function may be permanently impaired! G&D VisionXS-C-DP-HR · 19...
- Page 162 The driver is provided as download on the website under www.gdsys.com/en More from G&D > Tools & drivers 1. Start any terminal emulator (e.g. HyperTerminal or PuTTY). 20 · G&D VisionXS-C-DP-HR...
- Page 163 4. In the service menu, you have the following options: Quit System information Set system defaults: A confirmation Are you sure? [y]es, [N]o (default) is displayed. Reboot: A confirmation Are you sure? [y]es, [N]o (default) is displayed. G&D VisionXS-C-DP-HR · 21...
-
Page 164: Start-Up
The connection between the computer module and the console module is established automatically after the modules are started. The activation of the feature activates the inter- Transm. Redundancy Transmission 2 face. Use the interface to establish a connection with a second counter- Transmission 2 part. 22 · G&D VisionXS-C-DP-HR... -
Page 165: User Login At The Console Module
(see Showing terms of use on page 28). IMPORTANT: The 2-Factor Auth Code (TOTP) field only appears if 2-factor authenti- cation is enabled. For detailed information, please refer to the separate manual of the web application. G&D VisionXS-C-DP-HR · 23... -
Page 166: Configuring The Password Complexity
Password Complexity line and press Enter 4. Select the line and press Min. capital letters Enter 5. Enter the desired minimum number of capital letters within a password (Default: 0) 6. Press to save your settings. 24 · G&D VisionXS-C-DP-HR... - Page 167 Password Complexity line and press Enter 4. Select the Min. special characters line and press Enter 5. Enter the desired minimum number of special characters within a password (Default: 0) 6. Press to save your settings. G&D VisionXS-C-DP-HR · 25...
-
Page 168: Configuring The Login Options
Max. failed attempts line and press Enter 5. Enter the desired maximum number of failed attempts when entering the pass- word (Default: 0 = off/unlimited number of failed attempts, max. 1,000) 6. Press to save your settings. 26 · G&D VisionXS-C-DP-HR... - Page 169 5. Enter the desired locking time in minutes for which a user is locked after exceed- ing the maximum number of failed password entry attempts (Default: 1 (if max. failed attempts > 0), max. 1,440 minutes) 6. Press to save your settings. G&D VisionXS-C-DP-HR · 27...
-
Page 170: Showing Terms Of Use
9. Select the Long text... entry and press Enter 10.Now enter the desired terms of use. This field is limited to 1,500 characters. 11.Press to save the text. 12.Press and then to save your settings. 28 · G&D VisionXS-C-DP-HR... -
Page 171: Concurrent Operation Of The Kvm Extender
As an alternative to operate the computer concurrently via consoles, the exclusive operation (see page 30) can be activated. Related topics: Changing the time span of the input lock on page 78 Changing the video mode of consoles on page 80 G&D VisionXS-C-DP-HR · 29... -
Page 172: Operating The Kvm Extender Exclusively
Related topics: Right for exclusive access to the console on page 79 Changing the video mode of consoles on page 80 Changing the exclusive mode aktionkey on page 77 30 · G&D VisionXS-C-DP-HR... -
Page 173: User Logout At The Console Module
Operation menu. 3. Press or select the E - User logout entry and press Enter ADVICE: After the on-screen display has been called up, you can use the User logout function by pressing Ctrl G&D VisionXS-C-DP-HR · 31... -
Page 174: Initial Configuration Of The Network Settings
) to open and configure the remote OSD of the computer module. Ctrl During the starting process of the console module the settings of both hotkeys are shown (see Starting process on page 22). 32 · G&D VisionXS-C-DP-HR... -
Page 175: Configuring The Network Interface
Enter the IP address of the interface. The operational mode DHCP does not allow making entries. Netmask: Enter the netmask of the network. The operational mode DHCP does not allow making entries. 5. Press to save your settings. G&D VisionXS-C-DP-HR · 33... -
Page 176: Configuring Global Network Settings
Enter the domain the device is to belong to. Gateway: Enter the gateway IP address. DNS 1: Enter the IP address of the DNS server. DNS 2: Optionally, enter the IP address of another DNS server. 5. Press to save your settings. 34 · G&D VisionXS-C-DP-HR... -
Page 177: Checking The Availability Of A Host In The Network (Ping)
Min. RTT: minimum round-trip-time Avg. RTT: average round-trip-time Max. RTT: maximum round-trip-time NOTE: A message informs the user if the host name cannot be resolved into an IP address. 6. Press to leave the menu. G&D VisionXS-C-DP-HR · 35... -
Page 178: Reading Out The Status Of The Network Interface
Network Network setup Enter 3. Select the row and press Link status Enter 4. The paragraph Interface A includes the following values: Link detected: Connection network established disconnected ( 5. Click on to leave the menu. 36 · G&D VisionXS-C-DP-HR... -
Page 179: On-Screen Display
OSD of the computer module and the local hotkey (default: to open and configure the local OSD of the console module. During the starting process of the console module, the settings of both hotkeys are shown (see Starting process on page 22). G&D VisionXS-C-DP-HR · 37... -
Page 180: Showing The Remote Osd
Menu items without submenus: The current setting is shown behind the menü item and can be changed directly. The footer shows the most important keys to operate the cur- Footer rently displayed menu and further information if available. 38 · G&D VisionXS-C-DP-HR... -
Page 181: Operating The Osd Via Keyboard Or Mouse
The displayed menu closes after the settings are saved and the superior menu is displayed again. Press this key to switch between the different options of a menu item. Ctrl+F8: Configuration settings with many options support this hotkey to open a clearly-arranged list containing all options. G&D VisionXS-C-DP-HR · 39... -
Page 182: Mouse Operation
Right mouse key: The currently displayed menu is closed after your settings are saved. Afterwards, the toplevel menu is shown. A message informs you if you changed your entries but forgot to save them. 40 · G&D VisionXS-C-DP-HR... -
Page 183: Osd Functions
4. Press to select the desired sort criterion: Alph+: The names of the list entries are sorted alphabetically in ascending order. Alph-: The names of the list entries are sorted alphabetically in descending order. G&D VisionXS-C-DP-HR · 41... -
Page 184: Overview Of The Menus Of The Remote Osd
System setup Password complexity page 24 Login options page 26 Terms Of Use Config page 28 Hotkeys page 71 Multiuser input lock page 78 Activation page 81 Active at startup page 82 Set system defaults page 95 42 · G&D VisionXS-C-DP-HR... - Page 185 Target access rights page 63 Target USB access rights page 64 Network setup Interfaces page 33 Link status page 36 Ping host page 35 Reset netfilter configuration page 96 Information Hardware, Firmware, Hotkey and page 45 Feature information G&D VisionXS-C-DP-HR · 43...
-
Page 186: Personal Profile Menu
After you called the OSD, press to open the Operation menu. The following functions can be carried out directly by the user: Function Description E – User logout page 31 T – Temporary login page 31 44 · G&D VisionXS-C-DP-HR... -
Page 187: Information Menu
MAC addresses of the network ports. Firmware information This menu displays the firmware of the console module, and the accessing computer module. Hotkey information This menu displays the active hotkeys. Feature information This menu displays the activated features. G&D VisionXS-C-DP-HR · 45... -
Page 188: Overview Of The Menus Of The Local Osd
Hardware, Firmware, Hotkey and page 45 Feature information Activating a premium function NOTE: The premium functions can be activated in the Config Panel web application. The necessary steps are described in the manual of the web application. 46 · G&D VisionXS-C-DP-HR... -
Page 189: Web Application Config Panel
How to change the language of the web application: 1. Click the language identifier of the current language in the upper right corner. 2. Switch the language to be used by clicking on the desired language. G&D VisionXS-C-DP-HR · 47... -
Page 190: Closing The Web Application
Logout function after finishing your work with the web application. How to close the web application: 1. Click on the at the top right. user icon 2. Click on Logout to exit the active session. 48 · G&D VisionXS-C-DP-HR... -
Page 191: Users And Groups
Target access view full full right The settings of the Target config and Change own password rights result from the rights assigned to the user groups. The Target access right is given directly in the user account. G&D VisionXS-C-DP-HR · 49... -
Page 192: Efficient User Group Administration
In addition to the »Office« group, also assign the respective user accounts to this group. In both cases, the user is provided with the effective right for Config target. ADVICE: The user profile lets you provide extended rights to a group member. 50 · G&D VisionXS-C-DP-HR... -
Page 193: Administrating User Accounts
The recently created user account can neither configure nor access the computer modules. Before the account can be used, it has to be added to an existing user group or pro- vided with individual rights (see page 50). G&D VisionXS-C-DP-HR · 51... -
Page 194: Renaming A User Account
User setup Enter 3. Select the user account you want to rename and press 4. Select the Name entry and press Enter 5. Enter the new name and press Enter 6. Press to save your settings. 52 · G&D VisionXS-C-DP-HR... -
Page 195: Changing The Password Of A User Account
The 2-Factor Auth Code (TOTP) field only appears if 2-factor-authenti- cation is enabled. For detailed information, please refer to the separate manual of the web application. New: Enter your new password. Repeat: Repeat your new password. 6. Press to save your settings. G&D VisionXS-C-DP-HR · 53... -
Page 196: Changing The User Account Rights
Access rights to a computer module page 63 Target config Configuration of computer modules page 63 Target USB access Access USB devices for all modules page 64 rights WebIf login Login to the Config Panel web application page 62 54 · G&D VisionXS-C-DP-HR... -
Page 197: Changing A User Account's Membership
User groups to which the user account is assigned to are marked with an arrow (). 7. Repeat steps 5 and 6 to edit the group membership for further accounts. 8. Press to save your settings. G&D VisionXS-C-DP-HR · 55... -
Page 198: Enabling Or Disabling A User Account
(default) hotkey to open the OSD. Ctrl 2. Select the User setup entry and press Enter 3. Select the user account you want to delete and press 4. Select and press Enter to respond to the prompt for confirmation. 56 · G&D VisionXS-C-DP-HR... -
Page 199: Administrating User Groups
Enter the name of the user group. 4. Press to save your inputs and create an user account. IMPORTANT: The recently created user group can neither configure nor access the computer modules (see Efficient user group administration on page 50). G&D VisionXS-C-DP-HR · 57... -
Page 200: Renaming A User Group
Access rights to a computer module page 63 Target config Configuration of computer modules page 63 Target USB access Access USB devices for all modules page 64 rights WebIf login Login to the Config Panel web application page 62 58 · G&D VisionXS-C-DP-HR... -
Page 201: Administrating User Group Members
NOTE: User accounts that are assigned to the user group are marked with an arrow (). 7. Repeat steps 5 and 6 to change the group membership for further accounts. 8. Press to save your settings. G&D VisionXS-C-DP-HR · 59... -
Page 202: (De)Activating A User Group
(default) hotkey to open the OSD. Ctrl 2. Select the User group setup entry and press Enter 3. Select the user group you want to delete and press 4. Select and press Enter to respond to the prompt for confirmation. 60 · G&D VisionXS-C-DP-HR... -
Page 203: System Rights
4. Select the Superuser right entry and press F8 to select one of the following options: yes: full access to the KVM system access authorisation according to user and group rights 5. Press to save your settings. G&D VisionXS-C-DP-HR · 61... -
Page 204: Changing Settings In The "Personal Profile" Menu
Config rights 5. Select the WebIf login entry and press F8 to select one of the following options: yes: Allow access to web application Deny access to web application 6. Press to save your settings. 62 · G&D VisionXS-C-DP-HR... -
Page 205: Rights To Change Your Own Password
Full access to the computer connected to the computer module allowed Access to the computer connected to the computer module denied view: Screen contents of the computer connected to the computer module can be viewed 7. Press to save your settings. G&D VisionXS-C-DP-HR · 63... -
Page 206: Access Rights To Usb Devices
5. Select the computer module for which you want to change the access rights. 6. Press F8 to select one of the following options: yes: Access to USB devices allowed Access to USB devices denied 7. Press to save your settings. 64 · G&D VisionXS-C-DP-HR... -
Page 207: Configuration
Active console after starting an extender none Adjusting the operating mode of the RS232 interface RS232 Selecting the EDID mode of the KVM extender automatic Reducing the colour depth of the image data to be transmitted 24 bit Freeze mode deactivated G&D VisionXS-C-DP-HR · 65... - Page 208 Changing the position of the information dispaly left upper corner Changing the position of the OSD centre The basic operation of the OSD is described on page 37. NOTE: The separate manual provides more information about the operation of the web application. 66 · G&D VisionXS-C-DP-HR...
-
Page 209: Configuration Settings
Ctrl+Num 2. Select the row Console setup and press Enter 3. Under Console type , select one of the following options: OpenAccess OpenAccess mode (default) Standard mode Standard 4. Press to save your settings. G&D VisionXS-C-DP-HR · 67... -
Page 210: Renaming A Console Module
(default) to open the OSD. 2. Select the entry and press Target setup Enter 3. Select the Name entry and press Enter 4. Enter the new name and press Enter 5. Press to save your settings. 68 · G&D VisionXS-C-DP-HR... -
Page 211: Changing Your Password
Current field for users with activated superuser rights. The 2-Factor Auth Code (TOTP) field only appears if 2-factor-authentication is enabled. For detailed information, please refer to the separate manual of the web application. 5. Press to save your settings. G&D VisionXS-C-DP-HR · 69... -
Page 212: Selecting The Language
2. Press to open the Personal Profile menu. 3. Under press to choose between the following options: Language Use the system language from system Use the selected language [Selection] 4. Press to save your settings. 70 · G&D VisionXS-C-DP-HR... -
Page 213: Changing Hotkeys
Ctrl Ctrl key (default for remote hotkey) Alt key (default for local hotkey) Alt Gr key Alt Gr Windows key Shift Shift key 5. Press to save your settings. G&D VisionXS-C-DP-HR · 71... -
Page 214: Changing The Osd Key
Pause key Insert key Insert Delete key Delete Home key Home End key Page Up key PgUp PgDn Pace Down key Space Space key 5. Press to save your settings. 72 · G&D VisionXS-C-DP-HR... -
Page 215: Opening The Osd Via Double Keypress
OSD is opened by pressing the Windows key twice OSD is opened by pressing the Shift key twice Shift OSD is opened by pressing the Print key twice Print 5. Press to save your settings. G&D VisionXS-C-DP-HR · 73... -
Page 216: Channel Switching When Using A Dh Computer Module
Enter 4. Under Select stream select one of the following options: Cursor left, right Cursor left key and Cursor right key (Standard) Num+, Num- Num+-key and Num- key 5. Press to save your settings. 74 · G&D VisionXS-C-DP-HR... -
Page 217: Configuration Of Channel Auto-Switching
If a connection is terminated, the device auto-switches to the always other channel regardless of the connection status of the other channel. 4. Press to save your settings. G&D VisionXS-C-DP-HR · 75... -
Page 218: Displaying Information Of Channel Auto-Switching
Alternatively, you can enter if you do not want any information to be displayed, or perm (default) if the information should be displayed permanently or until the OSD is used again. 5. Press to save your settings. 76 · G&D VisionXS-C-DP-HR... -
Page 219: Changing The Exclusive Mode Aktionkey
Pause Insert key Insert Delete Delete key Home Home key End key Page Up key PgUp PgDn Page Down key Space Space key 5. Press to save your settings. G&D VisionXS-C-DP-HR · 77... -
Page 220: Changing The Time Span Of The Input Lock
Enter 3. Under enter the desired timespan of the input lock (1 to 90 Multiuser input lock seconds). 4. Press to save your settings. Related topic: Operating the KVM extender exclusively on page 30 78 · G&D VisionXS-C-DP-HR... -
Page 221: Right For Exclusive Access To The Console
right for exclusive access is granted (default) right for exclusive access is denied 4. Press to save your settings. Related topics: Operating the KVM extender exclusively on page 30 Changing the video mode of consoles on page 80 G&D VisionXS-C-DP-HR · 79... -
Page 222: Changing The Video Mode Of Consoles
After the time period of the input lock has elapsed, the screen is automatically switched on again. 4. Press to save your settings. Related topics: Changing the time span of the input lock on page 78 Right for exclusive access to the console on page 79 80 · G&D VisionXS-C-DP-HR... -
Page 223: Activating A Console After The Permanent Switch-Off Of The Image Display
mouse only 4. Press to save your settings. Related topics: Changing the time span of the input lock on page 78 Right for exclusive access to the console on page 79 G&D VisionXS-C-DP-HR · 81... -
Page 224: Active Console After Starting An Extender
Transmission 2 is activated 4. Press to save your settings. Related topics: Changing the time span of the input lock on page 78 Right for exclusive access to the console on page 79 82 · G&D VisionXS-C-DP-HR... -
Page 225: Adjusting The Operating Mode Of The Rs232 Interface
(default). The data stream of an RS422 device is transmitted from the RS422 computer module to the console module via separately available G&D RS232-422 adapters 4. Press to save your settings. G&D VisionXS-C-DP-HR · 83... -
Page 226: Selecting The Edid Mode Of The Kvm Extender
Save your selection by pressing With DH variants, you can make these settings for Video channel 1 Video channel 2 5. Press to save your settings. 84 · G&D VisionXS-C-DP-HR... -
Page 227: Reducing The Colour Depth Of The Image Data To Be Transmitted
24 bits (default) reduces the colour depth of image data to 18 bits 18 Bit: With DH variants, you can make these settings for Video channel 1 Video channel 2 4. Press to save your settings. G&D VisionXS-C-DP-HR · 85... -
Page 228: Freeze Mode
shows Frozen and the time passed since disconnection shows a coloured frame ( ) and Frozen ( frame+OSD frame With DH variants, you can make these settings for Channel 1 Channel 2 5. Press to save your settings. 86 · G&D VisionXS-C-DP-HR... -
Page 229: Enabling Or Disabling Ddc/Ci Support
CPU to the monitor. The transmission of DDC/CI signals is carried out bidirectional bidirectionally. With DH variants, you can make these settings for Channel 1 Channel 2 4. Press to save your settings. G&D VisionXS-C-DP-HR · 87... -
Page 230: (De)Activating An Usb Keyboard Or The "Generic Usb" Mode
Wacom IntuosPro L Wacom Cintiq Pro 24 Pen Wacom CP24 Pen Wacom Cintiq Pro 27 Wacom CP27 Pen/Touch Wacom Cintiq Pro 32 Pen Wacom CP32 Pen Wacom Cintiq Pro 32 Touch Wacom CP32 Touch 88 · G&D VisionXS-C-DP-HR... - Page 231 (default) to open the OSD. Ctrl+Num 2. Select the row Target setup and press Enter 3. Select the row USB HID mode and press key to select an option (see above). 4. Press to save your settings. G&D VisionXS-C-DP-HR · 89...
-
Page 232: Prioritizing A Usb Device For A Reboot
The prioritization remains even if the USB device is disconnected from the console module (then appears in red on the OSD) and is subsequently recon- nected (then reappears in green on the OSD and marked with a triangle ()). 90 · G&D VisionXS-C-DP-HR... -
Page 233: Changing The Scancode Set Of Ps/2 Keyboards
activates scancode set 2 for PS/2 keyboard inputs activates scancode set 3 for PS/2 keyboard inputs 4. Press to save your settings. After you turn the KVM extender on again, the keyboard is initialised and the selected scancode set is applied. G&D VisionXS-C-DP-HR · 91... -
Page 234: Reinitialising Usb Input Devices
If communication to one USB device is interrupted, all devices are reinitialised. The status of the USB devices is monitored. If communication to a USB device is interrupted, the device is reinitialised. 4. Press to save your settings. 92 · G&D VisionXS-C-DP-HR... -
Page 235: Adjusting The Waiting Period Of The Screensaver
2. Select the row Console setup and press Enter 3. Under Screensaver (min) enter a waiting period (1 to 999 minutes) for the screensaver. Entering the value 0 disables the screensaver. 4. Press to save your settings. G&D VisionXS-C-DP-HR · 93... -
Page 236: Selecting A Keyboard Layout For Inputs Via Osd
german english US english UK french spanish lat. americ. portuguese swedish swiss-french danish 4. Press to save your settings. 94 · G&D VisionXS-C-DP-HR... -
Page 237: Resetting The Default Settings
2. Select the row (remote OSD) or (local OSD) and System setup Console utility press Enter 3. Select the row Set system defaults and press Enter 4. Confirm the security prompt or cancel the process. G&D VisionXS-C-DP-HR · 95... -
Page 238: Resetting The Netfilter Rules
) if you want to reset the local settings of the console module. 2. Select the row Network and press Enter 3. Select the row and press Reset netfilter configuration Enter 4. Confirm the security prompt or cancel the process. 96 · G&D VisionXS-C-DP-HR... -
Page 239: Changing The Colour Of The Information Display
How to change the setting of the information display: 1. Press (default) to open the OSD. Ctrl+Num 2. Press to open the Personal Profile menu. 3. Under Display color press to select the desired colour. 4. Press to save your settings. G&D VisionXS-C-DP-HR · 97... -
Page 240: Information Display
OSD transparency high high transparency of the screen content average average transparency of the screen content (default) low transparency of the screen content screen content is covered 4. Press to save your settings. 98 · G&D VisionXS-C-DP-HR... -
Page 241: Automatic Closing Of The Osd After Inactivity
F2: Save 4. Use the arrow keys or the mouse to move the menu to the desired position or press Ctrl+D to reset the default position.. 5. Press to save your settings or to cancel the process. G&D VisionXS-C-DP-HR · 99... -
Page 242: Changing The Position Of The Osd
Enter 4. Use the arrow keys or the mouse to move the OSD to the desired position or press Ctrl+D to reset the default position. 5. Press to save your settings or to cancel the process. 100 · G&D VisionXS-C-DP-HR... -
Page 243: Further Information
The monitor’s DDC information is usually transmitted one-to-one to the computer. Should the KVM extender determine that the display cannot be read without errors or that the entries are invalid, the information is completed or corrected (if possible). G&D VisionXS-C-DP-HR · 101... -
Page 244: Channel Switching At The Console Module
(channel 2) are preset. Alt+1 Alt+2 NOTE: Open the local OSD of the user module with the key combination Alt+Num (default). In the local OSD, for example, you can change the hotkey modifier and the select key. 102 · G&D VisionXS-C-DP-HR... -
Page 245: Pin Assignment Of The Rs232 Socket/Interface
RxD (Receive Data) Input Output TxD (Transmit Data) Output Input not occupied GND (Ground) Ground Ground not occupied RTS (Request to Send) Output Input CTS (Clear to Send) Input Output Power Power G&D VisionXS-C-DP-HR · 103... -
Page 246: Status Leds
The KVM extender is supplied with voltage and the device software has been started successfully. yellow The KVM extender is supplied with voltage. blue On as soon as the LED has been activated via web application. The KVM extender is not supplied with voltage. 104 · G&D VisionXS-C-DP-HR... -
Page 247: Technical Data
Variants [A] and [AR] Resolution: 24 bit digital, Stereo Sampling rate: 96 kHz Bandwidth: 22 kHz RS232 Transmission type: transparent Variants [AR] Transmission rate: max. 115.200 bit/s Supported signals: RxD, TxD, GND, RTS, CTS, 5V G&D VisionXS-C-DP-HR · 105... - Page 248 3840 × 2160 @ 30Hz Further resolutions standardized accord- ing to VESA and CTA are possible within the supported video bandwidth/pixel rate and horizontal/vertical frequency. Vertical frequency: 24 Hz to 120 Hz Horizontal frequency: 25 kHz to 185 kHz 106 · G&D VisionXS-C-DP-HR...
- Page 249 DeviceCarrier Air humidity: 20 % to 80 %, non-condensing Storage environment Temperature: -20 °C to +60 °C Air humidity: 15 % to 85 %, non-condensing Conformity CE, UKCA, FCC class B, TAA, EAC, RoHS, WEEE, REACH G&D VisionXS-C-DP-HR · 107...
-
Page 250: Specific Features Of Devices
1 [+1 optional] × RJ 45 socket (1 Gbit/s) Current consumption Main power supply: 12 VDC/1.0 A Casing Material: anodised aluminium Dimensions (W × H × D): 109 × 31 × 184 mm approx. IP protection class: IP20 Weight: approx. 0.7 kg 108 · G&D VisionXS-C-DP-HR... - Page 251 1 × RJ45 socket Current consumption Main power supply: 12 VDC/1.0 A Casing Material: anodised aluminium Dimensions (W × H × D): 109 × 31 × 184 mm approx. IP protection class: IP20 Weight: approx. 0.7 kg G&D VisionXS-C-DP-HR · 109...
- Page 252 1 × RJ45 socket Current consumption Main power supply: 12 VDC/1.0 A Casing Material: anodised aluminium Dimensions (W × H × D): 109 × 31 × 184 mm approx. IP protection class: IP20 Weight: approx. 0.7 kg 110 · G&D VisionXS-C-DP-HR...
- Page 253 1 [+1 optional] × RJ 45 socket (1 Gbit/s) Current consumption Main power supply: 12 VDC/1.9 A Casing Material: anodised aluminium Dimensions (W × H × D): 109 × 31 × 184 mm approx. IP protection class: IP20 Weight: approx. 0.7 kg G&D VisionXS-C-DP-HR · 111...
- Page 254 USB 2.0 devices: (1 Gbit/s) Current consumption Main power supply: 12 VDC/1.9 A Casing Material: anodised aluminium Dimensions (W × H × D): 109 × 31 × 184 mm approx. IP protection class: IP20 Weight: approx. 0.7 kg 112 · G&D VisionXS-C-DP-HR...
- Page 255 1 × RJ45 socket Current consumption Main power supply: 12 VDC/1.9 A Casing Material: anodised aluminium Dimensions (W × H × D): 109 × 31 × 184 mm approx. IP protection class: IP20 Weight: approx. 0.7 kg G&D VisionXS-C-DP-HR · 113...
- Page 256 Main power supply: 12 VDC/1.0 A redundant 100-240 VAC/60-50Hz/0.4-0.2 A power supply: Casing Material: anodised aluminium Dimensions (W × H × D): 170 × 40 × 184 mm approx. IP protection class: IP20 Weight: approx. 1.2 kg 114 · G&D VisionXS-C-DP-HR...
- Page 257 Main power supply: 12 VDC/1,1 A redundant 100-240 VAC/60-50Hz/0.4-0.3 A power supply: Casing Material: anodised aluminium Dimensions (W × H × D): 170 × 40 × 184 mm approx. IP protection class: IP20 Weight: approx. 1.3 kg G&D VisionXS-C-DP-HR · 115...
- Page 258 Main power supply: 12 VDC/1,0 A redundant 100-240 VAC/60-50Hz/0.4-0.3 A power supply: Casing Material: anodised aluminium Dimensions (W × H × D): 170 × 40 × 184 mm approx. IP protection class: IP20 Weight: approx. 1.3 kg 116 · G&D VisionXS-C-DP-HR...
- Page 259 Main power supply: 12 VDC/1.9 A redundant 100-240 VAC/60-50Hz/0.5-0.4 A power supply: Casing Material: anodised aluminium Dimensions (W × H × D): 170 × 40 × 184 mm approx. IP protection class: IP20 Weight: approx. 1.2 kg G&D VisionXS-C-DP-HR · 117...
- Page 260 Main power supply: 12 VDC/1.9 A redundant 100-240 VAC/60-50Hz/0.5-0.3 A power supply: Casing Material: anodised aluminium Dimensions (W × H × D): 170 × 40 × 184 mm approx. IP protection class: IP20 Weight: approx. 1.3 kg 118 · G&D VisionXS-C-DP-HR...
- Page 261 Main power supply: 12 VDC/1.9 A redundant 100-240 VAC/60-50Hz/0.5-0.3 A power supply: Casing Material: anodised aluminium Dimensions (W × H × D): 170 × 40 × 184 mm approx. IP protection class: IP20 Weight: approx. 1.3 kg G&D VisionXS-C-DP-HR · 119...
- Page 262 Main power supply: 12 VDC/1.0 A redundant 100-240 VAC/60-50Hz/0.4-0.2 A power supply: Casing Material: anodised aluminium Dimensions (W × H × D): 170 × 40 × 184 mm approx. IP protection class: IP20 Weight: approx. 1.3 kg 120 · G&D VisionXS-C-DP-HR...
- Page 263 Main power supply: 12 VDC/1.1 A redundant 100-240 VAC/60-50Hz/0.4-0.3 A power supply: Casing Material: anodised aluminium Dimensions (W × H × D): 170 × 40 × 184 mm approx. IP protection class: IP20 Weight: approx. 1.3 kg G&D VisionXS-C-DP-HR · 121...
- Page 264 Main power supply: 12 VDC/1.0 A redundant 100-240 VAC/60-50Hz/0.4-0.3 A power supply: Casing Material: anodised aluminium Dimensions (W × H × D): 170 × 40 × 184 mm approx. IP protection class: IP20 Weight: approx. 1.3 kg 122 · G&D VisionXS-C-DP-HR...
- Page 265 Main power supply: 12 VDC/1.9 A redundant 100-240 VAC/60-50Hz/0.6-0.4 A power supply: Casing Material: anodised aluminium Dimensions (W × H × D): 170 × 40 × 184 mm approx. IP protection class: IP20 Weight: approx. 1.2 kg G&D VisionXS-C-DP-HR · 123...
- Page 266 Main power supply: 12 VDC/1.9 A redundant 100-240 VAC/60-50Hz/0.5-0.4 A power supply: Casing Material: anodised aluminium Dimensions (W × H × D): 170 × 40 × 184 mm approx. IP protection class: IP20 Weight: approx. 1.2 kg 124 · G&D VisionXS-C-DP-HR...
- Page 267 Main power supply: 12 VDC/1.9 A redundant 100-240 VAC/60-50Hz/0.5-0.3 A power supply: Casing Material: anodised aluminium Dimensions (W × H × D): 170 × 40 × 184 mm approx. IP protection class: IP20 Weight: approx. 1.3 kg G&D VisionXS-C-DP-HR · 125...
- Page 268 Main power supply: 12 VDC/1.9 A redundant 100-240 VAC/60-50Hz/0.5-0.3 A power supply: Casing Material: anodised aluminium Dimensions (W × H × D): 170 × 40 × 184 mm approx. IP protection class: IP20 Weight: approx. 1.3 kg 126 · G&D VisionXS-C-DP-HR...
- Page 269 1 [+1 optional] × RJ 45 socket (1 Gbit/s) Current consumption Main power supply: 12 VDC/1.0 A Casing Material: anodised aluminium Dimensions (W × H × D): 109 × 31 × 184 mm approx. IP protection class: IP20 Weight: approx. 0.7 kg G&D VisionXS-C-DP-HR · 127...
- Page 270 USB 2.0 devices: (1 Gbit/s) Current consumption Main power supply: 12 VDC/1.1 A Casing Material: anodised aluminium Dimensions (W × H × D): 109 × 31 × 184 mm approx. IP protection class: IP20 Weight: approx. 0.7 kg 128 · G&D VisionXS-C-DP-HR...
- Page 271 1 × RJ 45 socket Current consumption Main power supply: 12 VDC/1.0 A Casing Material: anodised aluminium Dimensions (W × H × D): 109 × 31 × 184 mm approx. IP protection class: IP20 Weight: approx. 0.7 kg G&D VisionXS-C-DP-HR · 129...
- Page 276 G&D. FEELS RIGHT. Hauptsitz | Headquarter US-Büro | US-Office Guntermann & Drunck GmbH Systementwicklung G&D North America Inc. Obere Leimbach 9 | D-57074 Siegen | Germany 4540 Kendrick Plaza Drive, Suite 100 | Houston, TX 77032 | USA Phone +49 271 23872-0 Phone +1-346-620-4362 sales@gdsys.com | www.gdsys.com sales.us@gdsys.com | www.gdsys.com...
Need help?
Do you have a question about the VisionXS-C-DP-HR and is the answer not in the manual?
Questions and answers